

Want to make your own Taylor Swift Lover outfit? This tutorial shows you everything you need to know to make the sparkly Era tour bodysuit.

Reputation Outfit Part 1: Supplies, Patterning, and Piecing
Reputation Outfit Part 2: Applique and Assembly
Reputation Outfit Part 3: Finishing
Today, I’m back with a tutorial for another one of the Taylor Swift's Eras tour outfits, this time from the Lover era of the tour.
Her iconic look is a custom Versace bodysuit, loaded with rhinestones, sequins, and beads - a true spectacle of design.
It’s one of the most popular looks to come out of Taylor Swift’s concerts, and it’s been a really popular request from people wanting to order one.
I’m not taking orders anymore, and - only in our Wildest Dreams can any of us afford a custom atelier Versace bodysuit.. So today I’m going to show you the whole Lover bodysuit process!
Because it’s going to take you a fair amount of time to do, try to plan ahead if you can - you’ll likely have to order at least some of the supplies, so build that time in.
I promise, with this tutorial, a bit of effort, and a lot of patience, you’ll be making the whole place sparkle soon enough... whether you’re wearing it to a Taylor Swift party, or to go see Taylor Swift live.
So, get your red lipstick ready, I’m going to show you how to recreate some of Taylor’s style for yourself!
A Note on Colour and Style
I did this tutorial for the pink and blue version of Taylor’s outfit, as this one stuck out to me as being the first I thought of when it came to the Lover aesthetic.
The other colourways are also fantastic, though - I just don’t have the time or budget to make all of them!
So, I went through all the other different versions of the Lover bodysuit and came up with lists of material and supply recommendations for all them!
I also compiled pinterest boards with source images for each of them.
See the bottom of the post for those, if you’re looking to do one of the other colour variations.
The instructions will more or less be the same across all the styles, though!

Recommended Reading
Before getting started, here are a few posts with information that will come in handy for this project:
How to Measure for Spandex Costuming
Spandex Costuming Tools & Supplies
Basic Pattern Alterations
Types of Stretch Fabric for Spandex Costuming
How to Cut Spandex
How to Sew Spandex With or Without a Serger
How to Apply Elastic
Beading & Sequins on Spandex
Everything You Need to Know about Rhinestones
Crystalling on Spandex
Proper Care of Spandex Costumes
In some cases, I’ll be glossing over a technique in THIS post, as it is fully covered in another post.

Equipment and Supplies
Here’s what you’ll need to have on hand, to make one of the most iconic looks from the Eras Tour:
Equipment
Dress form or stretcher
Scissors
Pins
Needles - both Hand Sewing Needles and Beading Needles
Supplies
Pink Bodysuit (I’ll go into this more in the tutorial itself)
Pattern Paper - I use exam table paper
Painters Tape
Pens or markers - ideally washable.
Repositionable Spray Adhesive (I use Odif's 505 Temporary Fabric Adhesive)
E-6000 Fabri-Fuse
Rhinestone Pickers
Clear Invisible Nylon Thread
Rhinestones
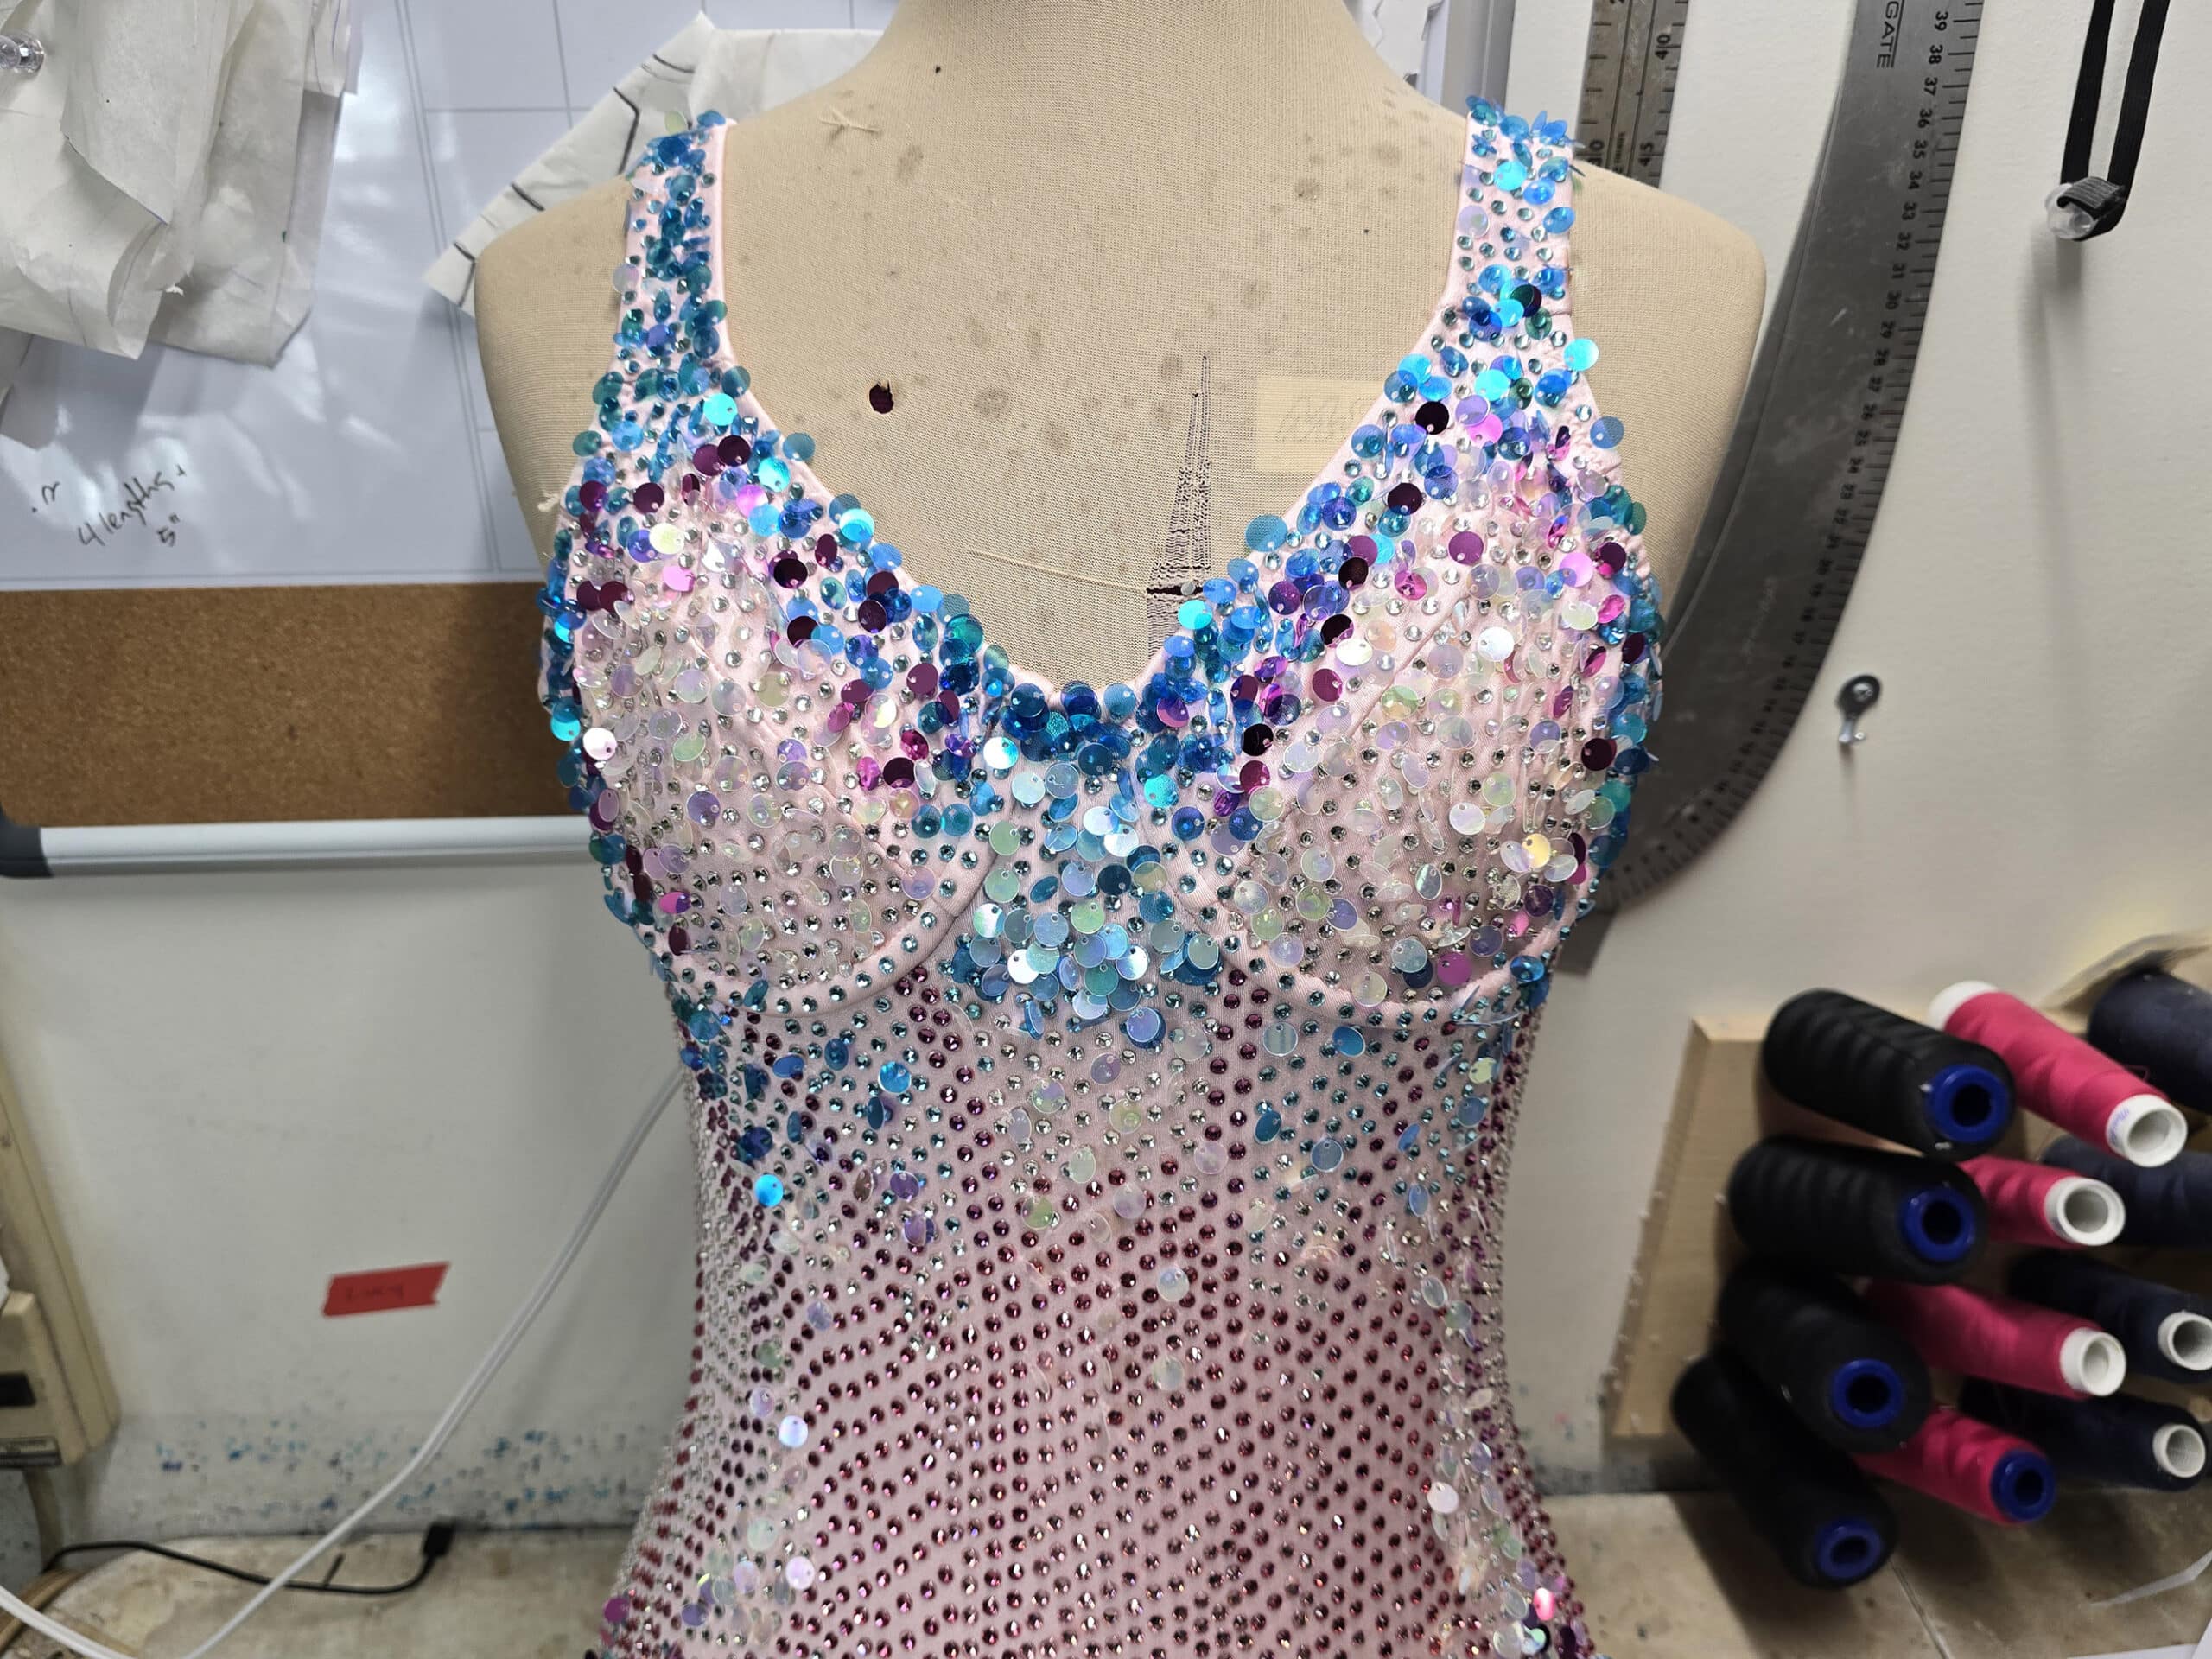
Rhinestones - or Crystals - are used for colour, shine, AND to establish the design on this bodysuit.
I started out using SS20 rhinestones - usually a good default size - but they ended up looking big and clunky, so I started over, using the SS16 rhinestones you see in the photos throughout this tutorial.
If you’re making your bodysuit an XL or larger, you might want to look at using SS20. If you’re making a very small version, I’d look at maybe sizing down to an SS12 (for a very young child).
Otherwise, I recommend using SS16 sized crystals.
You can buy hot fix/ glue back rhinestones, but I don’t recommend actually using a hot fix tool for this tutorial. Glue goes MUCH faster, and holds much better.
For this sample size (Women’s XS) bodysuit, that ended up being:
SS16 Clear Crystal Rhinestones (3 packs of 1440 pieces). I used Beadsland SS16 Crystal Rhinestones
SS16 Light Pink Rhinestones (2 packs of 1440 pieces). I used Beadsland SS16 Light Pink Rhinestones
SS16 Medium Pink Rhinestones (1 pack of 1440 pieces). I used
Beadsland SS16 Rose Rhinestones
SS16 Dark Pink Rhinestones (1 pack of 1440 pieces). I used Beadsland SS16 Fuchsia Rhinestones
SS16 Sky Blue Rhinestones (3 packs of 1440 pieces). I used Beadsland SS16 Aquamarine Rhinestones
For more details on rhinestones, be sure to read Everything You Need to Know about Rhinestones before buying!

Sequins
SO much cost and focus goes into the rhinestones, but the sequins actually go a long way to making the hitmaker sparkle in this bodysuit.
In general, you’re going to want sky blue, iridescent, and pink sequins for this bodysuit.
The sizes don’t matter a TON, but try to keep them between 8-10mm (for the iridescent ones), or 8-12mm for the colours.
You can use multiple sizes in a colour for visual interest - I’m pretty sure the OG bodysuit uses at least 2 sizes of the blue, for instance.
8mm Iridescent Flat Top Hole Sequins (3 packs)
8mm Peacock Flat Top Hole Sequins (1 pack)
10mm Peacock Flat Top Hole Sequins (1 pack)
8mm Orchid Pink Flat Top Hole Sequins (1 pack)
If I had my time back, I would have ordered a 4th pack of the iridescent sequins, and a second pack of one of the Peacock sequins (probably the 8mm, but it’s harder to come by).

Beads
The beads are a bit more difficult to acquire, ever since Swarovski pulled from the retail market. For these, I recommend seeing what you have locally, then looking into mail order if you have to.
As far as colour goes, you want a light pink. Ideally NOT medium pink, dark pink, or fuchsia. I ended up ordering “Rose” instead of “Light Rose”, which would have been better. The rose was a bit too dark.
In an ideal world, you’d find them in both 4mm or 6mm bicones, and a small teardrop shape around 1 cm - 1.5 cm long.
In a slightly less ideal world, I would have stacked 4 and 6mm bicone beads with an 8mm bicone or round bead. I was only able to find the 8mm in a light pink - shown below - so I tried it with and without.
Personally, I liked the look of it better with the larger, light pink bead in there. Yes, it would have been better if they’d all been the same colour, but I was on a deadline - wanted to get this tutorial out to you sometime this year, after all!
Anyway.
Two or three 4mm beads, then a 6mm, and finally a 4mm bead sort of mimics the shape of a teardrop.
If you can find the right colour in an 8mm as well, I recommend two or three 4mm, a 6mm, an 8mm, and ending with a 4mm.
About the Beads I Used
I ordered from Fire Mountain Gems and Beads. The price was decent, the quality was excellent, and the customer service was terrible.
I’d emailed them after progress on shipping had stalled for almost a week, worried that it had gotten lost in transit.
They finally emailed me back over a MONTH AND A HALF later, to say that they tracked it and showed it as being delivered a week after I emailed them.
Thanks for that? Probably better to have just completely ghosted me, at that point, than to resurrect an annoyance I had moved on from.
Had to laugh at the comment about being a valued customer, though.
Anyway, if you’re in a time crunch, wouldn’t recommend them. Otherwise, the product was good.

Share the Love!Be sure to take some pics of your handiwork! If you post it to Bluesky, be sure to tag us - @SpandexSimplified. Also, be sure to follow me on Pinterest, and subscribe to my free newsletter and Youtube Channel, so you never miss out on any of my nonsense. (Well, the published nonsense, anyway!) |
How to Make Taylor Swift’s Lover Bodysuit
Note: This is for the pink and blue bodysuit, but can be used for any of the other colourways. See my notes at the bottom of this post for the changes in materials.
You might need to make slight changes in the layout of the rhinestones, depending on which version you’re doing. You can follow the same basic techniques here, just alter the design to look as you want it to.
Bodysuit
The bodysuit is the first thing you need to get squared away, as it is the base for everything you’ll be doing in this tutorial.
There are a few ways you can go with the bodysuit, depending on the amount of time you’re looking to put into this.
Buy One
On the first level, you can buy a pink bodysuit. This is the quickest solution, and - depending on where you’re buying it - may be the cheapest solution.
... it’s just not the best solution, by a longshot. A few issues:
1. It may be hard to find one with a zipper, and - with this amount of rhinestones - you’re definitely going to want a zipper.
Not only do really light colour bodysuits really need one in general, lining bolsters the bodysuit.
This project adds a fair amount of weight to the base bodysuit - glue, rhinestones, sequins, and beads - so it’s really good to have the extra support that lining can provide.
3. You’re not as likely to find exactly what you want, if you’re going for accuracy. The colour, the neckline, etc - you may find yourself having to make some design compromises, if buying a ready to wear one.
You’ll be putting a fair amount of money and effort into this project, so I definitely recommend starting out by making the bodysuit. Go big or go home!
Make Your Base Bodysuit
I have two free tutorials, either one can be used to make a base for the Lover bodysuit.
How to Make a Basic Bodysuit is a great basic tutorial, for a very straightforward bodysuit.
How to Make an Underwire Bodysuit is a bit more involved, and shows you how to make a bodysuit with underwires and bra cups.
The Leg Opening
Many bodysuit patterns will have a higher leg than Taylor’s bodysuit. If you like a higher leg, go for it!
If you’re going for accuracy, you’ll want to adjust most leg openings a bit. See Basic Pattern Alterations for info on how to do that.

The Neckline
Most bodysuit patterns will have more of a scoop neckline, rounding down starting at the shoulders.
Taylor’s bodysuits look more like straps - a straight line down from the shoulders, before curving in to the center.
If you’re doing a basic bodysuit - rather than the underwired one, with straps - you’ll want to reshape the neckline in both the front and the back, as well as the arm holes.
This should give you an idea of what you’ll probably need to do. The top photo is the front, the bottom is the back.
Black lines are the original pattern, teal are the new design lines

You’ll want to adjust your pattern for size before making the style adjustments, and you’ll want to make the style adjustments (neckline, legs, center back if you’re adding a zipper - How to Sew an Invisible Zipper) before cutting any fabric.

Here’s what a bodysuit made from that adjusted pattern looks like:

Patterning the Design
After you’ve got a finished bodysuit, the next step is to start patterning the design.
First off, be sure to have some good source images for the design on hand.
I’ve got a Pinterest board to help you out: Pink & Blue Lover Bodysuit Photos
Secondly, I definitely recommend having a dress form set to approximately your measurements for this.
While the original (altered) bodysuit pattern can be handy in theory, in reality your bodysuit will be an entirely different shape and size with a body in it.
... and it’s best to pattern for “with a body in it”, in this case!
Line the long edge of the paper with the center front of the bodysuit, and tape it in place with painter’s tape.
Then, gently form the paper to the bodysuit as best you can - you can fold it or mash it slightly if needed - and trace out the edges of the bodysuit - where the elastic is, and where the side seam is.
You’re only patterning the front piece, at this point..
In this case, I was using an underwired base, so I only patterned the center front bodysuit, up to the wires.

Trim the edges where you drew them on. Once you’re happy with the pattern, remove it from the dress form and start drawing in your design lines.

As I saw it, this is what they looked like on the Lover suit I was recreating:

Figure out where you want your crystal colours to change, and draw those areas in on your paper pattern, as shown.

Colour coding REALLY helps when you start gluing the crystals!
Set those pieces aside for now, while we start crystalling the front of the bodysuit!.
Crystals
The thing to keep in mind with the crystals is that the more accurate you are in the beginning, the easier things are down the line.
The distance you use between the crystals in the first steps will set the distance you’ll be using for the whole suit.
I’d recommend laying them out on your work surface to decide how close together you want them, before proceeding.
Also: See the end of this section for a video on how I crystal my suits - it’s good for technique!
The First Few Lines
To start, I like to run a line of Painters Tape down the front of the suit, so that one of the edges establishes the center front line of the suit. I’ll use this as a guide for placing the first pattern piece.
Cut out the center front section of your pattern piece.
Spray the wrong side of it (not the one you drew on) with a bit of repositonable adhesive, let it dry 15-30 seconds, then position it on your bodysuit, lined up with the center front guide, as shown:

When you’re starting from the top of the pattern - as pictured - just pipe the dots until you reach the end of the first colour.
Use your Rhinestone Picker to place your darkest pink rhinestones on these dots.

Place a medium pink rhinestone on each glue dot.

Place a light pink stone on each glue dot.

Carefully remove your pattern - you don’t want to disturb the rhinestones you just glued down - and spray the other side with repositionable adhesive. Let it sit 15-30 seconds again.
Line up the straight edge of your pattern with the center front line of your bodysuit - you’ll want to eyeball it, this time - and press the sticky pattern piece into place.

As shown, I did it on the outside of the first line (closer to the side seam) - I’d intended to do it on the inside, closer to the center. Do whichever feels right to you.
... just remember which you pick, because you’ll want to do the same when you start on the other side!
Anyway, pipe your second set of glue dots. Position these as far away from the first line, as you were positioning the initial glue dots.
Also, position them kind of in between the dots initial line, as shown below.
Using the original line of rhinestones as your guide for colours, place the second line of rhinestones.

There’s also colour change involved with this line, though it’s definitely a bit more of a free form thing than the lines are.
Here is a diagram I made of how I was doing the interior (non-line) rhinestone placement:

I started with the light pink section, and worked my way out from there.

Then I did the mirror-image of the first line, using the same techniques and colours, and let the whole thing dry for several hours.

Trim a little from the long side of the pattern, to account for the row of rhinestones you’ll be adding.

Very carefully and gently, place it on your bodysuit so that the edge closest to the center front rests *over* the outer edge of the 2 rows of rhinestones.
The space between the sequins is basically what you’re aiming for.
Pipe a line of glue, then place your rhinestones as indicated by the colour coding on your pattern piece (Dark pink up top, medium pink below).
Repeat on the other side, creating mirror image lines.

Note: You can crystal the double line, as I did in the first section. I wanted to show it both ways, so only did a single one this time.
If you’re lining your pattern up to a double line of rhinestones, you’ll center the edge over the rhinestones, so the edge is basically between them.
If you’re only doing a single line at first, you’ll line up your next pattern piece close to the first line of rhinestones, as pictured.
Either way, that leading edge of the next pattern piece should be in between *what will be* a double line of stones.
Once you’ve got these lines established, you can run your second row of glue beside each line, and fill in with the appropriate colour of stones.

Start Filling in the Bottom
After letting the initial few lines dry for several hours (you’ll still want to be careful at this point!), I ran a piece of painters tape, extending from the center line of rhinestones, all the way to the crotch seam.
I used that as a guide to finish piping the glue down the center front, then placed the clear / crystal rhinestones.

Note: Keep the lines parallel to the center line as far as you can.
You may need to get creative as you start to meet up with the curved line, but keeping the lines straight at first will give you a much neater looking final result.

Take a look at the reference photos - the pink lines go lower in the center front, and gradually work their way up to being shorter / higher, closer to the side lines.

Parallel lines, offset, get creative near the curves. Continue this up to the point where your center line of rhinestones changes to the medium pink.

Finish out that center panel the same way - switch over to medium pink, then clear, then finishing out with the blue to fill in the top section.

So just before the medium pink transitions to clear, I’ll do a clear stone, then a medium pink, then another clear... before continuing with medium pink from there.
It’s totally optional, it just gives you a nicer transition between colours.

Following the same sort of idea, fill in the next sections, working out from the center.

It basically just prevents a hard, stark line at each transition:

Assess and Continue
At this point, I like to place my remaining pattern piece against the dressform, and see how close it is to the remaining space.
Don’t expect it to be perfect, working around the established rhinestone lines can throw things off a bit.
If your pattern is now way too big or misshapen for the remaining area between the rhinestones and the side seam, just trim it down a bit.
Be sure to re-draw any colour coding you may be trimming off, though!

Be sure to do each set - mirror image on both sides - before proceeding to the next line

Go back and add the second row of lines to any that you’ve currently got as single lines of rhinestones.
Again, just use the colour placement of the initial lines as you guide to colour changes.

Fill in the Spaces
Using the diagram I shared earlier, continue filling in the spaces between the lines, working from the center out.

You’re essentially working towards yourself, and that helps avoid messing up the glue/rhinestones you’ve already placed.

Rhinestone the Cup - or Cup Area
If you’re using an underwired base, it’s a lot easier to figure out where to transition from “body” rhinestones, to the placement of the stones in the cup area - another good reason for using a dress form!
Anyway, once you’ve rhinestoned the body past the point of where the cups are, I like to take a break from the body, and rhinestone the cups.
These can be placed a little further apart than the body rhinestones, as pictured below.
This is because you’ll be adding a fair amount of sequins, later - you definitely want to leave enough room to sew between the crystals!

Finish Filling in the Front
Once the cups have dried, I like to go back and finish filling in the side, all the way to the side seam:

I like to leave this part until the rest of it has dried overnight, as I tend to move the dress form around a lot, to get the underside crystaled.

Because you’ll be crystalling the other side, you want to make sure that the first round is good and secure, before you put any stress on it!

Start Rhinestoning the Back
Working from the center back towards the sides, repeat what you did with the front.
Spray glue your center back piece, let it dry, place it, and pipe out your glue.

At this point, I started filling in the center back. I was running out of time, and really needed to get as much gluing done in a session, as I could!
Filling in the center back early on let me work my way to the sides, without messing anything up by going back and filling the spaces in while glue was still wet.

I couldn’t find any really good, clear views of the back, so I basically used the front for inspiration.

The back goes a lot faster because it doesn’t have cups. I did follow the same basic colour scheme as I did over the cups, though.

Some progress...

Over the hip area - where the blue transitions up into pink - I did more of the blending that I described earlier.

So, I placed blue stones until I was happy with the look, then transitioned out from there.

Behold, the almost finished - and then finished - back!

Here is my video on crystalling the Lover bodysuit:
Front:

... and back:

Hand Sew the Sequins
You’ll be hand sewing a LOT of sequins to this suit.
First a word of warning:
I’m going to show you the proper way of sewing sequins on. It is definitely more time consuming than some other way you can sew them on, but there’s a reason for that.
Knotting after every sequin ensures that if a thread breaks while you’re wearing it, at most you’re out a sequin or two.
If you sew the sequins on without knotting between each - like with basic running stitch or whatever - a simple thread break can be far more catastrophic.
You’re putting so much time and money into this suit, you don’t want to lose a bunch of your sequins the first time you wear it, IMHO.
It’s not much of a time saver, when you have to do extensive repairs, IMHO.
The sequins are placed in sections, not necessarily following the bodysuit underneath for too much guidance.
Here’s a diagram I made, of how I see the sequin placement on this suit.
This may vary with other versions of the suit, but it’s good to have some sort of idea as to where you’ll want them, before you get started sewing them on.

Sequin Technique
Thread a regular hand sewing needle (NOT a beading needle) with clear nylon thread. Knot one end of it several times, trimming any excess thread.
You can start from the underside of the suit, but I like to start so that my knot rests on the outside.
NO ONE will see it... but those knots from nylon thread can annoy, if rubbing against skin!
Anyway, either poke your needle up through the wrong side of the bodysuit OR a small stitch into and out of the suit from the right side. Either way, your elastic should be anchored in place, with the needle and thread on the right side of the suit.
Thread the needle through one or more sequins (I’ll get into this in a minute), then make a small stitch near where the thread is coming out of the bodysuit.
This stitch will be into and out of the bodysuit, so the thread and needle are again on the outside of the fabric. (I’ll share a video at the end of this explanation!)

Do another small stitch - while still holding the sequin away from the bodysuit - then knot the thread close to the other stitches.

Pull up the needle through the suit in the spot where you want it, and repeat with another sequin. Continue - in small areas - until you’re done with all of the sequinning you want to do.

Sequinning Tips
1. You can use single sequins - and you will, when using the iridescent ones - or you can stack them for a different effect.
Stacking a Peacock or Orchid sequin with an iridescent one will mute the colour of the blue or pink sequin, while also giving it a flash of iridescence.
I like to use this to transition between colours. For instance, I’ll do the peacock blue ones at the bottom of the bodysuit, then start stacking a peacock with an iridescent for a few, before transitioning to the pink.
Alternatively, you can start stacking a peacock and an orchid one together, before you transition to just the orchid.
In my case, it was REALLY easy to snag the cover of my dress form, when sequinning the bodysuit.
A super easy way to avoid this is to just wedge some markers - or something similar - under the bodysuit, where you’re working.
You can move them around as necessary, easily.

Using (capped!) markers under the bodysuit helps prevent sewing the bodysuit to the dress form fabric!
The thing with sequins is that you can feel like you’re adding a TON, only for them to look really sparse afterwards.
As an example, here’s what my hip looked like when I THOUGHT I was done sequinning it:

So, a second round of sequins later, I was much happier with the result:

This was how I initially sequinned the cups:

The top photo below is a good before and after, though!

5. When doing the upper part of the bodysuit, I find it easier to start towards the center (with the iridescent sequins), and work my way to the top, rather than to start at the top and work toward the center.

6. I also find it easier to do the sequins on the body itself, and leave the cup sequinning for after that’s done.

Work with SMALL lengths at a time, and only single lengths. (Knot one end, rather than the two ends together).
Anything else is just asking for trouble - it really wants to kink, knot up on itself, etc.
8. While the rhinestones may seemed tedious, know that the sequins are the REAL slog of this project.
Take your time, rest your eyes as often as you need, and try to have patience for the project.
IMHO the sequinning SUCKS, but the results will be worth it in the end!

Bead Fringe
OK, so you’re done sequinning! Congrats, you’re through the worst of it now!
Just one small task left to do, and you’ll have a gorgeous Lover bodysuit of your own. This part really isn’t so bad to do, and is nowhere near as laborious as the previous two stages!
At the end of this section, I have a short video demonstrating how to do this fringe. If you prefer video learning, feel free to skip ahead to it.
Get the Thread and Needle Ready
First, thread a beading needle - NOT a regular hand sewing needle - with your clear nylon thread.
Note: Don’t even try to use one of those little wire beading needle threaders with the nylon thread, it’ll just break the threader.
Just thread it directly into the needle, the stiffness of the nylon makes this far easier, than attempting the same with a regular thread!
You want a double thread - so, thread your needle, then tie the ends together.
Try not to use any longer than you need. This thread is really annoying to work with and - especially when doubled over - has a tendency to knot into itself and tangle.
Sew Your First Strand
Bring the needle up from the underside of the suit, just above the edge of the leg hole, in the place you’re going to want to start your fringe.
Bring the needle back down into the bodysuit, exiting at the bottom of the elastic (this is easier to see in the video, below!)

I recommend using a small bead as the bottom - I used one of the 4mm bicones.
Skipping the last bead you threaded - the small one - thread your needle back through the beads.
You’ll go in at the second last bead you threaded, and exit at the first bead you threaded:

Carefully pull the needle through, pulling the thread tight through your beaded fringe.

This secures each individual strand, so you don’t lose all of them if you happen to snap a thread while wearing your Lover bodysuit.

Continue Along the Elastic
With your first strand knotted off, make a few small - slightly loose - stitches across the top of your suit, close to the leg opening.
Stop at the point of your next fringe - about 1 cm away from the first, in my case, and repeat the whole first step.

Always be sure you leave a LITTLE slack in your stitches - both at the top of a fringe drop, and when stitching across - to allow a bit of leeway for movement.
Tight stitches with no slack are more prone to break!
As the thread is invisible, don’t worry about any loops or loose stitches you see close up. NO ONE will see them from more than a foot away, and durability is more important!

Then, repeat it on the second leg opening, trying to mirror what you did on the first.
In my case, the first couple of drops on the front used only two 4mm beads to start, then I did a few with three 4mm beads, then four 4mm beads.
This was because it looked like the fringe on the original Lover outfit gradually got a little longer as it moved out to the hip, then gradually a bit shorter as it went around back.
There is plenty of room for customizing this as you’d like, though, so do whatever fits your supplies, style, budget, and aesthetic, really.

Beaded Fringe Instructional Video:

More Cosplay Posts
Looking for more Cosplay tutorials and posts? Here are a few for you:
Cosplay Photography Tips
How I Made the Maleficent Costume
How I Made the MCU Hela Costume
How to Add a Sole to Boot Covers
How to Make Basic Spandex Gloves
How to Make Fancy Spandex Gloves
How to Make Maleficent's Headpiece
How to Make Spandex Boot Covers
Katniss Wedding Gown Wings
Maleficent Staff Tutorial
Poured Latex Smaug Top
Thranduil Crown Tutorial
Triceracop Costume
Weeping Angel Costume Tutorial
Thanks for Reading!If you loved this tutorial - or have any questions about it - please leave a comment below! I'll do my best to answer any questions you may have. |
Other Lover Bodysuit Colour Variations
If you want to do any of the other colour combinations of the Lover outfit, here's what I recommend:
Note: I’m just giving a few different recommendations for the supplies to use, feel free to mix and match, use all or some, or just go in a completely different direction!
Also: The actual designs vary slightly between colourways, so check out my Pinterest boards - linked in each set of recommendations - for a better idea of what you want to do.
Pink Lover Bodysuit
Source Images: Pink Lover Bodysuit Photos
Bodysuit: Very light Baby Pink Nylon Lycra.
Rhinestones: SS16 Crystal Rhinestones, SS16 Crystal AB Rhinestones, SS16 Lt Pink Rhinestones, SS16 Lt Pink AB Rhinestones, SS16 Lt Siam AB Rhinestones, SS16 Rose Rhinestones, SS16 Fuchsia Rhinestones
Sequins: 10mm Raspberry Flat Top Hole Sequins, 12mm Fuchsia Flat Top Hole Sequins, 8mm Iridescent Flat Top Hole Sequins
Other: NA
Pink and Purple Lover Bodysuit
Source Images: Pink and Purple Lover Bodysuit Photos
Bodysuit: A very light Baby Pink or possibly Lavender Nylon Lycra.
Rhinestones: SS16 Crystal Rhinestones, SS16 Blue Moonlight Rhinestones, SS16 Crystal AB Rhinestones, SS16 Violet Rhinestones, SS16 Lt Purple Rhinestones, SS16 Purple Violet Rhinestones, SS16 Lt Purple AB Rhinestones
Sequins: 6mm Purple Flat Top Hole Sequins, 10mm Purple Flat Top Hole Sequins, 12mm Violet Flat Top Hole Sequins, 10mm Raspberry Flat Top Hole Sequins, 12mm Fuchsia Flat Top Hole Sequins, 8mm Orange Flat Top Hole Sequins
Other: Mini Purple Tassels
Blue & Gold Lover Bodysuit
Source Images: Blue and Gold Lover Bodysuit Photos
Bodysuit: White, Grey, or the palest possible blue Nylon spandex you can find. I mean *almost* white.
Rhinestones: SS16 Crystal Rhinestones, SS16 Blue Moonlight Rhinestones, SS16 Indicolite Rhinestones, SS16 Aquamarine Rhinestones, SS16 Lt Colorado Topaz Rhinestones, SS16 Metal Sunlight Rhinestones, SS16 Golden Shadow Rhinestones
Sequins: 10mm Gold/Silver Top Hole Sequins, 12mm Deep Gold Top Hole Sequins, 12mm Rich Gold Top Hole Sequins, 6mm Gold Top Hole Sequins
Other: 5*8mm Austrian Crystal Gold Champagne Teardrop Beads, 4mm Austrian Crystal Gold Champagne Bicone Beads
Orange and Fuchsia New Lover Bodysuit
Source Images: New Orange Lover Bodysuit Photos
Bodysuit: A true Orange or Cantaloupe Nylon Lycra
Rhinestones: SS16 Amber Rhinestones, SS16 Hyacinth AB Rhinestones, SS16 Light Siam AB Rhinestones, SS16 Orange Rhinestones, SS16 Fuchsia Rhinestones
Sequins: 8mm Red Top Hole Sequins, 10mm Raspberry Top Hole Sequins, 10mm Red Sequins, 8mm Burgundy Wine Top Hole Sequins
Other: NA.


Your blog has been my holy scripture from the moment I found it (I make my own dresses for artistic rollerskating) AND I'm a huge Swiftie. Best crossover ever. Thanks for making this!! <3
Awww thank you so much!! <3
Your tutorials are amazing! This one was great and so time consuming for you. I don't imagine I will make one, but loved how it was made. I sew for dance and trick riding and love all your ideas. Thanks for sharing with us.
I might actually die. I purchased a bodysuit and had my daughter try it on and it fit with some room. I spent daaaayyys putting over 20,000 rhinestones on the thing and seeing sequins. Before I sewed the beads on I went to have her try it on and it won’t go passed her butt now. I’m freaking out because she needs it by Sunday and idk what to do 😭 how could this happen?
Sounds like it wasn't properly stretched when you were crystalling it.
Does it have a zipper? If not, are you able to put one in?
How long in total did this take you? I'm going to her concert next week as a last minute surprise! I am currently unemployed so I have all day to work on it but it seems like it may be impossible to get done by the 22nd:')
If you're really committed to it and work fast, you could totally get it done by then!
The bodysuit took me about an hour, the rhinestoning was probably a total of 12 hours or so (plus some dry time), assume another full day for sequins, then the beads were maybe an hour?
Do you have a pdf version of how to make this ?
I don't, sorry.