

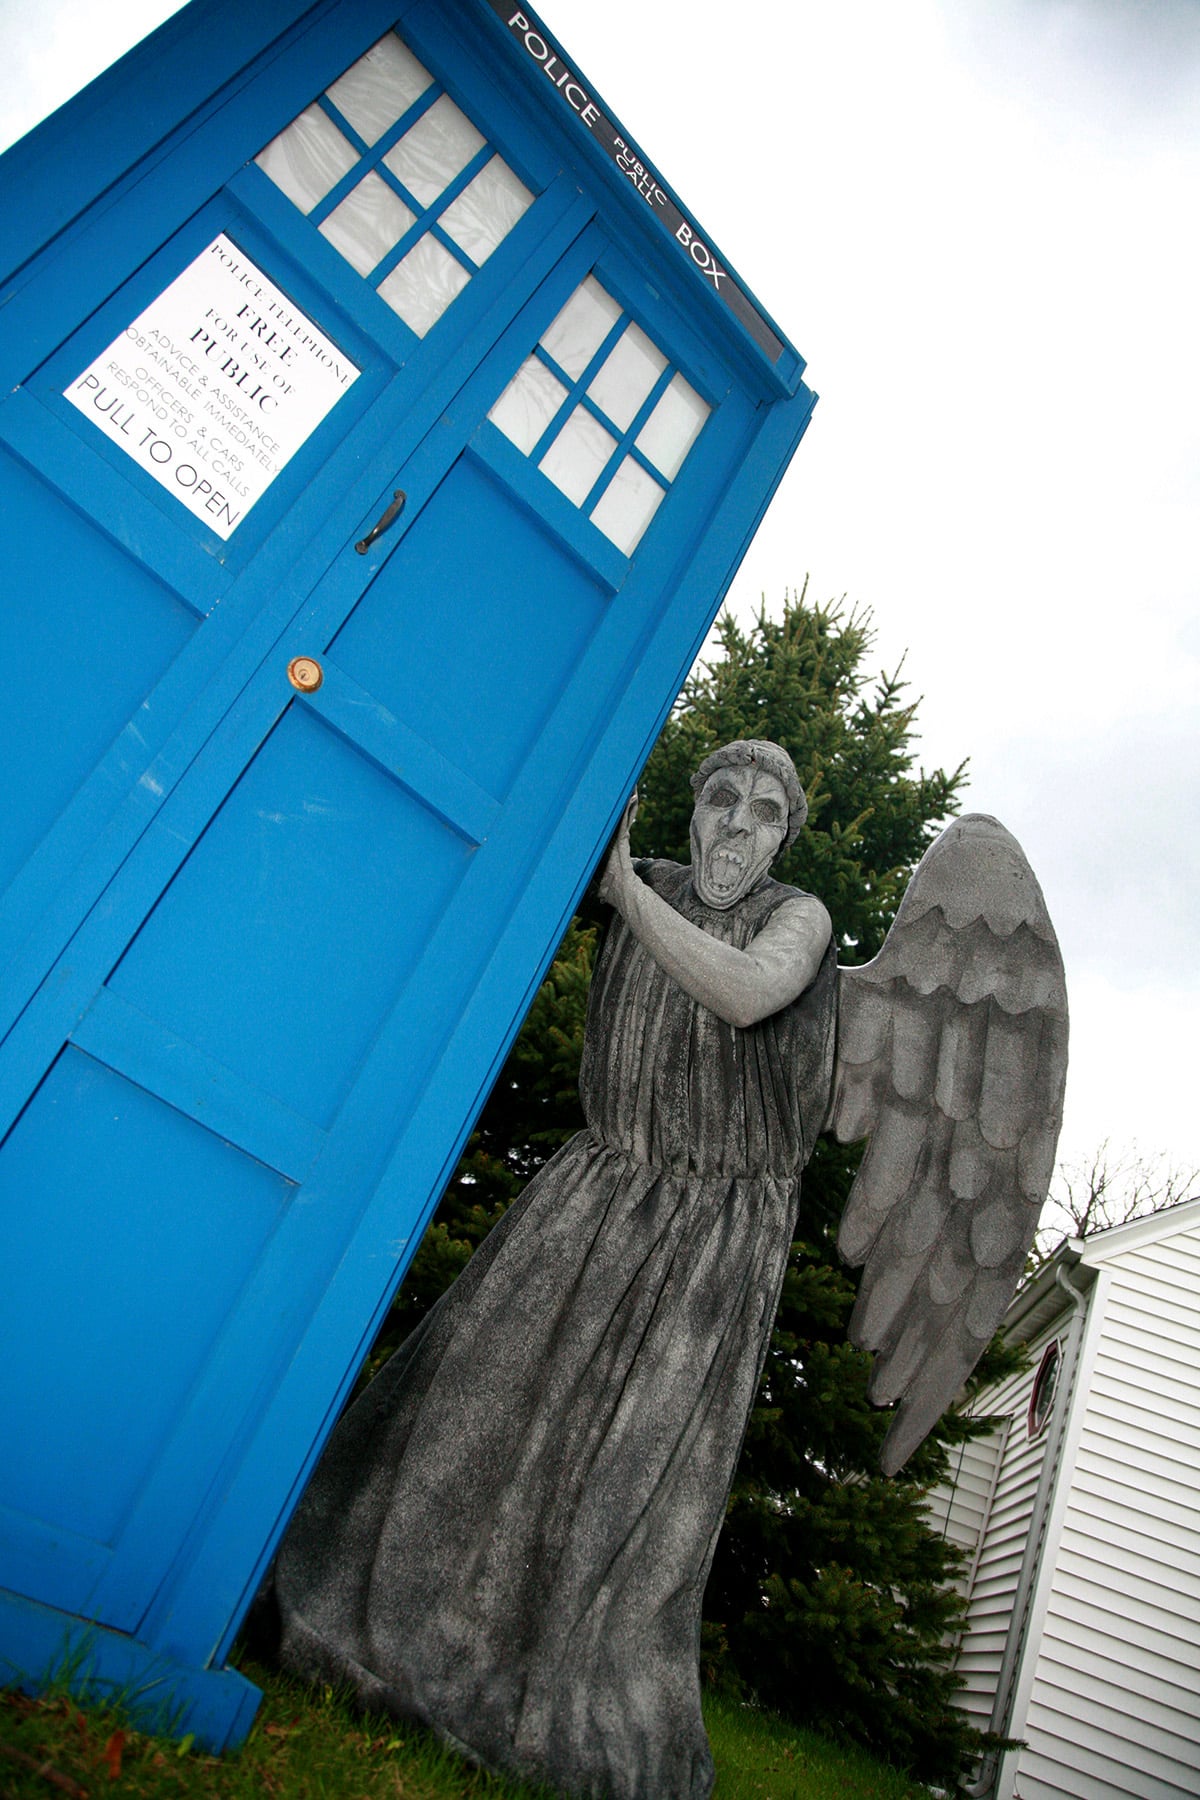
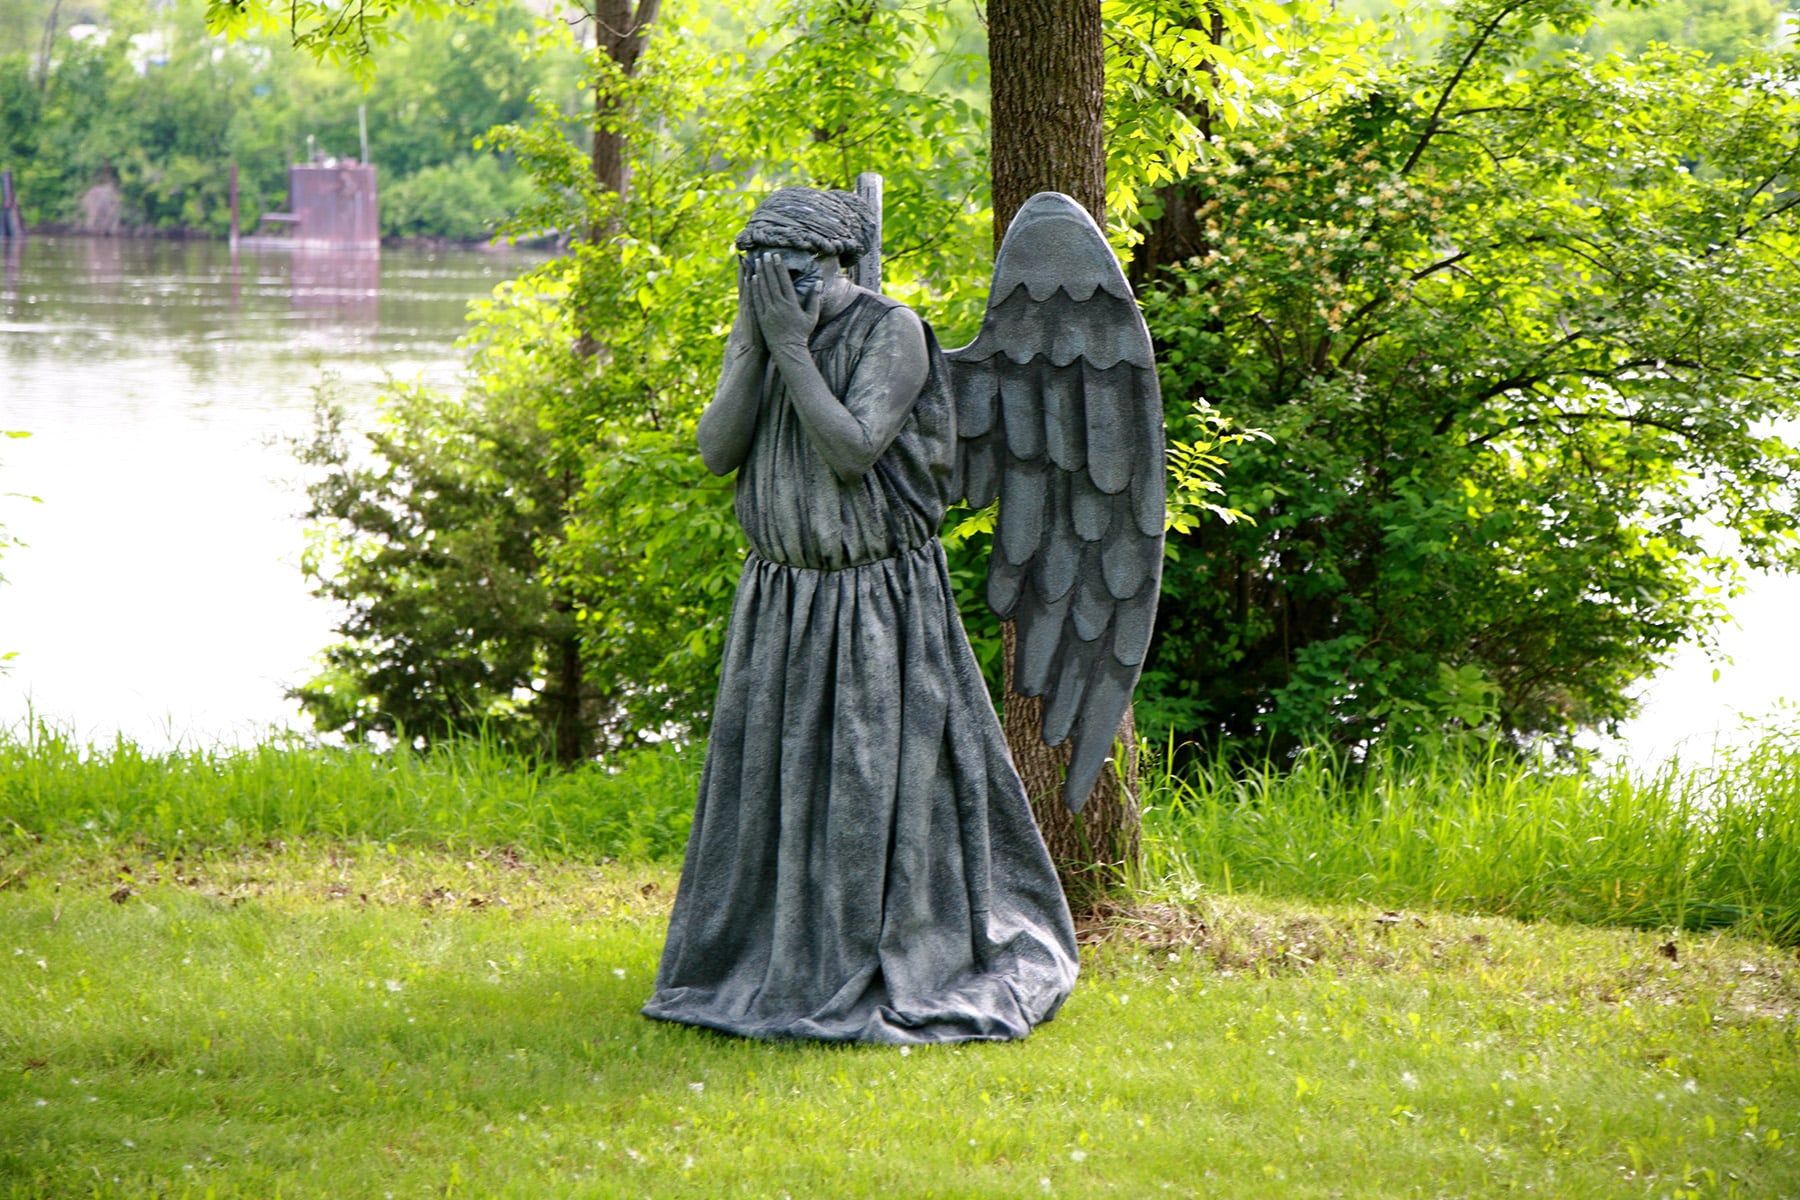
If you're looking to cosplay as a Doctor Who Weeping Angel, this Weeping Angel Costume Tutorial gives a ton of information on how to do it!
Originally published on Celebration Generation on June 6, 2013. Updated and moved over to this blog - comments and all - on 9/15/2021

So, it's been about a week and a half since we won "Best in Show" at the BritCon costume contest (Woo hoo! First time we've entered a con masquerade!) probably time to post the "How We Did It" post that I was promising that weekend.
First off, this is a pretty in-depth post, with a TON of photos and info.
If you have some experience in sewing and whatnot, it should be easy enough to follow. I don't have the space or time to do up an actual step by step for the whole thing - these costumes took a TON of time to make!
While these took a lot of time to make - and we probably killed a few million brain cells, breathing in all the spray paint fumes on account of crappy weather outside! - these were TOTALLY worth it.
Even at a super tiny convention like BritCon, we had a *BLAST*!
We arrived early and costumed up on Saturday, and had a ton of fun scaring the hell out of the groggy, just-woke-up people in the hallways.
We had many photos taken, which was a weird experience - I hate getting my picture taken, but didn't mind it at all when completely obscured by a costume.

He made a few not-quite-awake people scream!
Also, when it comes time for Convergence, we're looking forward to the BEST photo bombing opportunities ever. Muahahhaa!!
Anyway, let's get going..
How to Make Weeping Angel Masks
We tackled the masks first, as they were the most intimidating part - I'd never made a mask before!
Not even the wings scared us, as that was just... geometry and physics.
I may know how to sculpt cake, but I'd never done anything with plaster casting OR paper clay before, so... yeah. Nervous!
What You Need
Vaseline
Plaster Bandages
Paper Clay
Grey Acrylic Paints - light, medium, and dark.
Granite Texture Spray
Opaque Black Pantihose or Knee Highs
Hot Glue Gun & Glue Sticks
Clear Elastic or Grey Elastic

Sculpting the Base of the Mask
First, I used Plaster Bandages on Porter's face to create the base of the mask, twice.

Luckily, our faces are close enough in size/shape that both masks are quite comfortable!
To prepare, I clipped his hair back and covered his face in vaseline. I did - I think? - about 3 layers of cast material over the whole face, with a couple extra layers around the nose area.
Also, as the face would be elongated in the chin area to allow for the "scream", I wadded up a ball of plaster and applied it to the underside of the chin, securing it down with looong strips of plaster coming up on either side of the face.

Turbo took advantage of the situation!
Sculpting the Facial Features
After drying, I used Paper Clay to sculpt the face.
This was just freehand, while looking at a printout from a pic I found online.

Painting The Weeping Angel Mask
After drying, I painted with a base coat of grey acrylic.

Once that was dry, I used dark and light grey paint to add shadows to the insides of wrinkles, etc and highlights to the tops of ridges, etc.
Once all of that was dry, I sprayed the masks liberally with Granite Texture Spray, and allowed it to cure well.

Making The Eyes
The eyes were a little bit of drama.
Our original idea was to get a couple pairs of cheap sunglasses from the dollar store, cover with some black or grey pantihose, and spray with texture.
Well, then we realized that our masks were SO perfectly fitting, that the edges of the lenses would be annoying at best.
What we finally came up with worked perfectly: Comfortable, easy, looked great AND allowed for pretty decent vision!
I bought a pair of sheer black tights, and cut 4 squares out of it.
Without stretching them, I sprayed them liberally with texture and allowed it to dry fully. Once dry, I stretched them out a bit.
I ran a thick line of hot glue around the inside of each eye hole, and applied a square to the inside of each mask, textured side facing out.
Once that dried, I piped another line of glue to the outside of the mask, just on the inside of the eye holes - think "eyeliner".
I carefully pressed the fabric into the new line of glue from behind the mask.
This made it look more natural, not so sunken in.... and also gave us a bit of room so our eyelashes weren't hitting up against the eye part constantly!

Before and after adding the eyes.
Finishing the Mask
Once this was all dry, we cut some narrow, small slits in each mask - one set at the temples, another set near the back of the jaw bone, and threaded regular elastic through.
While we hadn't gotten around to painting the elastic in time for the photographs in this post, we swapped them out for Thick, Clear Swimwear Elastic before competing.
Alternately, you can use Grey Elastic if you can find it, or paint/dye white or cream coloured elastic.
Making Weeping Angel Wigs
I wish I’d taken more photos of this process, I hope the description works!
What You’ll Need
A Well-Fitting Costume Wig or Wig Base.
Seam Ripper
1-2 Balls of Yarn (Grey, ideally!)
Scrap Fabric
Headband
Yarn Needle
Scissors
Grey Acrylic Paints - light, medium, and dark.
Granite Texture Spray
Making The Wig Base
First I bought two cheap costume wigs, used a stitch ripper to remove all of the hair.
I took 3 balls of yarn - grey, white, and black, just in case any showed through - and cut them into LONG lengths... about twice as long as I wanted, so I could sew a seam up the middle.
I cut a piece of nonstretch fabric about ½ the length of the center seam of the wig, and stitched the yarn to it with a very tight zigzag - yarn centered over the fabric, which was only about ½-3/4" wide
From there, I sewed that piece down to the top part of the wig cap
Styling the Weeping Angel Wig
From there, I styled both of the wigs... Porter was a VERY patient model!
First, I pulled enough hair forward to make a double twist down each side of the face. Just behind that, I affixed a "headband" that I'd made from a tube of light blue spandex.
I'll be honest, I had NO idea what I was doing, so I just sort of pulled and twisted everything until it looked passable.
Hair is NOT my forte!
As I was going, I used LONG lengths of yarn and a yarn needle to sew everything into place. Twists and braids were secured not only to themselves, but down to the wig cap as well.
The goal was that the style would NOT move, once I tied everything off and took the wig off his head.
When I came to the end of styling, I twisted any remaining ends of yard under and sewed them into place.
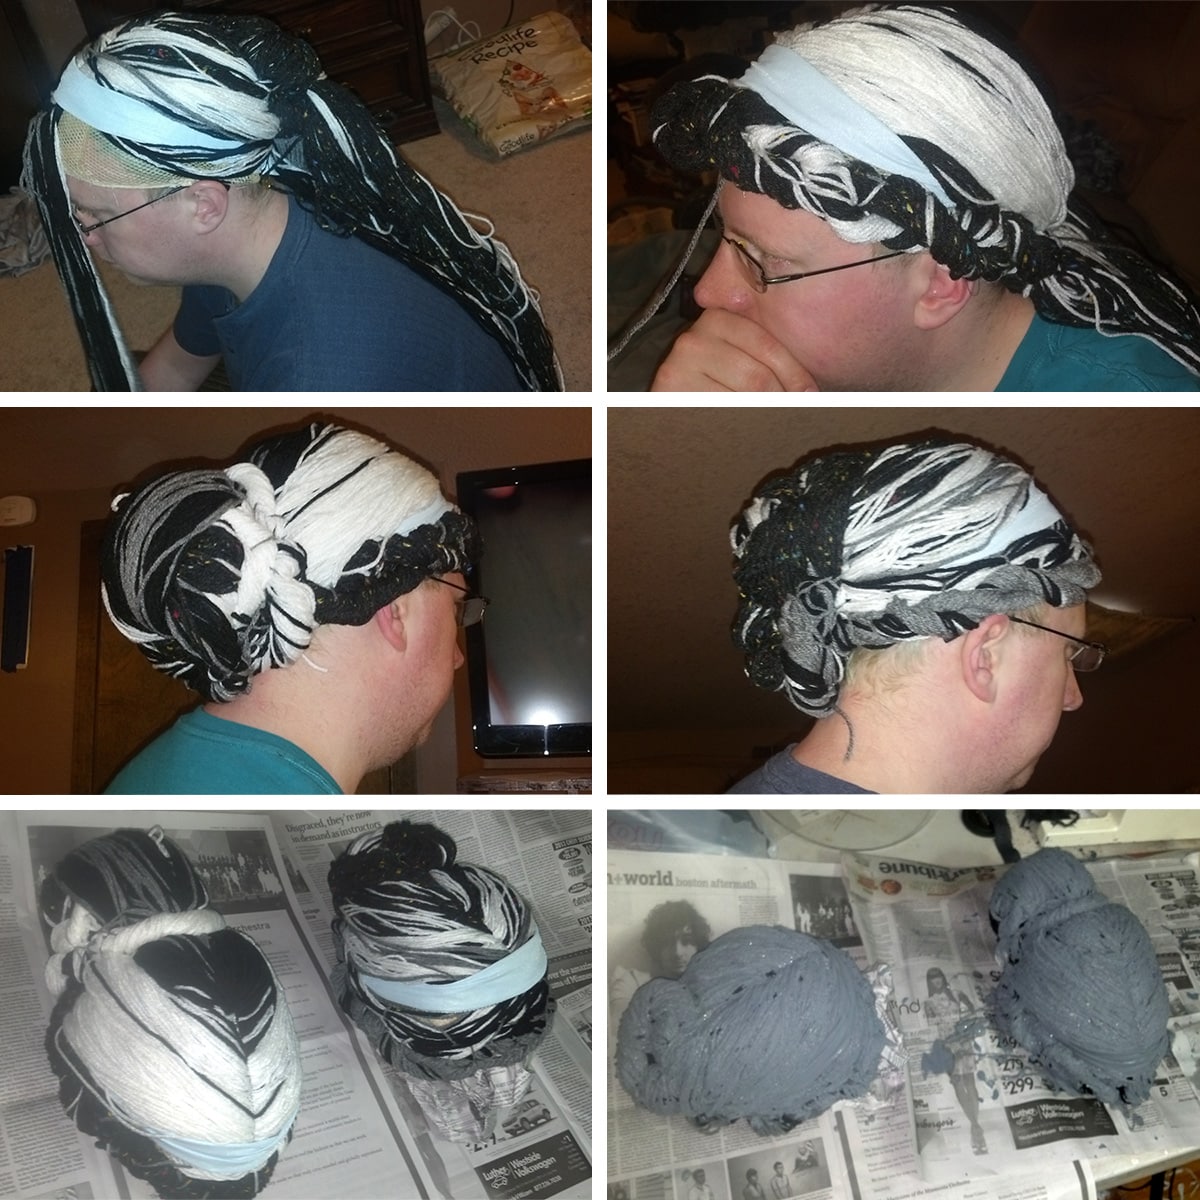
Painting the Wigs
I stuffed the wig caps with newspaper to hold it to a head shape, and painted it with grey acrylic paint.
It took several coats - and several days to dry - as I made sure to SOAK it.
I wanted the paint to sort of act as a glue, as well.
Once the wigs were completely dry, I sprayed them liberally with granite texture spray paint.
Weeping Angel Dresses
Ok, the dresses are something that could use a lot of photos/diagrams to explain.
Of course, I didn't think to take pics as I went... so, hopefully words are enough.
What You’ll Need
9 Gauge Galvanized Wire
Medium Weight, Dark Grey Fabric
STRONG Drawstring
Sewing Machine, Thread, etc
Scissors
Granite Texture Spray
Sewing The Dress
First off, we decided how big of a hoop we wanted for the hem, and settled on 30" diameter. We used lengths of 9 gauge wire for form two rings, one each.
Once that was done, I set about designing and making the dresses, which have three main parts - A liner, an outer skirt, and an outer bodice.
Liner
This was a floor-length, fairly fitted liner. Gores were added to either side of the bottom, as well as to the center back seam.
This was to add enough fullness to the bottom of the lining hem, that it would easily fit around the hoop.
The center back seam of the top was left wide open (but finished!) from just below the neckline, to the waistline.
This was to allow for access to the wing apparatus.
Outer Skirt
This was made from 2 lengths of 60" wide fabric, cut long enough to be waist - floor, plus a couple of inches for the hem, plus a few more inches to allow for it to "pool" a bit around the hem.
Additionally, long pockets were sewn near the top of each side seam - long enough to easily conceal wallets, water bottles, etc.
Outer Bodice
This took a fair amount of planning - we wanted to completely conceal the wing apparatus, while still allowing convenient enough access to easily get the wings on and off.
The outer bodice was made of 6 parts - a front yoke, a back yoke, a front main bodice (the gathered section), two back main bodice parts, and a "flap" for the back, to further conceal the apparatus.
The front main bodice was gathered and sewn to the front yoke. Easy!
The back bodice.. let me see if I can describe this well. The flap was finished along both long edges. It was sewn, right side down, to the center of the back yoke piece.
The two main back bodice pieces were finished on what would be the center back, and sewn down over the flap seam, overlapping by about two inches.
The rest of the top edge of the main piece was gathered and stitched down along the bottom of the yoke edge.
When the seam is flipped open/right side out, the flap covers the open center back.. which isn't all THAT open, on account of the overlap.
On the bottom of the main back bodice piece, the two pieces are overlapped in the same manner that they are up top, and stitched down.
From there, the side seams are sewn, and all horizontal seams (shoulders, bottom edges of yoke) are reinforced with bias tape to completely enclose the seam.
Then, the bottom edge of the bodice is gathered.
I aimed for a fairly large waist, as there would be drawstring to further gather it in, later on.

The long flap in the back tucks in to the waist, after the wings are placed.
Weeping Angel Dress Assembly
1. With the right sides together, I sewed the neck seam. Flipped it right side out and also sewed around the seam from the outside - this made it lay more flat, and reinforced it.
2. I serged the liner to the outer bodice at the armholes, flipped the edges, and stitched them down to finish the edge.
3. I sewed the outer bodice to the outer skirt, gathering the skirt a bit as I went.
I was aiming for a fair amount bigger than waist size, to allow for a drawstring later.
Make sure that the side seams match up, as well as the center back and center front. I finished this seam off by enclosing it in bias tape as well.
4. Add a LONG drawstring, finishing in the center back of the waist.
It's accessed from the center back of the bodice, and the ends are tucked in after being tightly tied around the waist.
With the time and expense of these costumes, I wanted them to be able to fit through ANY weight fluctuations we may go through!
5. Making sure everything was lining up, I pinned the bottom edge of the outer skirt to the bottom edge of the liner, matching up side seams, center back, and center front.
There was more outer skirt than inner, so I gathered it - evenly - to fit as I sewing the two pieces together around the entire bottom edge.
6. To finish this off, I flipped the bottom edge towards the underside of the dress, and VERY carefully sewed the whole bottom edge around one of the hoops.
This is tedious, but not super difficult. Once the entire hoop is enclosed, evenly distribute the fabric mass along the edge of the hoop.
Painting The Dress
Once the dresses were completely finished, in terms of the sewing... we had to paint them.
This used a TON of granite texture spray paint, but it made a HUGE difference.
We aimed to get it in between the folds as much as we could, but the variance in coverage looked amazing - like shadows, etc.

The Weeping Angel Bodysuit
What You’ll Need
Grey Spandex
¾-1" Wide Grey Velcro
Cardboard
Fake Nails
Granite Texture Spray
With our autistic sensory/texture issues, one thing was sure - we would NOT be able to handle makeup or other skin paint. Ugh!
So, I made a very customized set of bodysuits to suit our needs. I picked a lightly textured grey nylon lycra for this.
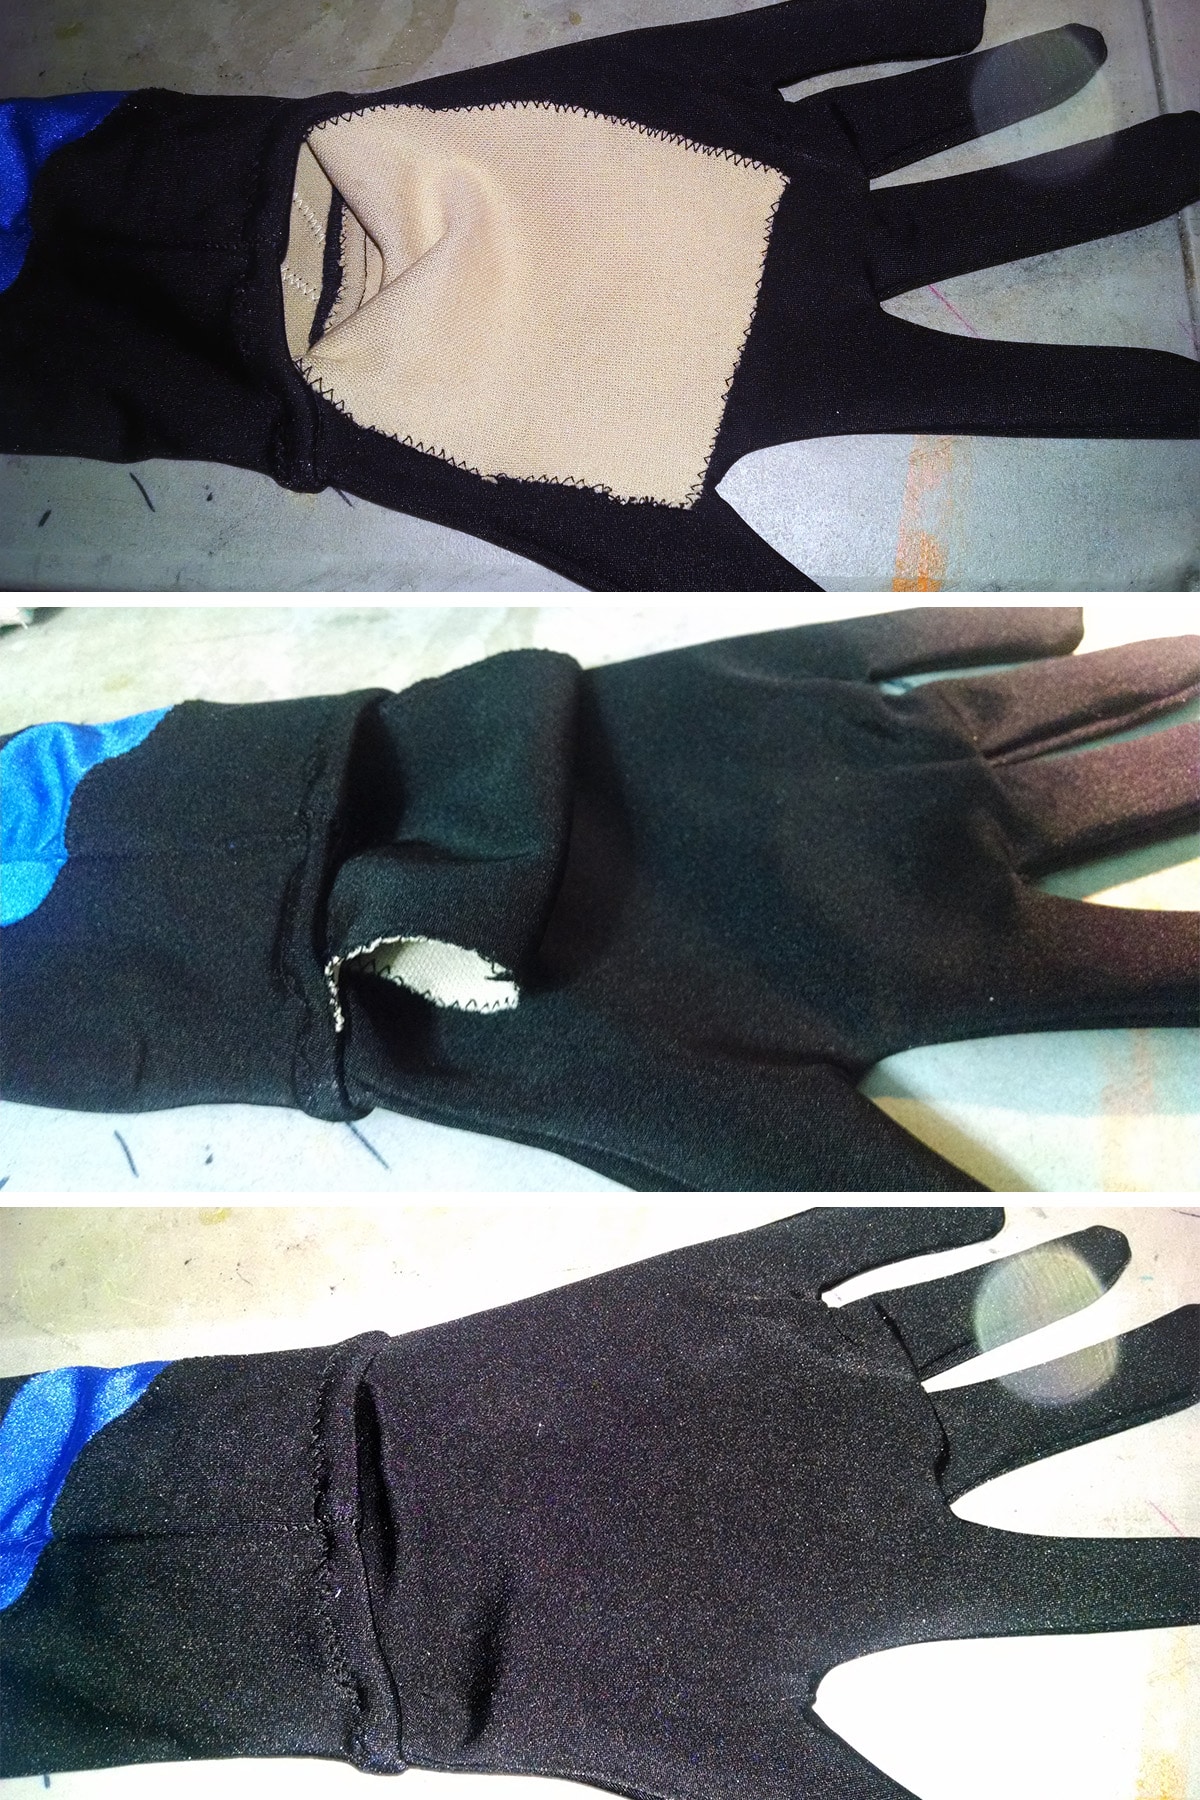
It was a full, relatively tight spandex shirt, with full sleeves, attached gloves, and a hood that covered most of the face.

You can't see it here, but there is a strip of velcro up the back of the neck/head to make it easier to get into, while still maintaining a very fitted profile once done up.
One feature I added was that the gloves were only attached on the top and sides of the wrists, but not on the underside.

The glove part under the wrist had a flap of fabric attached that tucked in under the wrist of the sleeve, so you couldn't really see that it was an opening.
This was to make washroom trips, etc a lot easier!
I didn’t take any photos of them on this costume, but here are some photos of another costume I made, with the same wrist treatment.
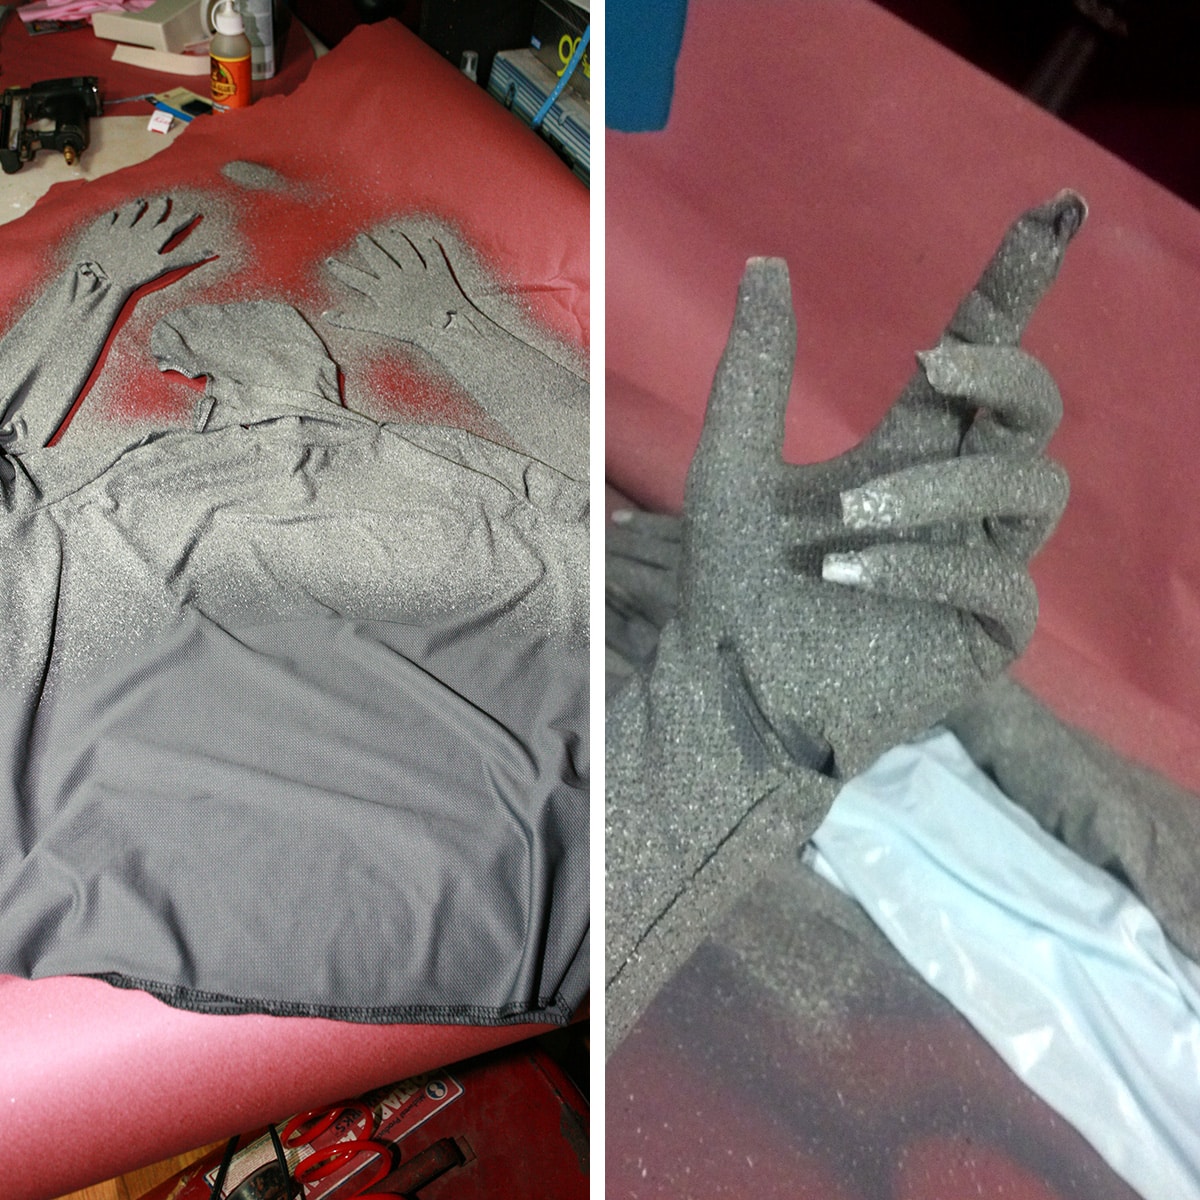
Detailing The Bodysuit
Once the suit was completely sewn and I was happy with the fit, I had to make it look more realistic.
I traced both of our hands and arms, and made stretch forms out of cardboard.
Once the stretch forms were placed inside the sleeves/gloves, I used superglue to attach a set of fake nails to the gloves. I had fit the nails to our hands beforehand, to make them proportionate to our actual hands.

Once the glue dried, I coated them with some matte white nail polish.
If I had my time back, I would have used black or grey - I just didn't have any on hand, and was feeling lazy!
This is what it looked like after one coat of texture spray. (One a subsequent coat of spray, I pulled the wrist flay out and sprayed it as well - really helped it blend in!)
Once the nails were completely dry, I used granite texture spray paint to paint/texture the entire hood, arms, and shoulders, as well as the upper part of the chest and back.
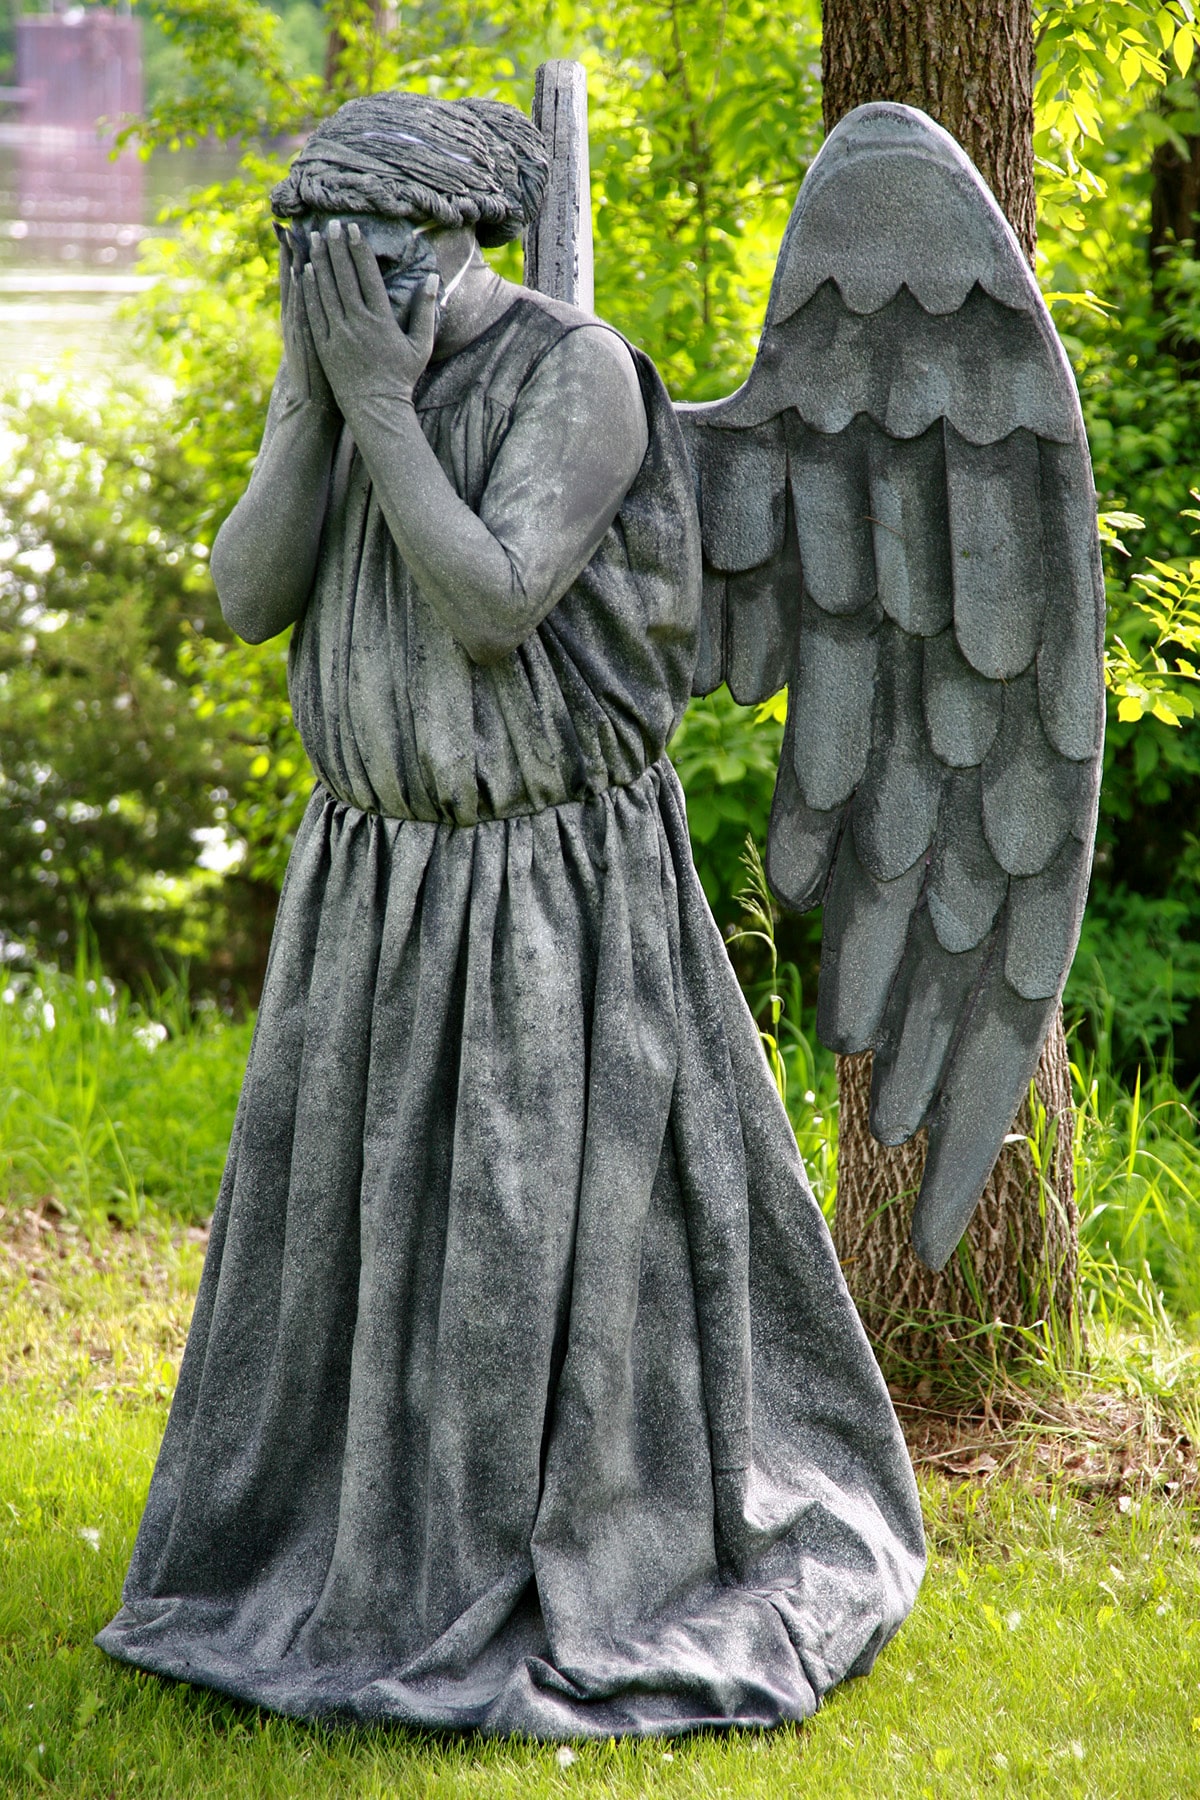
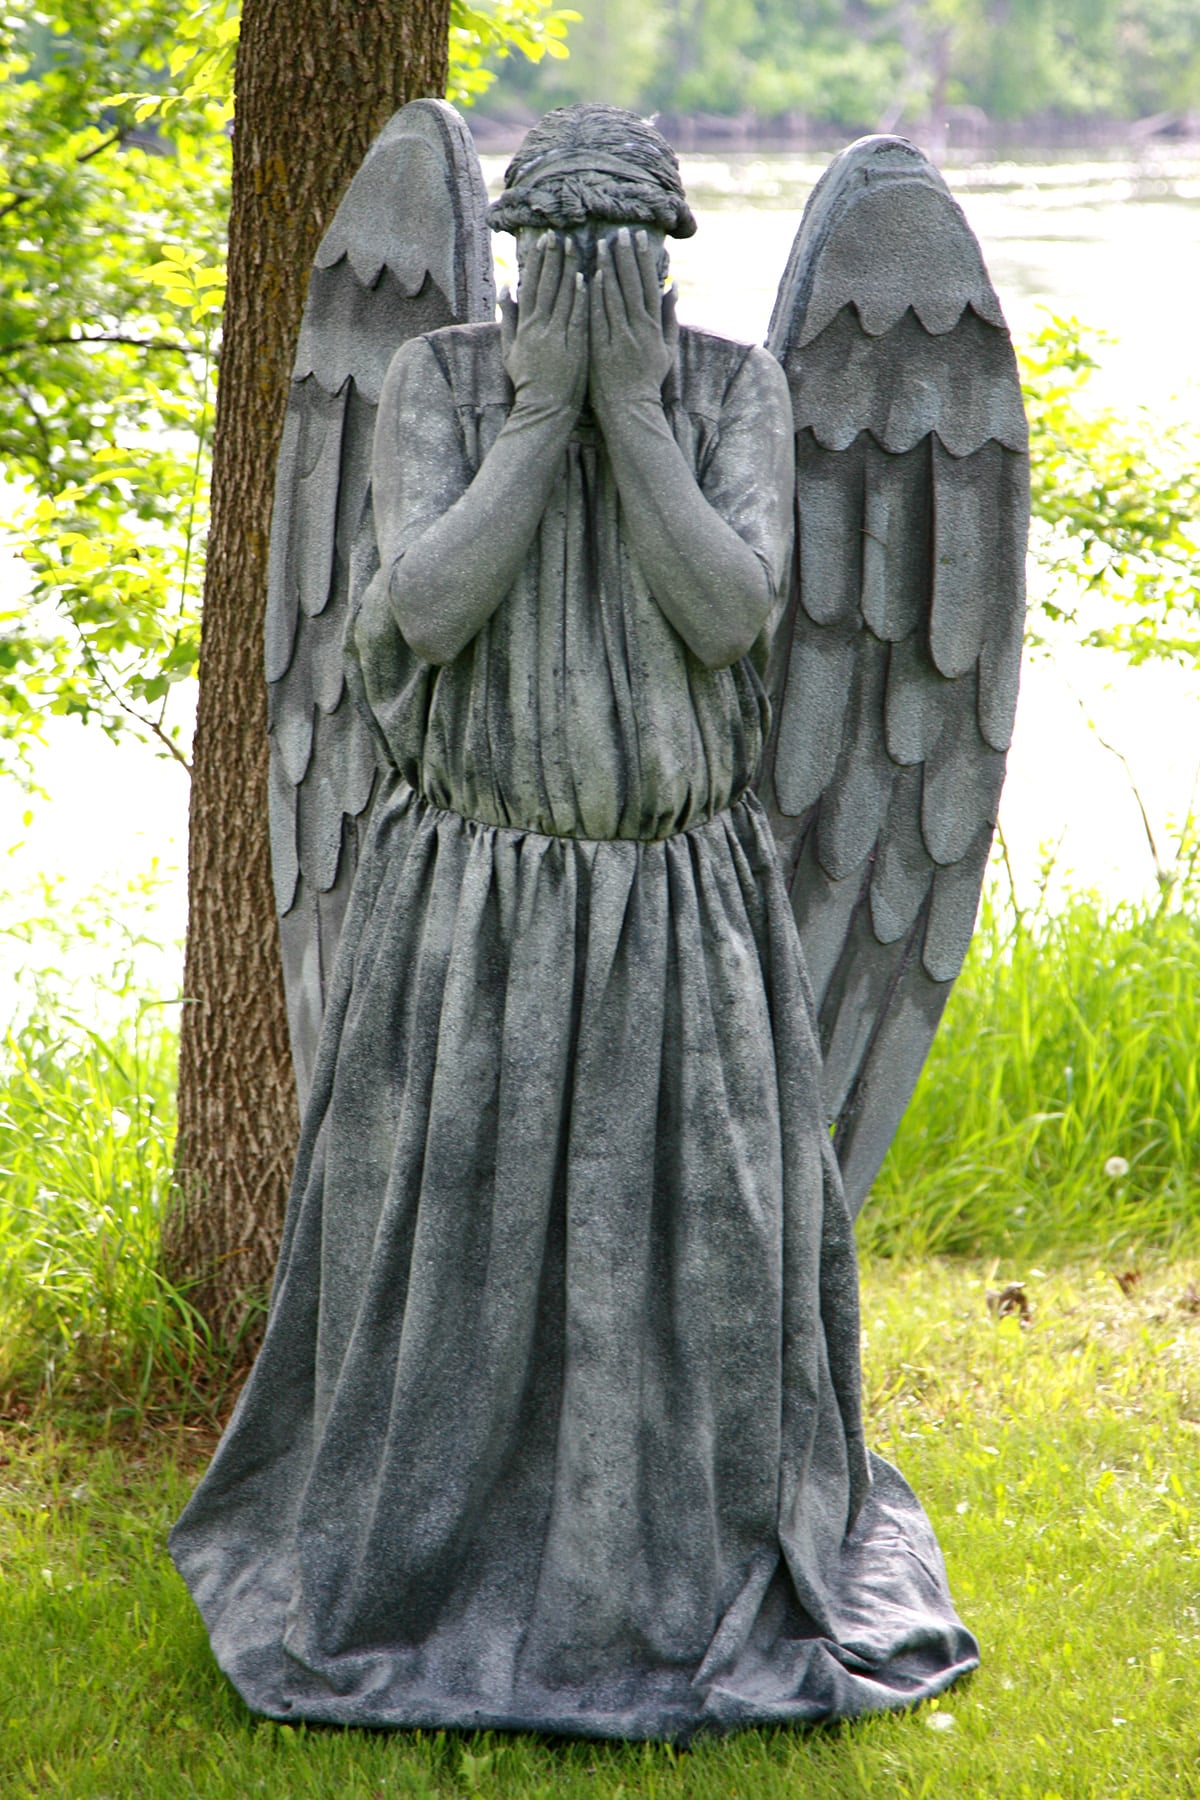
Making Weeping Angel Wings
The wings were the big stress for us this whole time.
We'd looked online and didn't see anything that looked at all comfortable, so we decided to - I'm sorry! - wing it.
What You Need
Rosin Paper
½" Foam Insulation Sheets
Jig Saw - Ideal - or something else to cut the insulation
Sill Plate Insulation
Scissors
¾" Thick Hardwood
Drill
Tube-Style Cable Mounts - to fit the wire.
9 Gauge Galvanized Wire
Woven Nylon Strapping
D Rings
Gorilla Glue
Staple Gun
Foam Insulation Adhesive
Caulking
Grey Primer
Granite Texture Spray
Grey Acrylic Paints - light and dark.
Patterning and Cutting The Wings
After studying "Blink", making notes of wing length/height/etc proportions, we figured out approximately the size we'd want, and I sketched it out on rosin paper
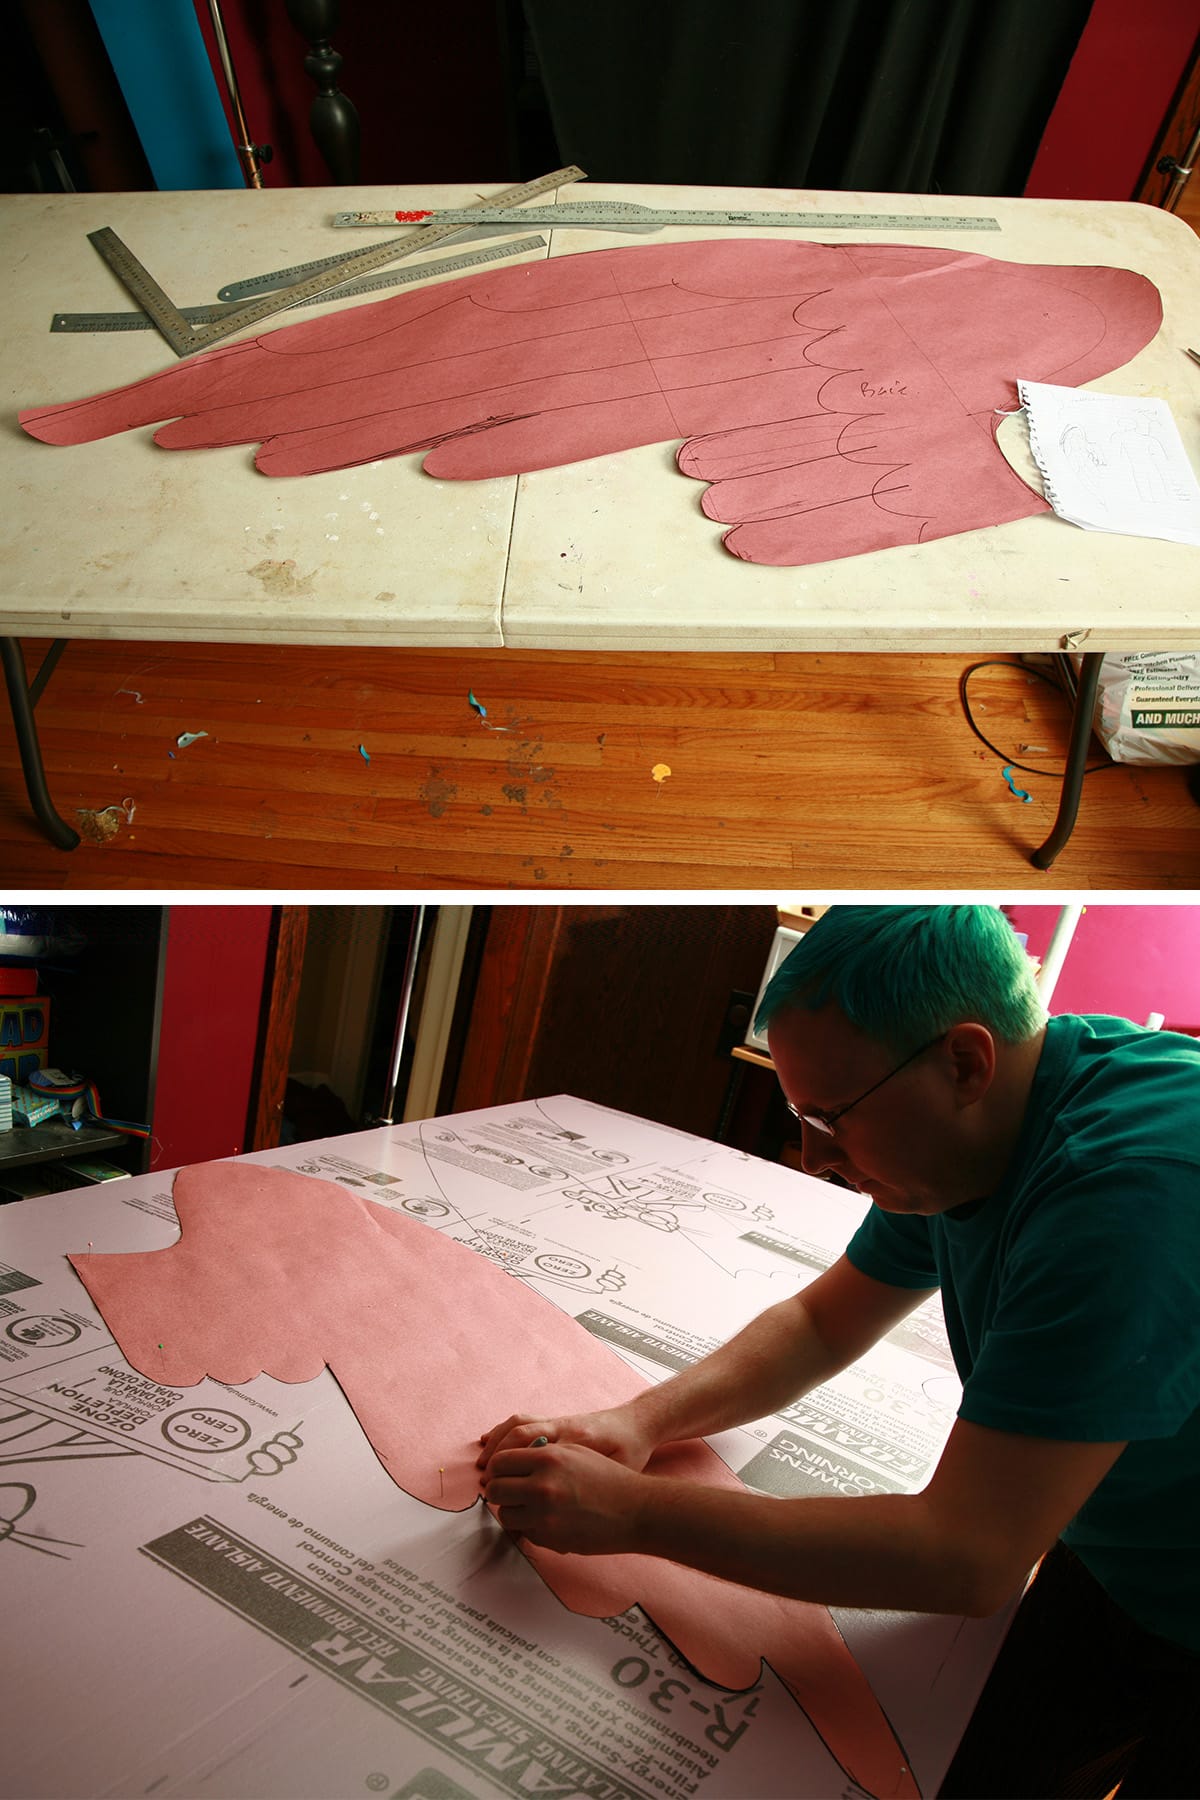
With my custom rosin paper pattern, my husband cut 8 wing pieces out from ½" foam insulation.

Each wing would have one front foam piece, and one back piece.
We cut feathers from sill plate insulation, glued them down with foam adhesive, and then stapled them down for good measure.

Making The Wing Apparatus
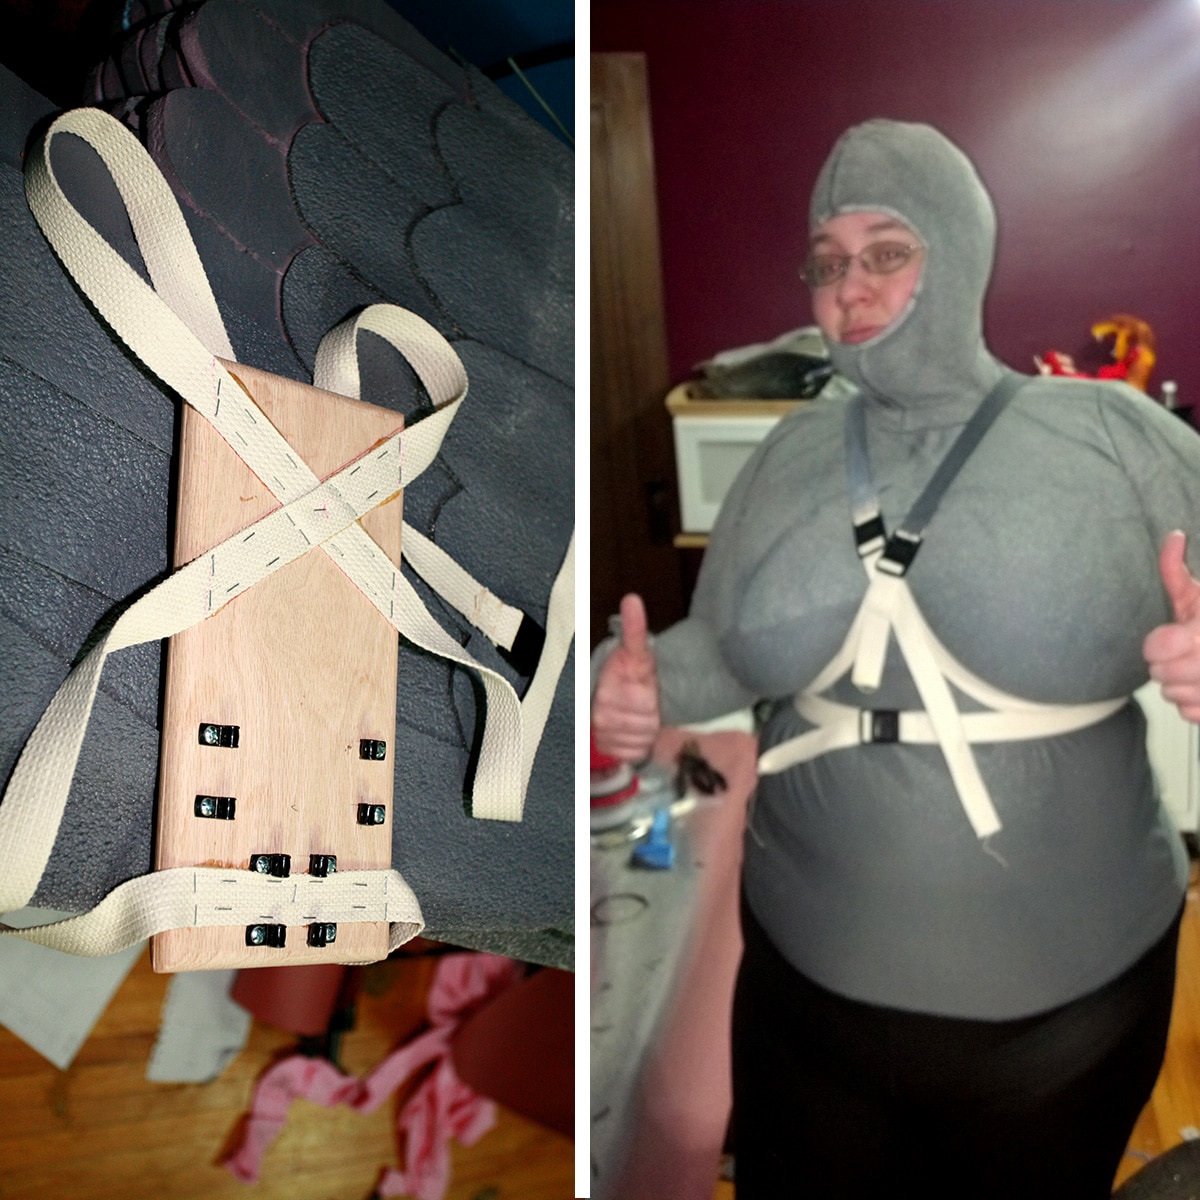
We designed our wing apparatus to be based on a ¾" thick piece of hard wood.
4 holes were drilled on the top edge, going straight down about 6" deep.
Each wing was designed to have 4 ends of wire sticking out: two would be bent to rest in these top holes, and two would slip into the black plastic cable straps that we positioned on the outside of the wood piece, and screwed them down.
Porter took great care to make sure both sides of each apparatus were symmetrical, and that the wires that would come out of the wings were in the appropriate places.
With a diagram ready, Porter had to bend 9 gauge galvanized wire to form the wing supports. (2 pairs of pliers will help get some sharp corners on bending the wire, but your hands will still be sore!)

Each wing ended up with 2 separate wire pieces - one upper piece to go in the top of the wood, and one lower piece to rest in the black cable tie things.


Once everything was bent and fit - and we were SURE everything would go where it was supposed to, we finished the harness:
We bought some strapping, and attached it to the back (outside) of the apparatus using Gorilla Glue and staples, each end sewn to adjustable strap fasteners.
Note: be careful where you staple! If you staple into your drilled holes, you'll have to ream them in order to get the wires in later - we learned the hard way!
D rings were used to secure and adjust the strapping when worn.
Assembling the Wings
The wire was stapled down to one side of the foam wings with 1" narrow crown staples, angled downward into the foam.
After MUCH frustration with staples pulling right out, we started using two staples at each staple point, facing in opposite directions. Problem solved!
Once the wire was completely stapled down, the wings were glued together with foam insulation adhesive and weighted down to dry (we used leftover bathroom tiles as weights).
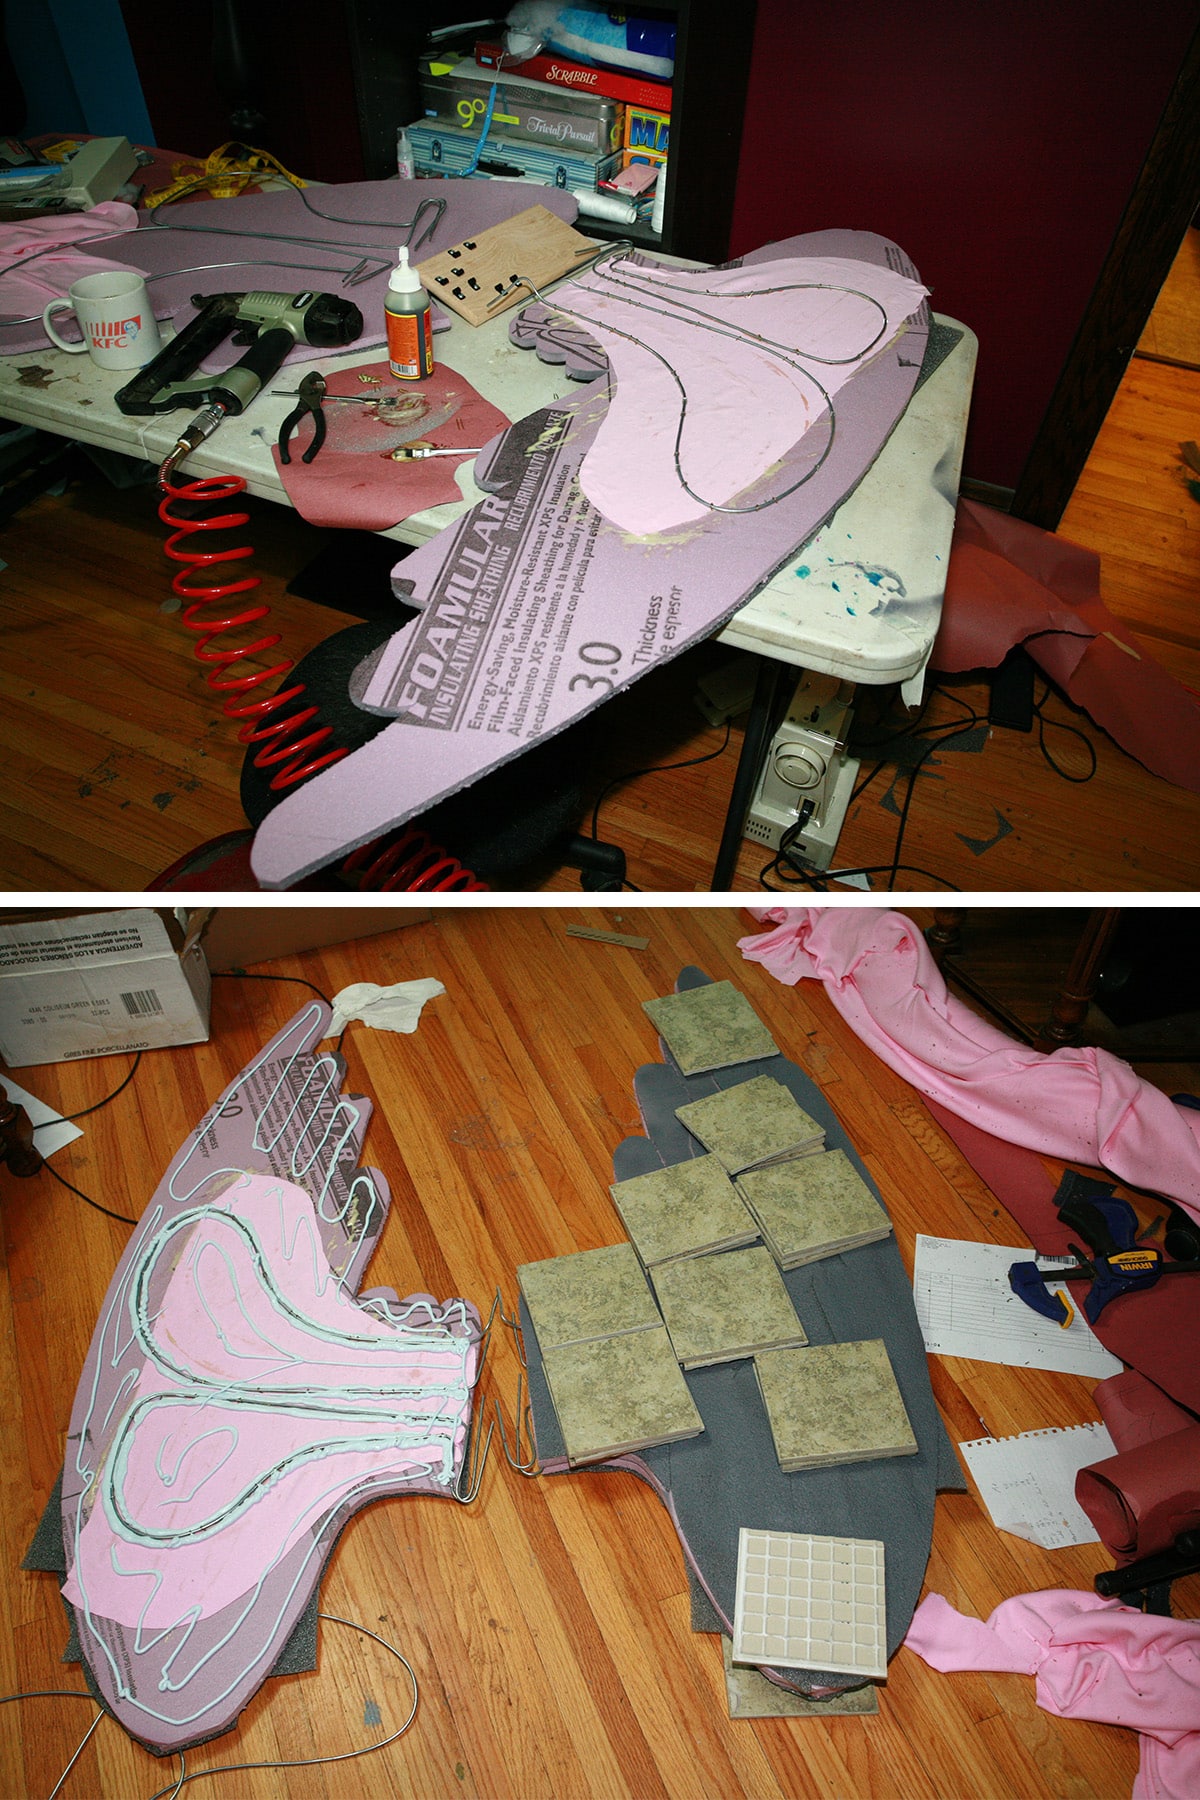
It took quite a bit of adhesive - 4 normal size tubes for two sets of wings.
I don't have a photo for the next step: We filled any spaces between the front/back of each wing with caulking, allowed it to dry, then hand carved all the edges to be rounded.
Once the wings were completely dry, I painted them. First, I coated them with a grey colored spray primer, then with a generous coating of granite texture paint.
Once the texture paint was dry, I felt that it was sort of flat looking, so I mixed some VERY thin, watery dark/ light grey acrylic paint, and sponged on some shadows and highlights.

Getting Into the Weeping Angel Costume
To get the whole thing on, here's what we do, in order:
- Bodysuit (leaving our hands poking out of the wrist holes)
- Apparatus
- Dress
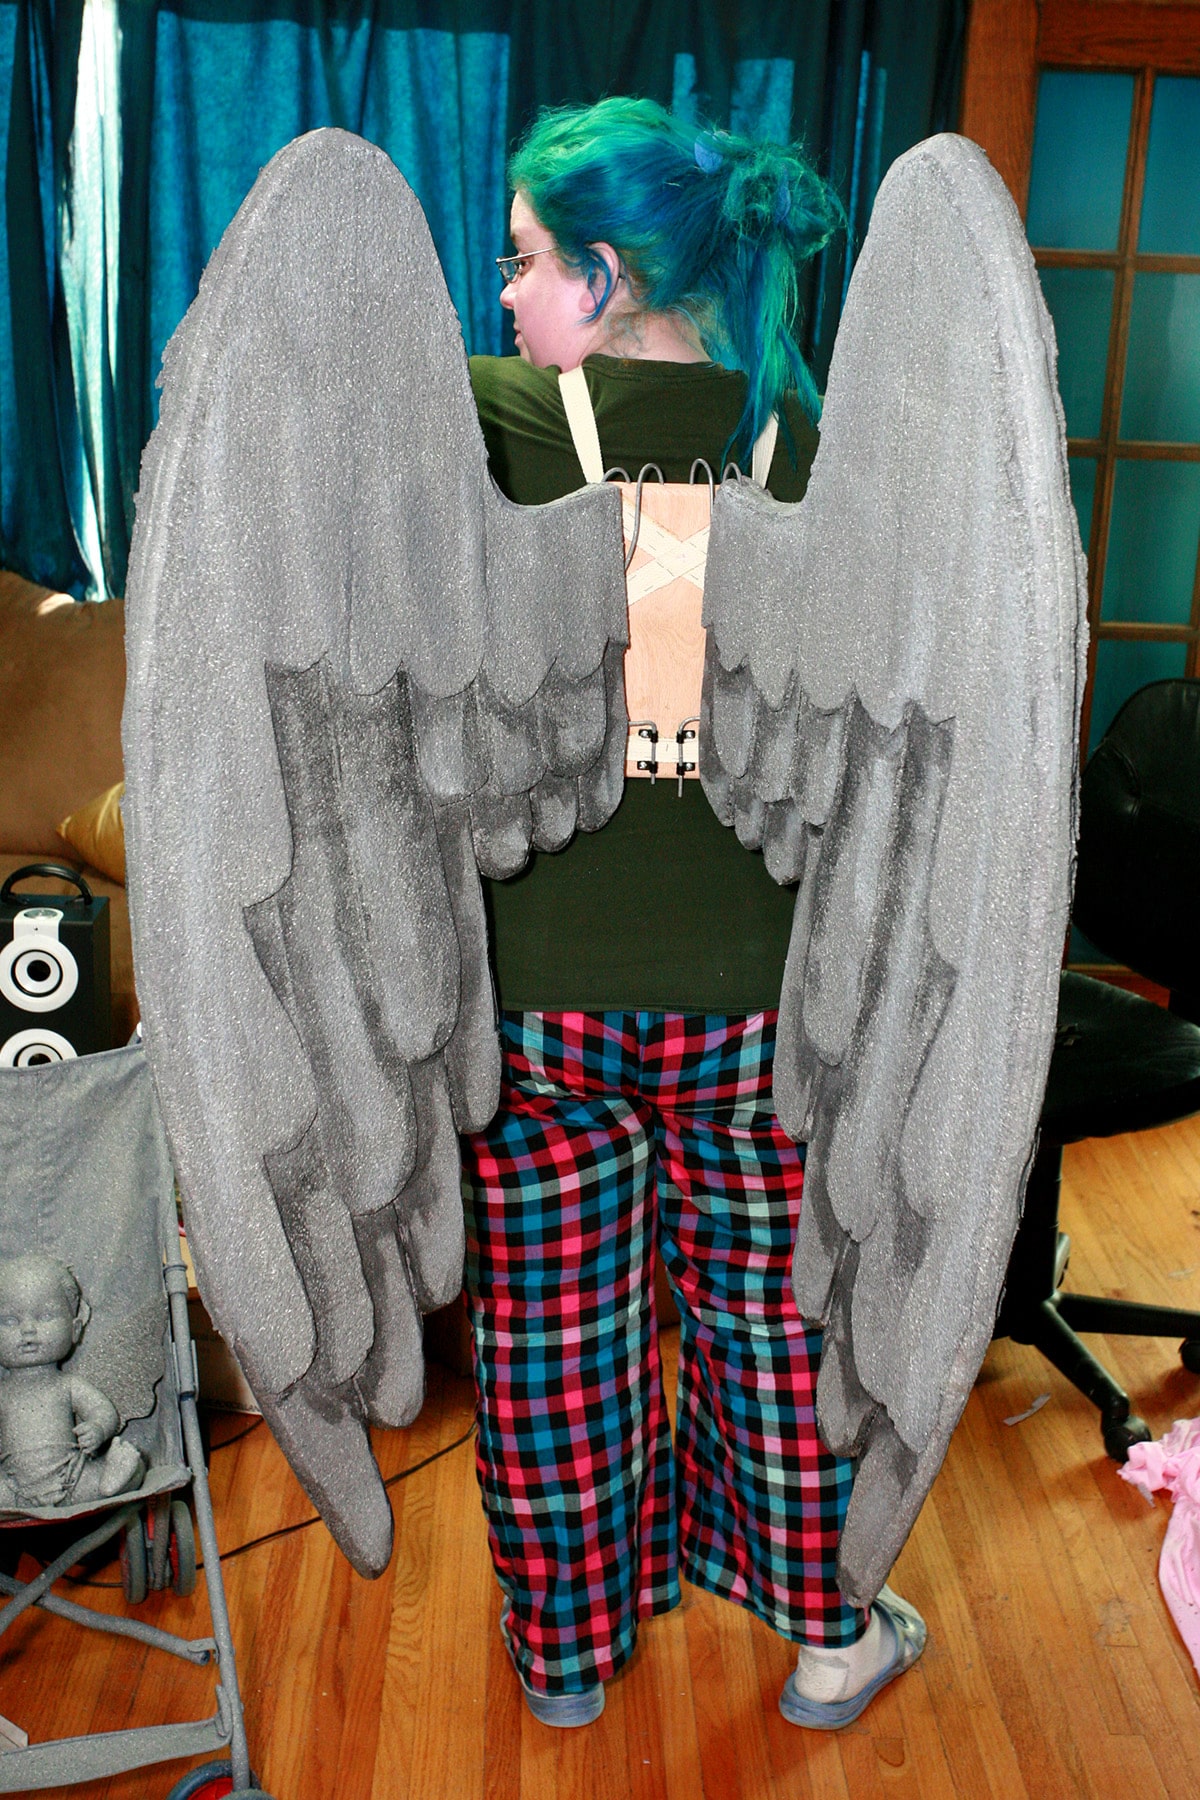
- Wings: Flip the back flap up and over a shoulder, pull the back bodice panels aside to expose the apparatus. Slide the wings in, adjust the back bodice panels to conceal the apparatus, and flip the flap back down - the bottom edge tucks into the waist.
- Mask
- Wig


DONE! They're super easy to get in and out of, so... mission accomplished!
Also, with the wings as light as they are, and the way we designed the apparatus, these are not difficult to wear at all.
My only problem was overheating, but that's just because I don't sweat properly. Porter was able to wear his for hours, no problem!

The Weeping Angel Baby
We wanted to have some fun with the costumes, so we decided that we NEEDED a baby ... and a granite-finished stroller, to match!.
We went to a thrift shop to find a baby doll... and found a really beat-up-looking one that was about the right size.
After washing the doll, I tied the hair back with elastic - as much as I could, it was a bit short to work with - and painted the whole thing with grey acrylic paint.
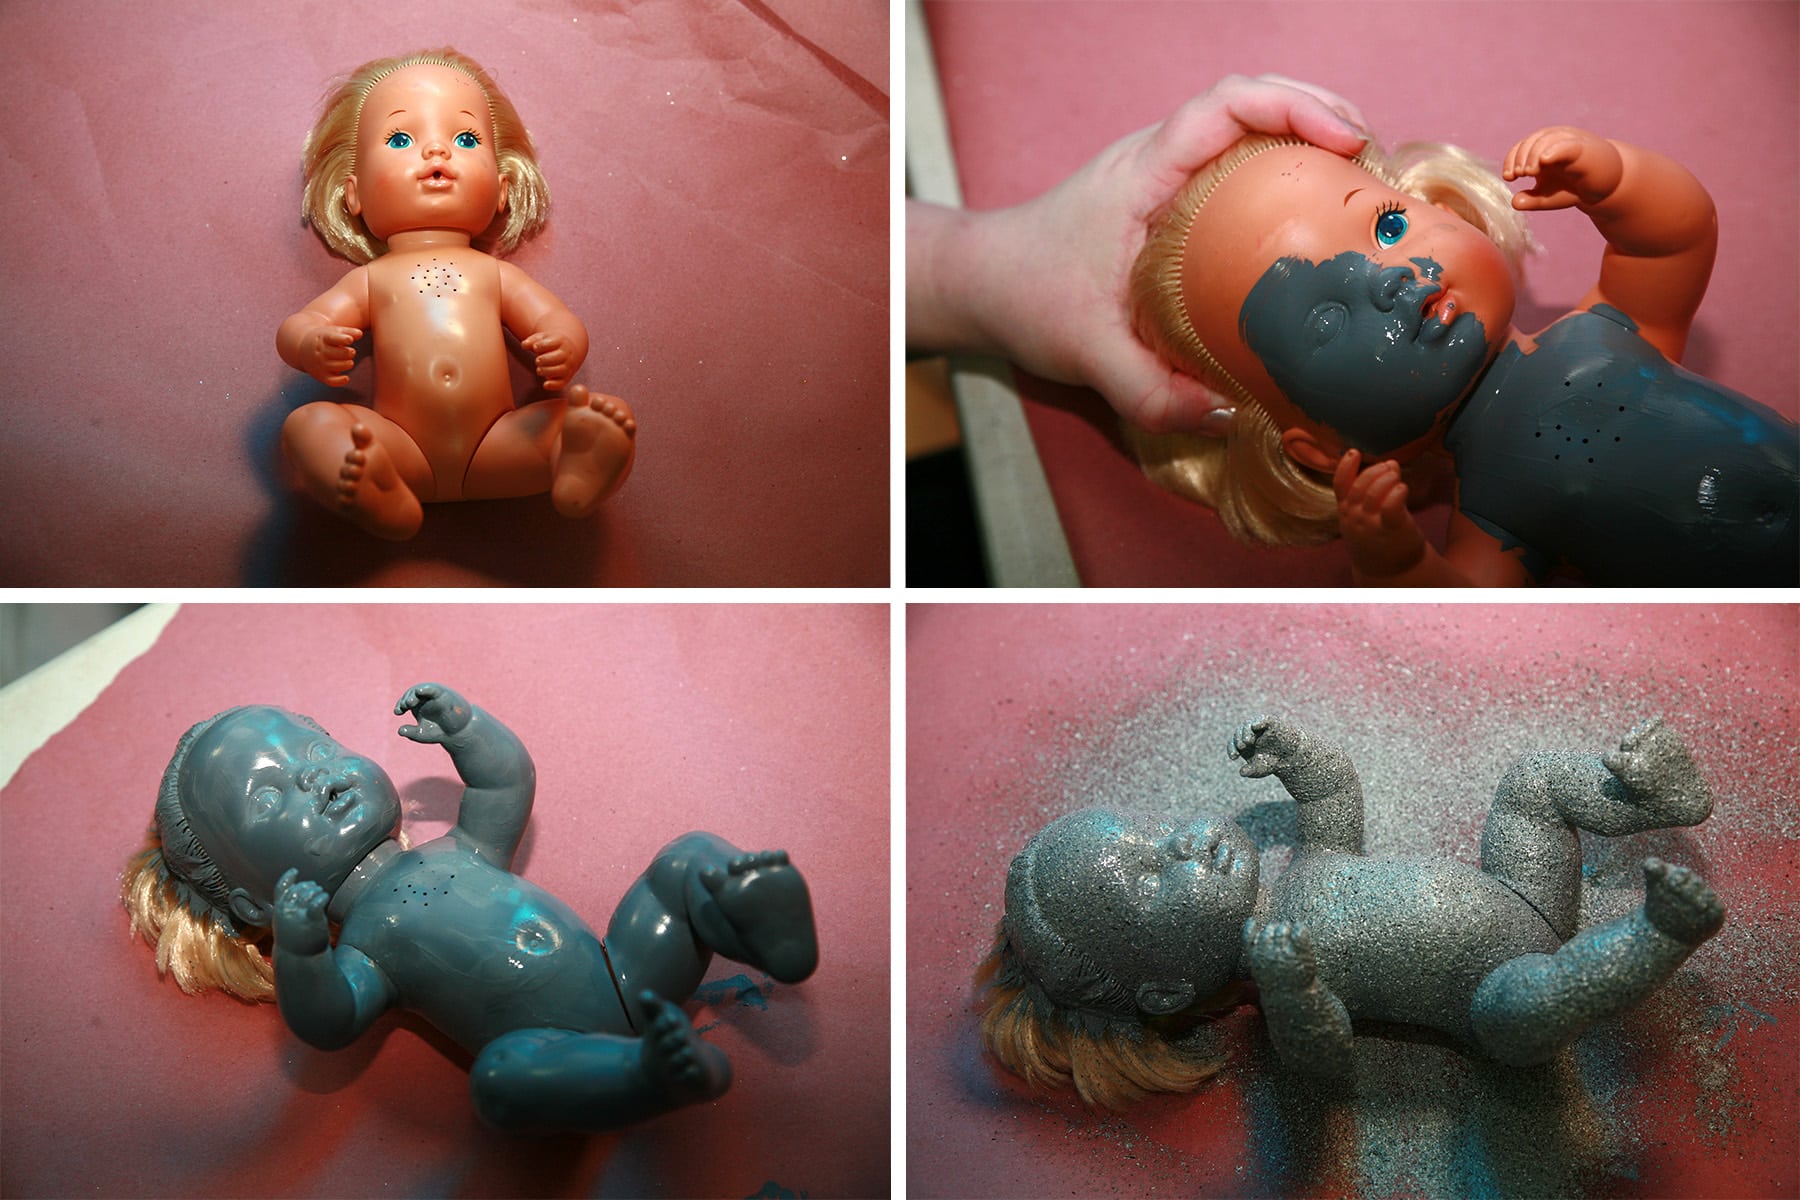
Once the acrylic dried, I gave the doll a generous coat of granite spray. Then I decided that it needed a diaper, so I made one from scraps, sewed it right on, and had to spray THAT!
I finished it off with wings cut out of scraps of the sill plate insulation.

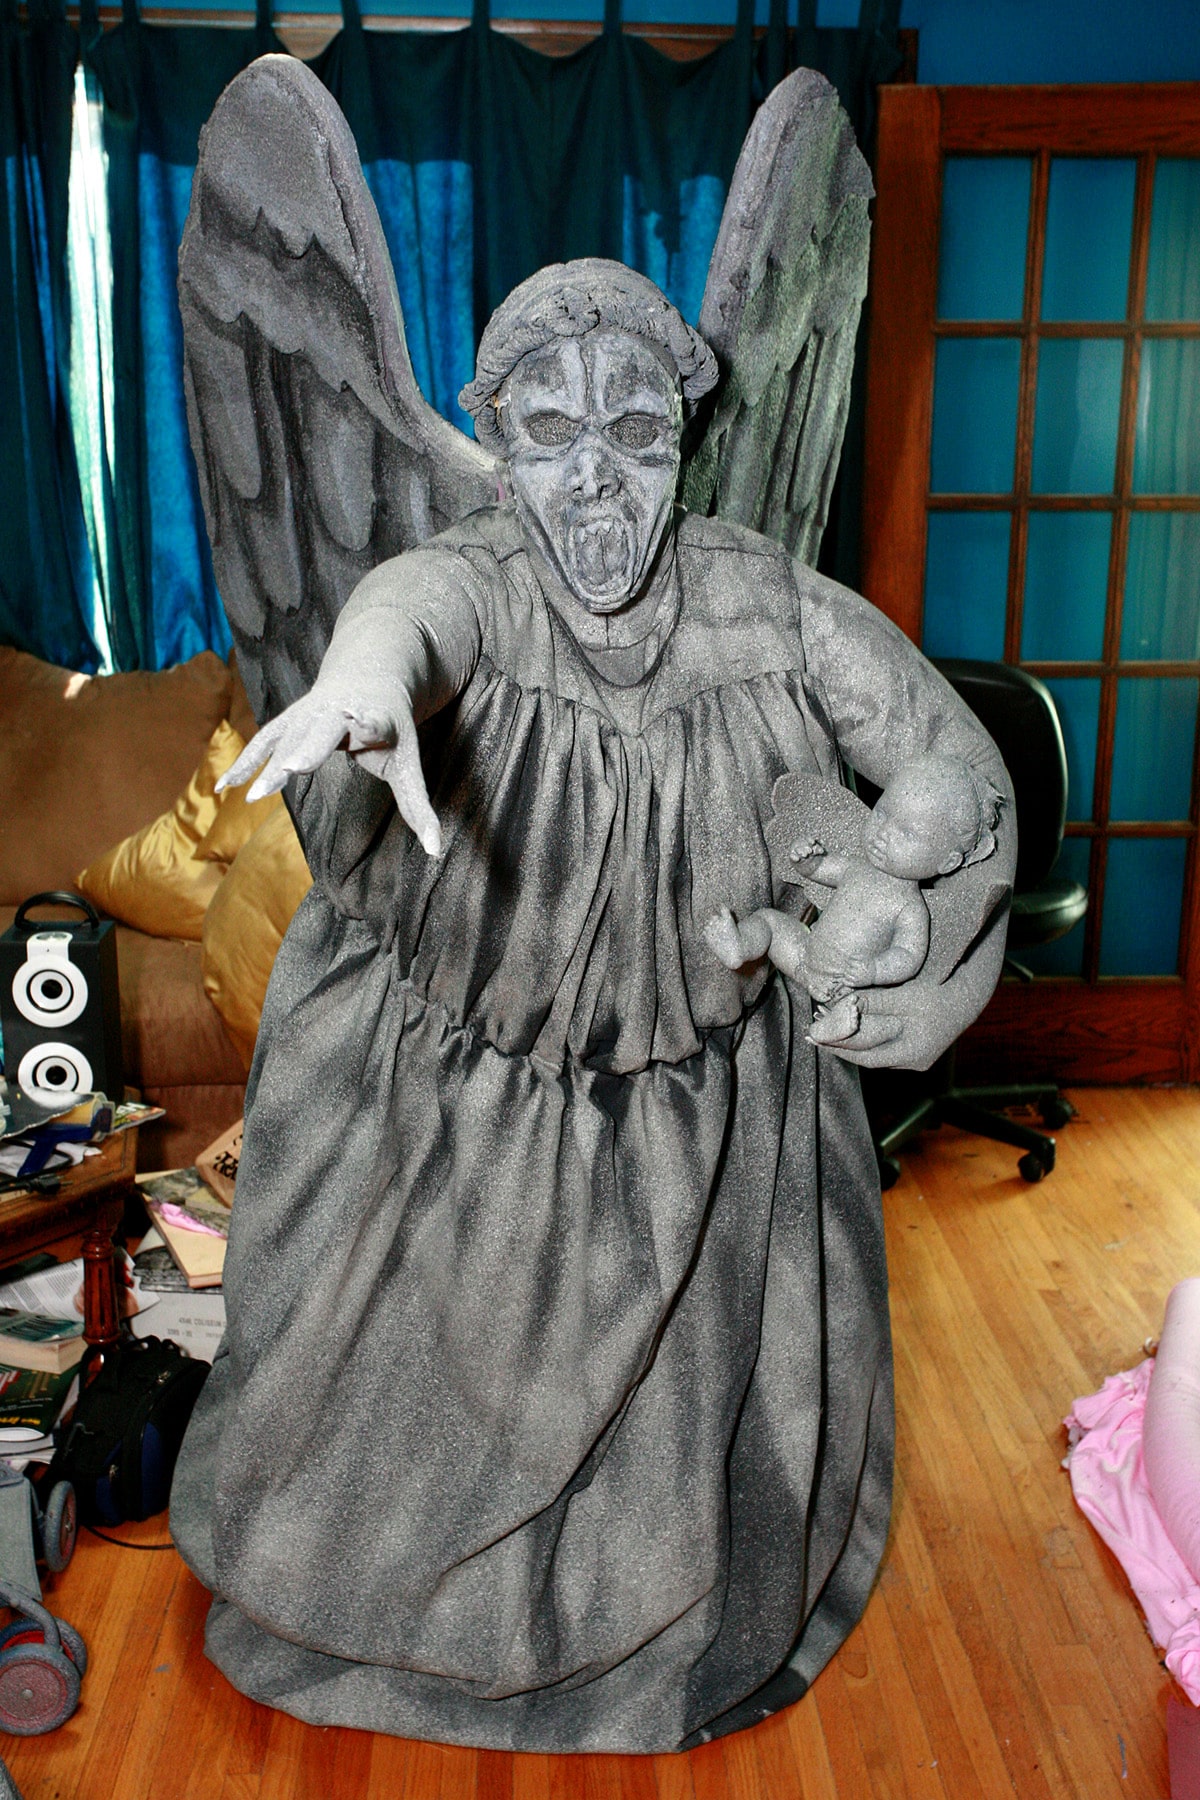
So, that was it! The whole project - costumes, I mean... not the baby! - took a LOOOONG time, and we probably breathed in way more fumes than is at ALL healthy, but I think the final product was worth it all!
Check out the very end of this post for even more photos!
More Cosplay Posts
Looking for more Cosplay tutorials and posts? Here are a few for you:
Cosplay Photography Tips
Katniss Wedding Gown Wings
How I Made the Maleficent Costume
How I Made the MCU Hela Costume
How to Add a Sole to Boot Covers
How to Make Basic Spandex Gloves
How to Make Fancy Spandex Gloves
How to Make Maleficent's Headpiece
How to Make Spandex Boot Covers
Maleficent Staff Tutorial
Poured Latex Smaug Top
Thranduil Crown Tutorial
Triceracop Costume
Share the Love!
Be sure to take some pics of your handiwork! If you post it to Bluesky, be sure to tag us - @SpandexSimplified.
Also, be sure to follow me on Pinterest, and subscribe to my Youtube Channel, so you never miss out on any of my nonsense.
Well, the published nonsense, anyway!


Amazing I cant wait to scare people on Halloween. I'm working on my weeping angel costume and hope it turns out good 🙂
THANK YOU! THANK YOU! THANK YOU!
I have been searching everywhere for a weeping angel tutorial that does not require professional skills! I am actually going to be a bit weird. My prom dress for April 2017 is gray... so guess what... Yes, I am using my prom dress as a weeping angel costume. The wings you made are AMAZING! I'm still unsure if I am going to attempt the mask. I think I am.
I also love the hands. I will be using the wig pattern since I have very short hair.
Thank you so much for this tutorial! I am dressing up for Wholanta 2017 (formally Time Gate Con)
Oh my gosh guys, you totally aced these cosplays! Love the weeping angels! I'm heading to Calgary, Canada Comic Con, and am toying with the idea of doing this! You put a lot of hard work into this! Props to you!! 😀
Hello! How are you?
I'm from Brazil, and I found your website looking for some weeping angels costumes and I thought:" OH MY GOD THIS IS WONDERFUL!"
Really, It's a nice job. I understand everything and now it's possible to me to make that costumes.
Thank you! (Sorry if there's something wrong with the words, my English isn't very good)
Amazing detailed tutorial!! Love the way this turned out. Thanks for sharing!!
Amazing! This tutorial is so well done, with all the photos and explanations. My daughter wants to be a weeping angel next Halloween, and I told her the wings would be the hard part. Then when I saw your design, I was really glad you had so many photos showing exactly how you did it. (and it does look hard, but not impossible.) I was so impressed by all the details - you even put fake nails on your gloves! Thanks for taking the time to document and post, we really appreciate it.
Holy hell! These are amazing. Nice work!
All I can say is, wow.
too awesome! the baby was a really good touch. the hair is perfect too!
I've been (somewhat impatiently) awaiting this blog entry ever since photos started appearing on Facebook.
I can't wait to see all the photos from CONvergence - you guys are going to be a sensation there (as in, people will be asking each other all weekend, in hushed whispers, "Have you seen the angels yet?").