

Sewing spandex can be intimidating, but it's really easy - it's all technique! Here, I show how to sew spandex. with or without a serger.
This tutorial is excerpted from The “Spandex Simplified” line of books by Marie Porter, as well as "Sewing for Skaters and Gymnasts and Dancers... Oh My. All photos, & accompanying tutorial are copyright @ 2000 - Marie Porter, all rights reserved.

This may seem like a lot of information, but I PROMISE the technique is really easy to do, once you know what's up!
Note: There is a video demonstration at the end of the post showing the actual technique, but it doesn't contain most of the other relevant into that is written into this post.
Another Note: This post covers seams, if you're looking to hem spandex, see How to Hem Spandex.
Supplies to Sew Spandex
Before starting on the actual sewing of your spandex project, you’ll want to have a few supplies on hand:
Sewing Machine Needles

Make sure that the needle in your sewing machine - or serger - is a stretch sewing needle, suited to either light, medium, or heavy weight knits, depending on what you are using - and have extras on hand.
For reference, regular spandex is a medium, illusion is a light, and stretch velvet is either a medium or heavy weight.
I tend to use the Schmetz Stretch Sewing Needles, as they're the easiest to find. That's important, as I go through a LOT of needles!
Be sure to change your needles out regularly - as they dull, they won't work as well. Also, they will bend over time, which will screw with your stitching.
Thread
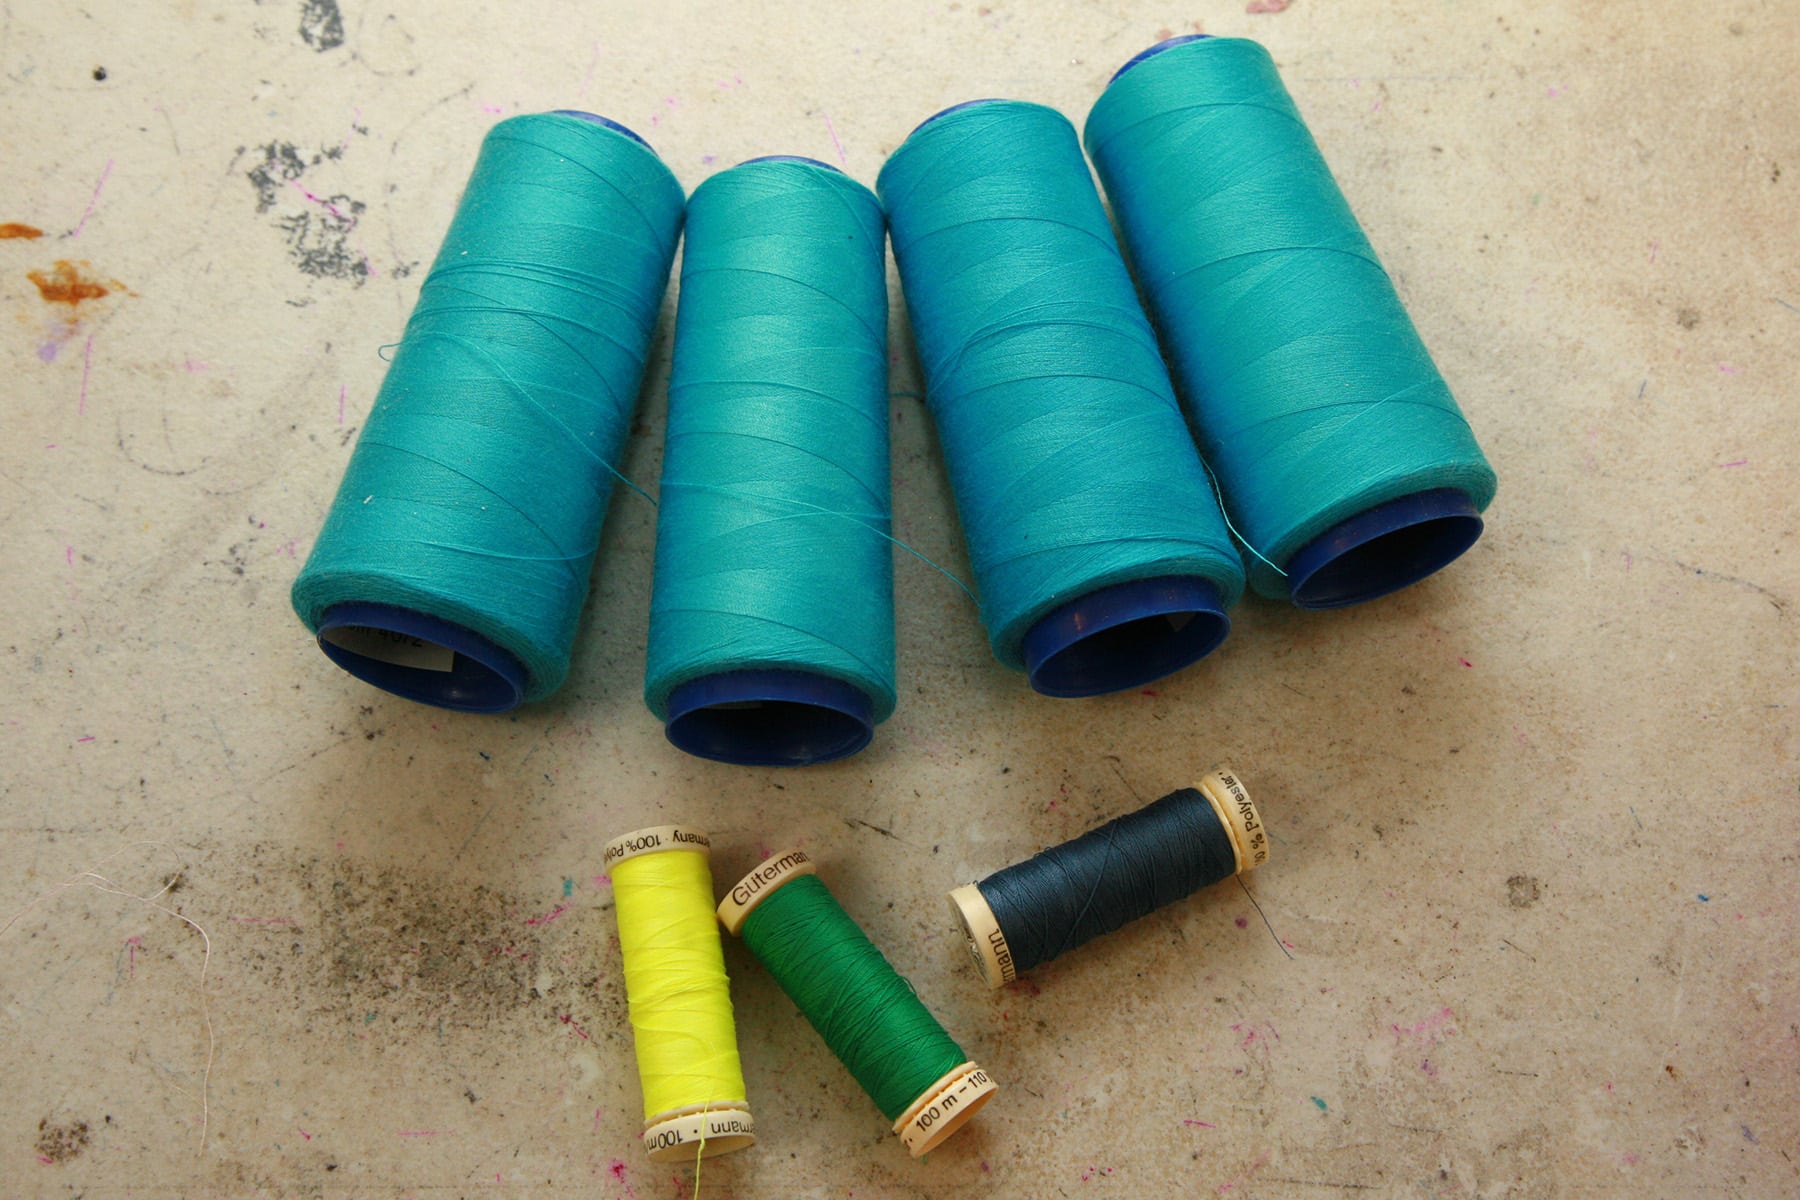
For sewing spandex, I highly recommend using a polyester thread, rather than a cotton one.
As far as brand goes, I prefer the Gutterman and Mettler brands for sewing with spandex... but that’ll largely be a matter of personal preference.
If you’re using a serger, you don’t need any special thread, just normal cones of polyester serger thread work fine.
There are some hems that work a little better with wooly nylon thread (more on that in a future post), but it’s definitely not a requirement across the board.
Use what is handy, and a decent colour for what you’re sewing!
On that note...
Thread Colour Selection
What colour thread you use depends on a few things. A few guidelines that I use:
- I sew all structural seams (sides, center back, shoulders) start to finish, with no break in the seam. I will sometimes come back and add a seam to camouflage a structural seam - more on that in a minute.
- Generally speaking, if there is any mesh involved at all on in a structural seam, I will sew all of the seams that have mesh with that particular colour thread.
- If the suit is a solid colour - no mesh - I will sew the seams with that colour.
- If the suit is solid spandex, but in various colours, I’ll sew the side seams to match the either the lightest colour of spandex used, or something in the mid range - it’s a judgment call.
Once you’ve sewn the side seams, flip the suit right side out, and examine the seams.
If the seam is really obvious due to the colours used, you’ll want to go over sections of seam with a plain straight stitch, in a more appropriate colour.
For example: The main part of the suit is black, but beige mesh was used in some parts, so the seams were sewn in white/beige. When opened up, the white/beige could show up in between sections of black.
Should this happen, simply use a regular sewing machine to stitch a straight seam - in a more appropriate colour - in the sections that need it.
Stay stitch on either side of the new seam - stretching as you go - and keep it very close to the original seam - just slightly further away from the garment edge.
When it comes to multiple colours - beige mesh excluded - on elasticized suit openings, exercise your
best judgment when it comes to top stitching.
If you have several colours that are “close enough”, I wouldn’t bother changing the colour of thread as you zig zag the elastic seam over.
For instance, if you have hot pink and a bright orange, no one will see the hot pink thread against the orange from more than a foot away.
Always finish elastic seams in meshed areas with thread to match the mesh. You really want these sections to disappear against the skin as much as possible.
Note: you’ll notice that the thread colour selections in the photos throughout this blog will not necessarily match what is being said here. In the interest of showing the stitches/ techniques, we have elected to use wildly inappropriate thread colour choices!
For thread colour, ignore the photos, and follow the stated recommendations instead!
Sharp Scissors
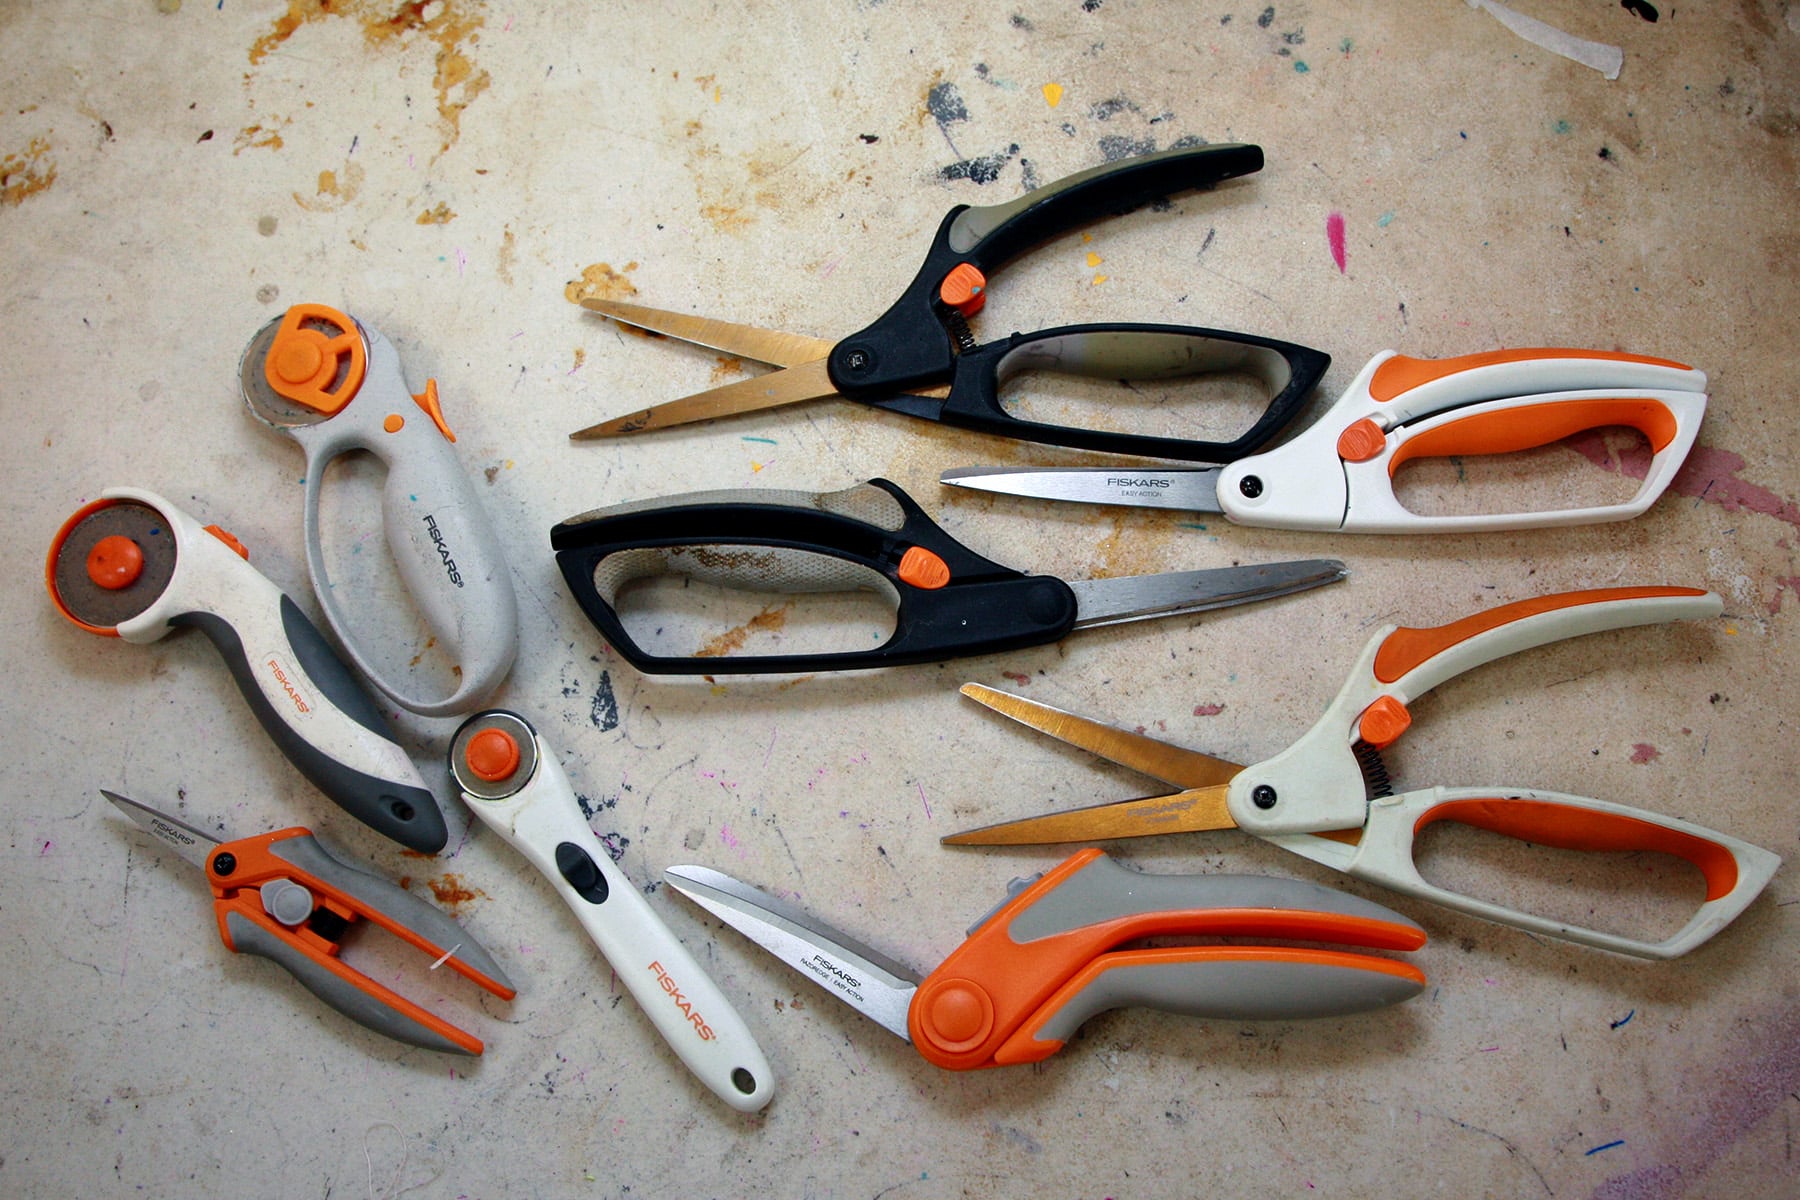
Make sure that you have a good, sharp pair of scissors.
Dull scissors may pull your pieces out of shape as you are cutting, causing a distorted shape. Rotary cutters can be good for some uses in spandex costuming, but you’ll definitely want a good sharp pair of scissors.
Personally, I love Fiskar scissors - the spring loaded "Easy Action" scissors, especially.
Long hours of cutting fabric can be hard on the hands, the spring really takes a lot of stress off the hand!
I also like to keep a couple pairs of the 5" little spring loaded snips on hand, with one near each machine for trimming threads.
Finally, I keep a few of the Fiskars rotary cutters on hand. I don't use them as often as the scissors, but they definitely come in hand for freehanding applique at times.
The cutter with the smaller diameter is great for freestyling hotrod flames, as an example.
Teflon Foot
This suggestion is optional, but is a nice thing to have when you’re working with certain finishes of spandex.
If you are using the metallic / foil spandex, you might want a Teflon foot on your machine. See my post on How to Applique Spandex for more details on that.
If you are buying one, be sure to buy a Teflon Foot that is compatible with your model of sewing machine.
Sewing Spandex
Technique is EVERYTHING!

When sewing any seam on spandex - with any type of machine - hold the two pieces together, with the right sides facing each other (some exceptions apply - such as with sewing Spandex Applique).
Before you start sewing, stretch the fabric. I hold the fabric in two places: my left hand is holding on to the garment BEHIND the sewing machine, the right hand is holding on to it in front of the machine.
Stretch the fabric in both directions (both pulling away from the machine), and hold it steady.

Before and after stretching a section of fabric to its limit. HOLD THIS the whole time you sew the section.
You do not want to jerk the fabric, let go of your tension, or pull the fabric away from the machine in only one direction. If you do any of these, you run the risk of breaking the needle.
Just stretch the fabric, and hold that degree of stretch throughout the seam.

Anyway, holding your edges together, sew along the side of fabric. I find the right side of the presser foot to be a great guide for seam allowances, on both traditional machines and sergers.
If you MUST release the stretch at any point, stop the machine first. Adjust as needed and stretch - and HOLD - before starting the machine up again.
You don’t want to pull the fabric out from under the needle at all, just feed a tautly stretched span of fabric
through.
A bit of a gory warning here:
One time when I was in my early teens, I was sewing something ... and I guess I pulled the fabric too hard.
The needle snapped in half. One side of the needle stayed in the machine, the other was still attached to the thread.
Unfortunately, a third tiny piece decided to lodge itself into my eyeball. Having a doctor hunched over you, using a Q Tip to try and dislodge a tiny piece of metal out of your eye is NOT a pleasant experience.
Needless to say, I can’t see myself ever being able to wear contacts. The idea grosses me right out. Maintain your stretch!

Sewing Machines for Sewing Spandex
Main body seams can be done in one of two ways: with a regular sewing machine, and with a serger.
Whichever machine you choose, you’ll want to follow the stretching technique described above, as you feed the fabric through.
No matter what kind of machine you will be using, you will need to figure out your stitch options in order to get maximum amount of stretch in your seams.
Be sure to practice on scrap pieces of fabric, stretching all practice seams - hard! - to make sure that they are durable.
Seams should be more or less flat (some fabrics may ruffle slightly, and normal sewing machine seams will have more ruffle than sergers), and threads should not be puckering the fabric, or loopy on one side.
How to Sew Spandex Without a Serger
First off - sergers may be great for sewing spandex, but if you don’t have one, no worries - a regular sewing machine will work just fine, with the right technique.
Now, there are several different stitches you can choose to use.
Your sewing machine might have a stretch stitch option, you may use a very narrow zig-zag, or a straight seam, among other possibilities.
Different machines have different options, and it’s all a matter of personal taste. I tend to use a plain straight seam, stretched... so that’s what I’ll be discussing here. I find it to be the best option, all around.
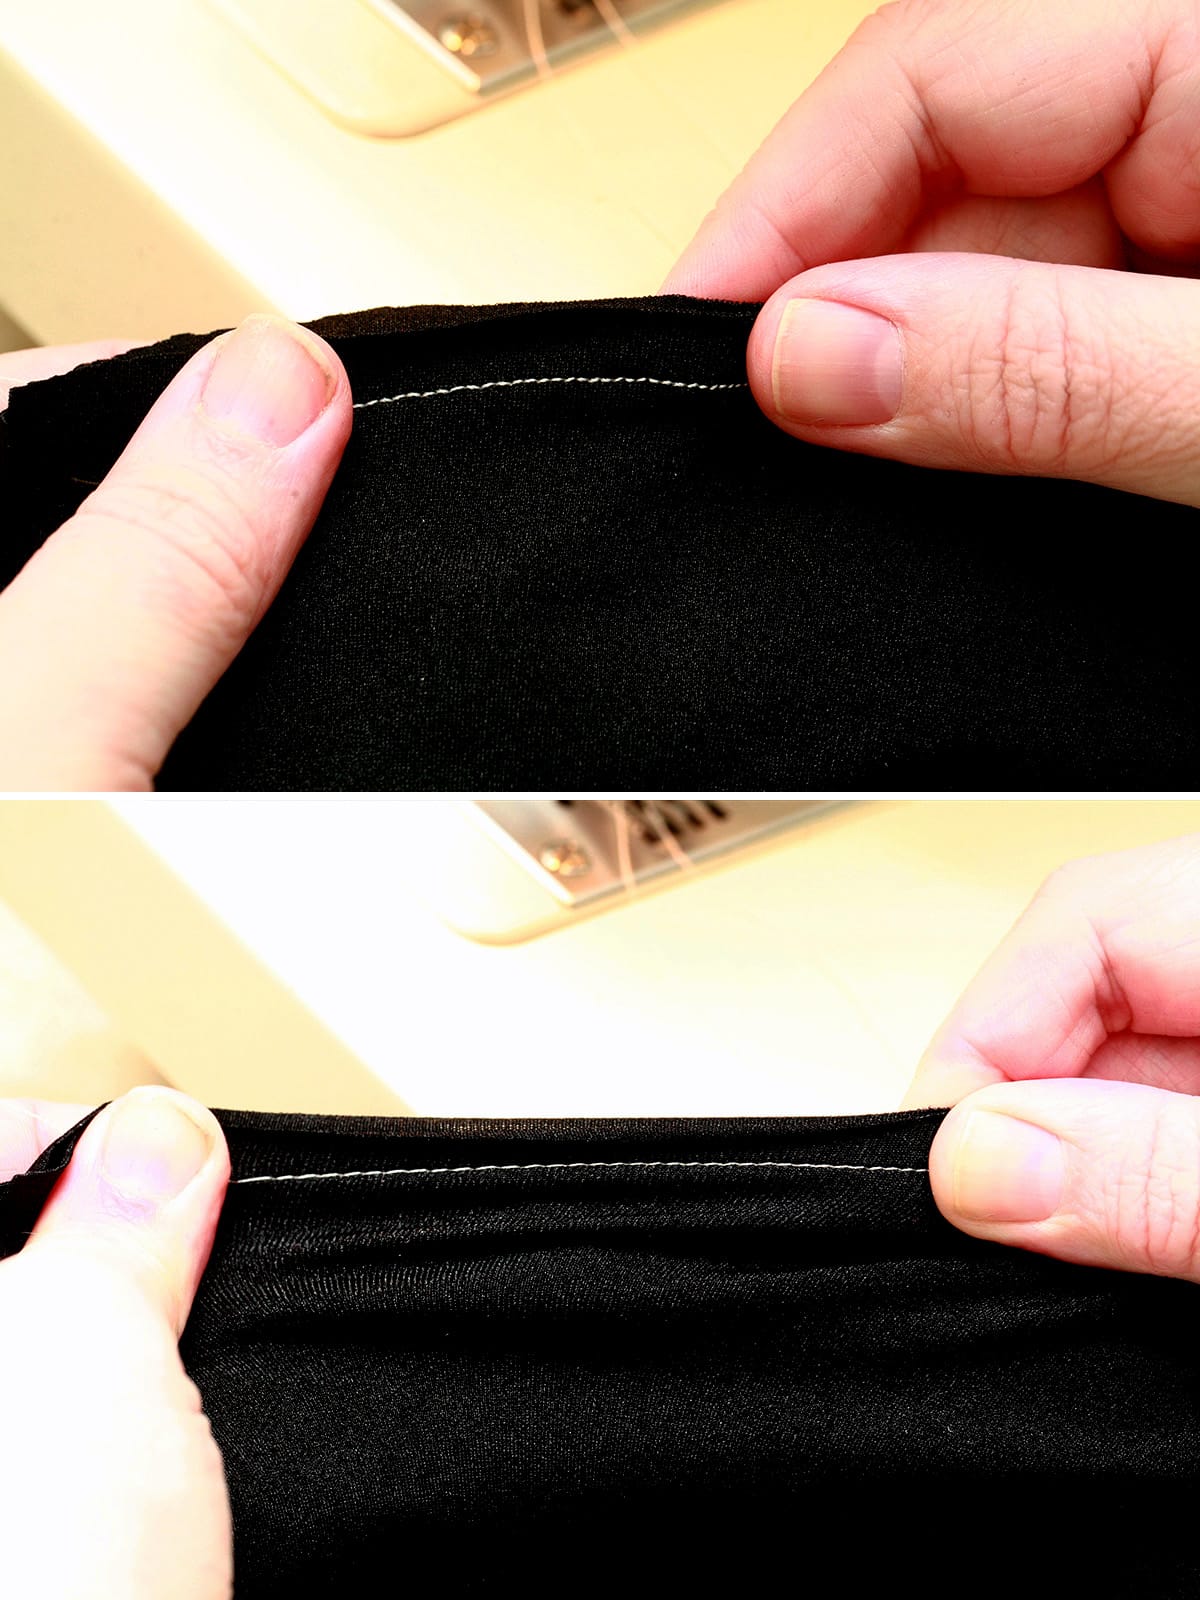
Stitch Settings: Go for a relatively short stitch. A longer stitch will be loose and loopy, when you stop stretching it.
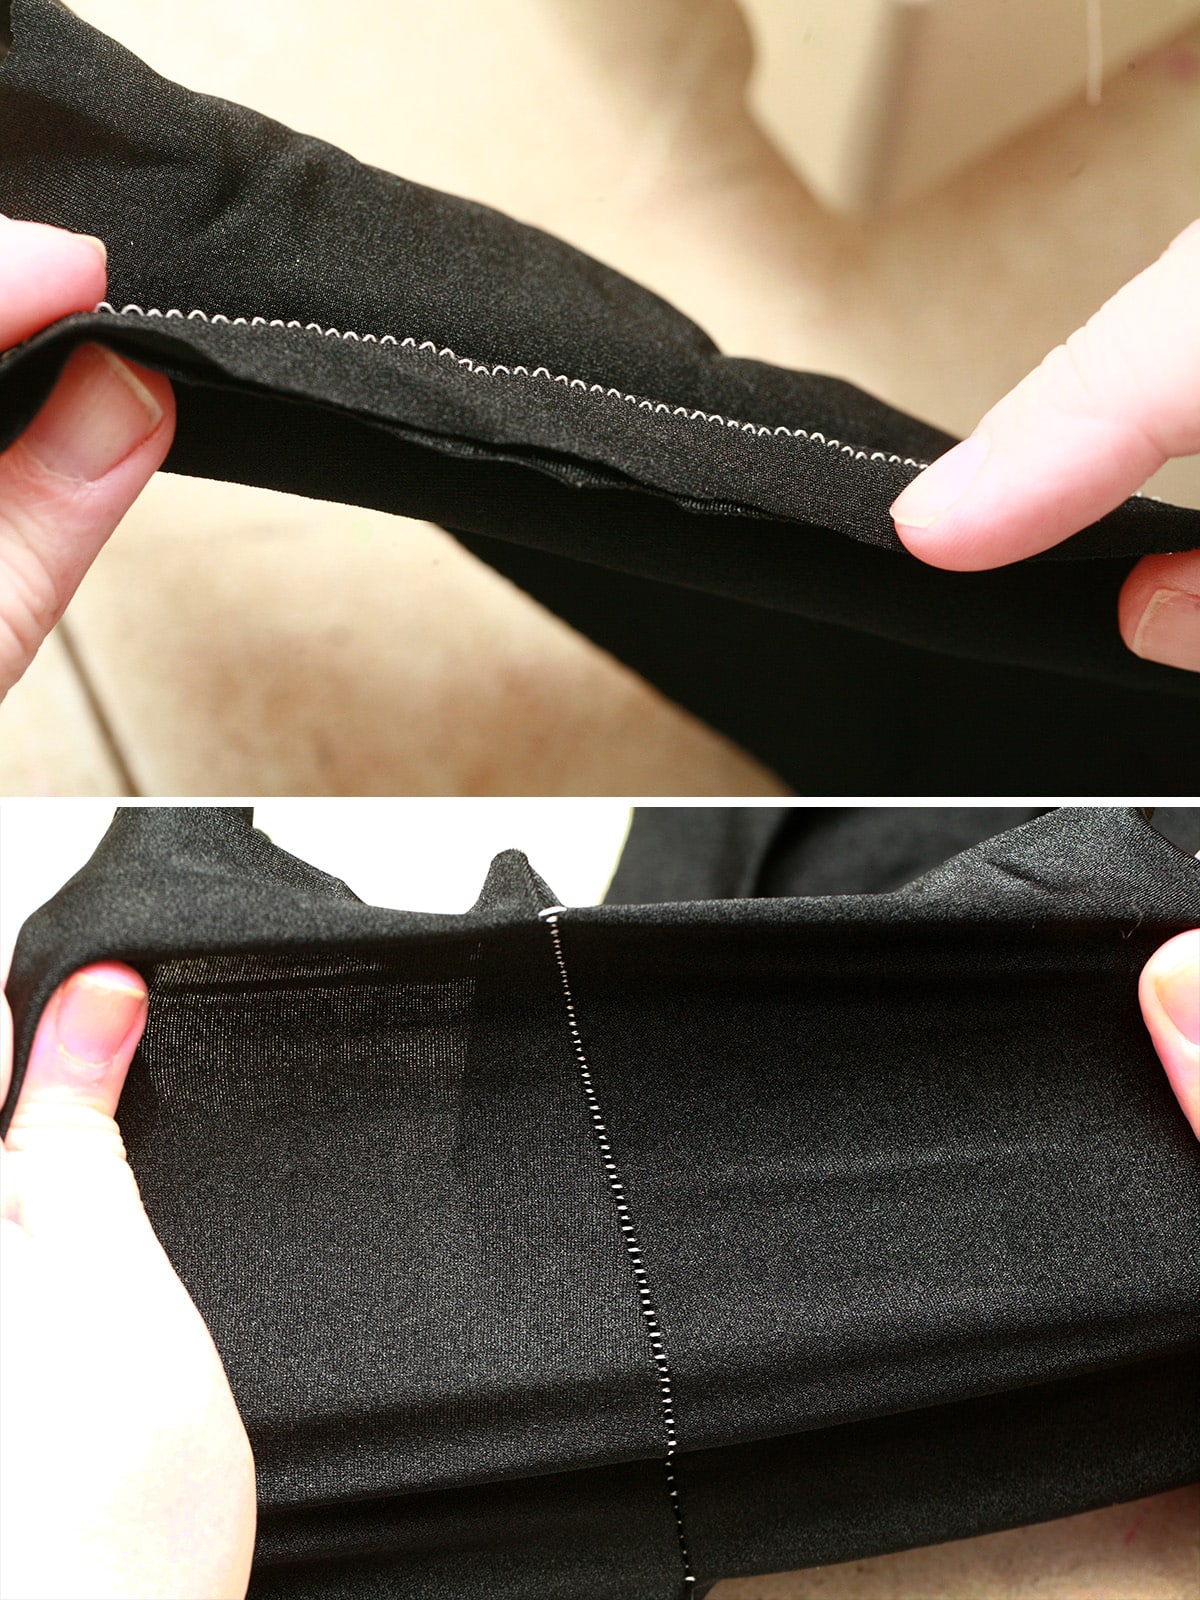
This is what a seam looks like when you use too long of a straight stitch - excessive looping, and a seam that looks loose from the right side of the garment.
At the starting point of your seam, sew a few stitches, then hit the reverse function and back over them. This acts as an anchor.
Stretch the fabric as described above, and sew the seam.

The difference between a seam sewn with a short-ish stitch (above), and one that's too long (below).
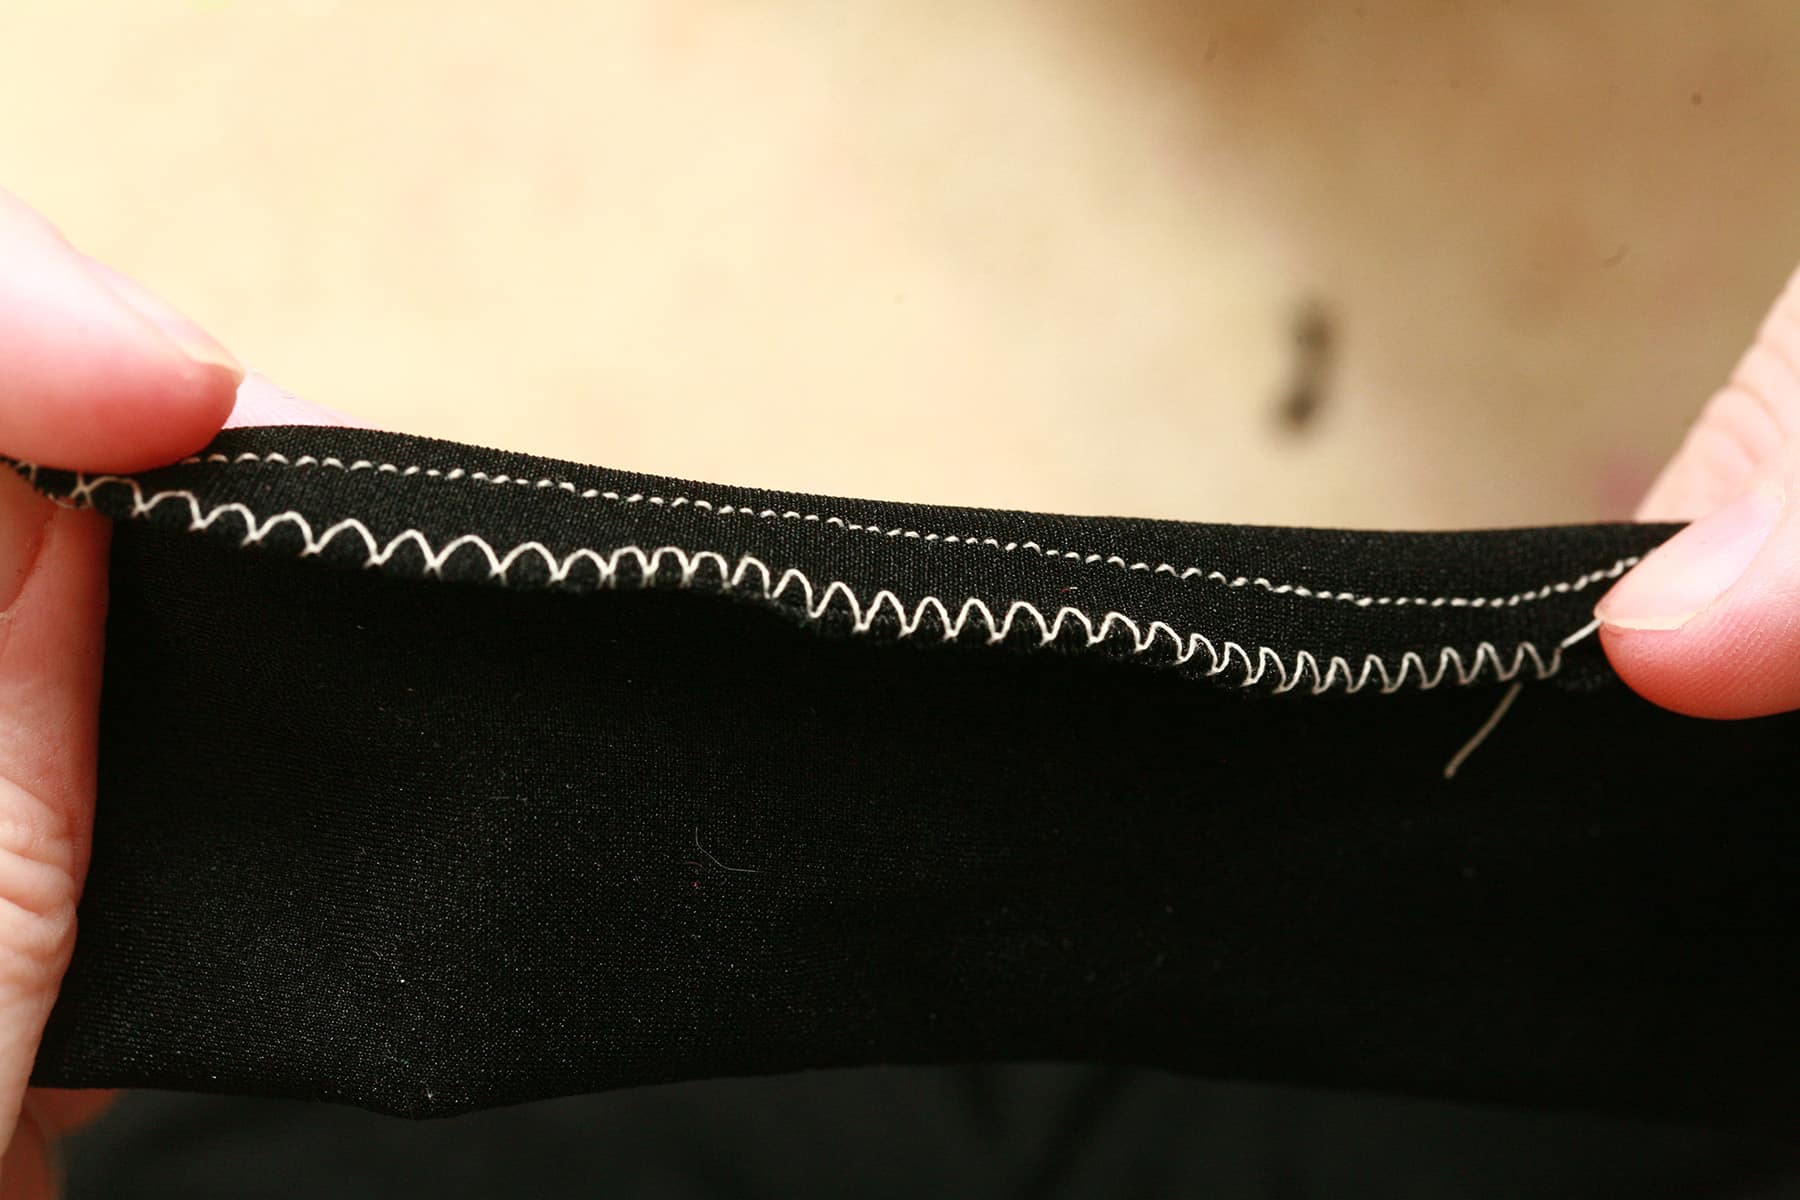
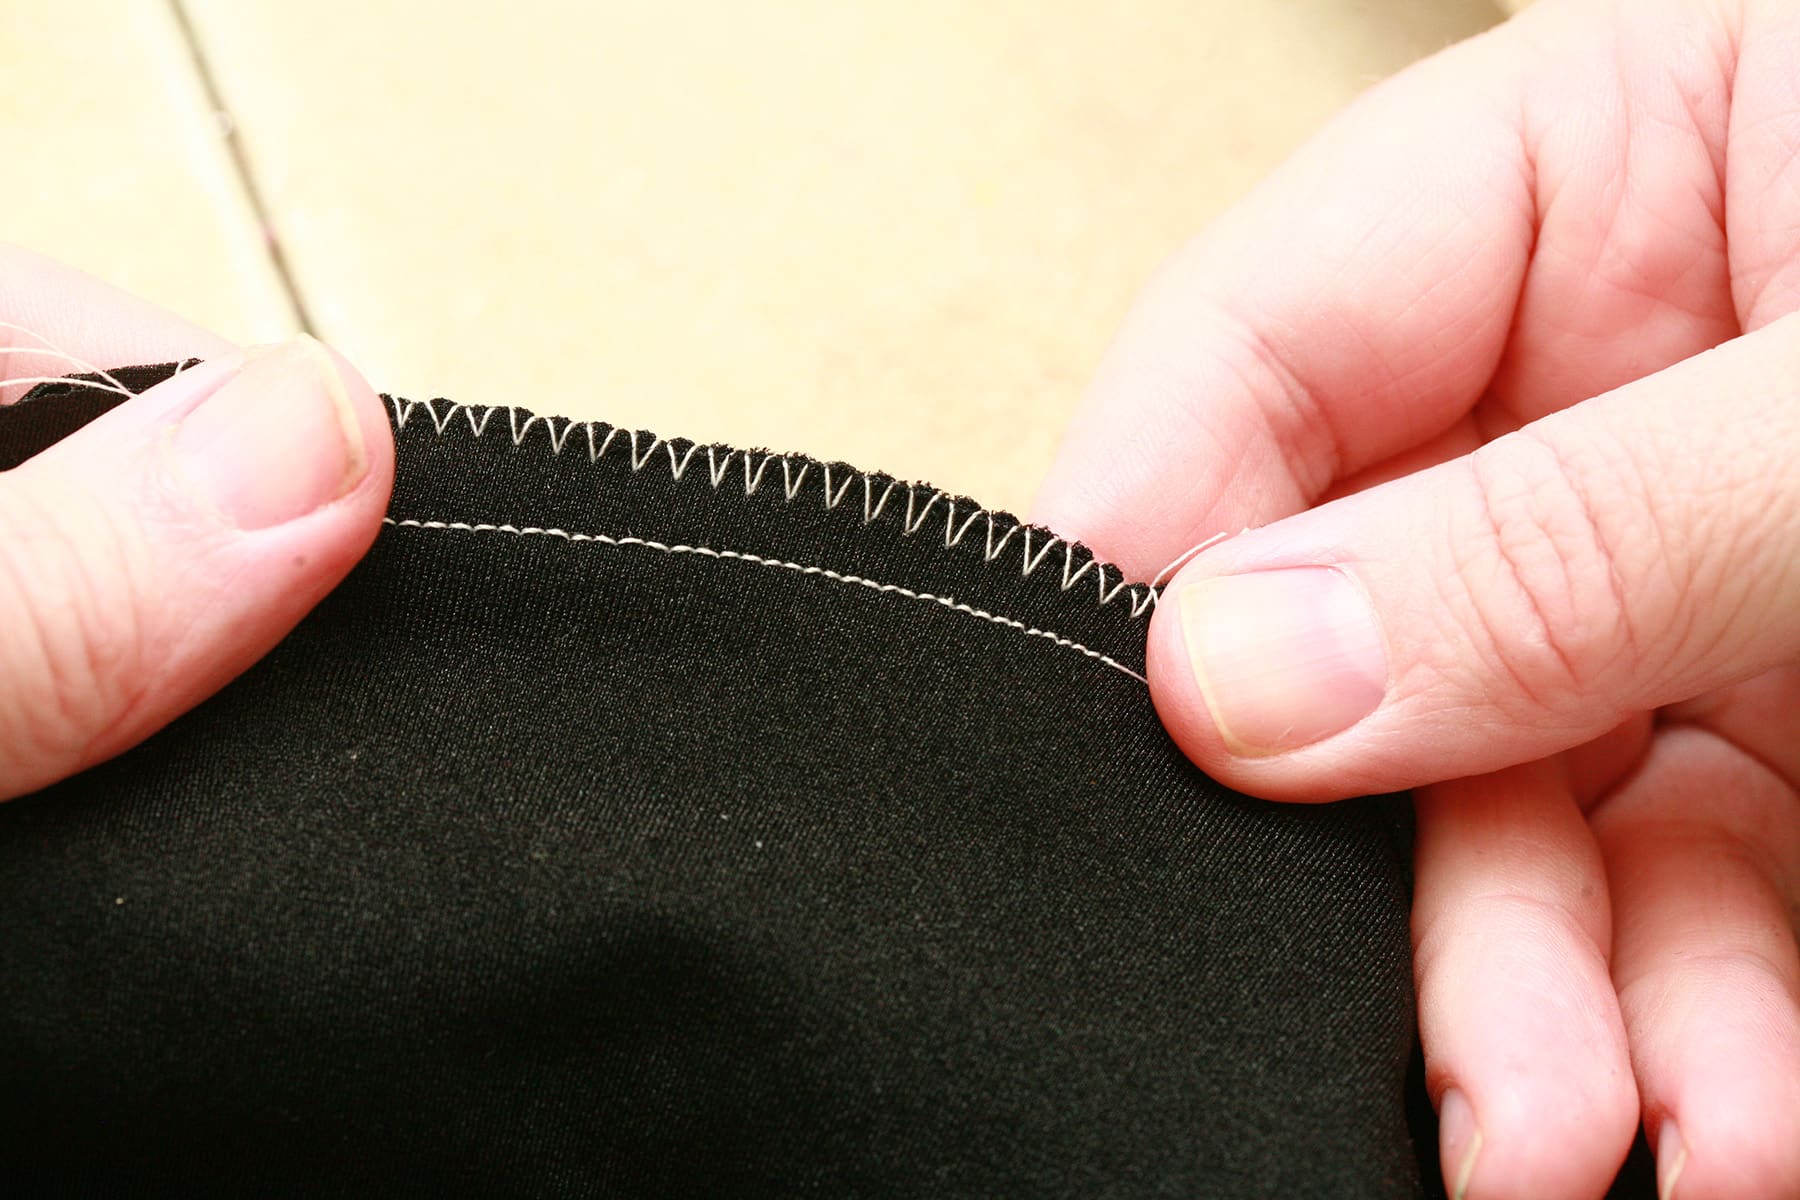
For zig zagging a finish to the seam, set your stitch width to be quite wide. I usually like using the widest stitch possible.
Your stitch length should be medium-ish. A long length won’t allow for much stretch, and a very short stitch length will cause a lot of curling in the seam.

This "lettuce edge" is what happens when too short of a zig zag stitch is used. While you can expect some degree of wave when sewing spandex, this is excessive.
Stretch the fabric well, and sew a zig zag stitch as close as you can get to the edge, slightly over it.
The outer peaks of the zig zag should bind the edges of the fabric as it goes.

Not only does this zig zag row add a little more strength to the seam, it finishes it and just plain looks better!
How to Sew Spandex With A Serger
Personally, I didn’t like sergers for probably the first half of my sewing career.
I convinced myself that it was because they made seams bulkier than they had to be, but really, I was just afraid of them, and HATED trying to thread them.
This was back 20 years, though - today’s sergers have become FAR more user friendly! I can’t even imagine NOT sewing with my precious Babylock Imagines now.
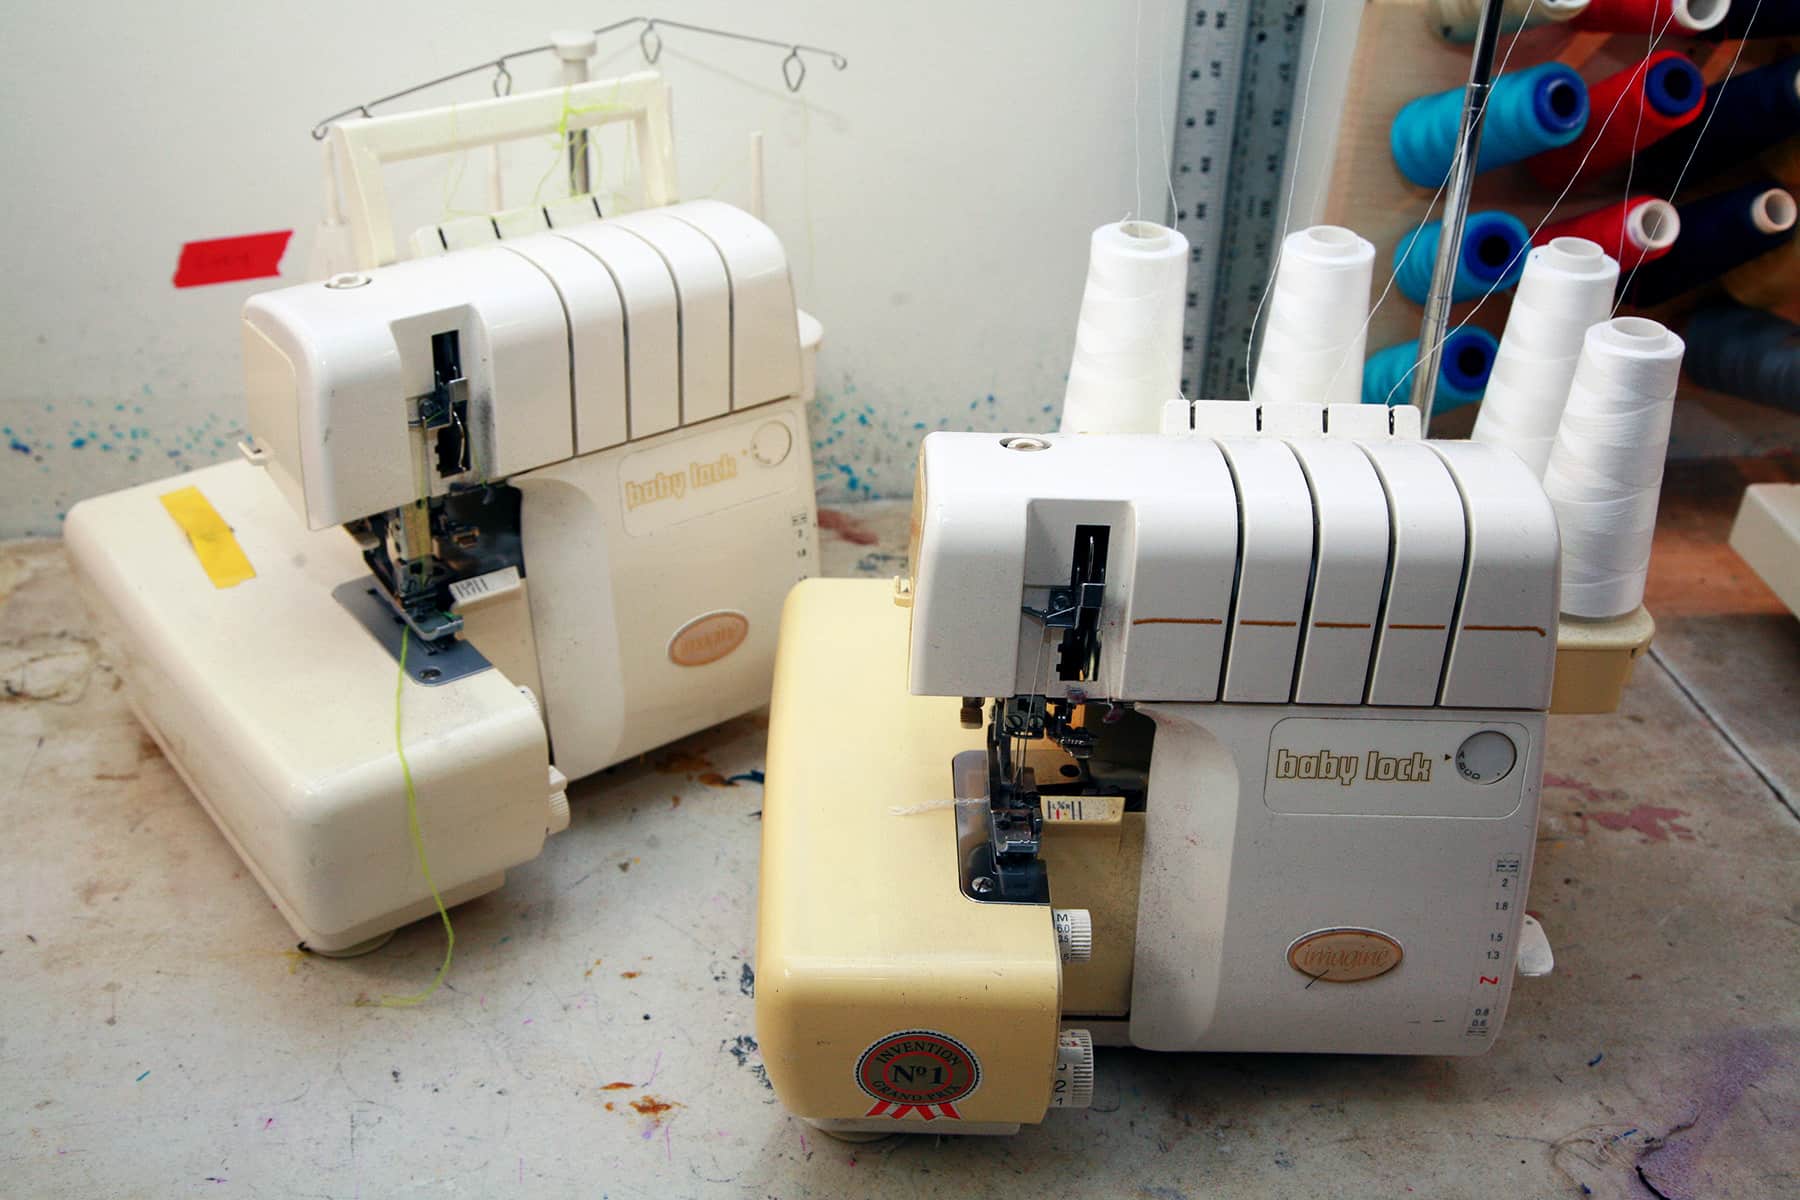
I've had these two machines since 2004! Love them!
Anyway, rather than provide a set of instructions that may or may not apply to your serger, I highly recommend consulting your machine’s user manual for advice on how to set it to serge stretch fabrics, and then play with it.
Generally speaking, I set my differential feed to neutral - NOT a stretch stitch - and use a medium stitch length for body seams (and a longer stitch length for elastic application). Again, use the stretching technique describe above, when feeding your fabric through the serger.

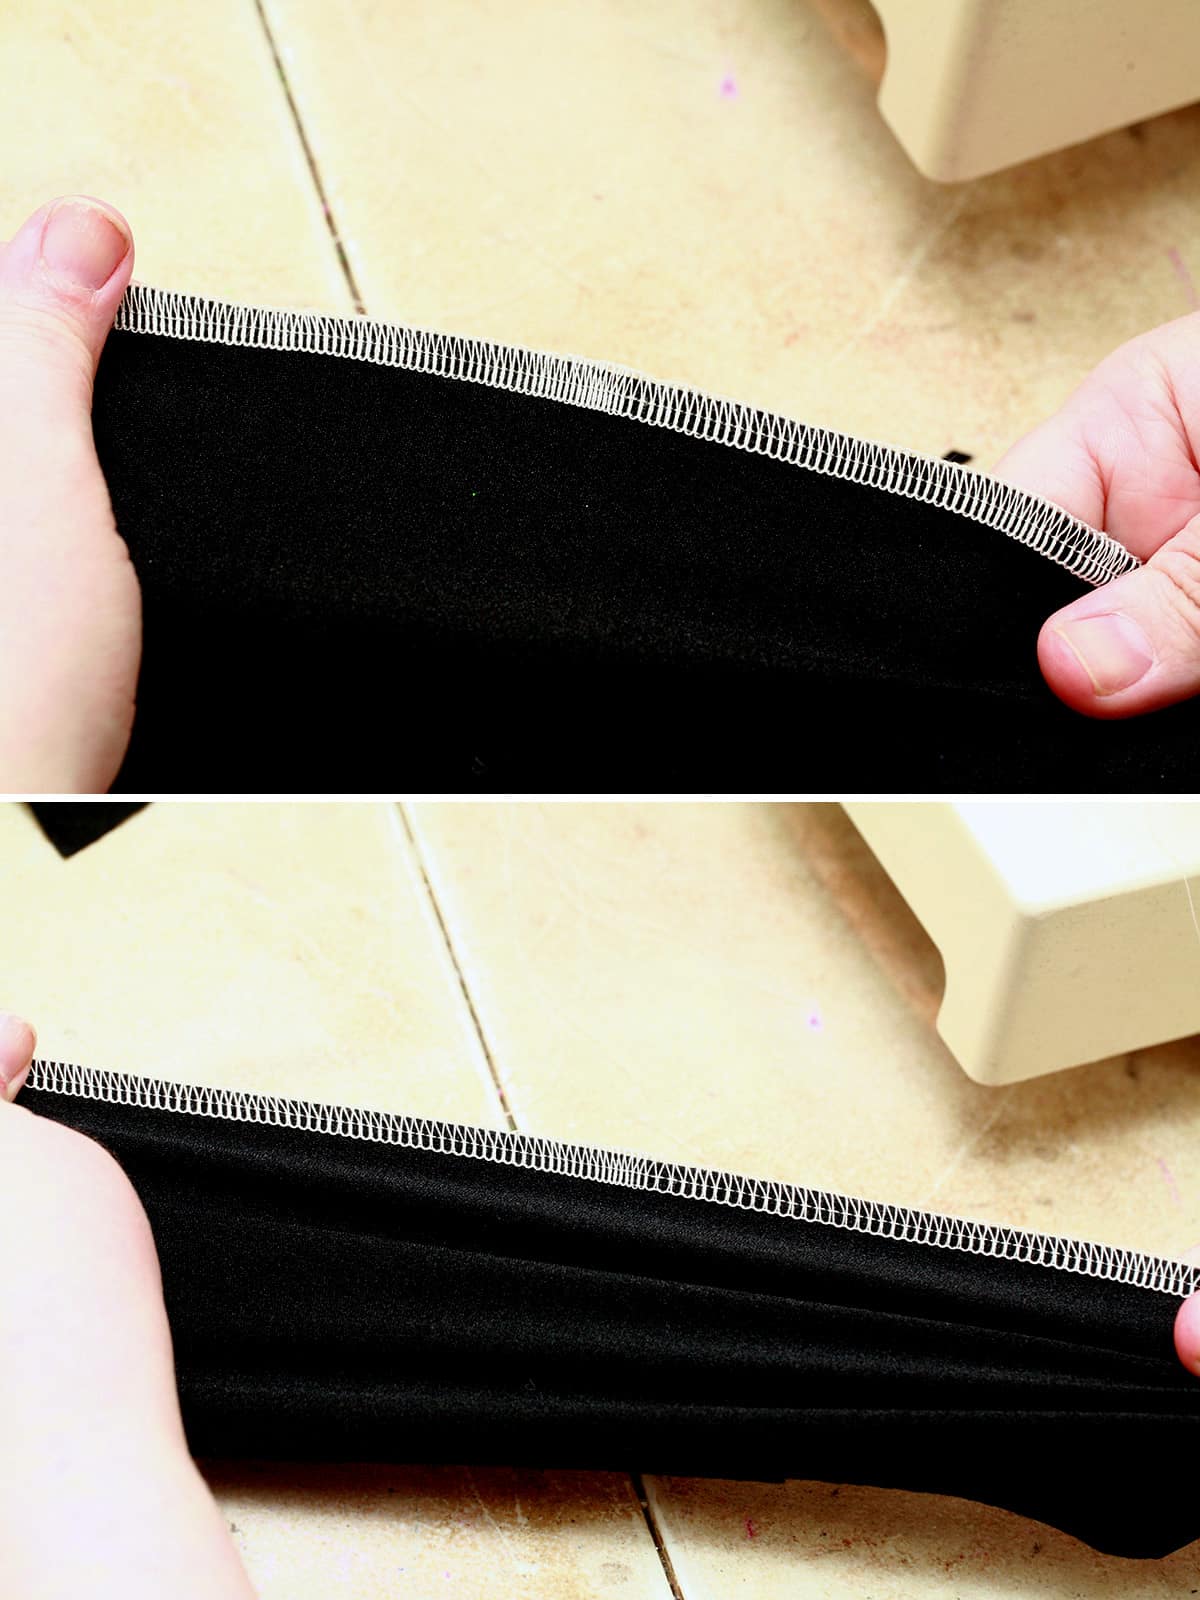
I prefer to use a 4 thread, regular flat serger stitch for structural seams and elastic application.
3 thread overlock is another option, but you will likely want to use a regular sewing machine to sew a straight seam first, using the 3 thread serger to finish the seam - much as you would with the zigzag stitch described.
Generally speaking, I only use 3 thread setups for hemming.
Whichever machine you have available, and whatever stitch you chose, just be sure to hold and stretch your fabric as described a bit earlier, and you’ll be fine!
Video Demonstration
More Spandex Sewing Technique Tutorials
Interested in learning the basics of sewing with spandex? Here are a few more posts
How to Cut Spandex
Hemming Spandex Skirts
How to Apply Elastic
Appliquing Spandex
How to Install Snaps in Spandex Garments
Padded Applique
How to Make Covered Elastic Straps
How to Make Bikini String
... and always, be sure to check out our Table of Contents for a full, categorized listing of all of our posts and tutorials!
Share the Love!
Be sure to take some pics of your handiwork! If you post it to Bluesky, be sure to tag us - @SpandexSimplified.
Also, be sure to follow me on Pinterest, and subscribe to my Youtube Channel, so you never miss out on any of my nonsense. Well, the published nonsense, anyway!
Finally: If you loved this tutorial - or have any questions about it - please leave a comment below! I'll do my best to answer any questions you may have!


How to Sew Spandex
Equipment
- Sewing Machine
- Serger
- Scissors
- Stretch Sewing Needles
Materials
- Spandex
- Thread
Instructions
Basic Technique
- When sewing any seam on spandex - with any type of machine - hold the two pieces together, with the right sides facing each other (some exceptions apply - such as with sewing Spandex Applique).
- Before you start sewing, stretch the fabric. I hold the fabric in two places: my left hand is holding on to the garment BEHIND the sewing machine, the right hand is holding on to it in front of the machine.
- Stretch the fabric in both directions (both pulling away from the machine), and hold it steady.
- You do not want to jerk the fabric, let go of your tension, or pull the fabric away from the machine in only one direction. If you do any of these, you run the risk of breaking the needle.Just stretch the fabric, and hold that degree of stretch throughout the seam.
- Anyway, holding your edges together, sew along the side of fabric. I find the right side of the presser foot to be a great guide for seam allowances, on both traditional machines and sergers.
- If you MUST release the stretch at any point, stop the machine first. Adjust as needed and stretch - and HOLD - before starting the machine up again. You don’t want to pull the fabric out from under the needle at all, just feed a tautly stretched span of fabric through
How to Sew Spandex Without a Serger
- First off - sergers may be great for sewing spandex, but if you don’t have one, no worries - a regular sewing machine will work just fine, with the right technique.
- Stitch Settings: Go for a relatively short stitch. A longer stitch will be loose and loopy, when you stop stretching it.
- At the starting point of your seam, sew a few stitches, then hit the reverse function and back over them. This acts as an anchor.
- Stretch the fabric as described above, and sew the seam.
- For zig zagging a finish to the seam, set your stitch width to be quite wide. I usually like using the widest stitch possible.
- Your stitch length should be medium-ish. A long length won’t allow for much stretch, and a very short stitch length will cause a lot of curling in the seam.
- Stretch the fabric well, and sew a zig zag stitch as close as you can get to the edge, slightly over it . The outer peaks of the zig zag should bind the edges of the fabric as it goes.
- Not only does this zig zag row add a little more strength to the seam, it finishes it and just plain looks better!
How to Sew Spandex With A Serger
- Generally speaking, I set my differential feed to neutral - NOT a stretch stitch - and use a medium stitch length for body seams (and a longer stitch length for elastic application). Again, use the stretching technique describe above, when feeding your fabric through the serger.


I sew for a ballet company and mostly sew tutus and bodices. Occasionally, I have to sew with lycra to made leotards and unitards. I loved your post especially on how to attach elastic to neck and leg openings. Thank you!
Absolutely wonderful instructions !!
No nonsense over the top frivolous discussions of other matters that do not pertain to sewing. I mean you did mention how you ended in the hospital because of over tightening the material to taut but again it pertained to the hazards of not stretching it correctly. Am I right? Smile
Merciiiii pour tout ces conseils avisés, c'est généreux, génial et très concret !!
I am a beginner and this was so detailed, easy to follow and perfect for what i needed.
Amazing instructions! I think I can do this! I'm so glad I found your site, and I will sign up for your emails. PS - I rarely do that, so it's a big compliment. LOL
I'm so glad I found your site. Just reading it I feel more confident about my sewing. I do however want to ask you about the sewing tension. Do you lower it on your machine (not serger) or isn't that necessary since you stretch the fabric? Thank you!
If your machine is doing anything weird, you can adjust it. Just as a default, though? No.