

While I'm not the biggest fan of them, knowing how to sew an invisible zipper into a spandex garment is a handy skill to have. Here's how!

From the first time I ever published a spandex manual - back in 2000 - I’ve never been happy with my attempts to show how to do an invisible zipper application.
There was never enough room for the photos I’d need to really do it justice, so I kinda... mailed it in.
Now, I can use as much text as I need, as many photos as it takes, AND include a video, for those who learn better like that.
So much nicer!
Anyway, it’s been a long time coming, but today I’m going to show you how to sew a perfect invisible zipper application.
Now, if you’ve read my books, you know that I am VERY “anti-invisible zipper”.
This hasn’t changed! I still see it as being a far from perfect finisher for any outfit that’s subjected to the kinds of stressors that performance costuming is.
That said, I know that some people still prefer the professional look and clean finish of an invisible zipper.
With a bunch of specialized tutorials coming up, I figured I may as well share my standard method of sewing invisible zippers. It’ll come in handy for some of the coming posts!
That said, I’ll get into my issues with invisible zippers further down in this post, AND share my way of using a slightly heavier-duty zipper, as an alternative.
It may not give the same elegant finish, but it IS a lot more durable.
Anyway, enough rambling, let’s get to this post...
What is an Invisible Zipper?
Invisible zips are a great way to bring a professional-looking finish to many kinds of sewing projects. You’ve probably seen in them in everything from home furnishings (especially duvets and pillow covers), to bridal gowns and other formal garments.
It’s a very lightweight zipper with a fine plastic coil. They look like they’re made backwards - the coil is on the wrong side of the zipper, rather then on the outward-facing side (with the zipper pull).
When sewn in properly, you’ll end up with an almost fully concealed zipper - they tend to blend in as a garment seam.
“Visible zippers” are generally much more obvious, whether the zipper itself is showing... or just the lapped covering.
As a heads up:
This is an easy invisible zipper tutorial, but you’re going to want to follow everything as described. If you skip a step, or sew from the opposite direction on the second side?
You’re going to have a bad time.
So, take your time, read the instructions all the way through, first, and watch the video if you think it’ll help. Once you have the technique down, I promise it’s actually really easy to do them.
Happy sewing!
Recommended Reading
Before getting started on invisible zippers, here are a few posts with information that may come in handy :
Spandex Costuming Tools & Supplies
Basic Pattern Alterations
Colour Blocking for Spandex
Neck & Back Style Variations
Types of Stretch Fabric for Spandex Costuming
How to Cut Spandex
How to Sew Spandex With or Without a Serger
How to Apply Elastic
In some cases, I’ll be glossing over a technique in THIS post, as it is fully covered in another post.
Equipment and Supplies
While this is probably considered a specialty technique, you’ll be able to find everything you need in your local fabric store.
Some notes for you:
The Invisible Zipper
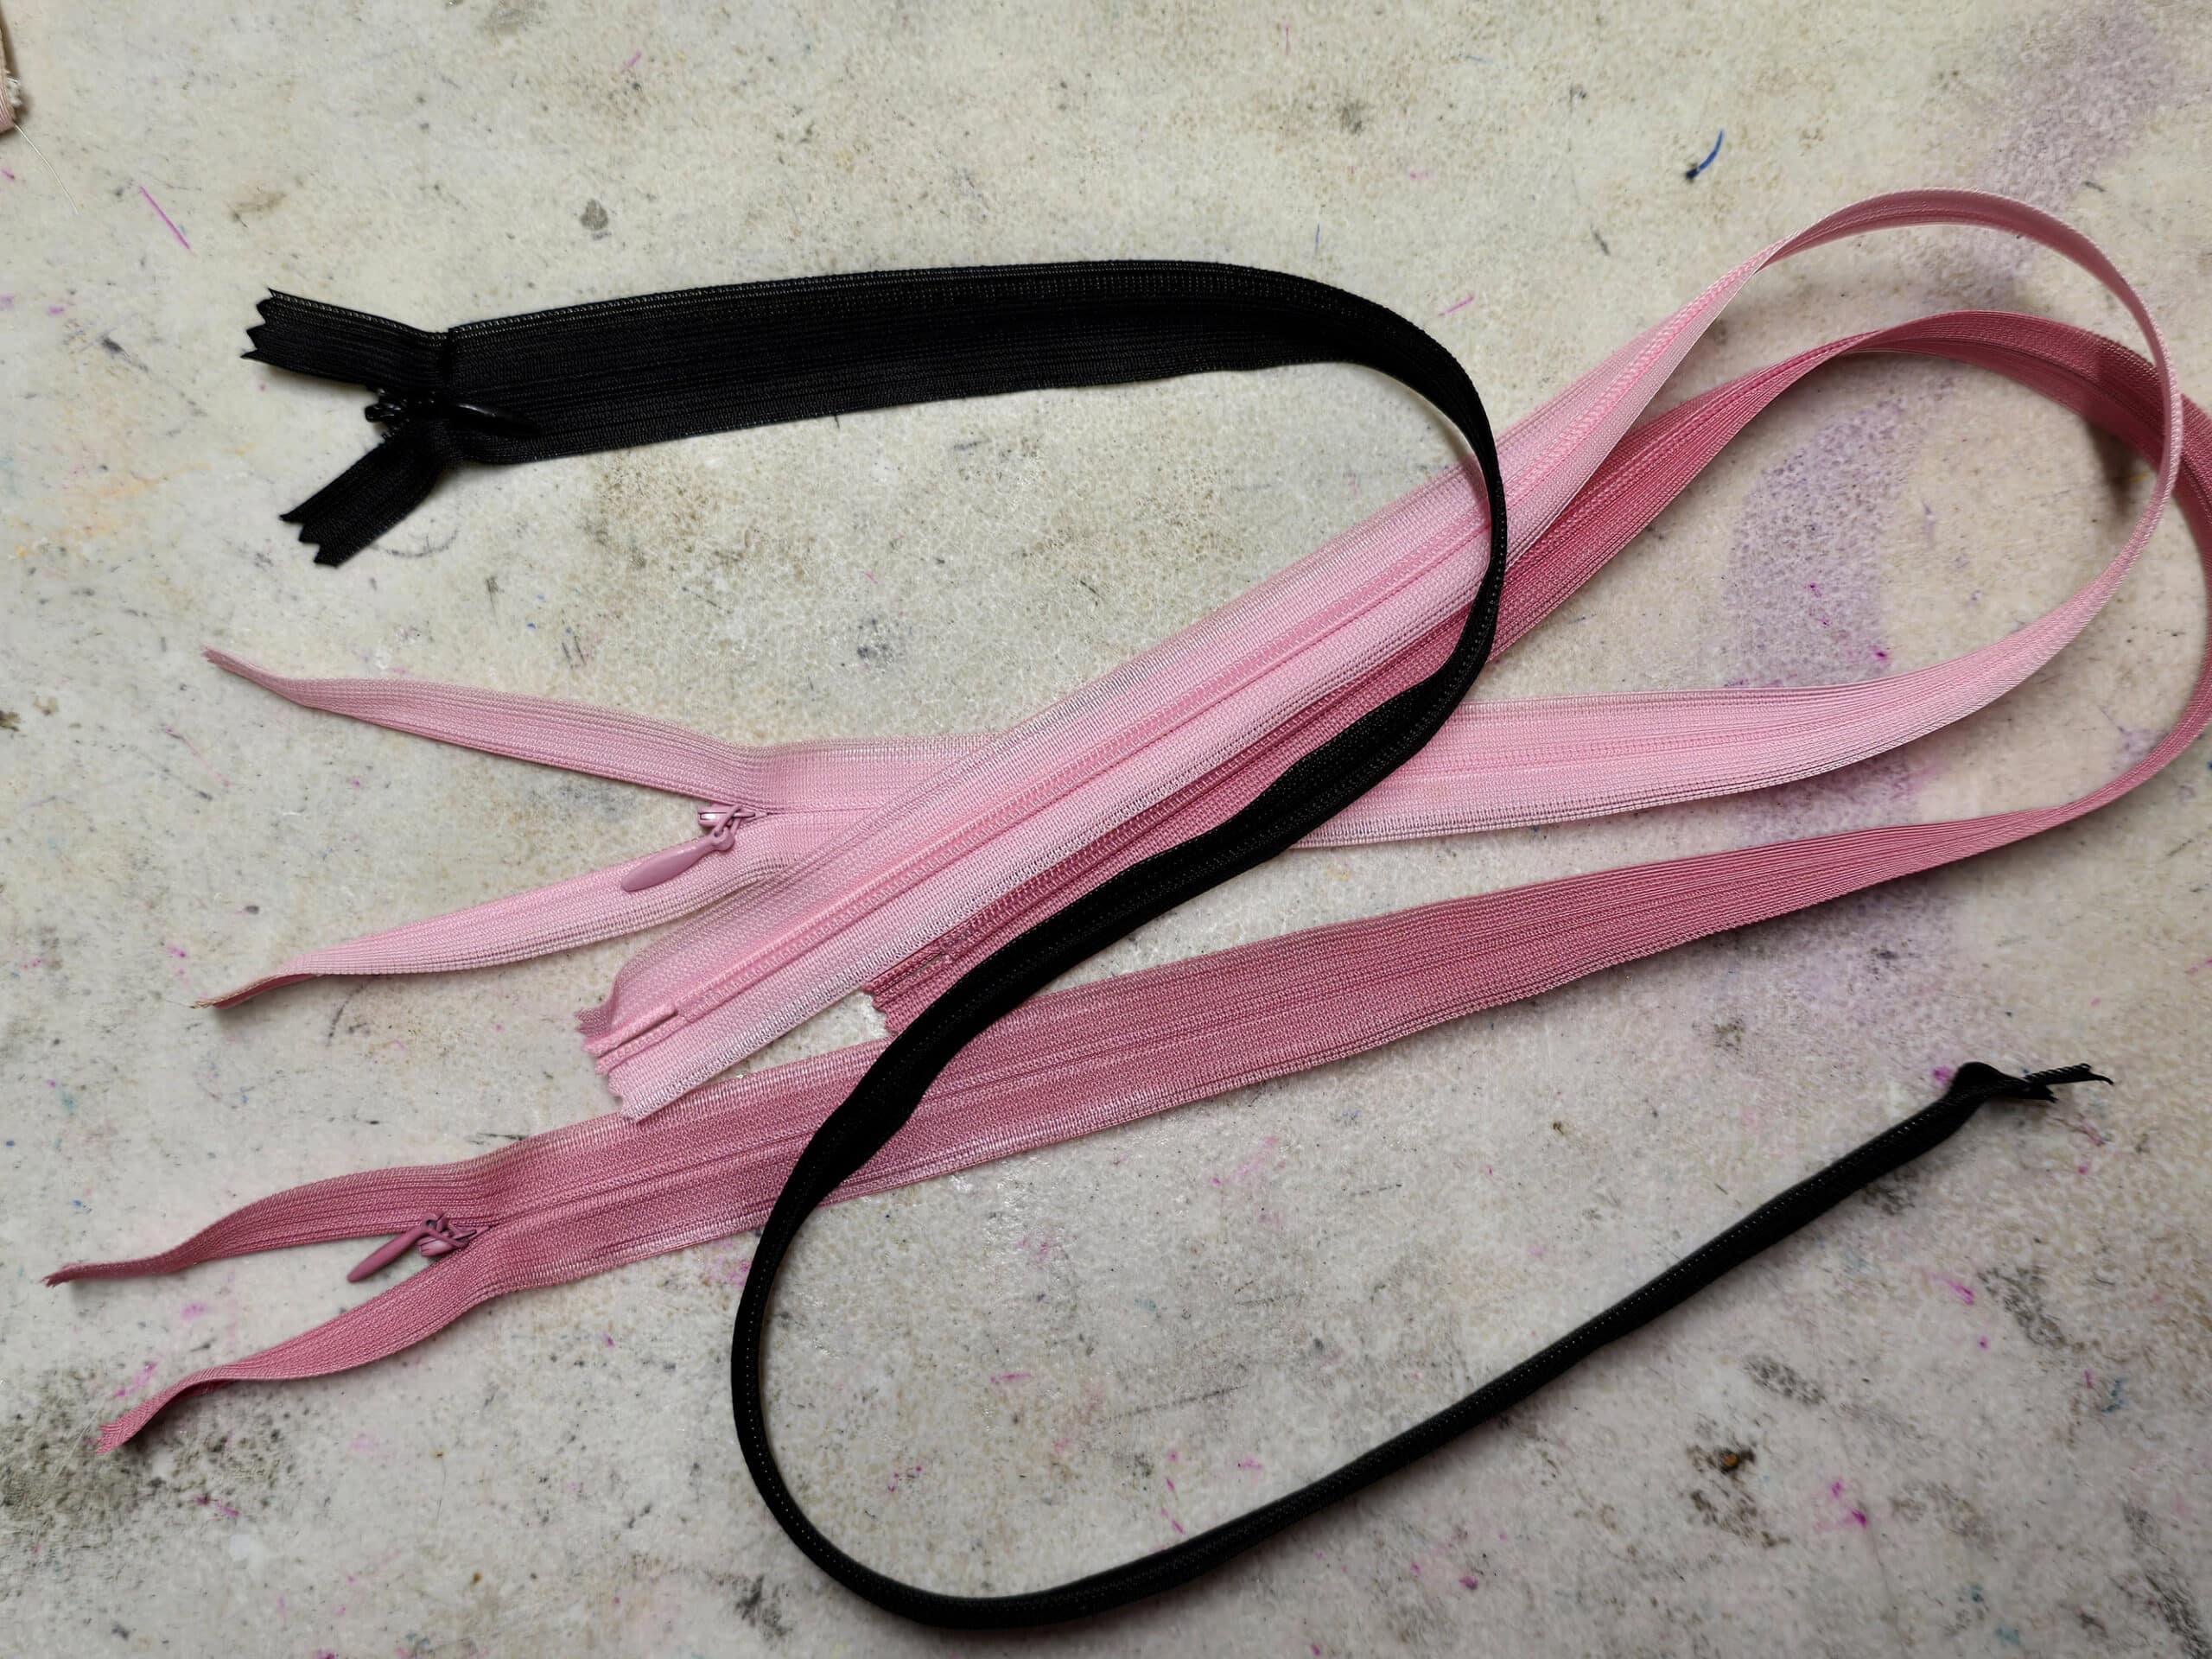
These are lighter weight than regular zippers - and they generally work best in lightweight fabrics that aren’t being subjected to a lot of external pulling / force.
As with most non-separating zipper types, I recommend getting a longer Invisible Zippers than you actually need for the length of the zipper opening.
I generally default to using a 22" Invisible Zipper for pretty much everything. It’s not worth it, to me, to keep a bunch of different sizes - it’s super easy to just trim excess.
In terms of colour...
If it’s crossing more than one colour, I will either match the colour that’s used for the longest portion of the area the zipper is being sewn into, the LIGHTEST colour, or the mid-darkest/brightest colour.
It’s going to be really individual to what you’re making, what colours are involved, and HOW they’re used. The one big constant is that if you’ve got mesh involved at all, match the colour of the mesh as best you can.
Invisible Zipper Foot
For the best results, you’re going to want to use a special Invisible Zipper Foot, sometimes known as a concealed zipper foot.
Invisible zipper feet are designed to roll back the coil in such a way that allows you to get your seam as close as possible to where it needs to be.
This is accomplished via two little channels on the underside of the foot - which channel you use depends on which side of the zipper you’re sewing at the time.
Anyway, it’s an essential tool for truly invisible zipper application, IMHO. I tried for years to just be slow and accurate with a regular zipper foot - my $10 invisible-zipper foot just instantly made life a lot better.
I use a metal invisible zipper foot, but you can also buy a clear invisible zipper foot - depending on your machine. Either way works fine.
Zipper Foot or Regular Foot
In addition to the zipper foot, I like to use either a regular sewing foot (especially if I decide to zig zag the edge of the zipper to the raw edge of the fabric after), or just a regular zipper foot.
This is for the straight seam that’s sewn *before* the seam that involves the invisible zipper foot.
A little fussy, I know - but it really does give the best results!
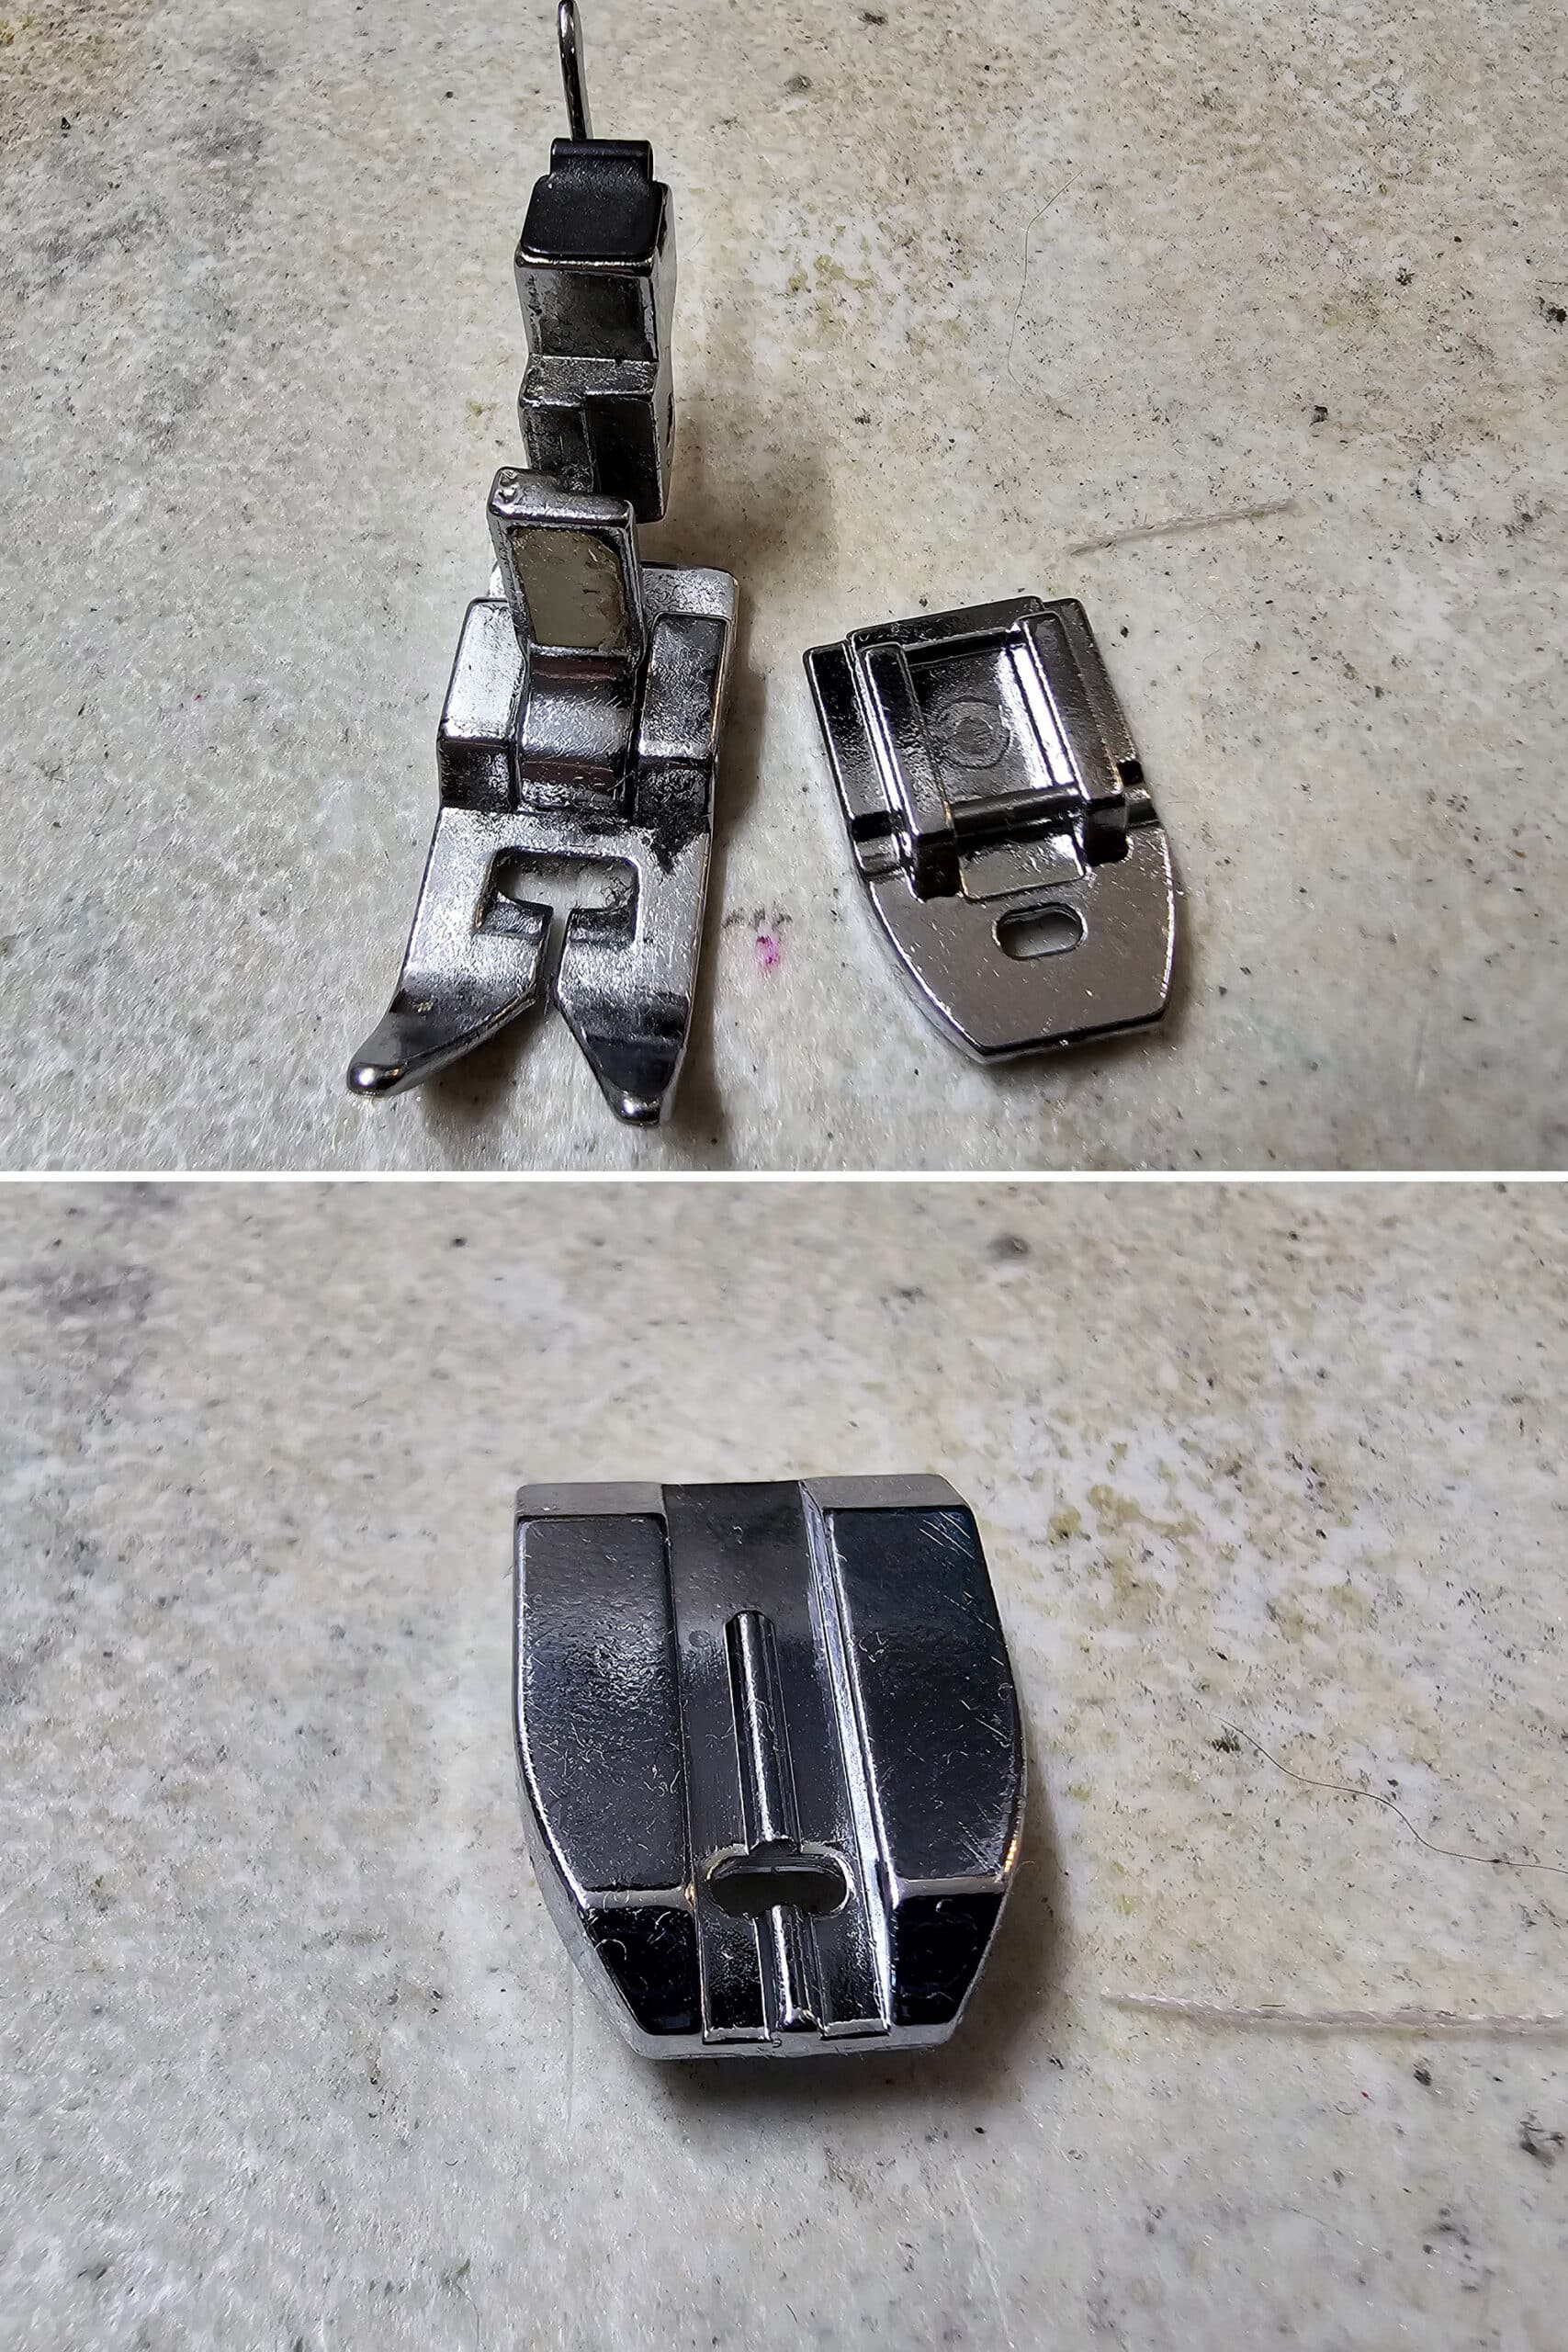
A regular foot and an invisible zipper foot.
Thread
I tend to use two different colours of thread when sewing an invisible zipper in:
Matching Thread: Thread to match the fabric of the outfit *in the area the zipper is being applied to*... or the zipper itself.
Base your thread choice on your zipper colour choice, and whatever is going on with the fabric it’s being sewn into. If you’re sewing it into a single colour of fabric, match the fabric.
If you’re sewing it to multiple different colours, I usually find it best to match the zipper.
Whichever colour you use, see my post Spandex Costuming Tools & Supplies for more information on thread choices.
Contrasting Thread: This is just a small amount of a contrasting thread for the basting.
Because it doesn’t have to stay in once the first machine seam is sewn, I generally pull the basting thread out. Using a contrasting color makes it either to see, both when sewing and when pulling it out!
Everything Else
You will also need:
1 hand sewing needle - for basting
Straight pins
... I just don’t really have anything to add, as far as those last two supplies go.
Share the Love!Be sure to take some pics of your handiwork! If you post it to Bluesky, be sure to tag us - @SpandexSimplified. Also, be sure to follow me on Pinterest, and subscribe to my free newsletter and Youtube Channel, so you never miss out on any of my nonsense. (Well, the published nonsense, anyway!) |
How to Sew an Invisible Zipper
This tutorial is going to seem long and involved, but it’s actually really easy to do - once you know the steps!
Once you do one or two of these invisible zipper insertions, you won’t need a tutorial, it’ll come pretty naturally.
Figure Out the Game Plan
Before getting started, you want to figure out when you’re putting the zipper in, where the end of the zipper will start, and if you’re going to need additional closures involved.
There are SO many things that affect the timing and placement, I couldn’t possibly cover every situation, but as some general guidelines:
Timing
1. You want to apply the zipper as early in the garment sewing process as possible. The less the fabric pieces have been stretched and worked with, the easier it will be.
2. If anything needs to be done to the area where the zipper will be applied - like if it’s crossing over a section of color blocking or applique - get that work done first.
3. If you’re sewing the invisible zipper into a garment that will have a 1 piece collar (folded over at the top), get the garment sewn to the point of having the collar attached, before adding the zipper. You don’t have to do any more than absolutely necessary - sew the shoulder seams, sew the collar in. That’s it.
You want the pieces of fabric you’re sewing the zipper to to be able to lay as flat as possible, sewing the side seams makes that a bit more difficult.
4. If you’re sewing the zipper into a garment that has a two piece collar (an outer collar, and then a separate inner piece that acts as a lining), get the outer part of the collar sewn on (shoulder seams, then collar), do the zipper, then finish it off with the lining collar piece.
5. If the top of the zipper will end in an elastic-finished neckline, you can do the zipper before or after adding elastic.
I prefer before, as it allows for a flatter surface to work with. You just need to decide which way you prefer. If you’re adding the elastic after doing the zipper, you’ll want to keep that in mind for placement. (More on that in a minute).
6. I definitely prefer sewing zippers in before any embellishment - crystals, sequins, etc.
The only exception to that is painting - if the zipper will cross an area that will be painted, it’s a good idea to paint it first and be sure it’s fully dry.
You don’t want to risk any wet paint getting into the zipper teeth - even a little bit of paint in the teeth will ruin the zipper and you’ll need to redo it.
7. If the garment is going to be lined, I recommend doing bonded lining - using temporary spray adhesive to glue the outer fabric to lining. It just makes it all cleaner and easier to work with, and is the least bulky option.
If you do any kind of enclosed lining, you’re going to have extra bulk from the fabric edges on either side of the zipper application.
IMHO, that goes completely against the idea of making the zipper disappear!

Placement
Much with the timing, the placement will depend on a bunch of factors. If you’re using a commercial pattern, it’ll tell you where to place it.
If not, here are a few general guidelines:
1. You want your entire length of the zipper insertion to extend down as far as needed for the wearer to be able to get the garment on *without putting a ton of stress on the zipper*.
For example, if the wearer has a small waist and larger hips, you’re going to want the length of the zipper to extend down to - or ideally - BELOW the waist line.
If you end it at, say, the bra line, it’ll have to be stretched over the hips to get it on, and that can cause damaging stress to the bottom of the zipper application.
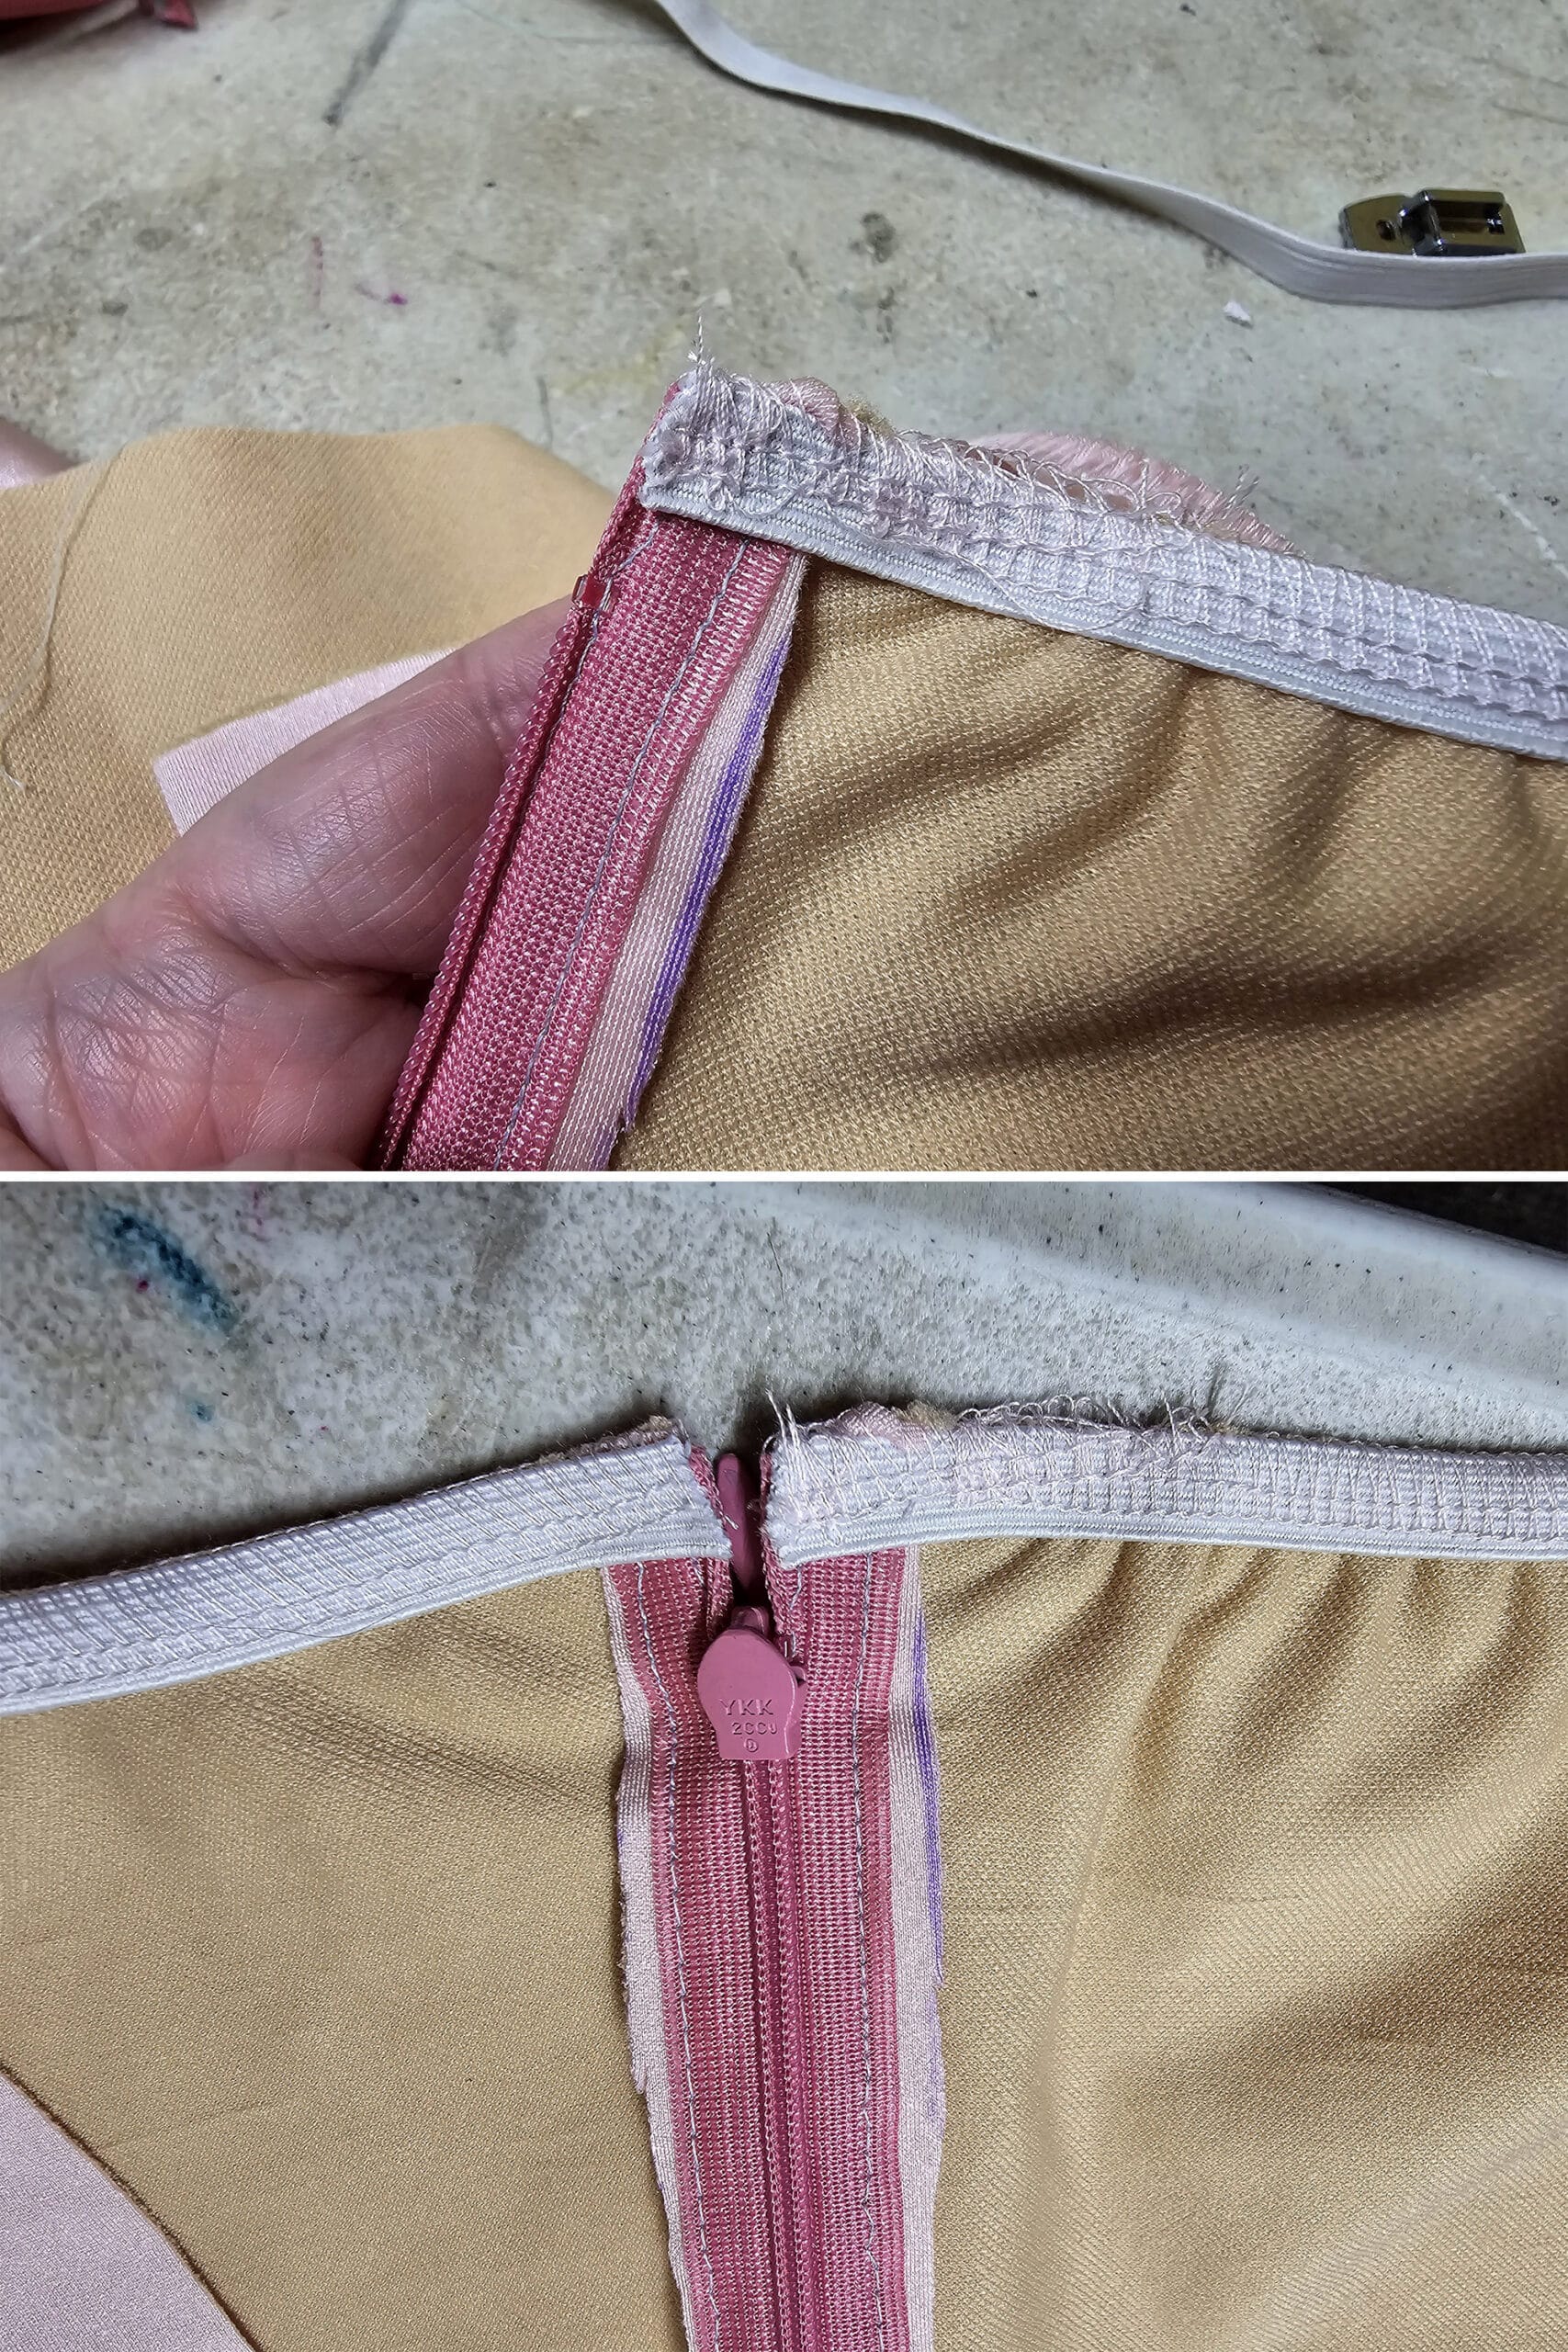
If you’re doing a zipper only, you can align the actual zipper stop with the folded top edge of the collar. Once sewn in, you can fold over the edge and stitch it down, out of sight.
If you’re doing a zipper and reinforcing the zipper with a hook and eye closure above it, I like to bend the top of my zipper (fabric part) back at a 90 degree angle, with the top of the edge facing away from the zipper coils.
This gives a uniform distance at the top of the zipper opening - the width of the zipper tape, essentially - for both sides of the zipper tape. The folded tape acts as a measure.
Once you’ve finished sewing the whole garment, you can sew in your hook and eye closure. This will ensure that the top of the zipper stays closed, AND that there isn’t any extra stress pulling on the zipper opening.
Alternatively, you can position the very end of the zipper tape (the pinked / cut edge) is right at the top edge of the fabric, if there’s a 2 piece collar.
The lining piece will be sewn over it, and the top of the zipper tape (fabric only, before the actual zipper starts) will be enclosed in the top seam allowance.
This gives you a bit of distance between the zipper stop and the end of the fabric - it’ll be enclosed in the seam allowance when you apply the sleeve.
4. If you are sewing the zipper into an opening that will have elastic applied - either a neckline or a sleeveless arm hole - there are a few ways you can do it.
You can do the elastic application - flipped, stitched down, and all - then sew the zipper in on top, as you do for a folded / one piece collar.
Or
You can sew your zipper with the end folded back at 90 degrees (as described above), and place it such that the zipper stop sits (2x the width of your elastic) from the top edge of the garment.
That is to say... if you’re using ½" elastic, you’d place the zipper such that the zipper stop is 1" below the top edge of the garment. The excess tape can be folded back so that the top edge of the zipper tape is pointing away from the coil edge of the zipper tape.
Or
You could sew the end of your zipper right to the top edge of the back panel (pictured below).
Apply the elastic, then - when stitching it down - just make sure the very end of the elastic starts and ends just to the side of the zipper teeth, rather than directly down on top of them.
Once you've got the elastic sewn in, you can trim the edge and stitch it down over the zipper.
More on that further down in this tutorial, though!
Make any Necessary Adjustments to the Pattern
If the pattern you’re using was intended for a zipper application, you can skip this section.
If you’re adding a zipper to a garment that has a vertical seam allowance already included for the seam you’re adding a zipper to, you can generally skip doing any adjustments.
Yes, technically you’d want to make sure that the seam allowance included in your pattern is the same as the width of one side of your zipper tape... but really, you’re talking a likely difference of a couple millimeters.
Adding an extra millimeter to a seam allowance is not only unnecessary and overkill for stretch garments, it’s likely to disappear (or be augmented even!) in the cutting process.
That said, if you’re using a pattern that doesn’t have a seam allowance for whatever reason - either it wants you to add your own, or it was intended as a “place on fold” - Add a 1 cm (~ ½ inch) seam allowance for the invisible zipper application.
Finally, while you CAN sew an invisible zipper into a curved seam, I don’t recommend it - far too much opportunity for stretching, waves, etc.
If you know how, convert your seam to a straight one, by basically distributing the dart to the sides of those pieces. If you know, you know - I’ll have to do a post on that at some point.
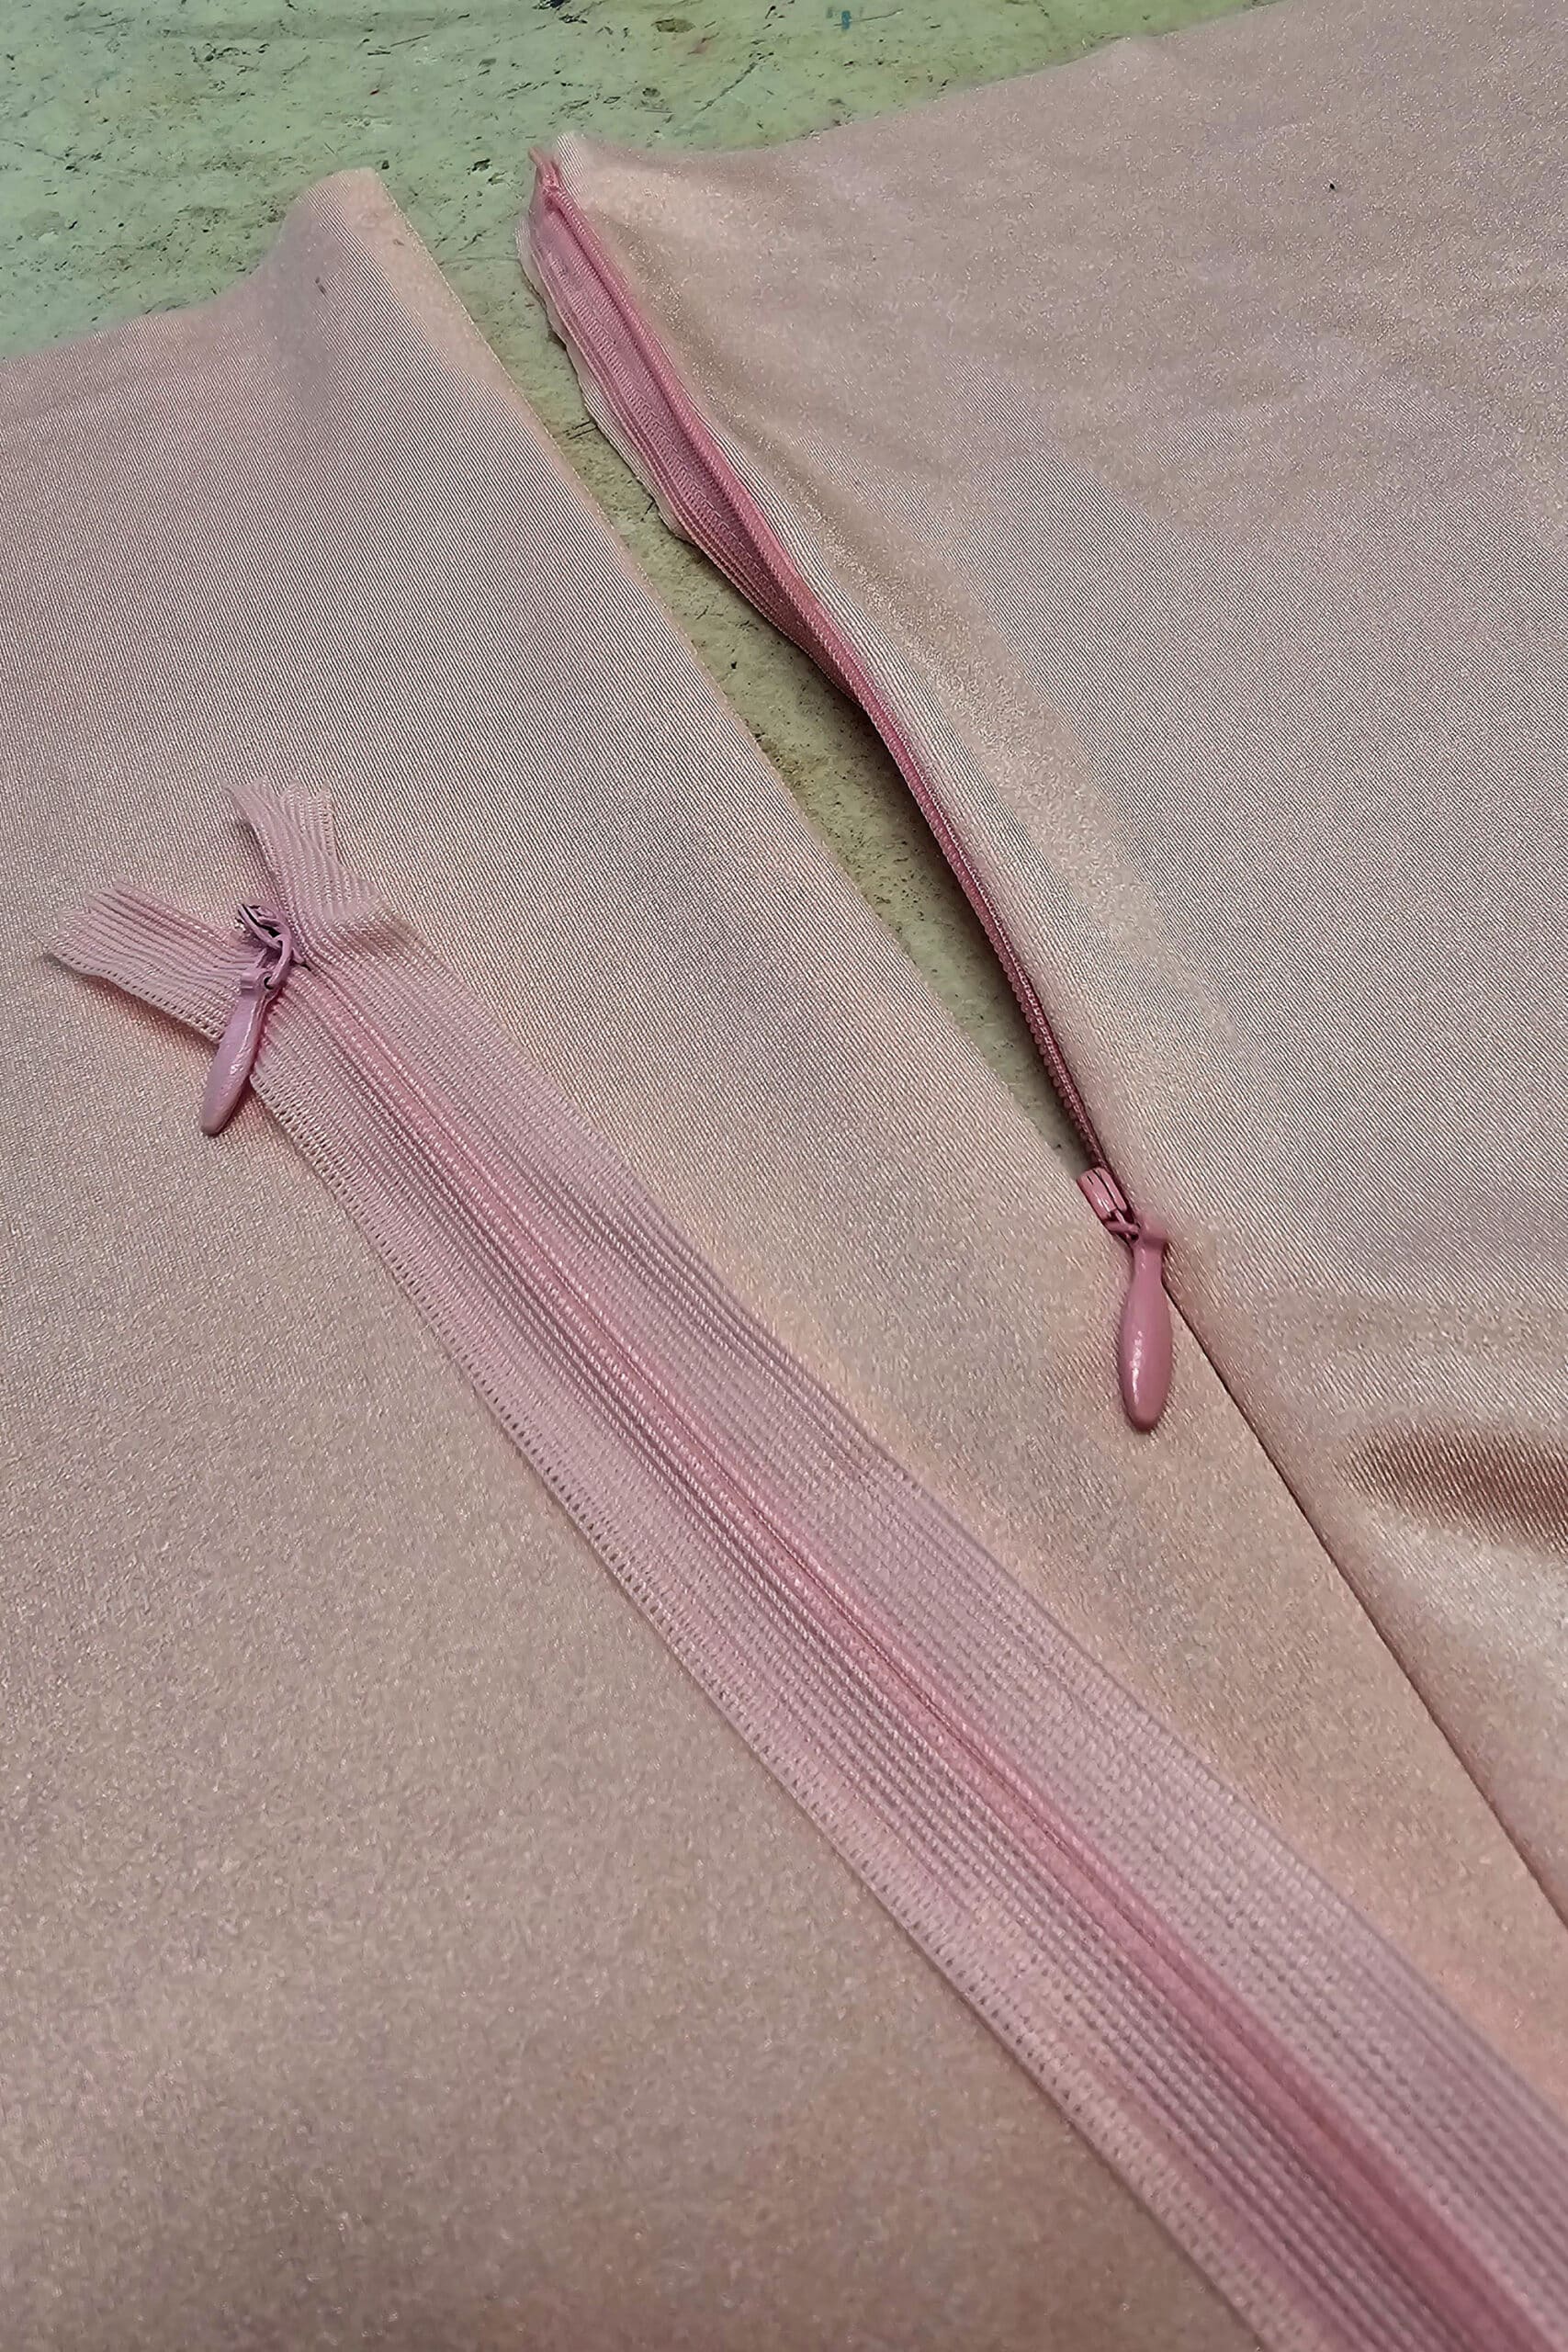
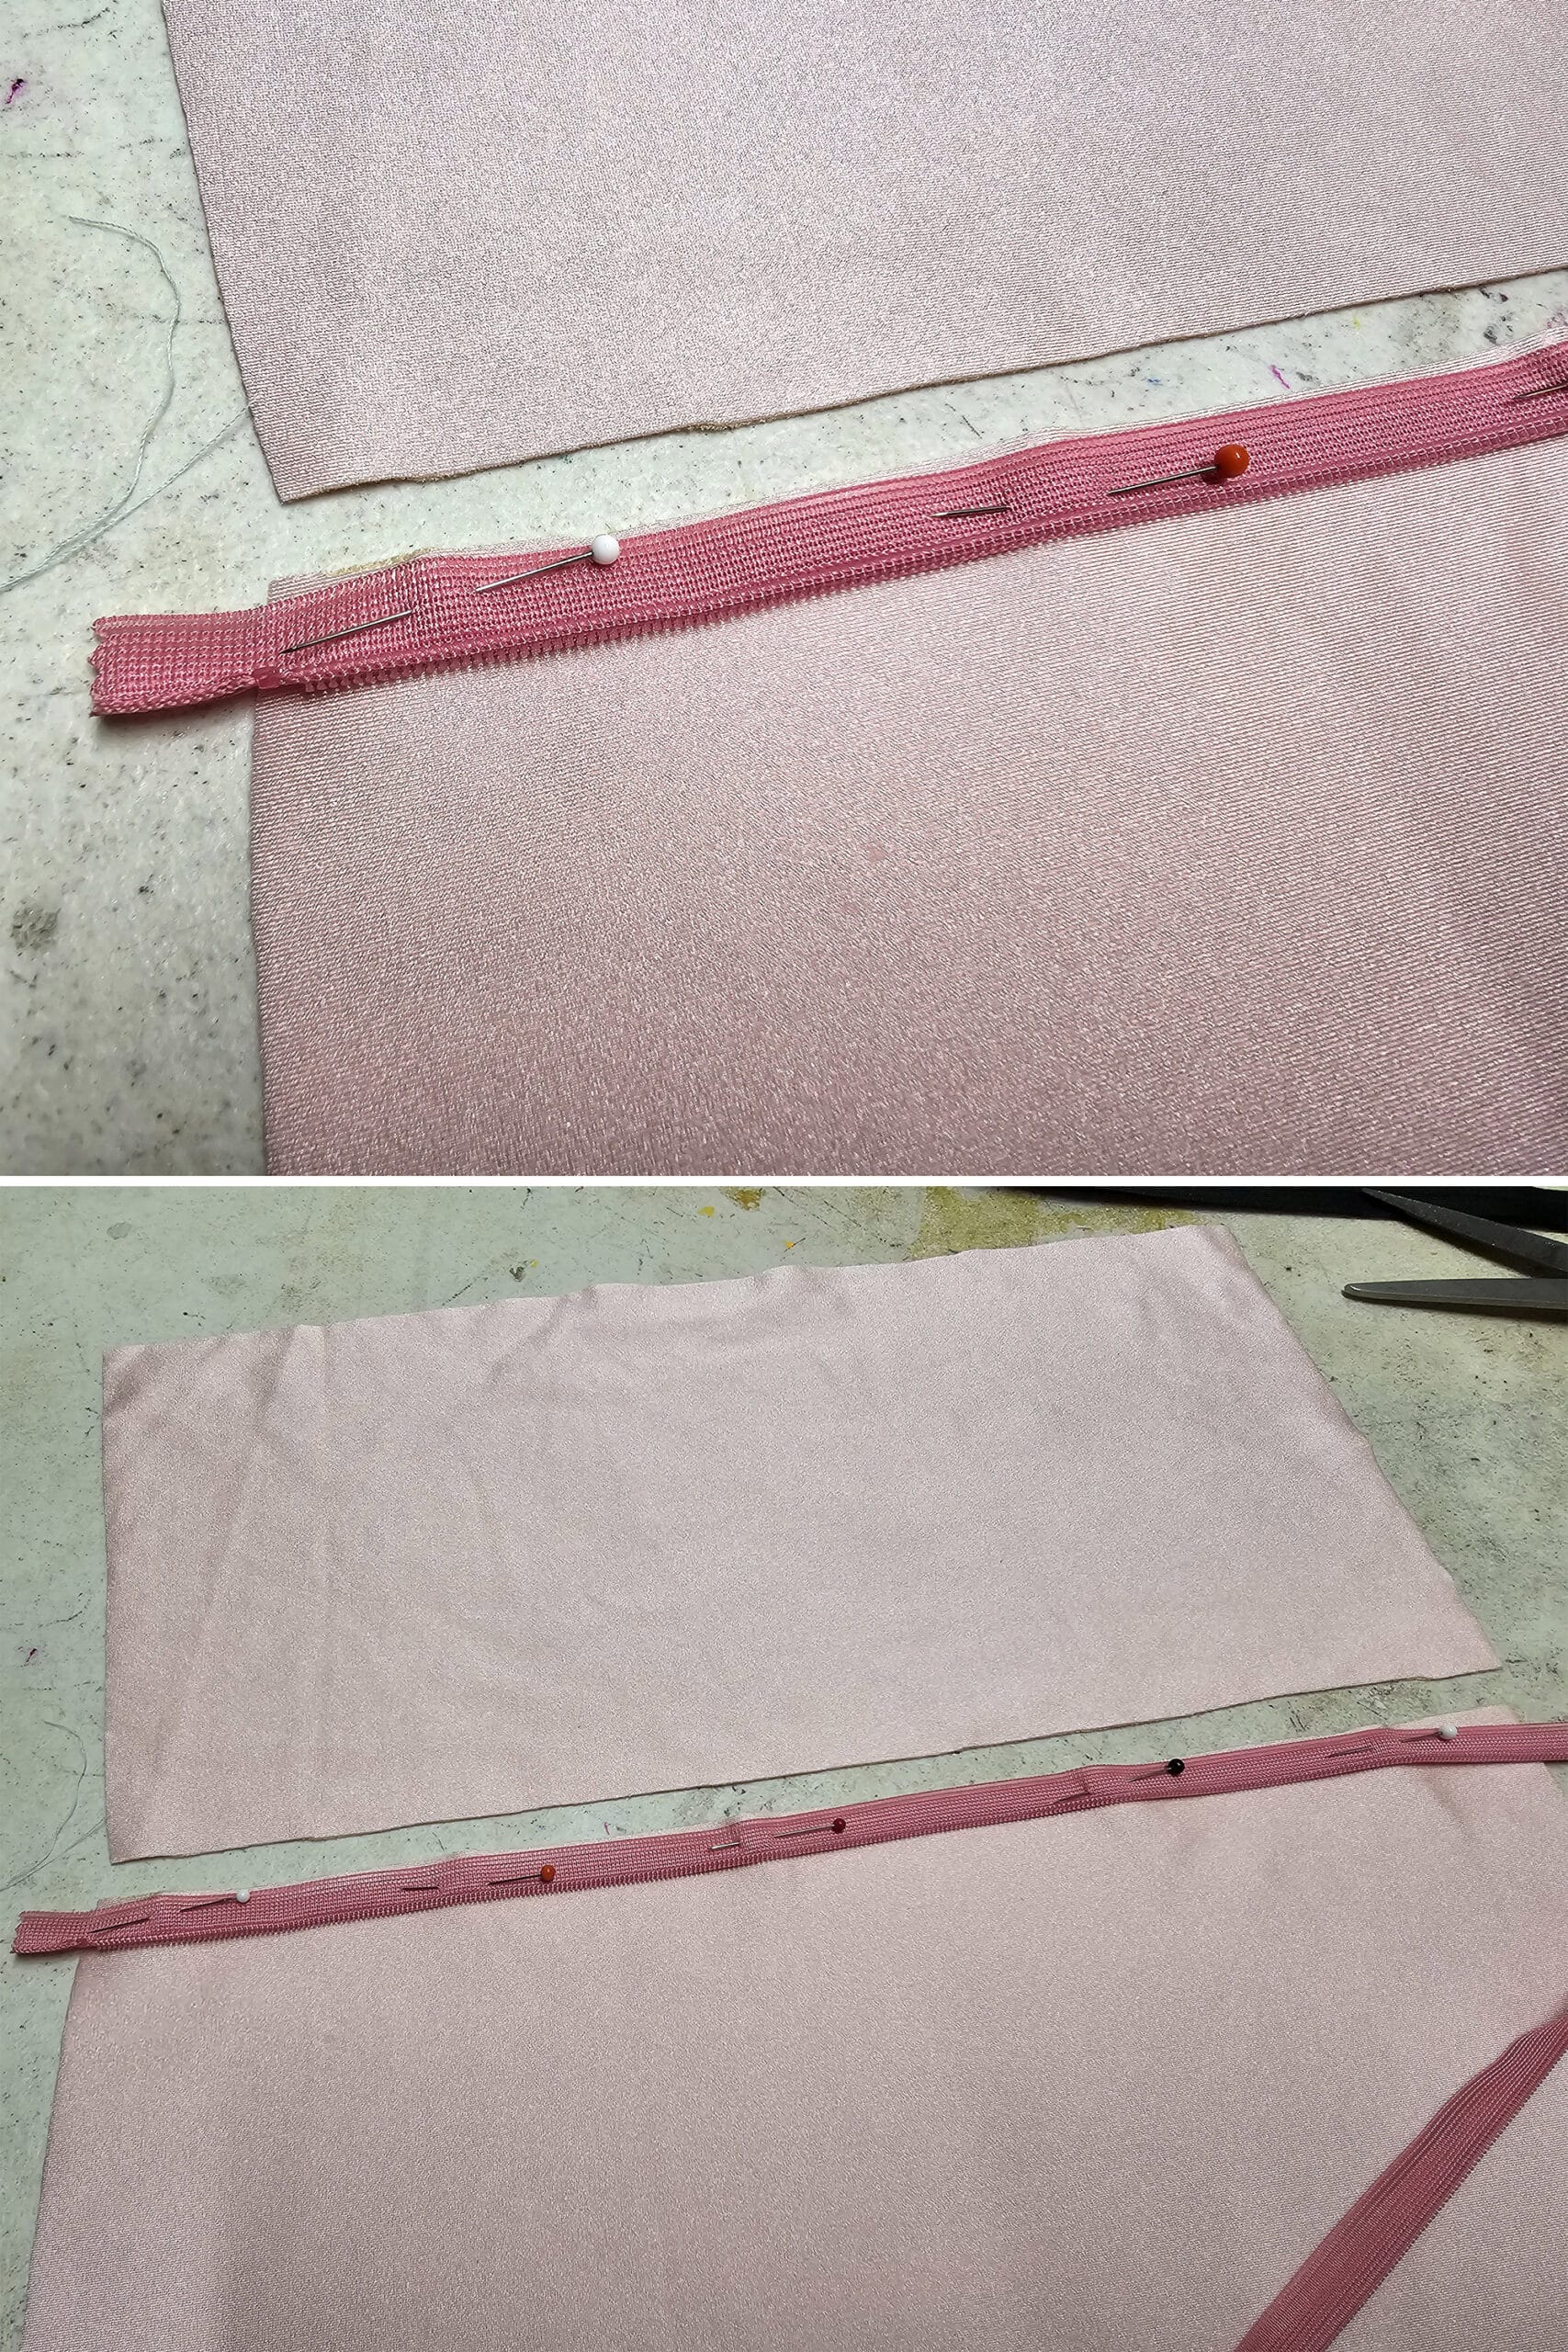
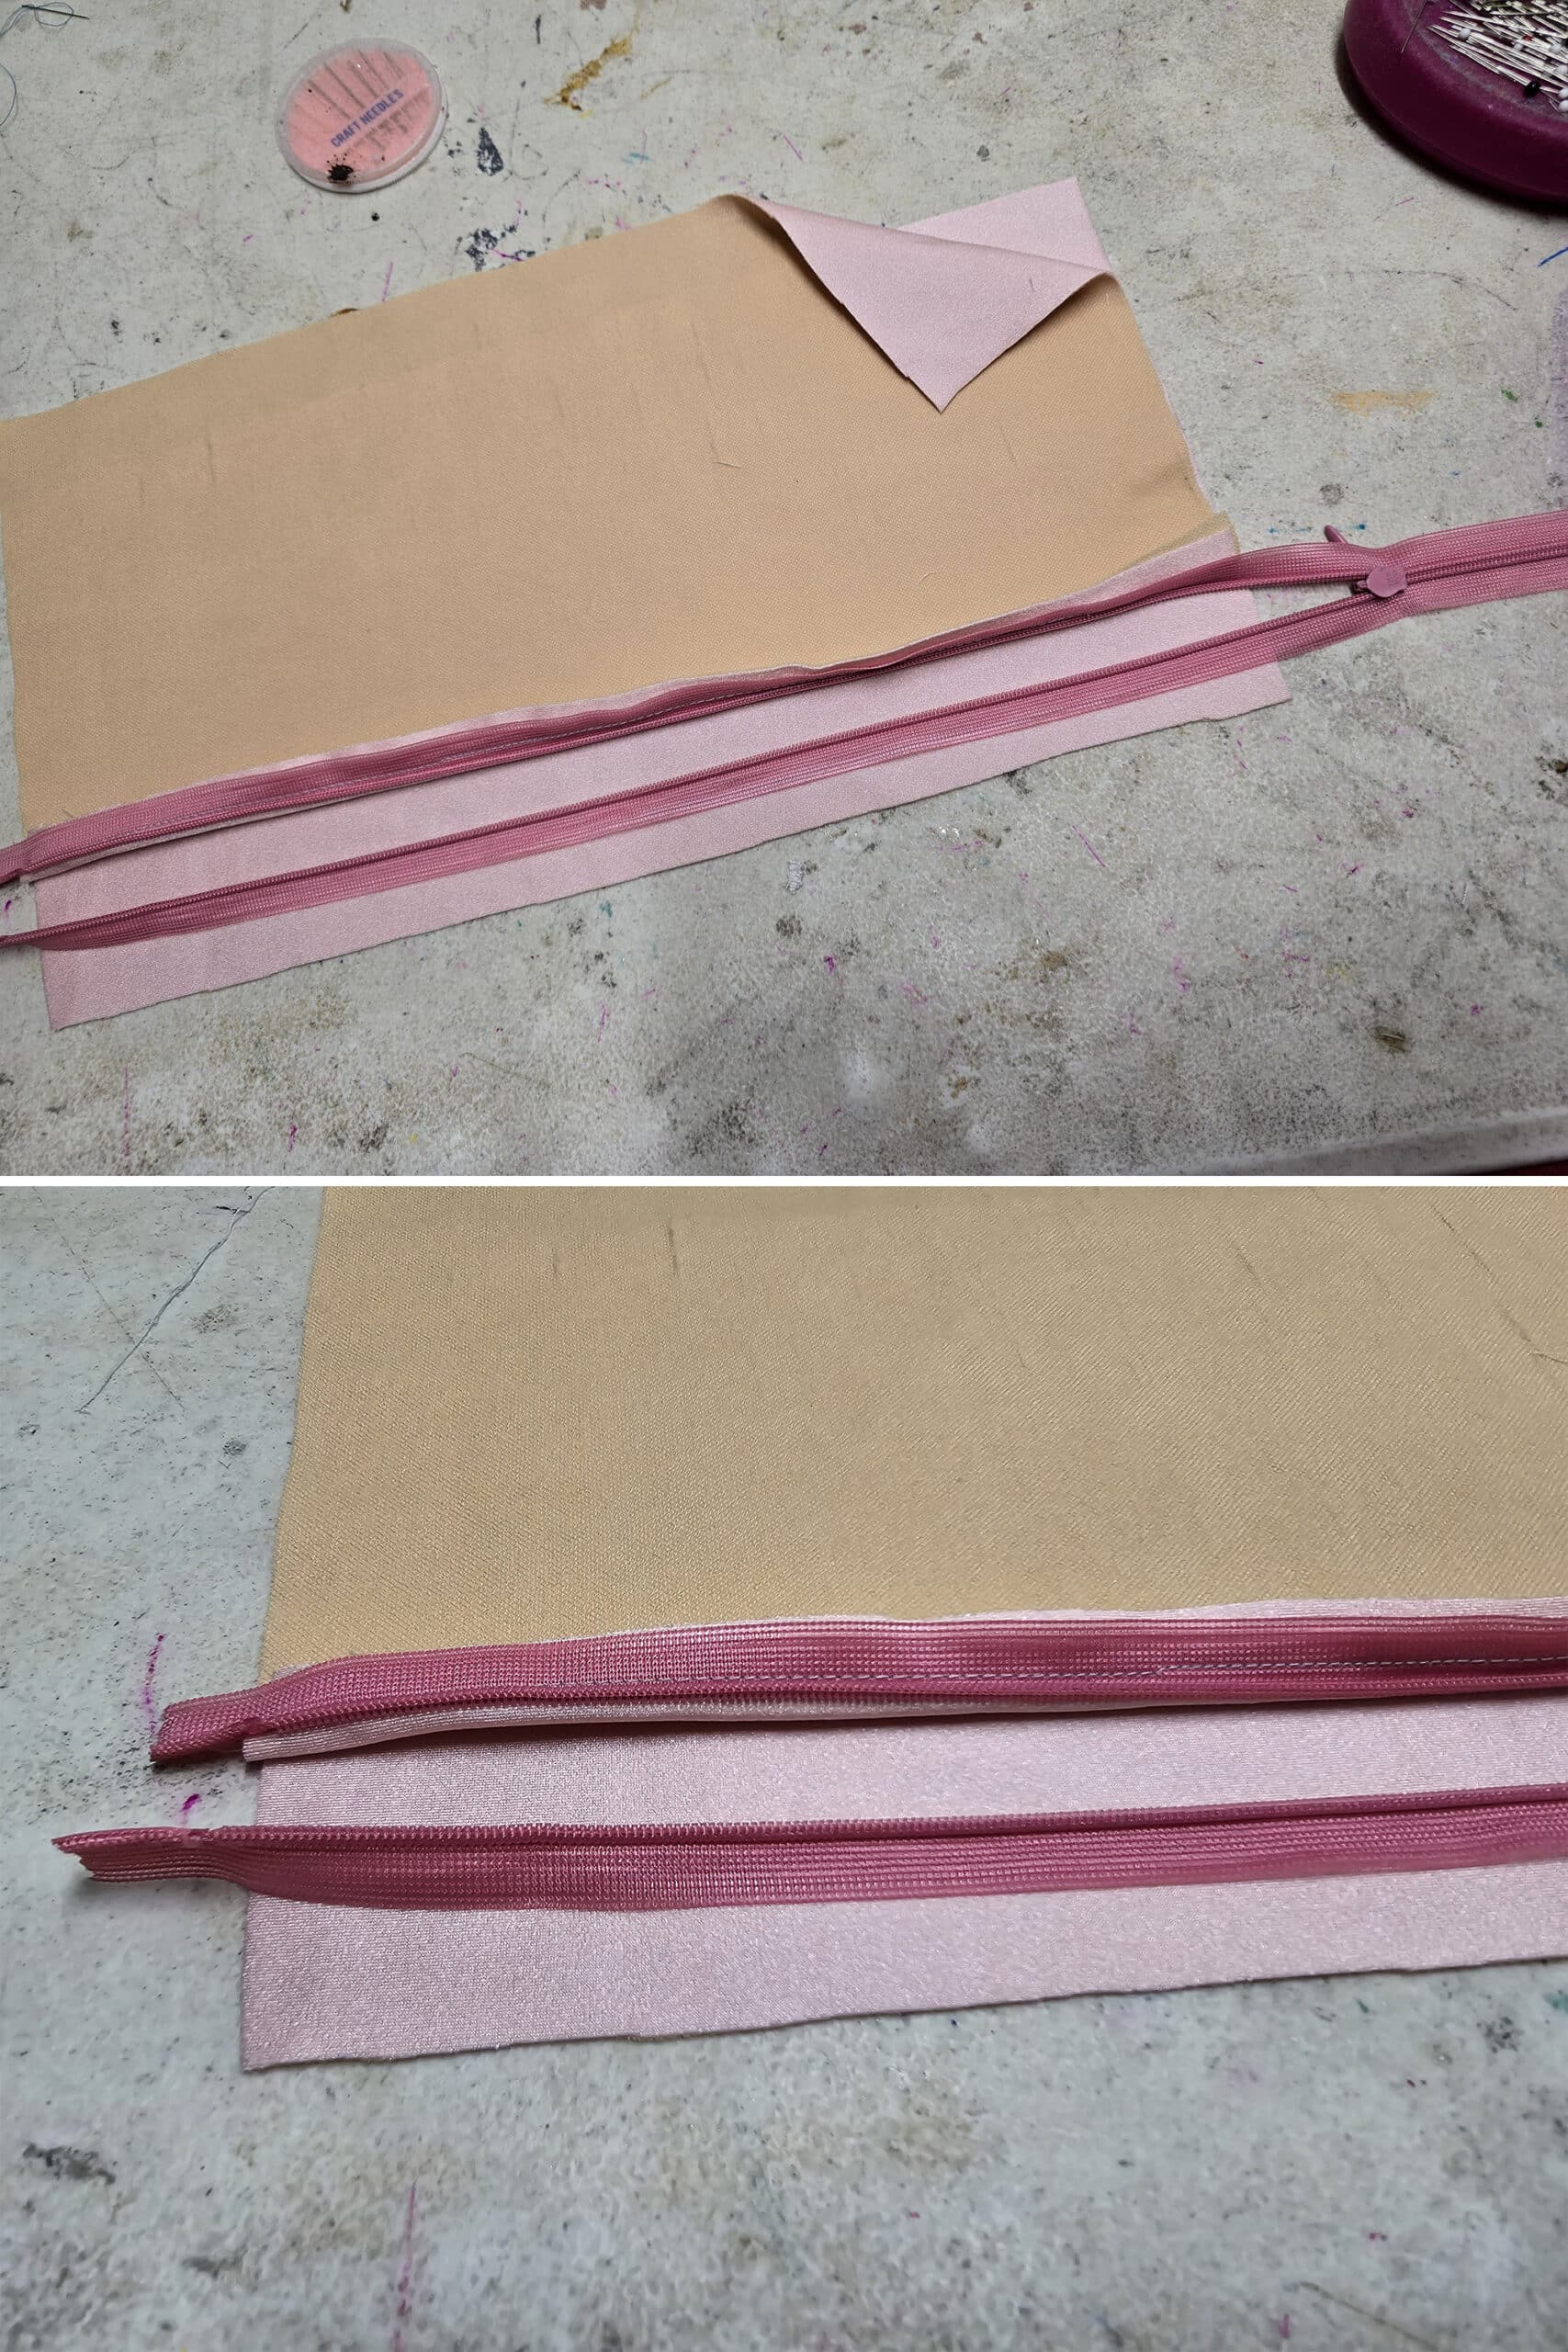
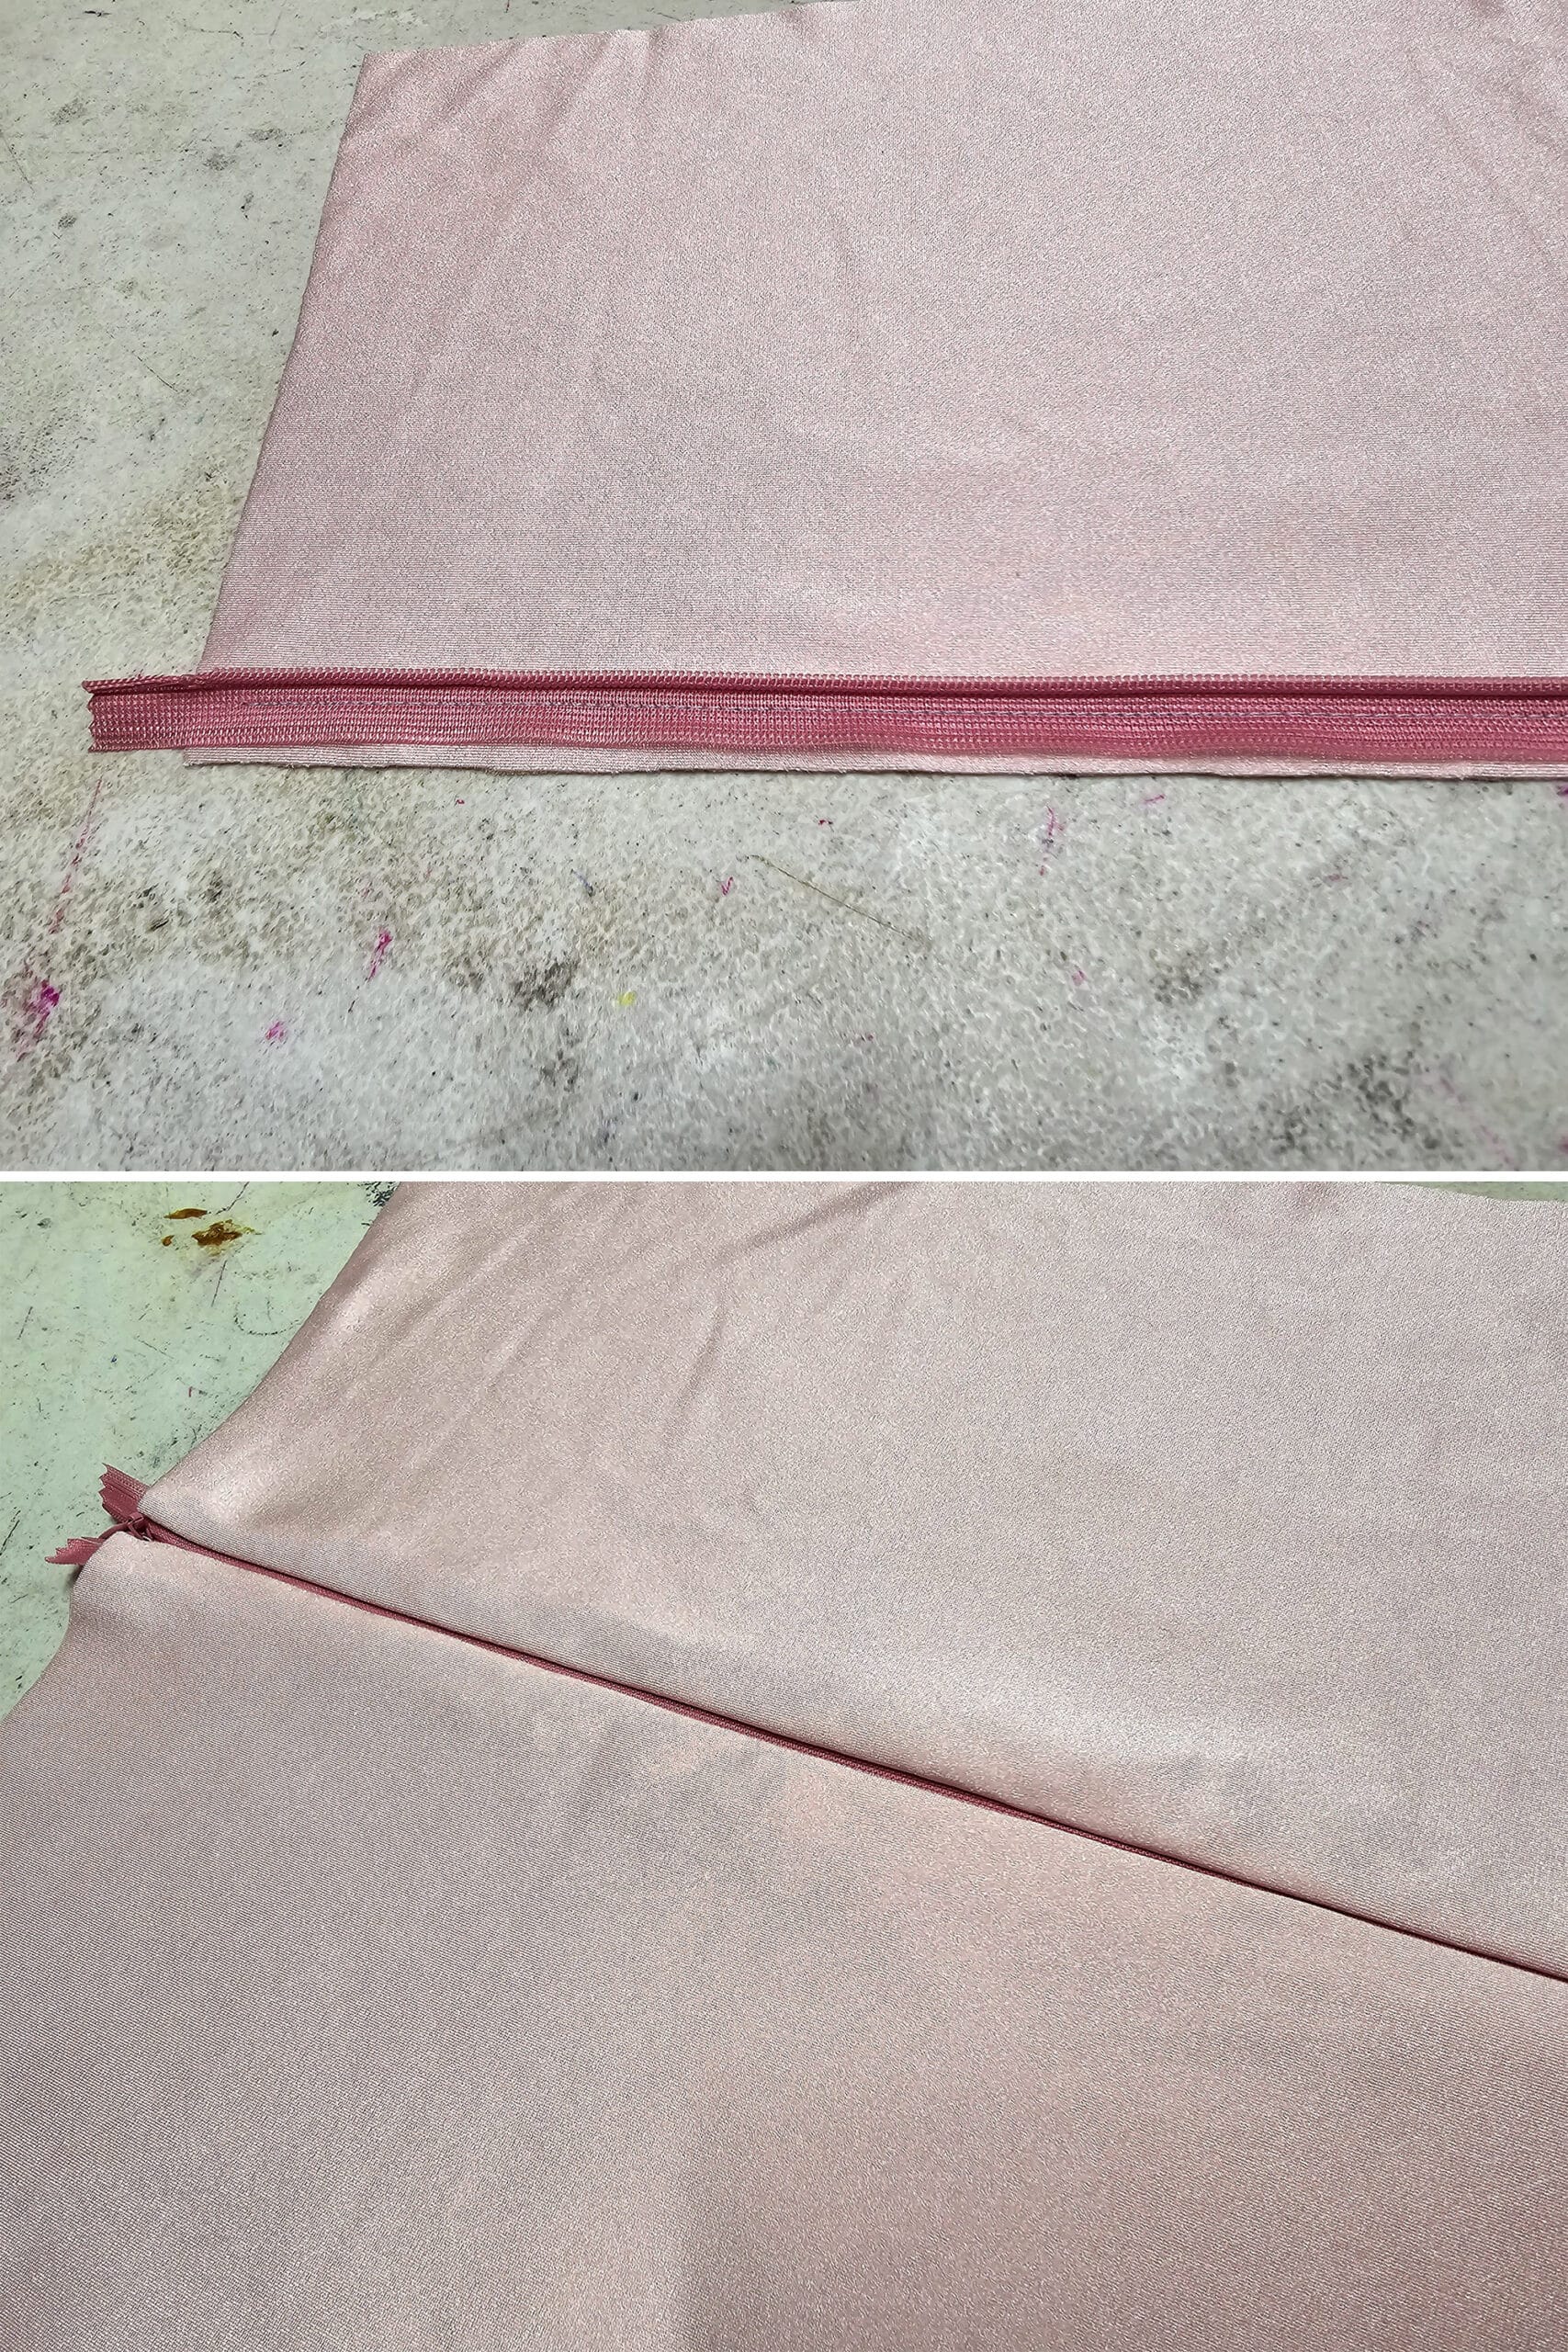
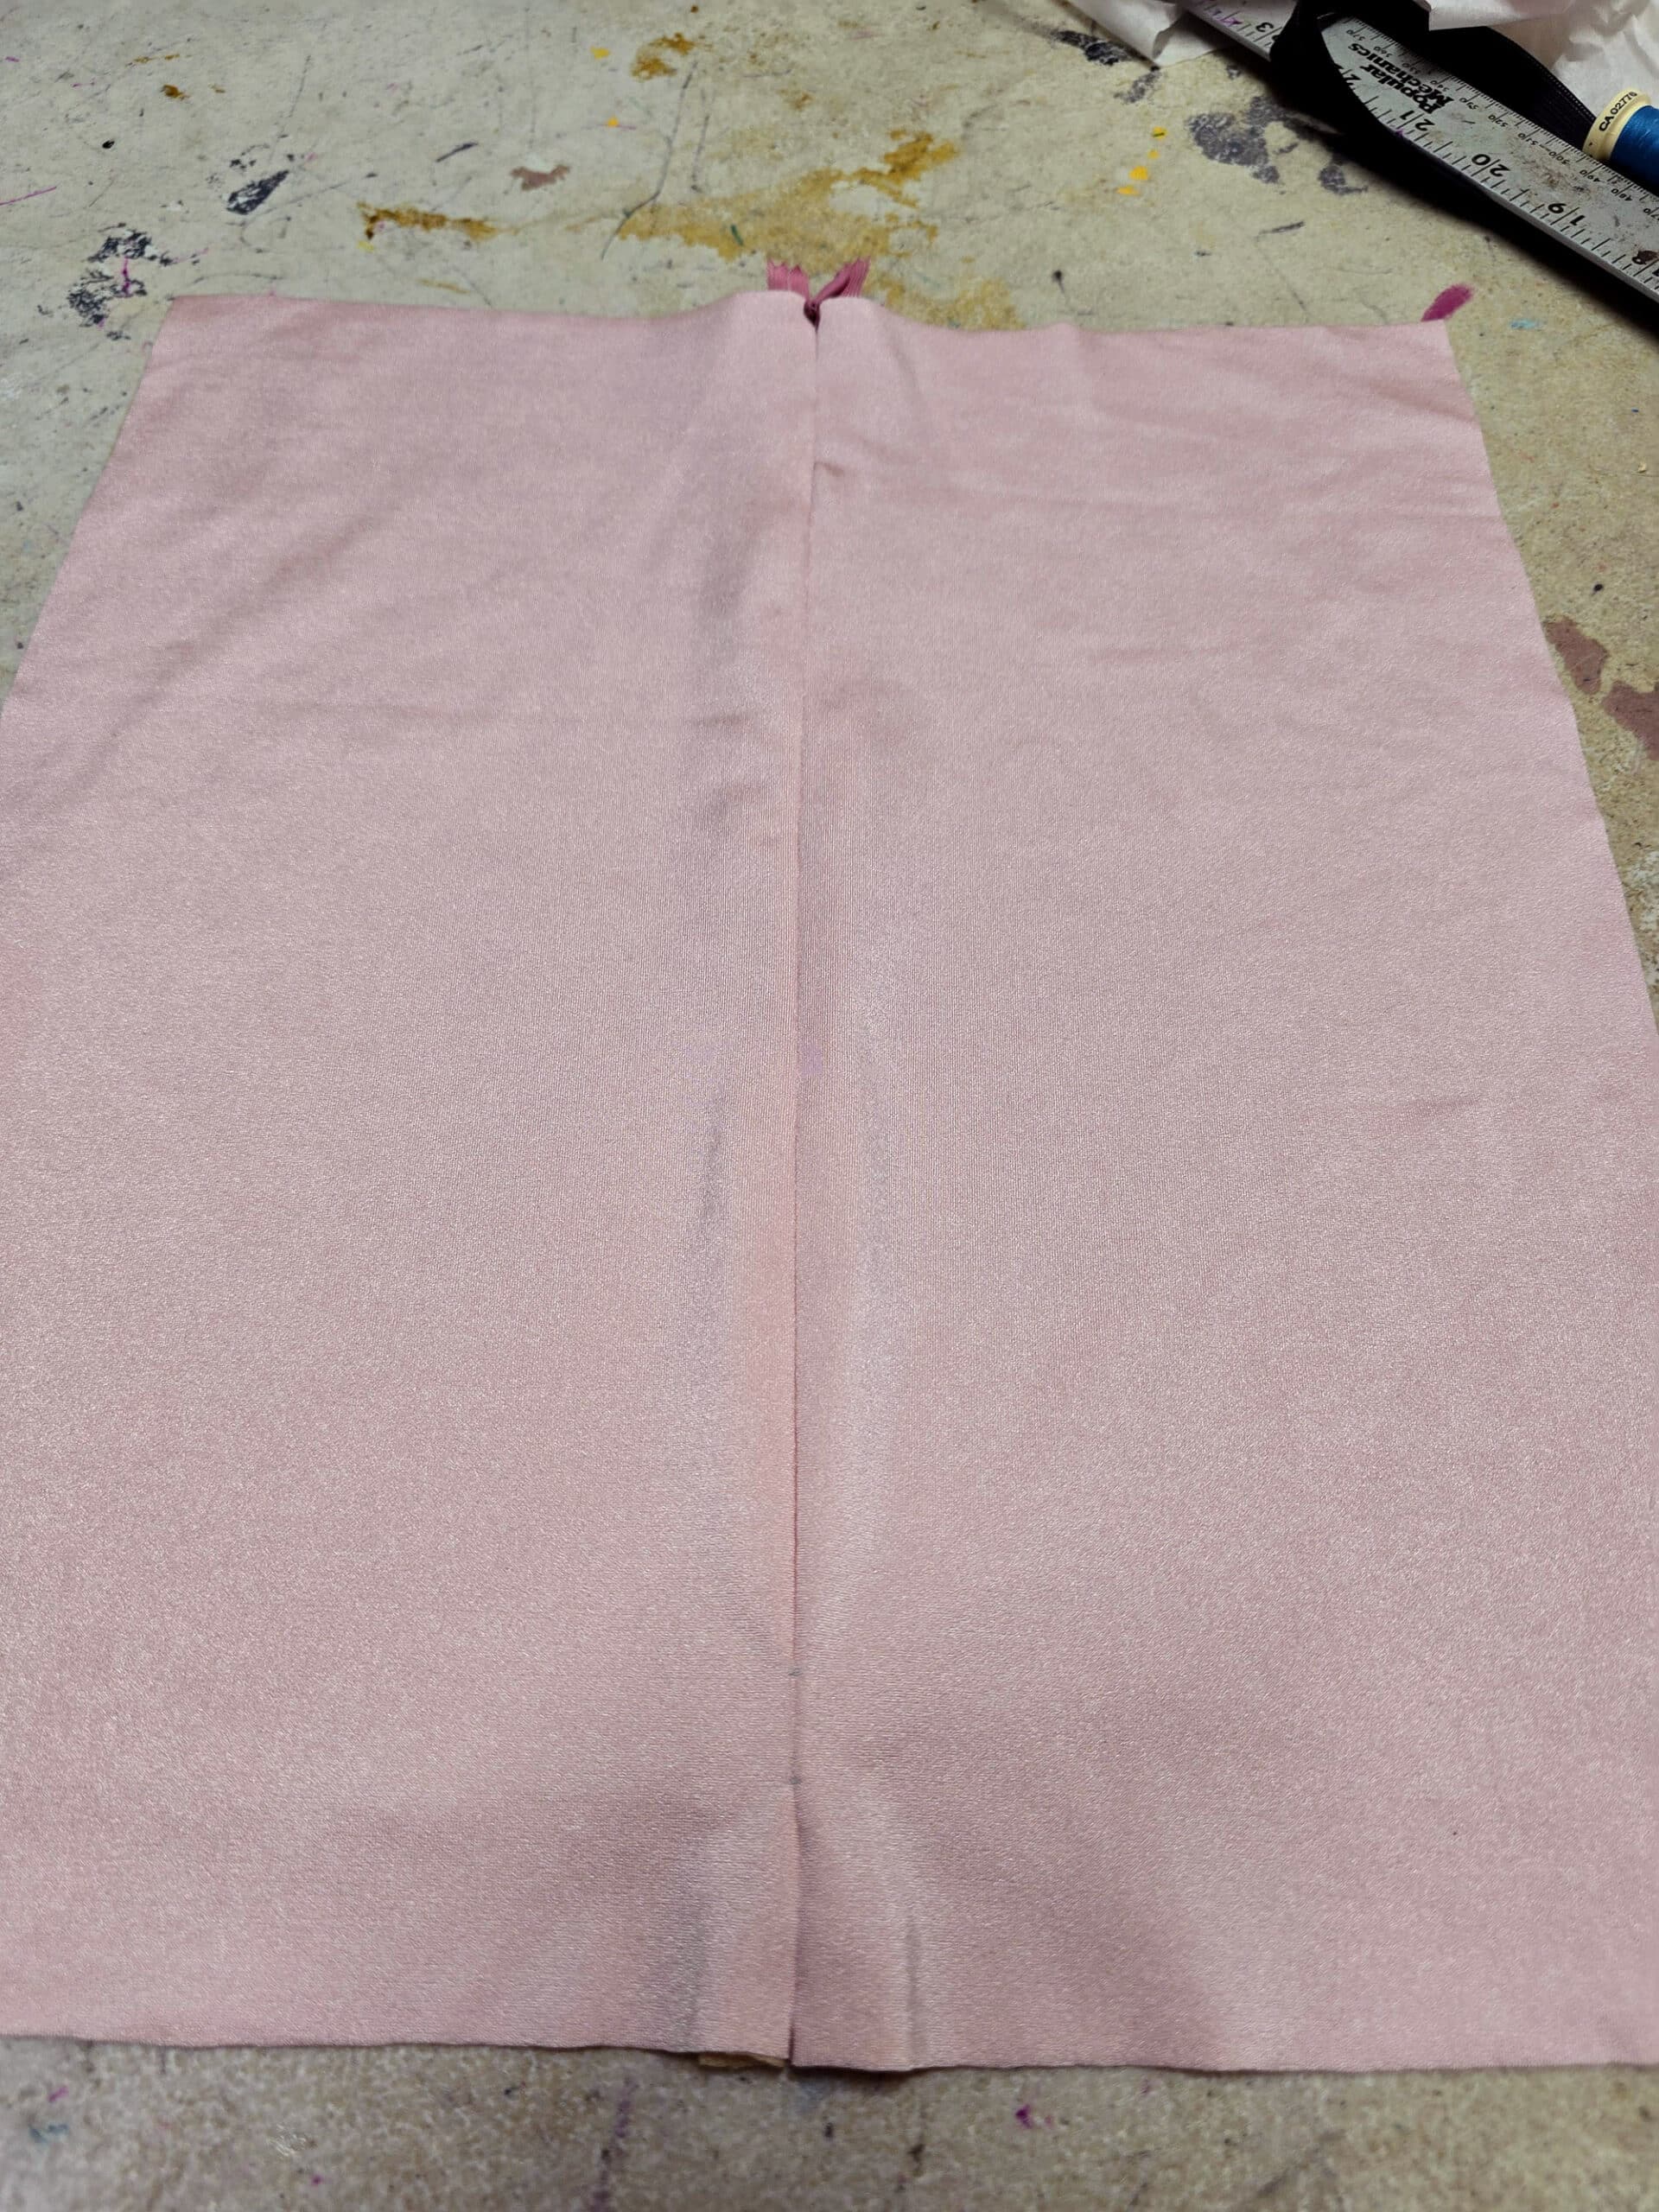
Place and Pin the Left Side of the Zipper
Lay your garment out in front of you, so the right side of the garment is facing up and the top of the garment is facing away from you.
We’re going to start with the left side of the opening, as you look at it here.
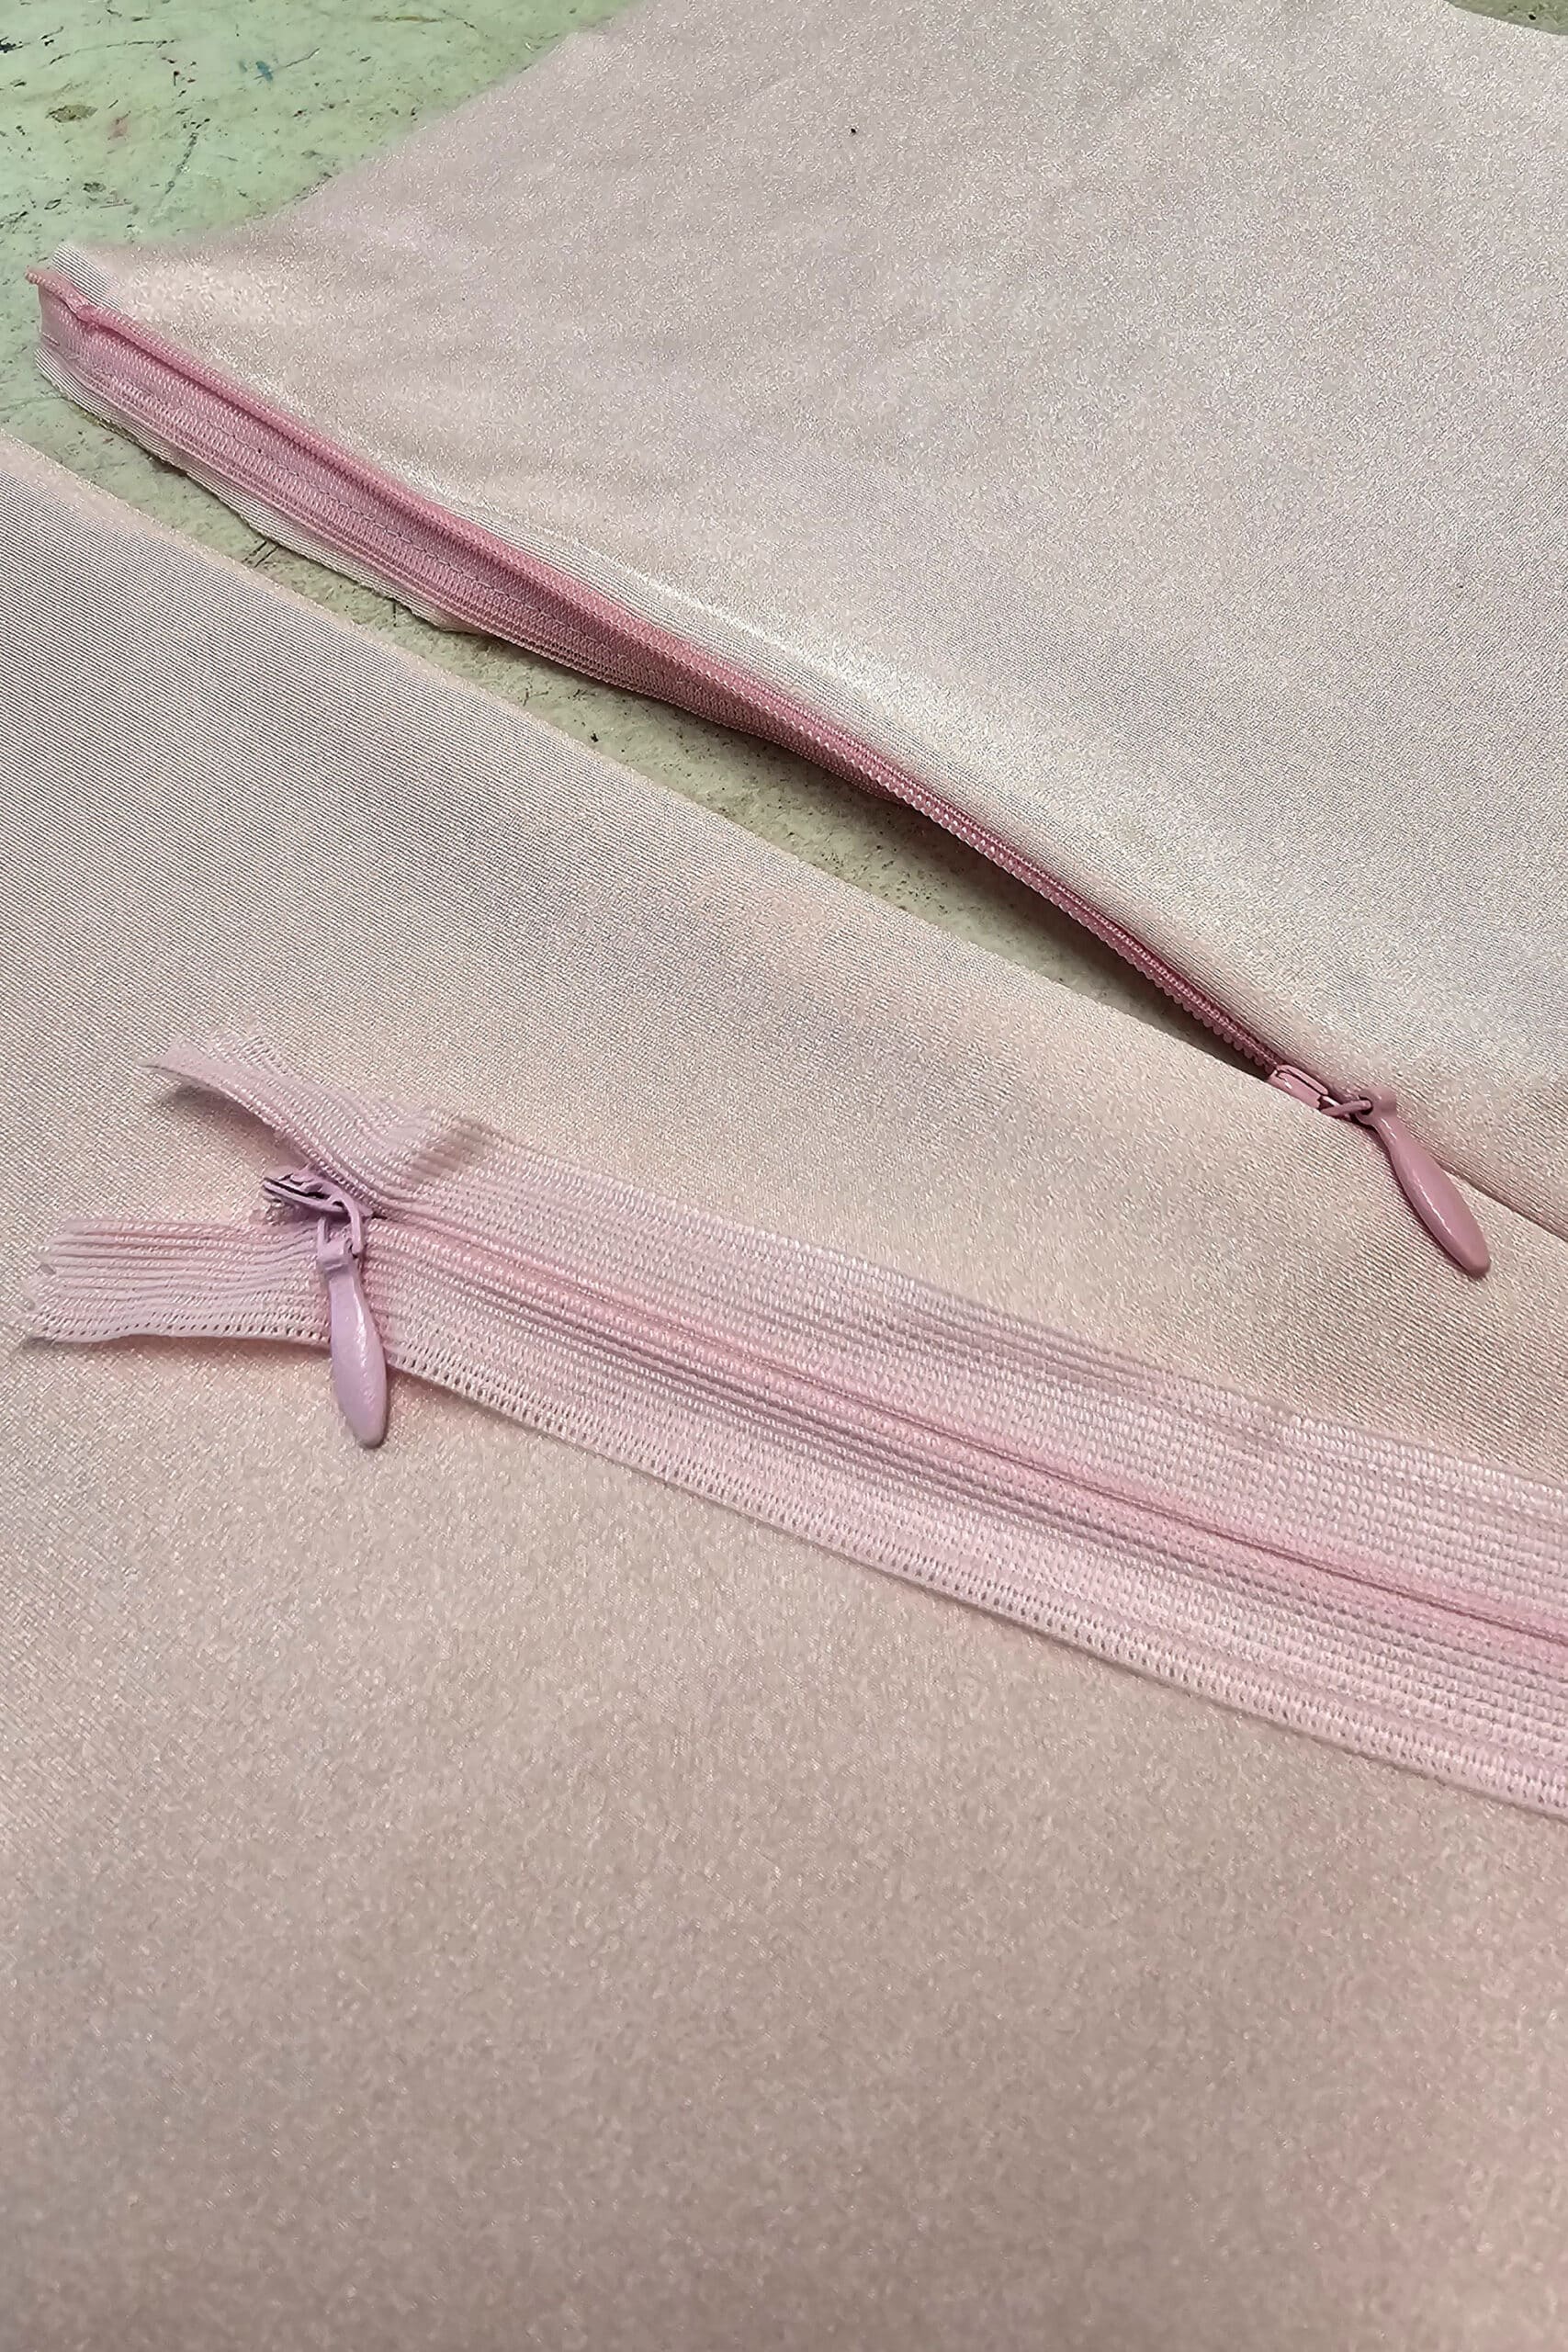
As a reminder: “Right side of the zipper” refers to the side that will be facing out, after installation. When the zipper is closed, the right side is the side that looks like a seam - the zipper face - and the wrong side is the one with zipper coil.
Open zipper all the way, and position the first side of the zipper against the right side of your fabric. You want the teeth of the zipper facing up (so right side down), and the coil side of the zipper along the seam allowance line (away from the raw edge of the fabric).
Placing the zipper as you determined in the previous step (distance from the top edge), pin the zipper to the right side of the fabric.
Keep the fabric ABSOLUTELY flat as you do this, making very sure not to stretch it - or the zipper - at any point.
This is key to your invisible zipper success - any stretching of the fabric or zipper tape will result in waves, and in the pieces of fabric - and any design on them - not lining up when the zipper is done up.
Pin down as far as you’d like the actual zipper to go - you can mark the end with dressmaker chalk, a fabric marker or a pin if you’d like, I tend to just eyeball it.
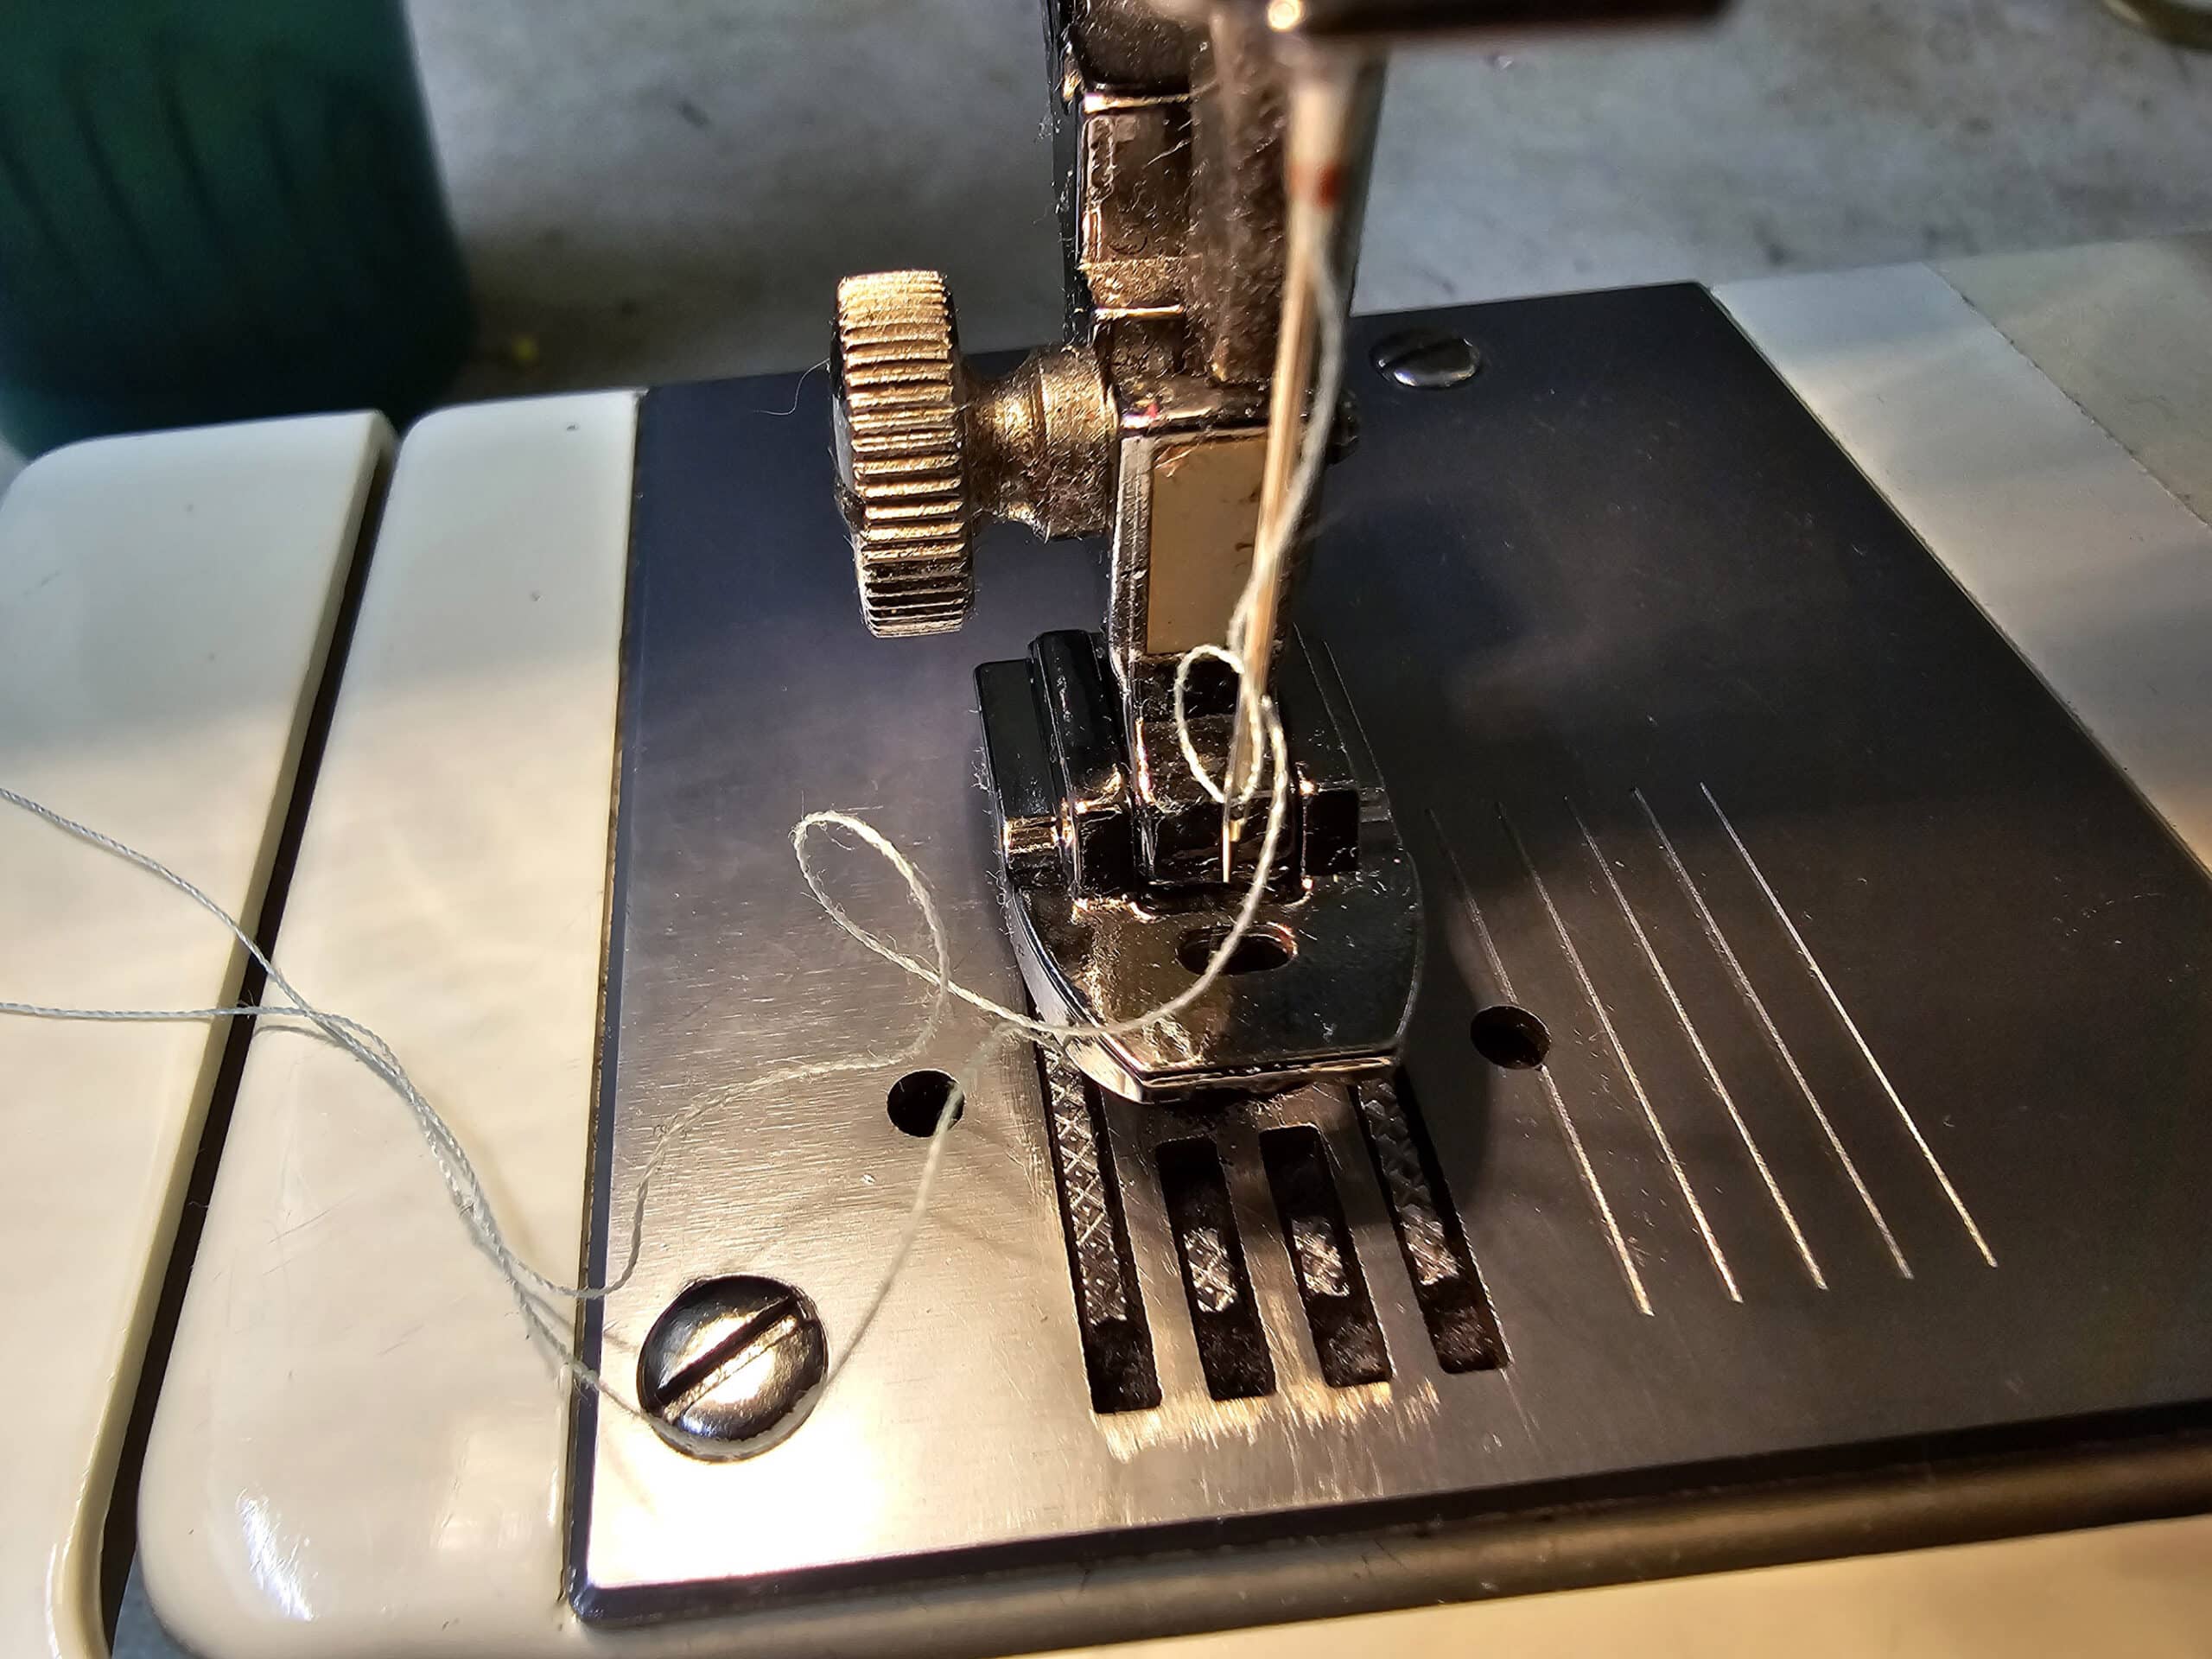
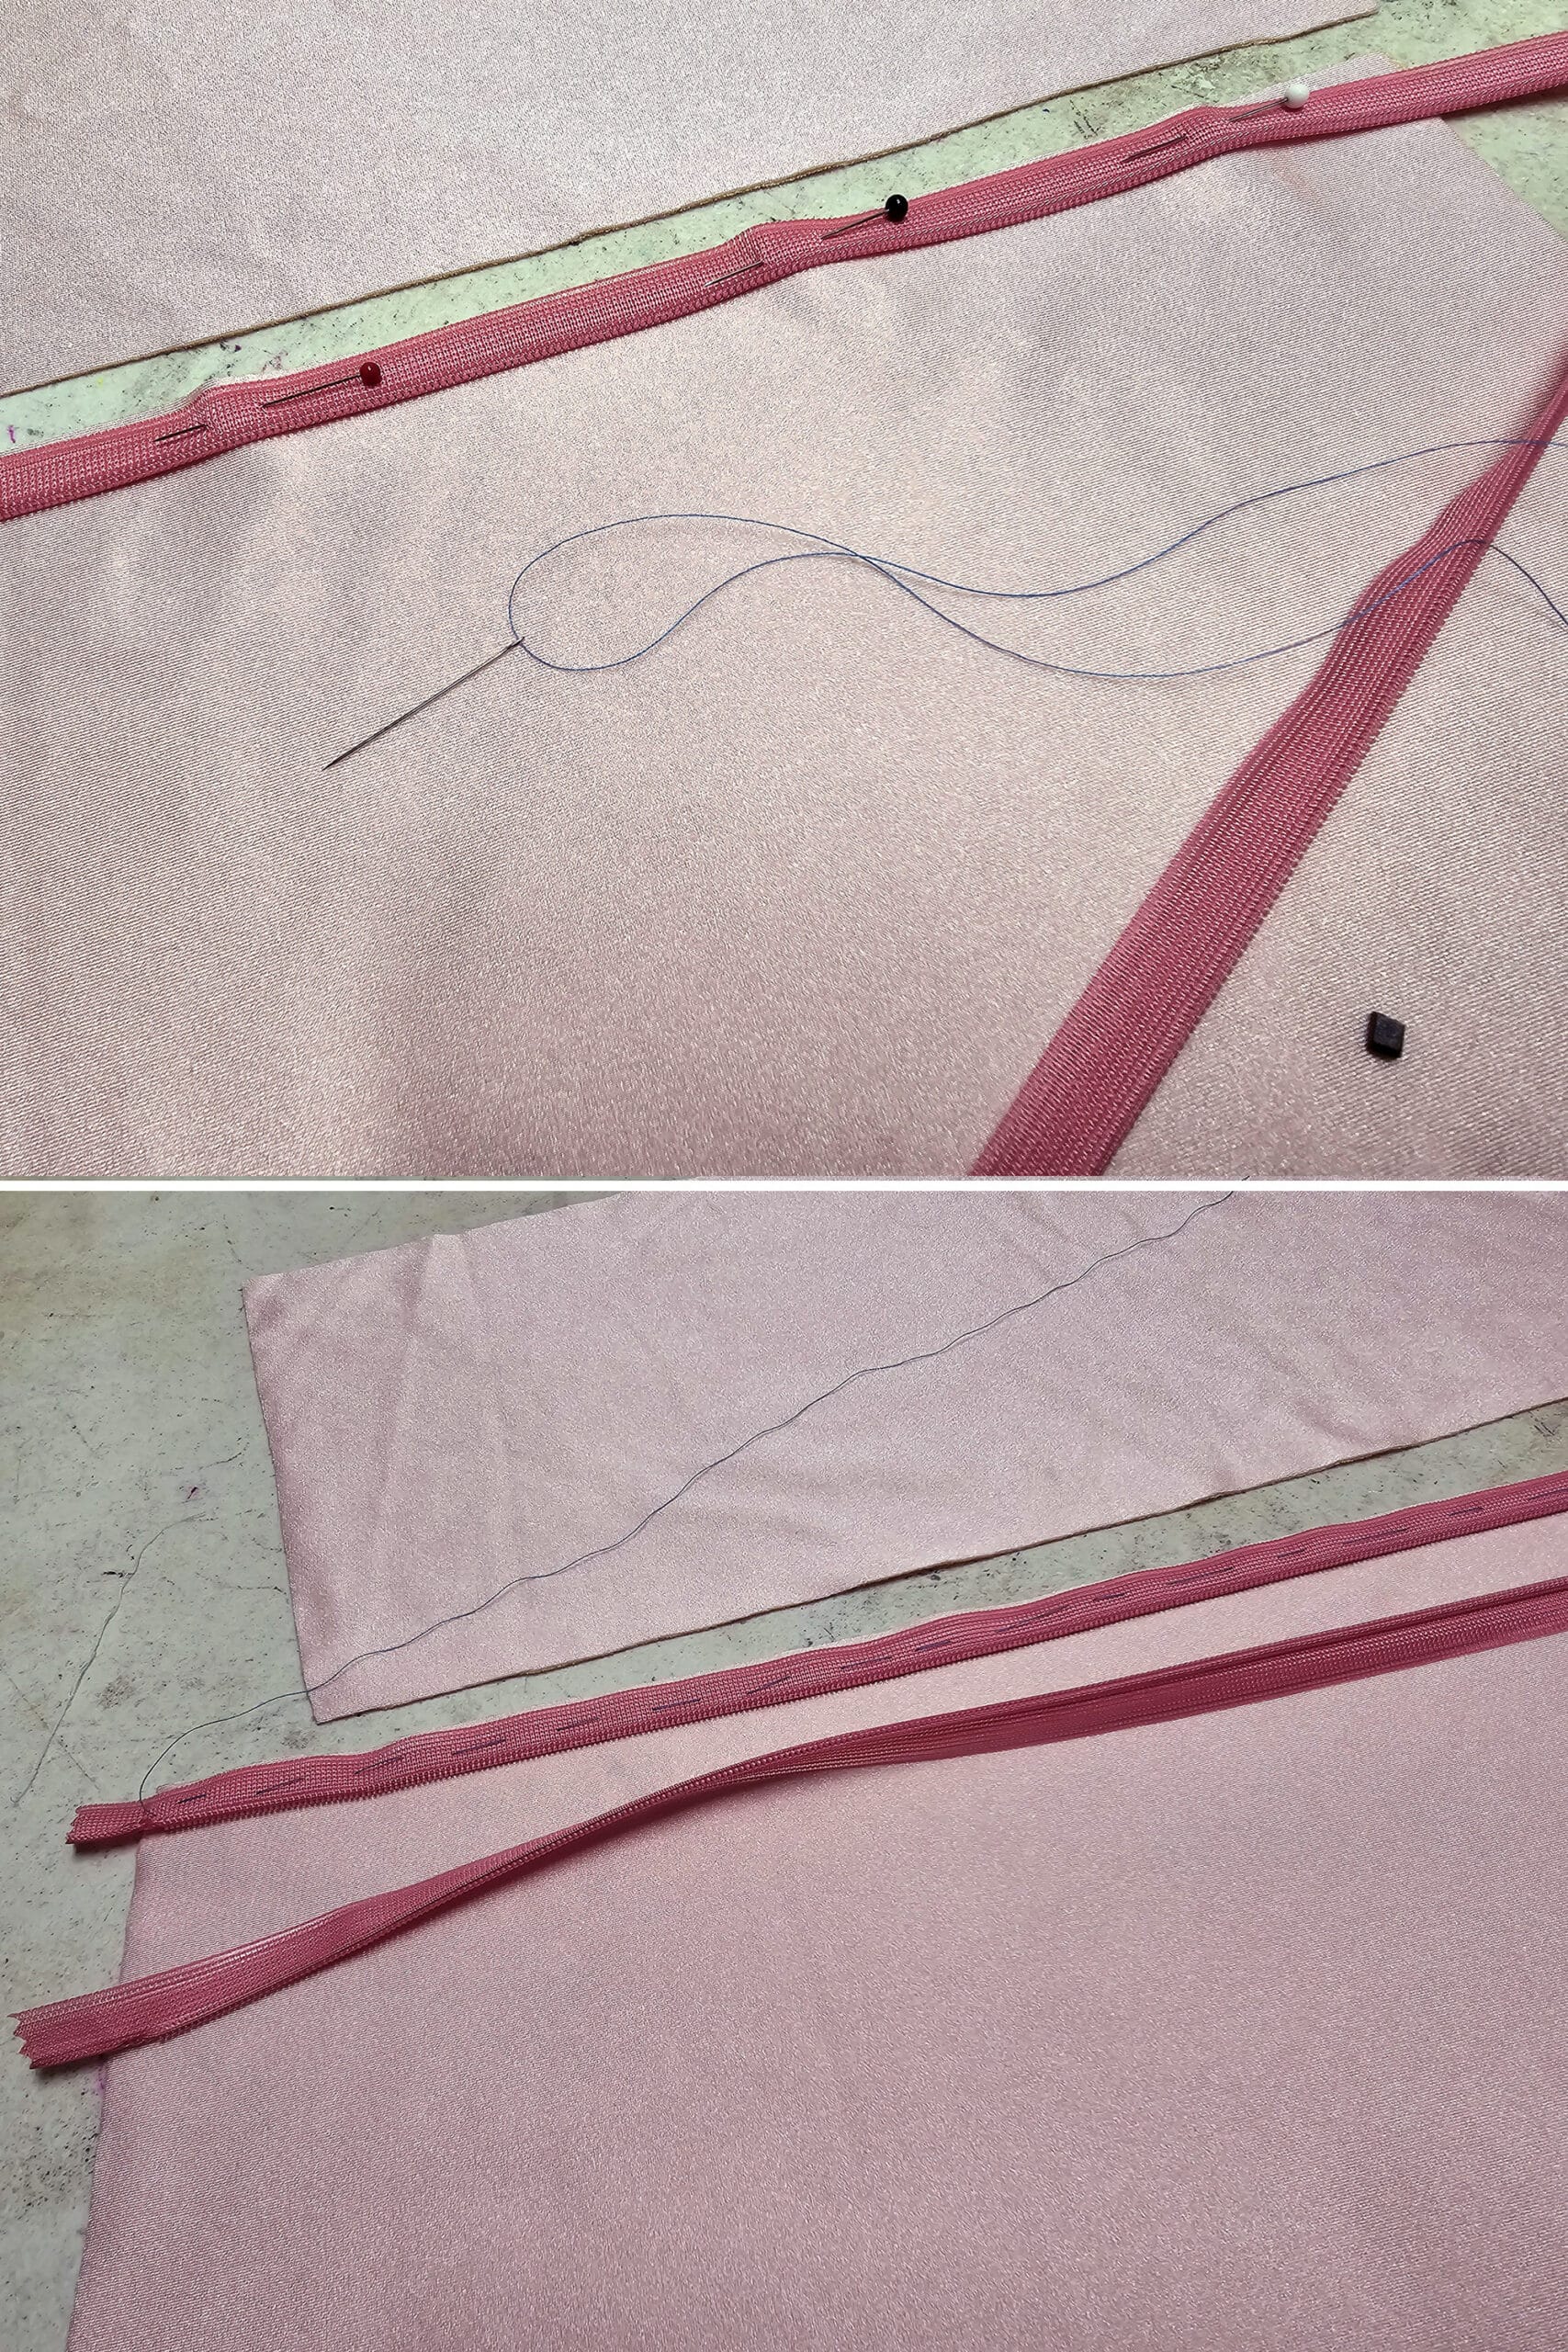
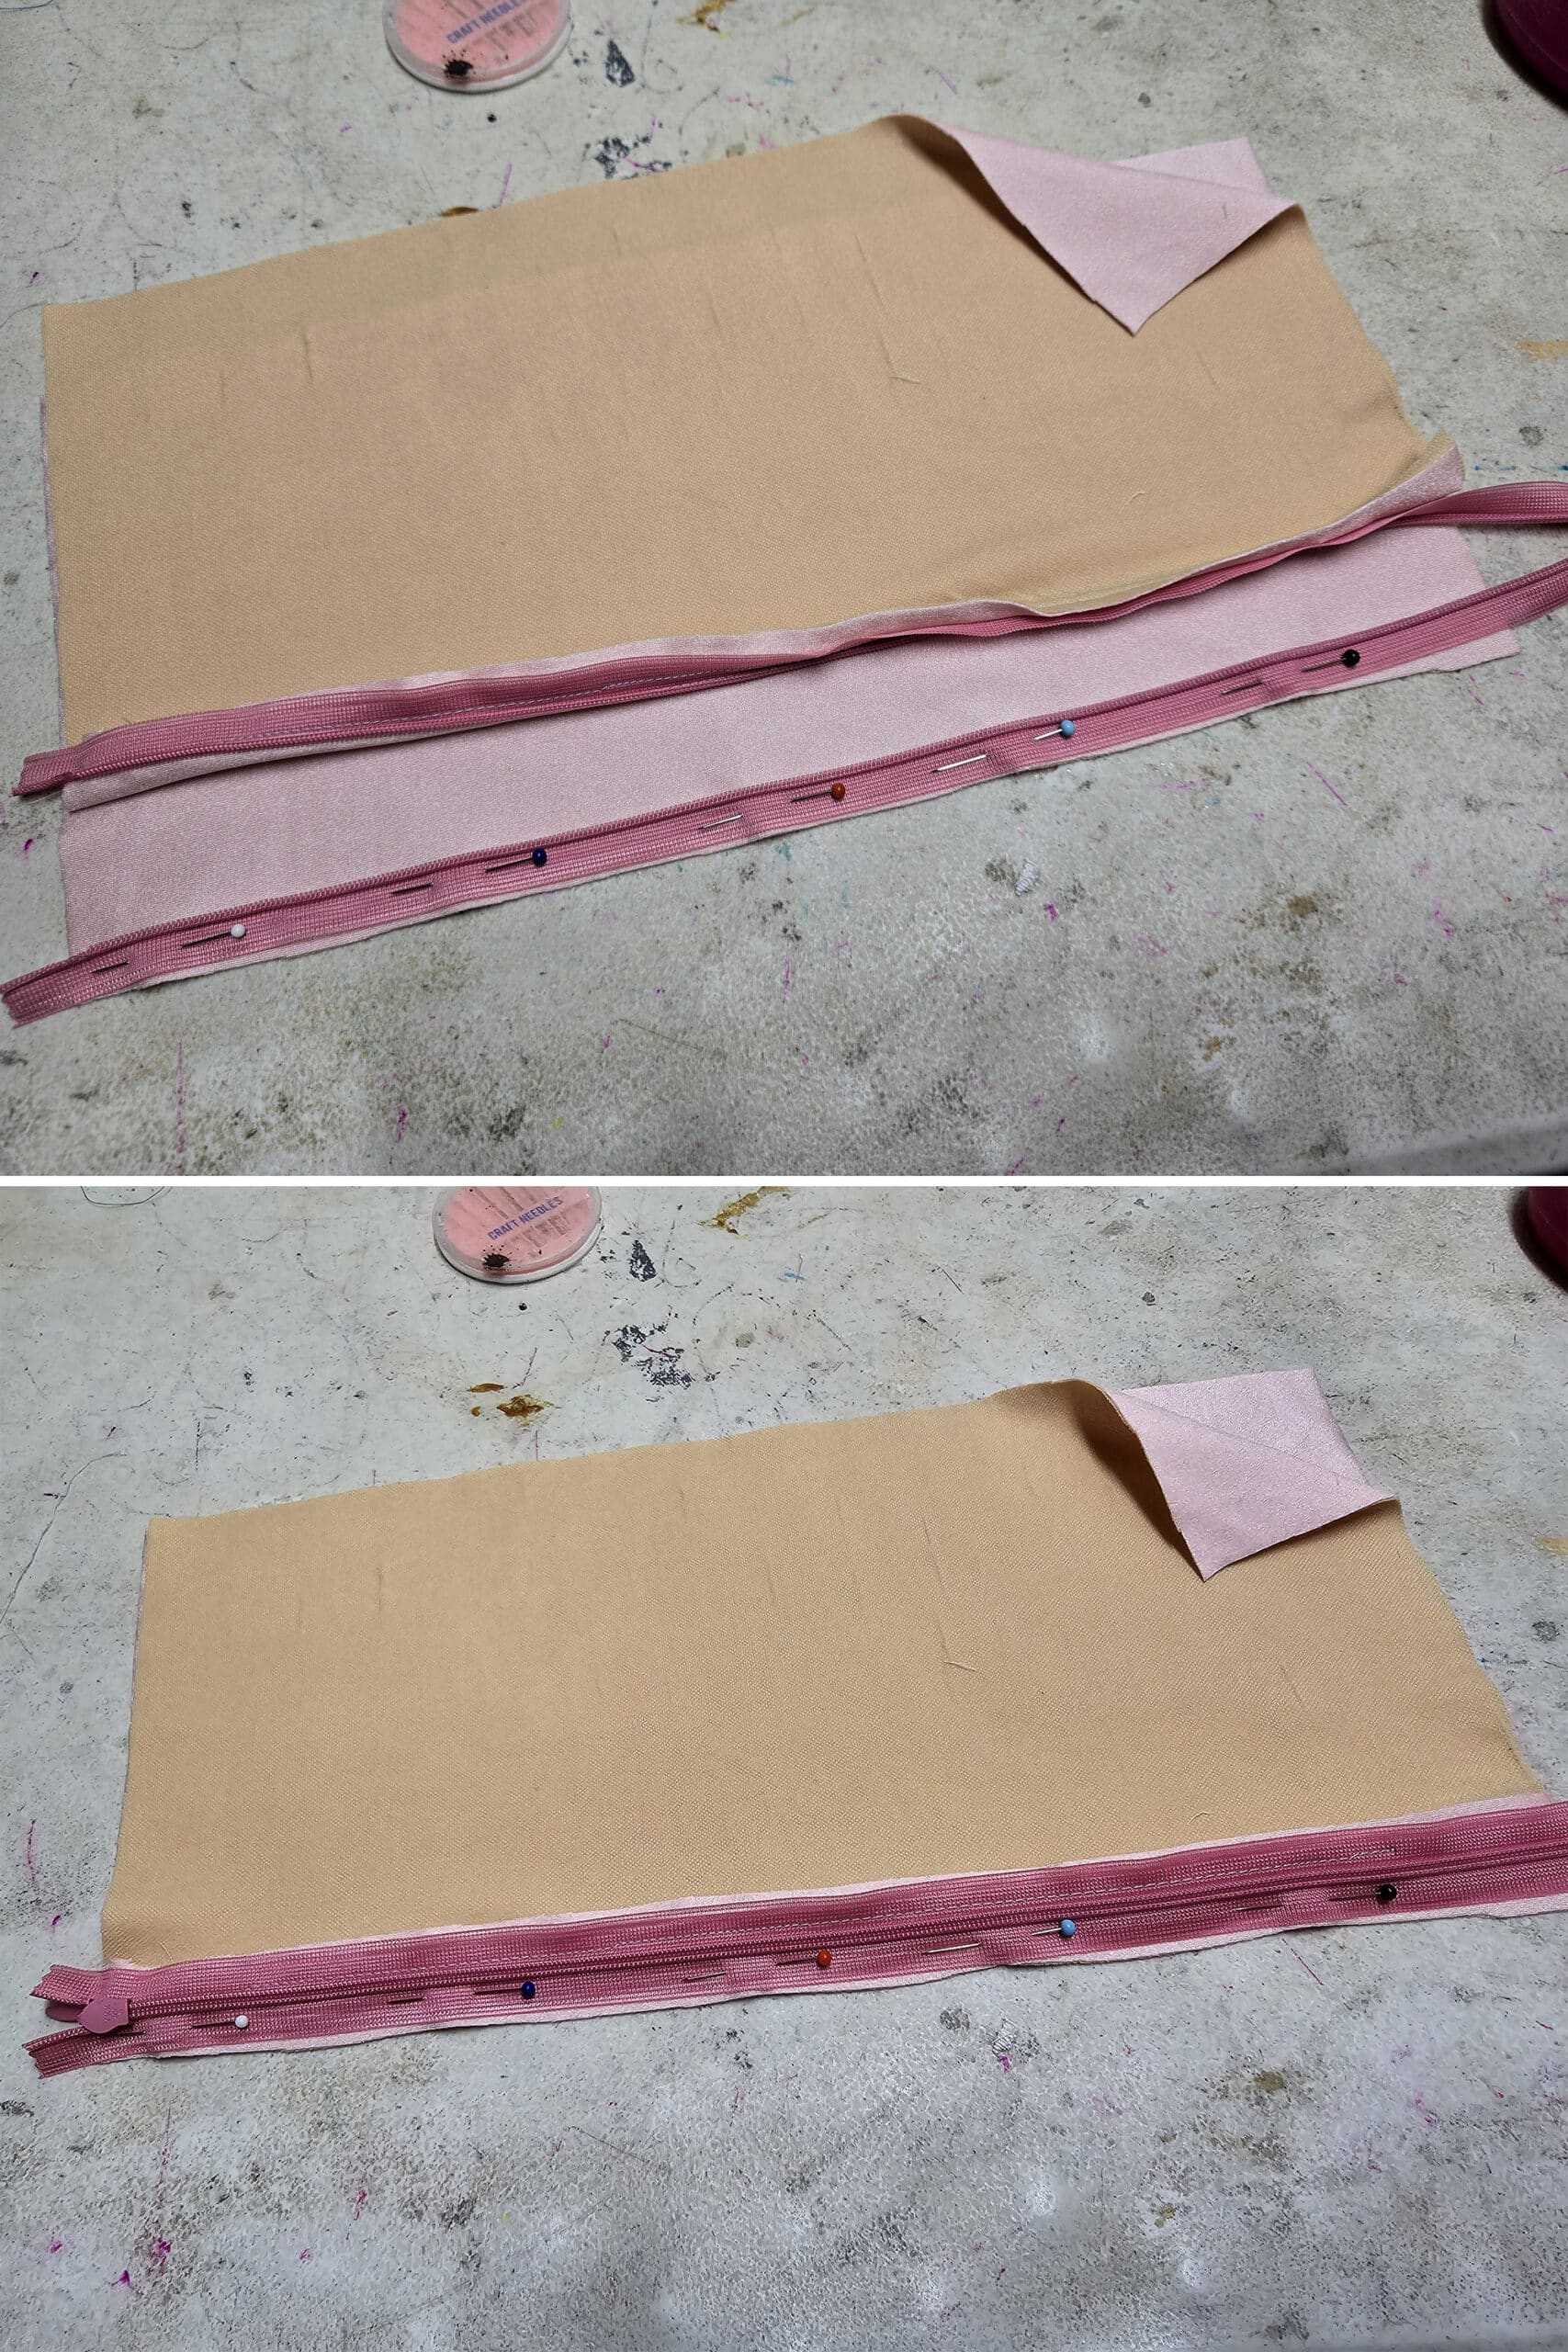
Hand Baste the Zipper
I’m going to tell you now, I absolutely hate hand sewing anything, I never baste anything at all - EXCEPT invisible zippers.
You really don’t want to skip this step - I definitely wouldn’t have you do it if it wasn’t absolutely necessary!
So, use your hand sewing needle and contrasting thread to carefully baste your zipper to this side of your garment. I don’t knot the thread, and I remove the pins as I go.
Again, just be sure you’re not stretching either the zipper or the garment as you sew. Once you have it basted and the pins removed, it should be able to lay out perfectly flat.
If not, take it out and start again. Doing so now will save you a world of stress, later!
Sew the First Seam Line
Thread your machine with thread to match your main garment fabric.
Starting at the top edge of the zipper, slowly and carefully sew a straight seam down the left side of the dress, down as far as you’d like the zipper opening to go.
Once you reach the end of the seam, trim your threads.
You can use a zipper foot or a standard zipper foot, with the machine set to the center needle position for this seam.
I try to sew pretty close to the edge of the coils, with the presser foot (a regular zipper foot, in this case) just to the right of the invisible zipper teeth.
Be very careful not to stretch anything as you sew. That’s going to be a repeat theme, throughout this process.
Also, I try to avoid the basted stitches, just so they’re easier to pull out, once I’m done sewing this seam.
Note: If you’d like to clean up the raw edge of the zipper application, you can use a zigzag stitch (I use a pretty wide stitch width when doing this) to bind the very edge of your fabric to the zipper - but don’t do it until you’ve machine sewn that first stitching line!

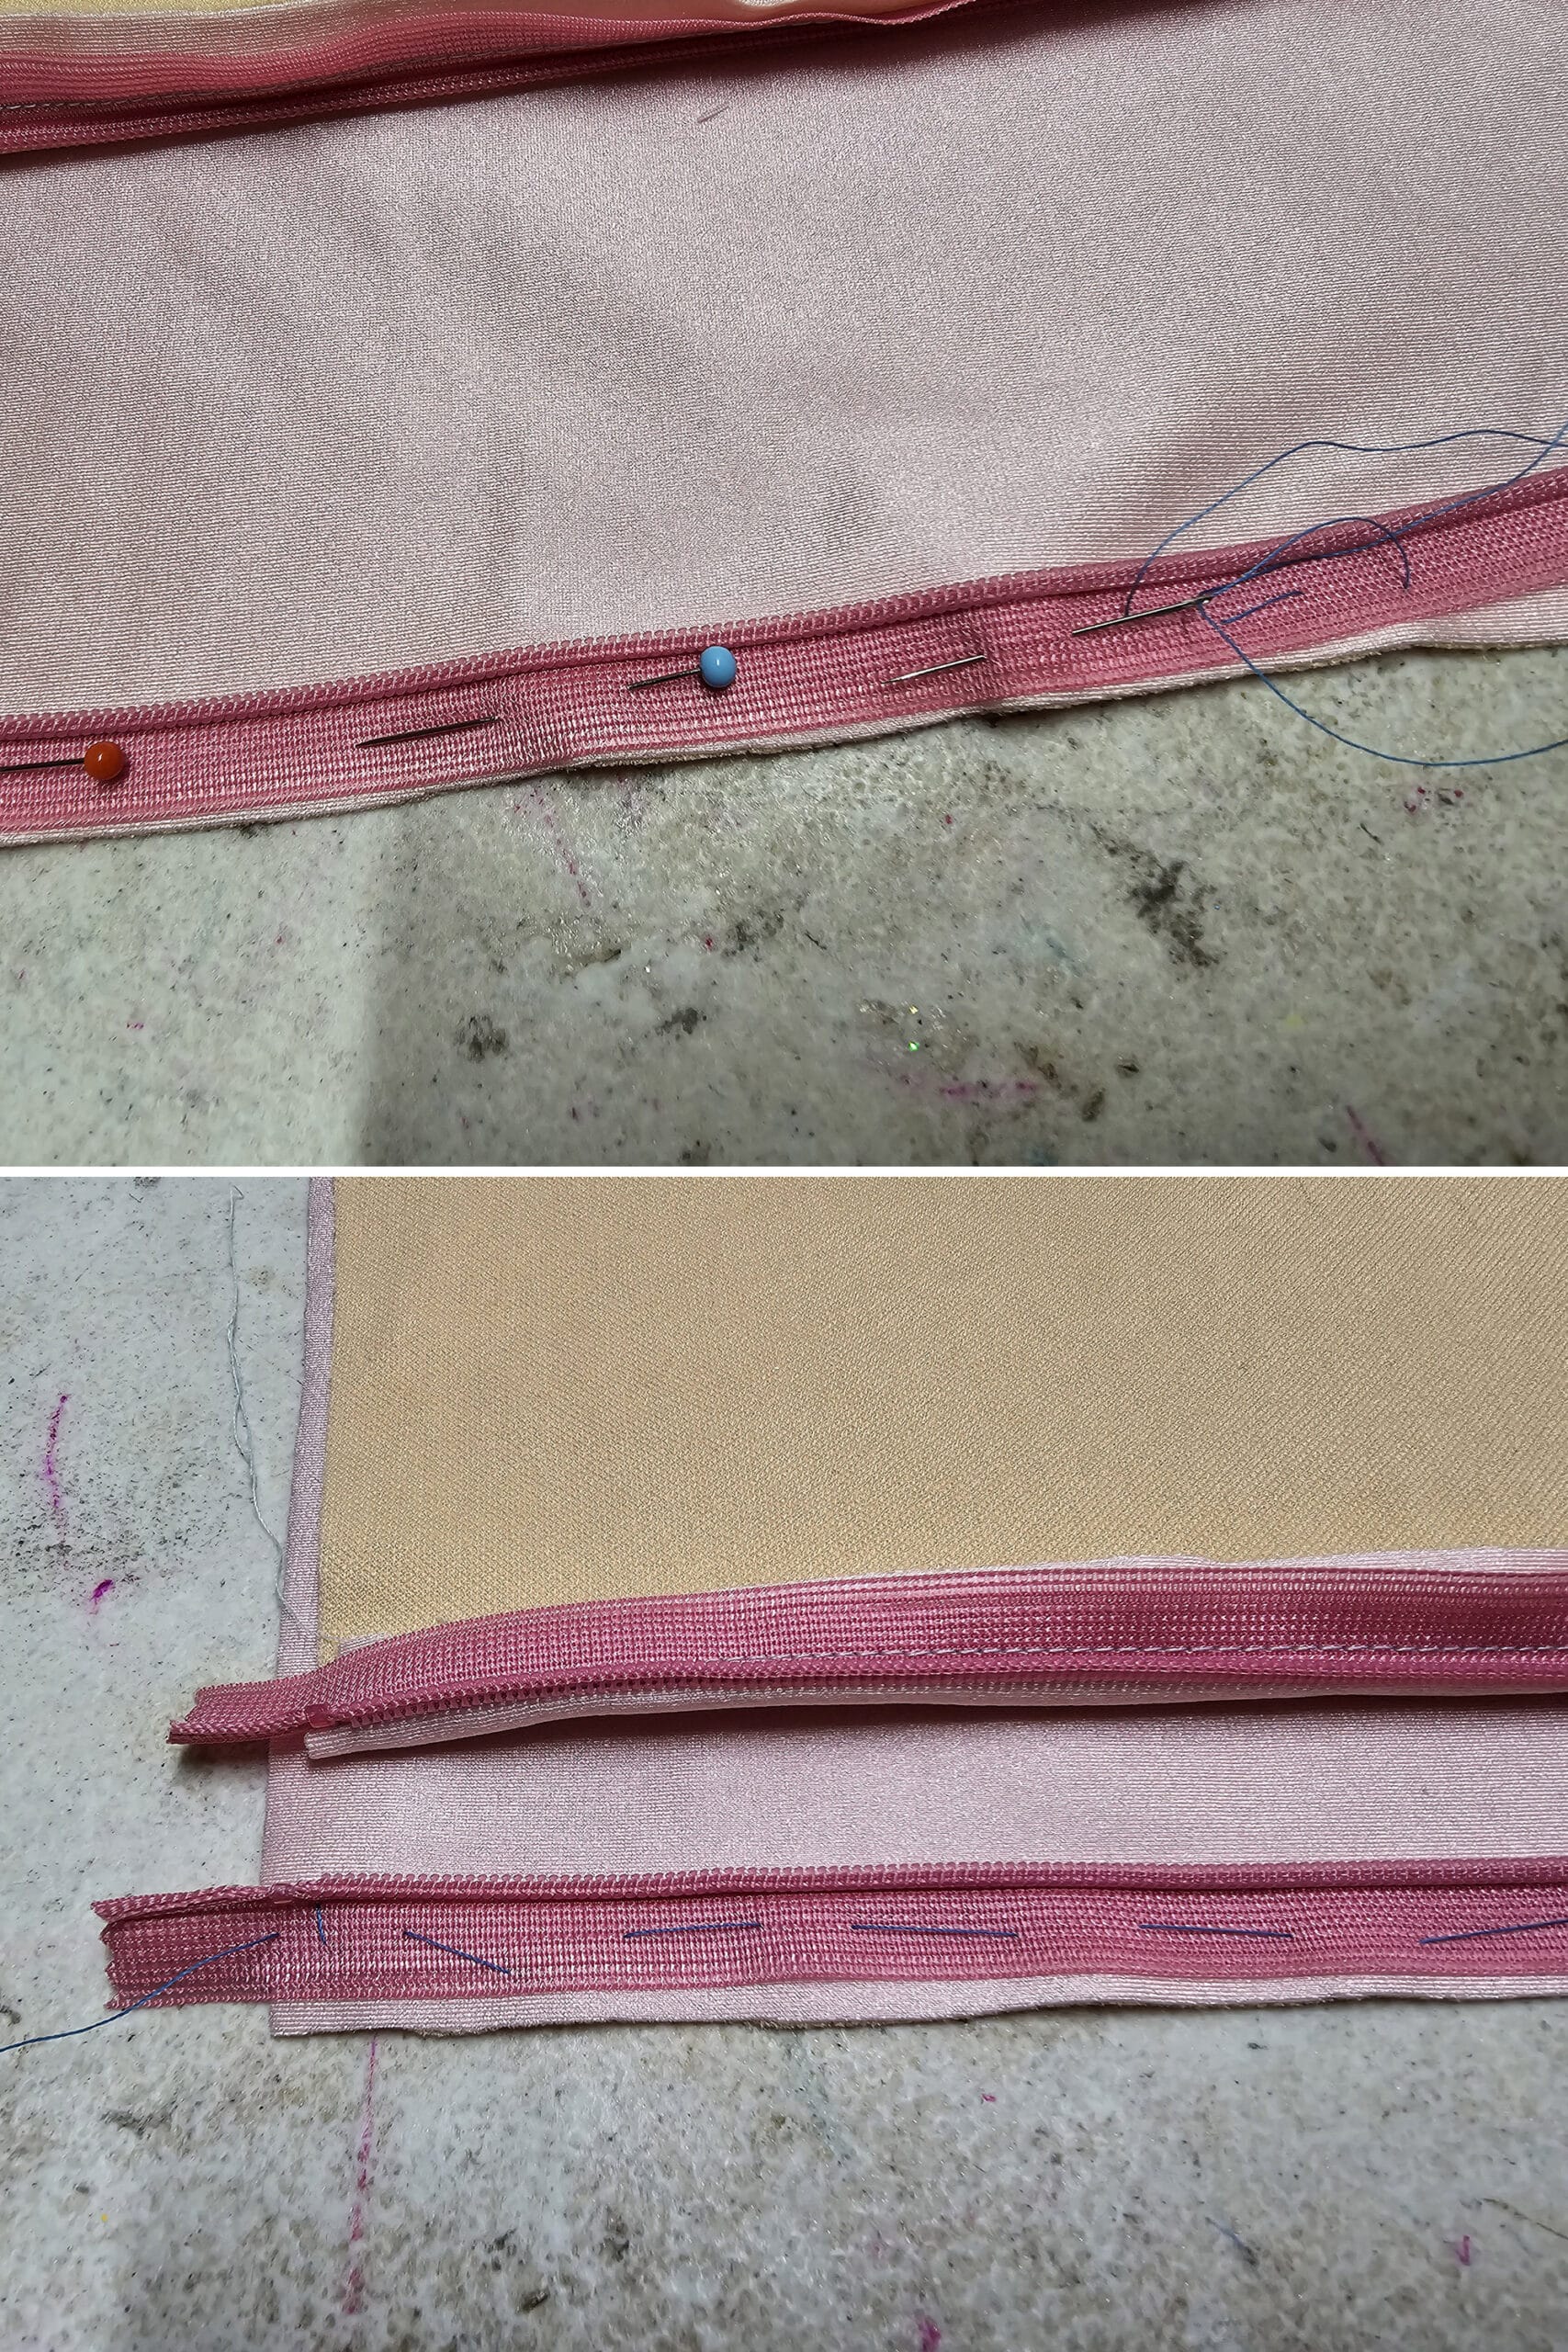
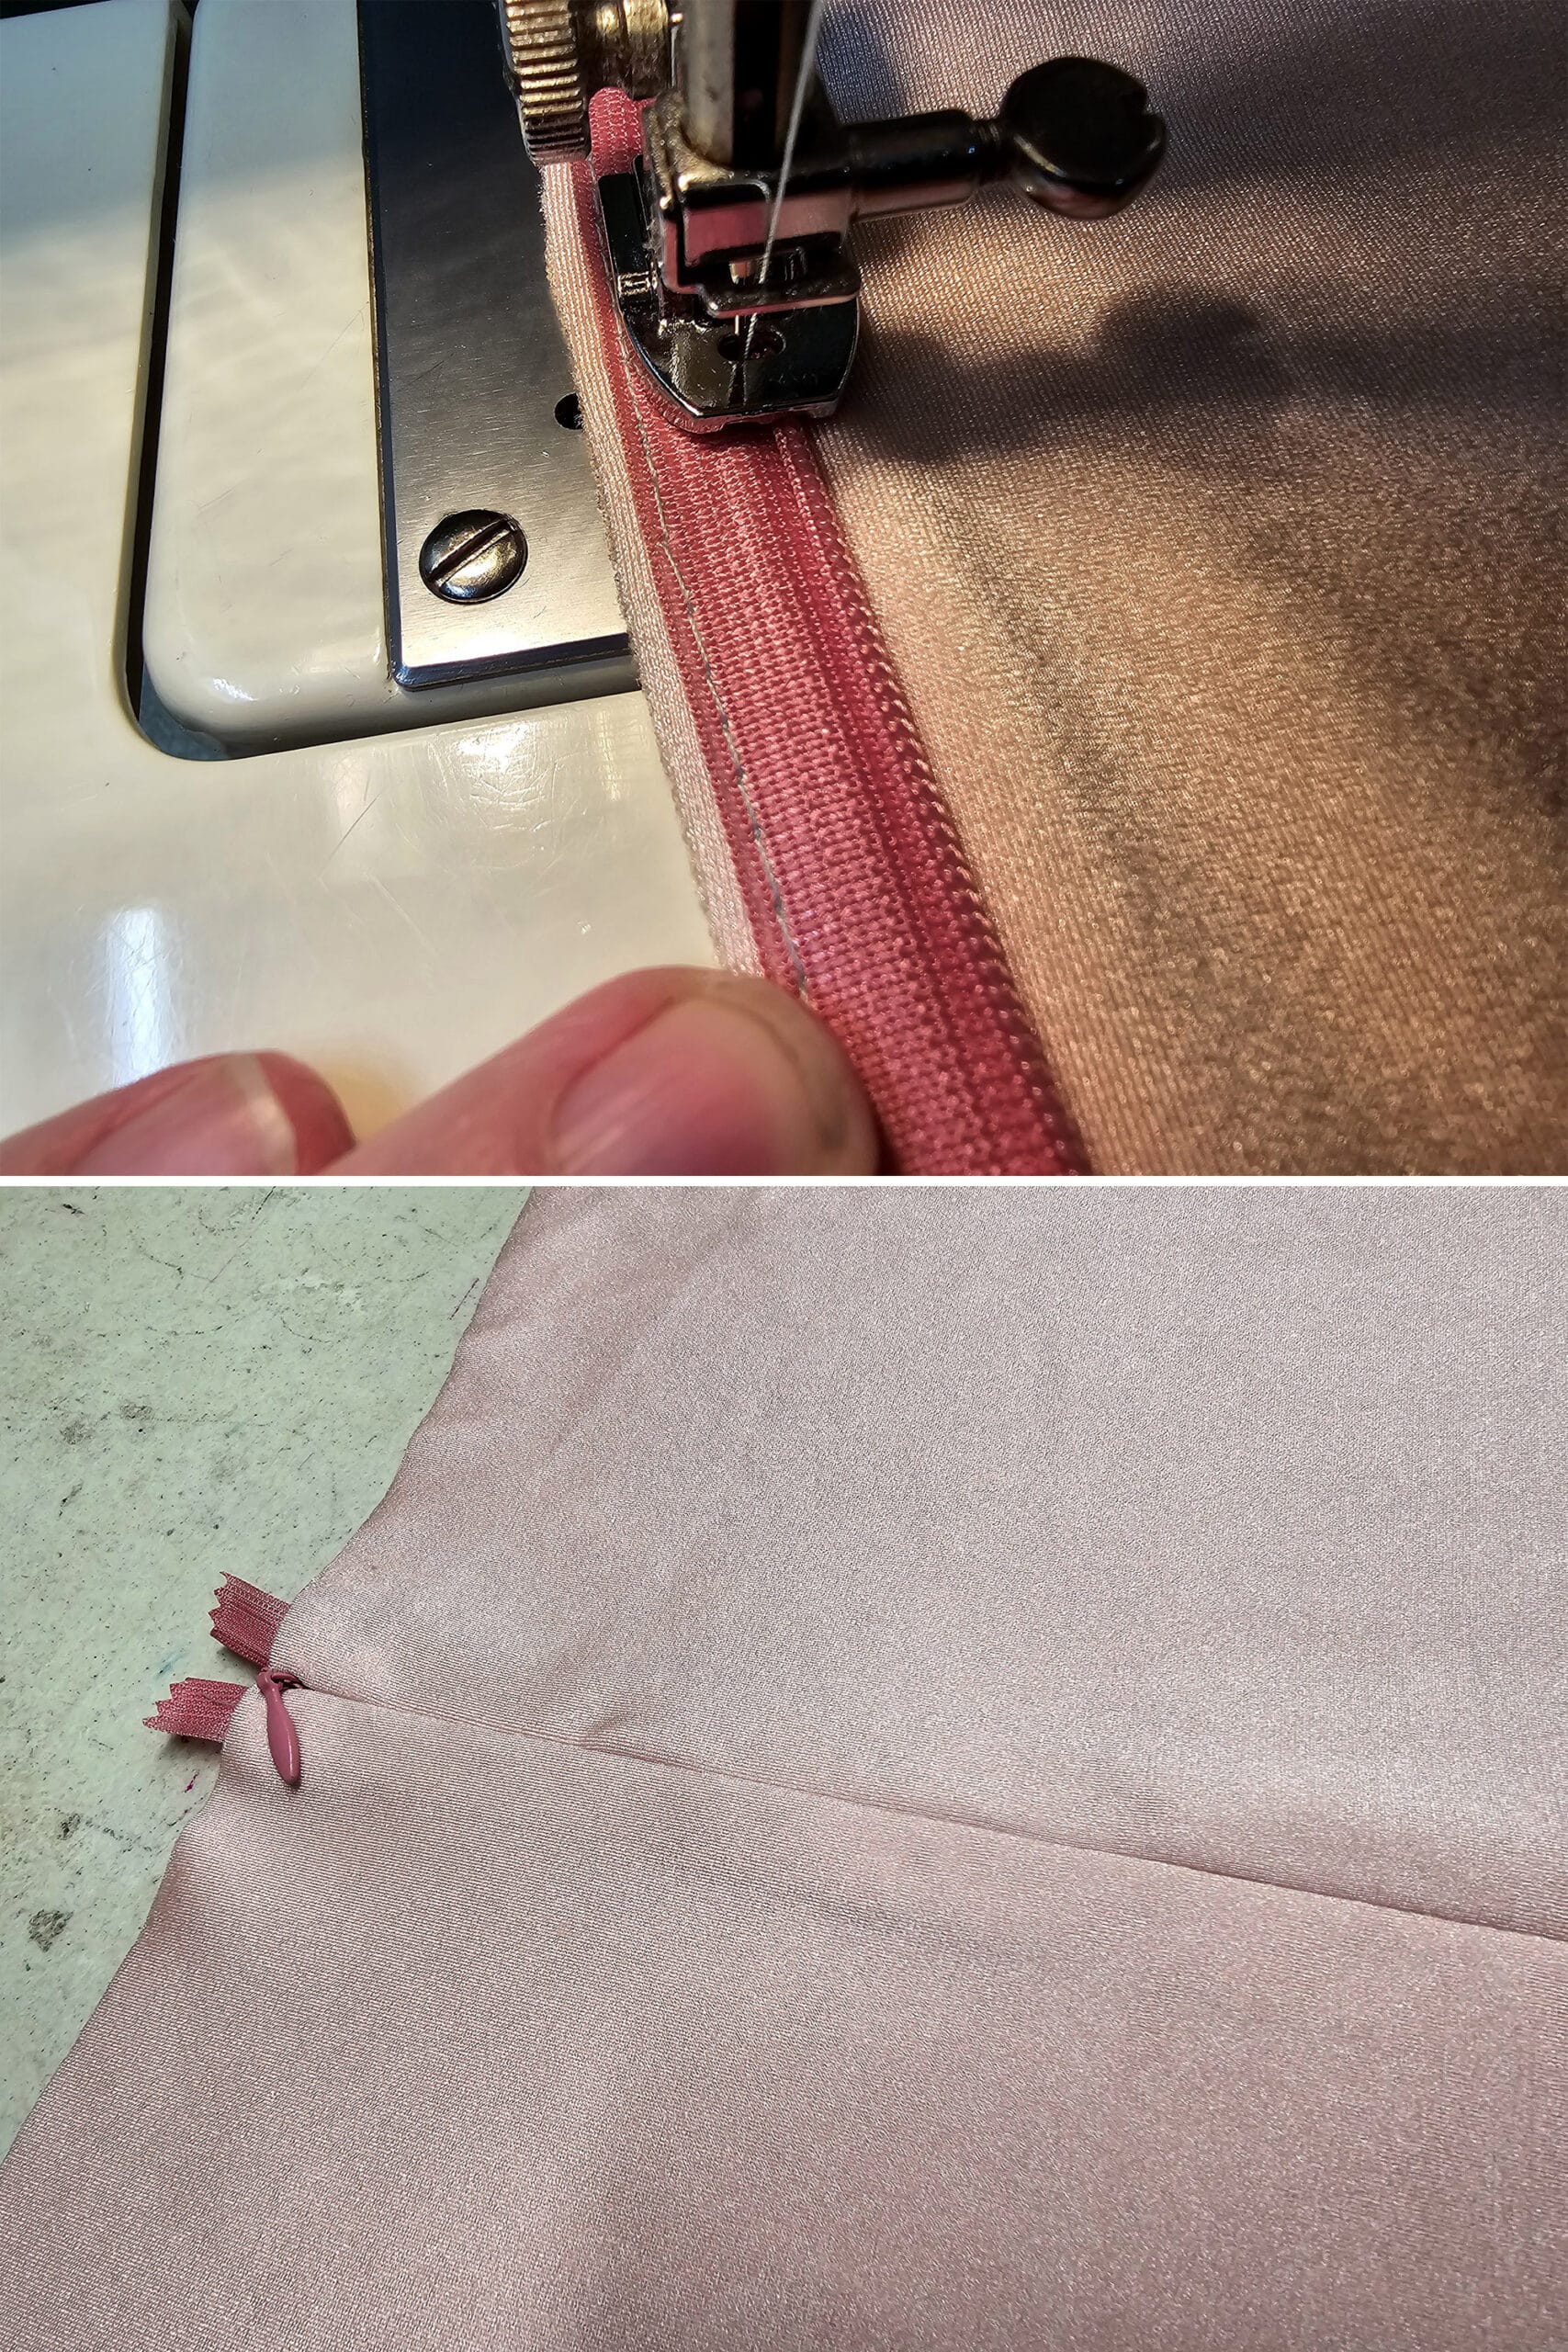
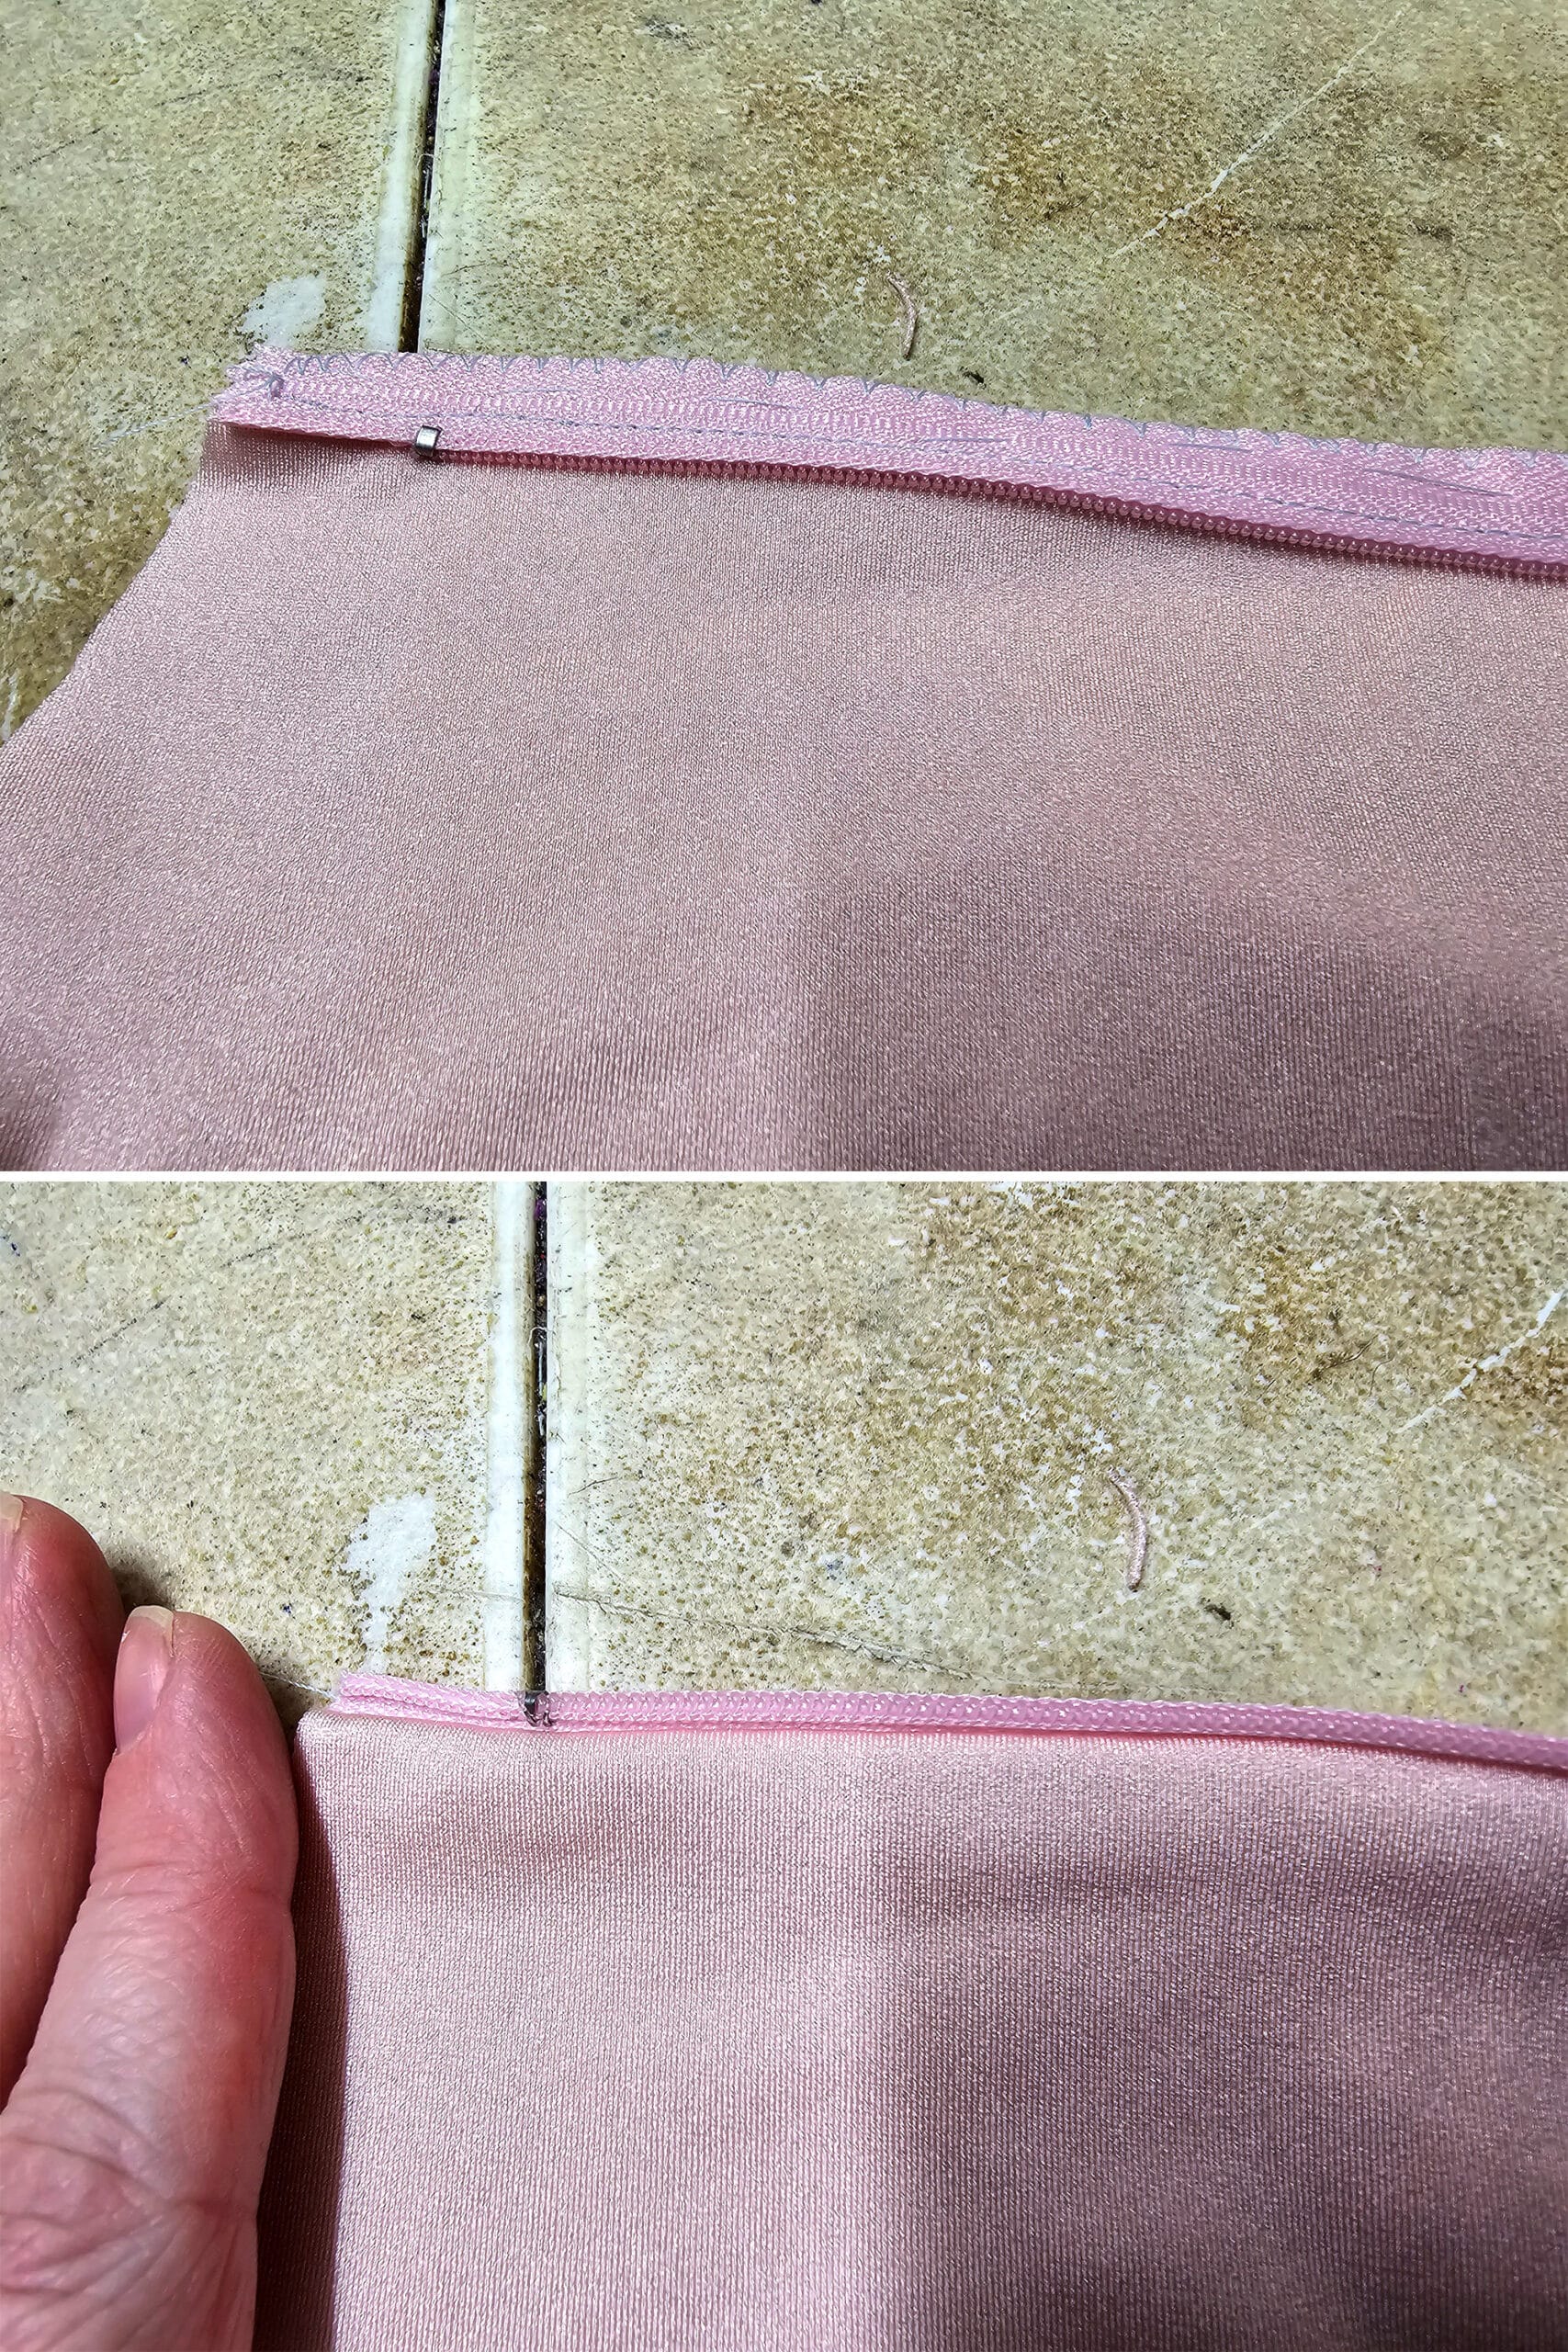
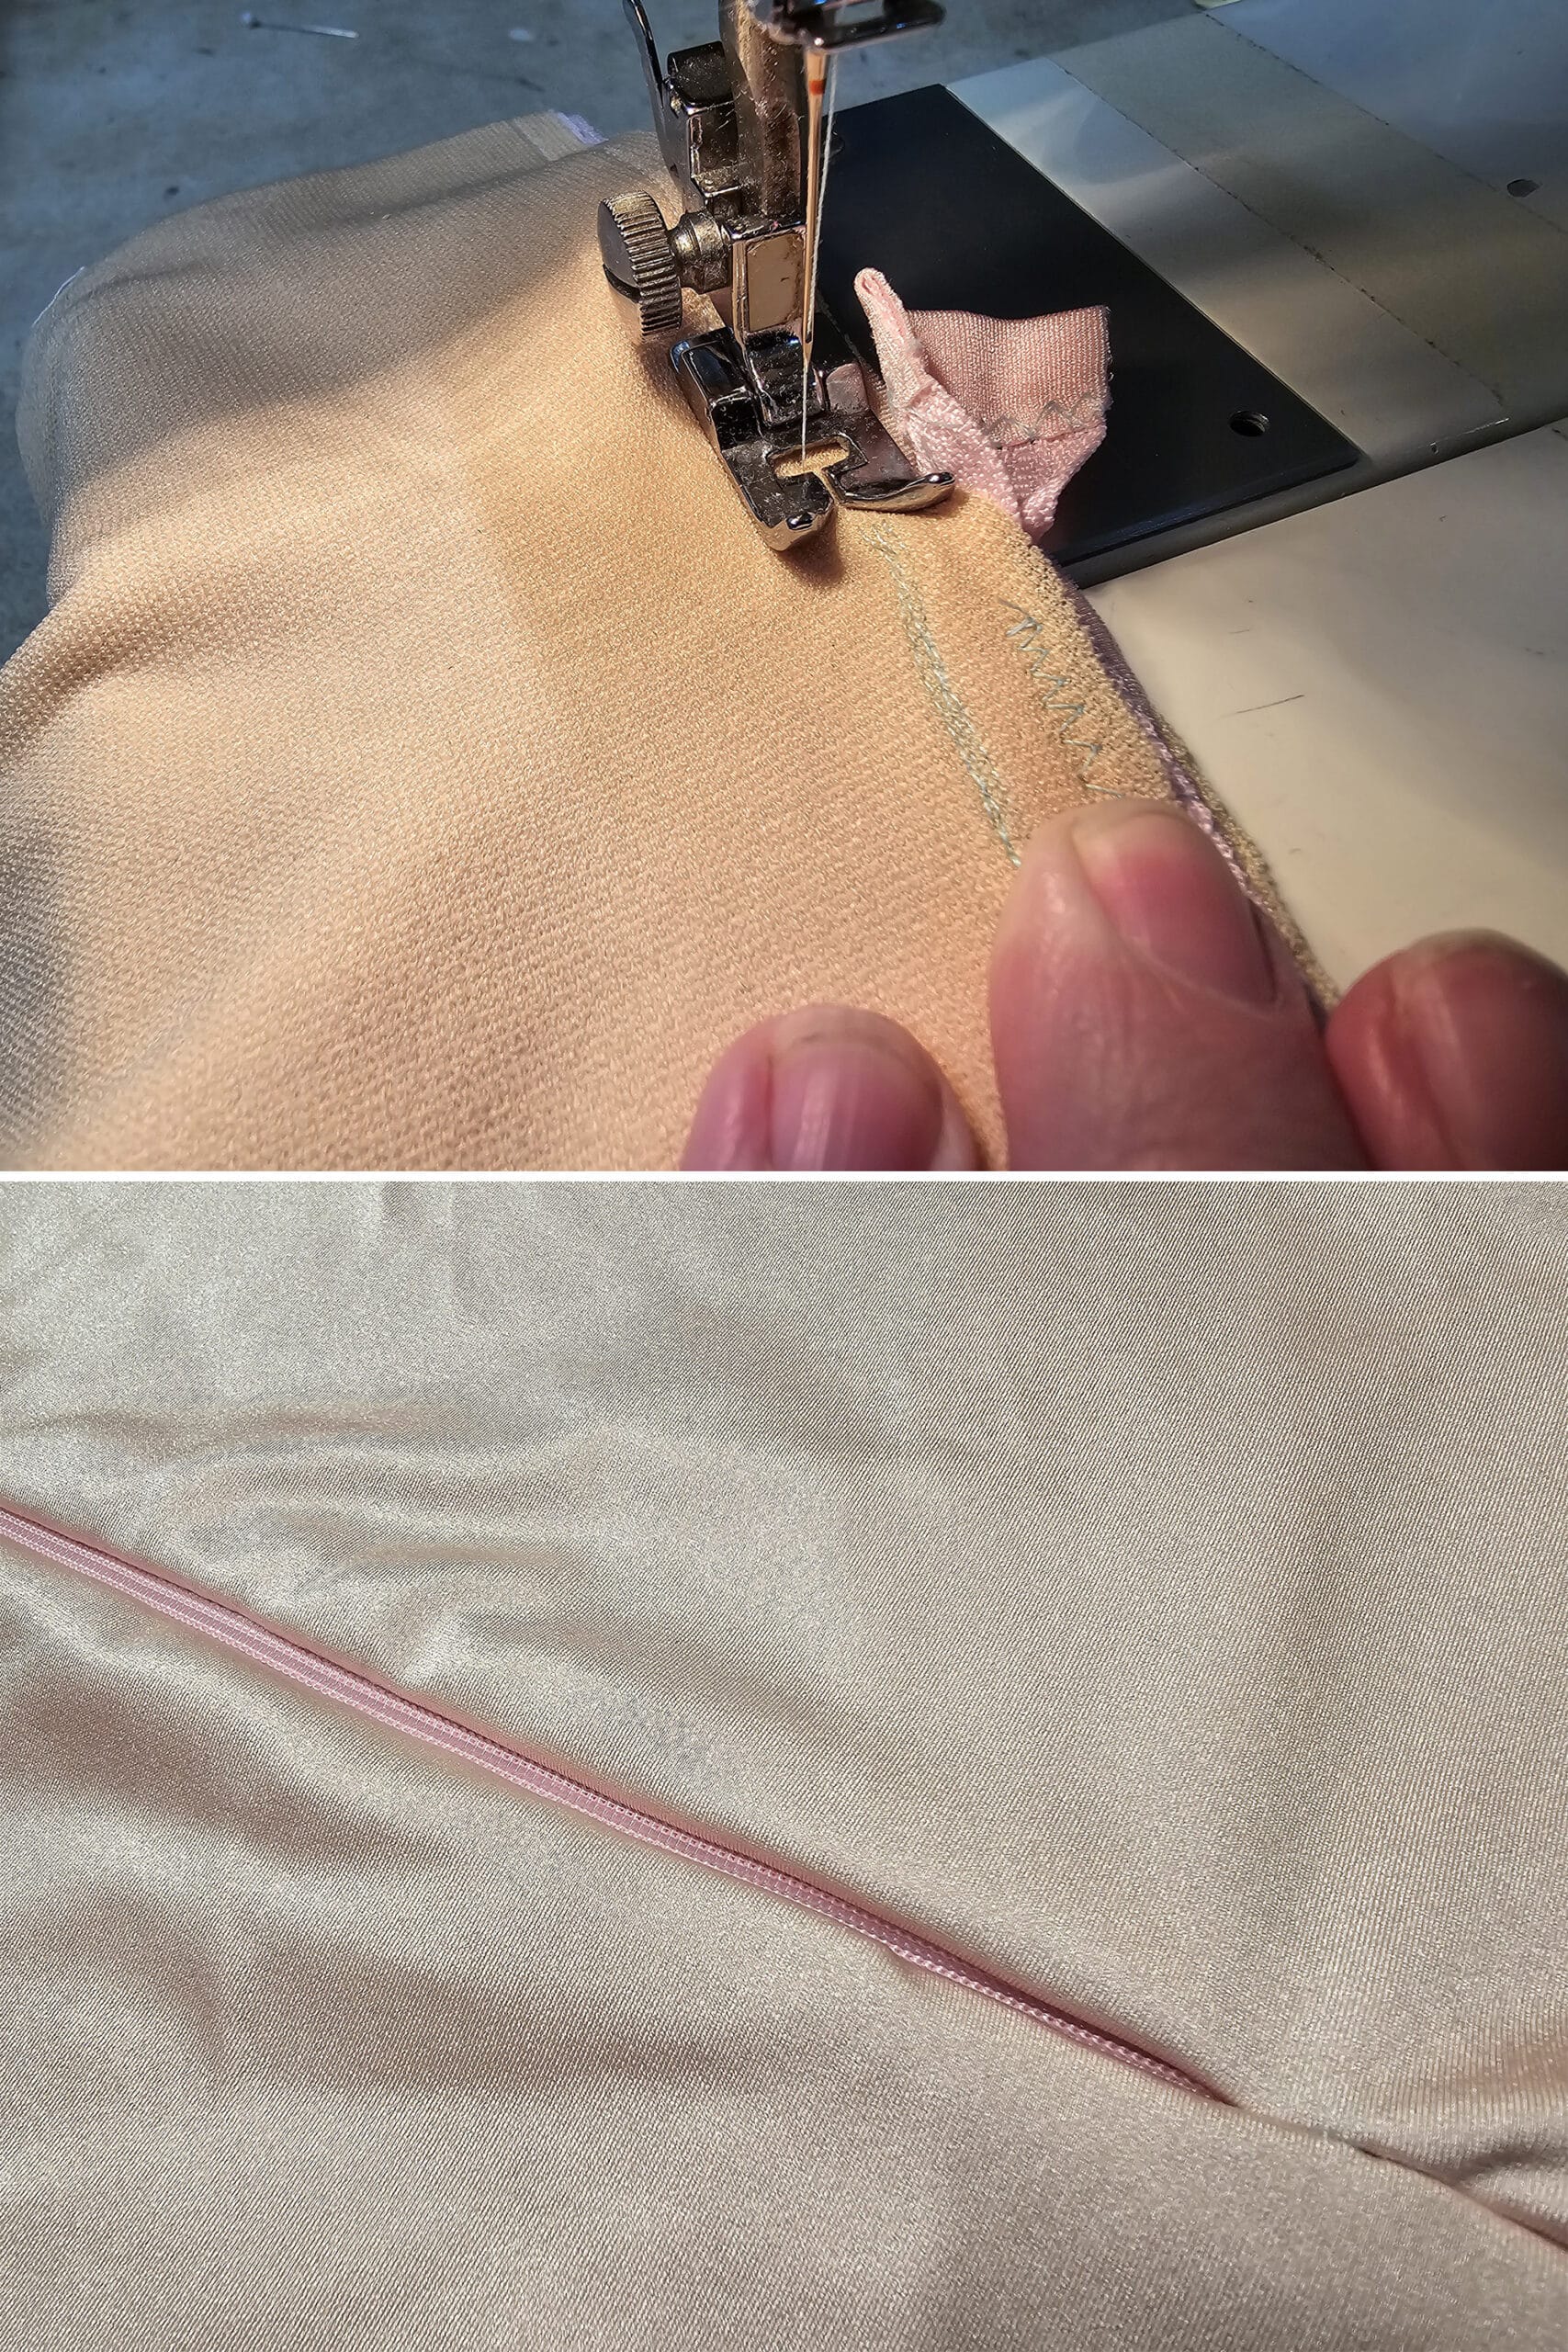
Sew the First Invisible Zipper Seam
Switch your zipper foot out to the invisible zipper foot for this next straight stitch seam.
Once again starting at the top edge of the garment, position the garment so that the zipper coils are feeding into the LEFT groove of the foot. You want your needle to come down very close to the right of the teeth.
Use a pointer finger to uncurl the zipper teeth as they head into the little groove of the invisible zipper foot. This will get the zipper coil into the correct position for the stitch line.
Basically, you want to get your stitches as close as possible to the groove in the zipper teeth - the point where you can curl the teeth back from - without stitching over that line, or into the zipper teeth at all.
Stitching into the teeth bend and warp the zipper connection, and will weaken the zipper after you pick the threads out and redo it.
Best to be slightly not close enough, than to sew into the teeth, IMHO. I’d rather see a little bit of zipper on the right side of the seam, than to have to fight with the zipper to close it (and risk breaking it!).
Anyway, sew a straight line from the top of the zipper opening, to the point where you would like the zipper application to end.
Backstitch the last stitch or two, remove, and trim your threads.

Carefully zip up your zipper, and position the garment with the right side facing up.
Did the zipper zip up cleanly, without catching on any thread that got stitched too close to the teeth? You’re good to go!
If the zipper did NOT cleanly zip, and caught on some rogue stitches?
Very, very carefully pick out the stitches in that area. Trim all visible threads, and re-sew that line.

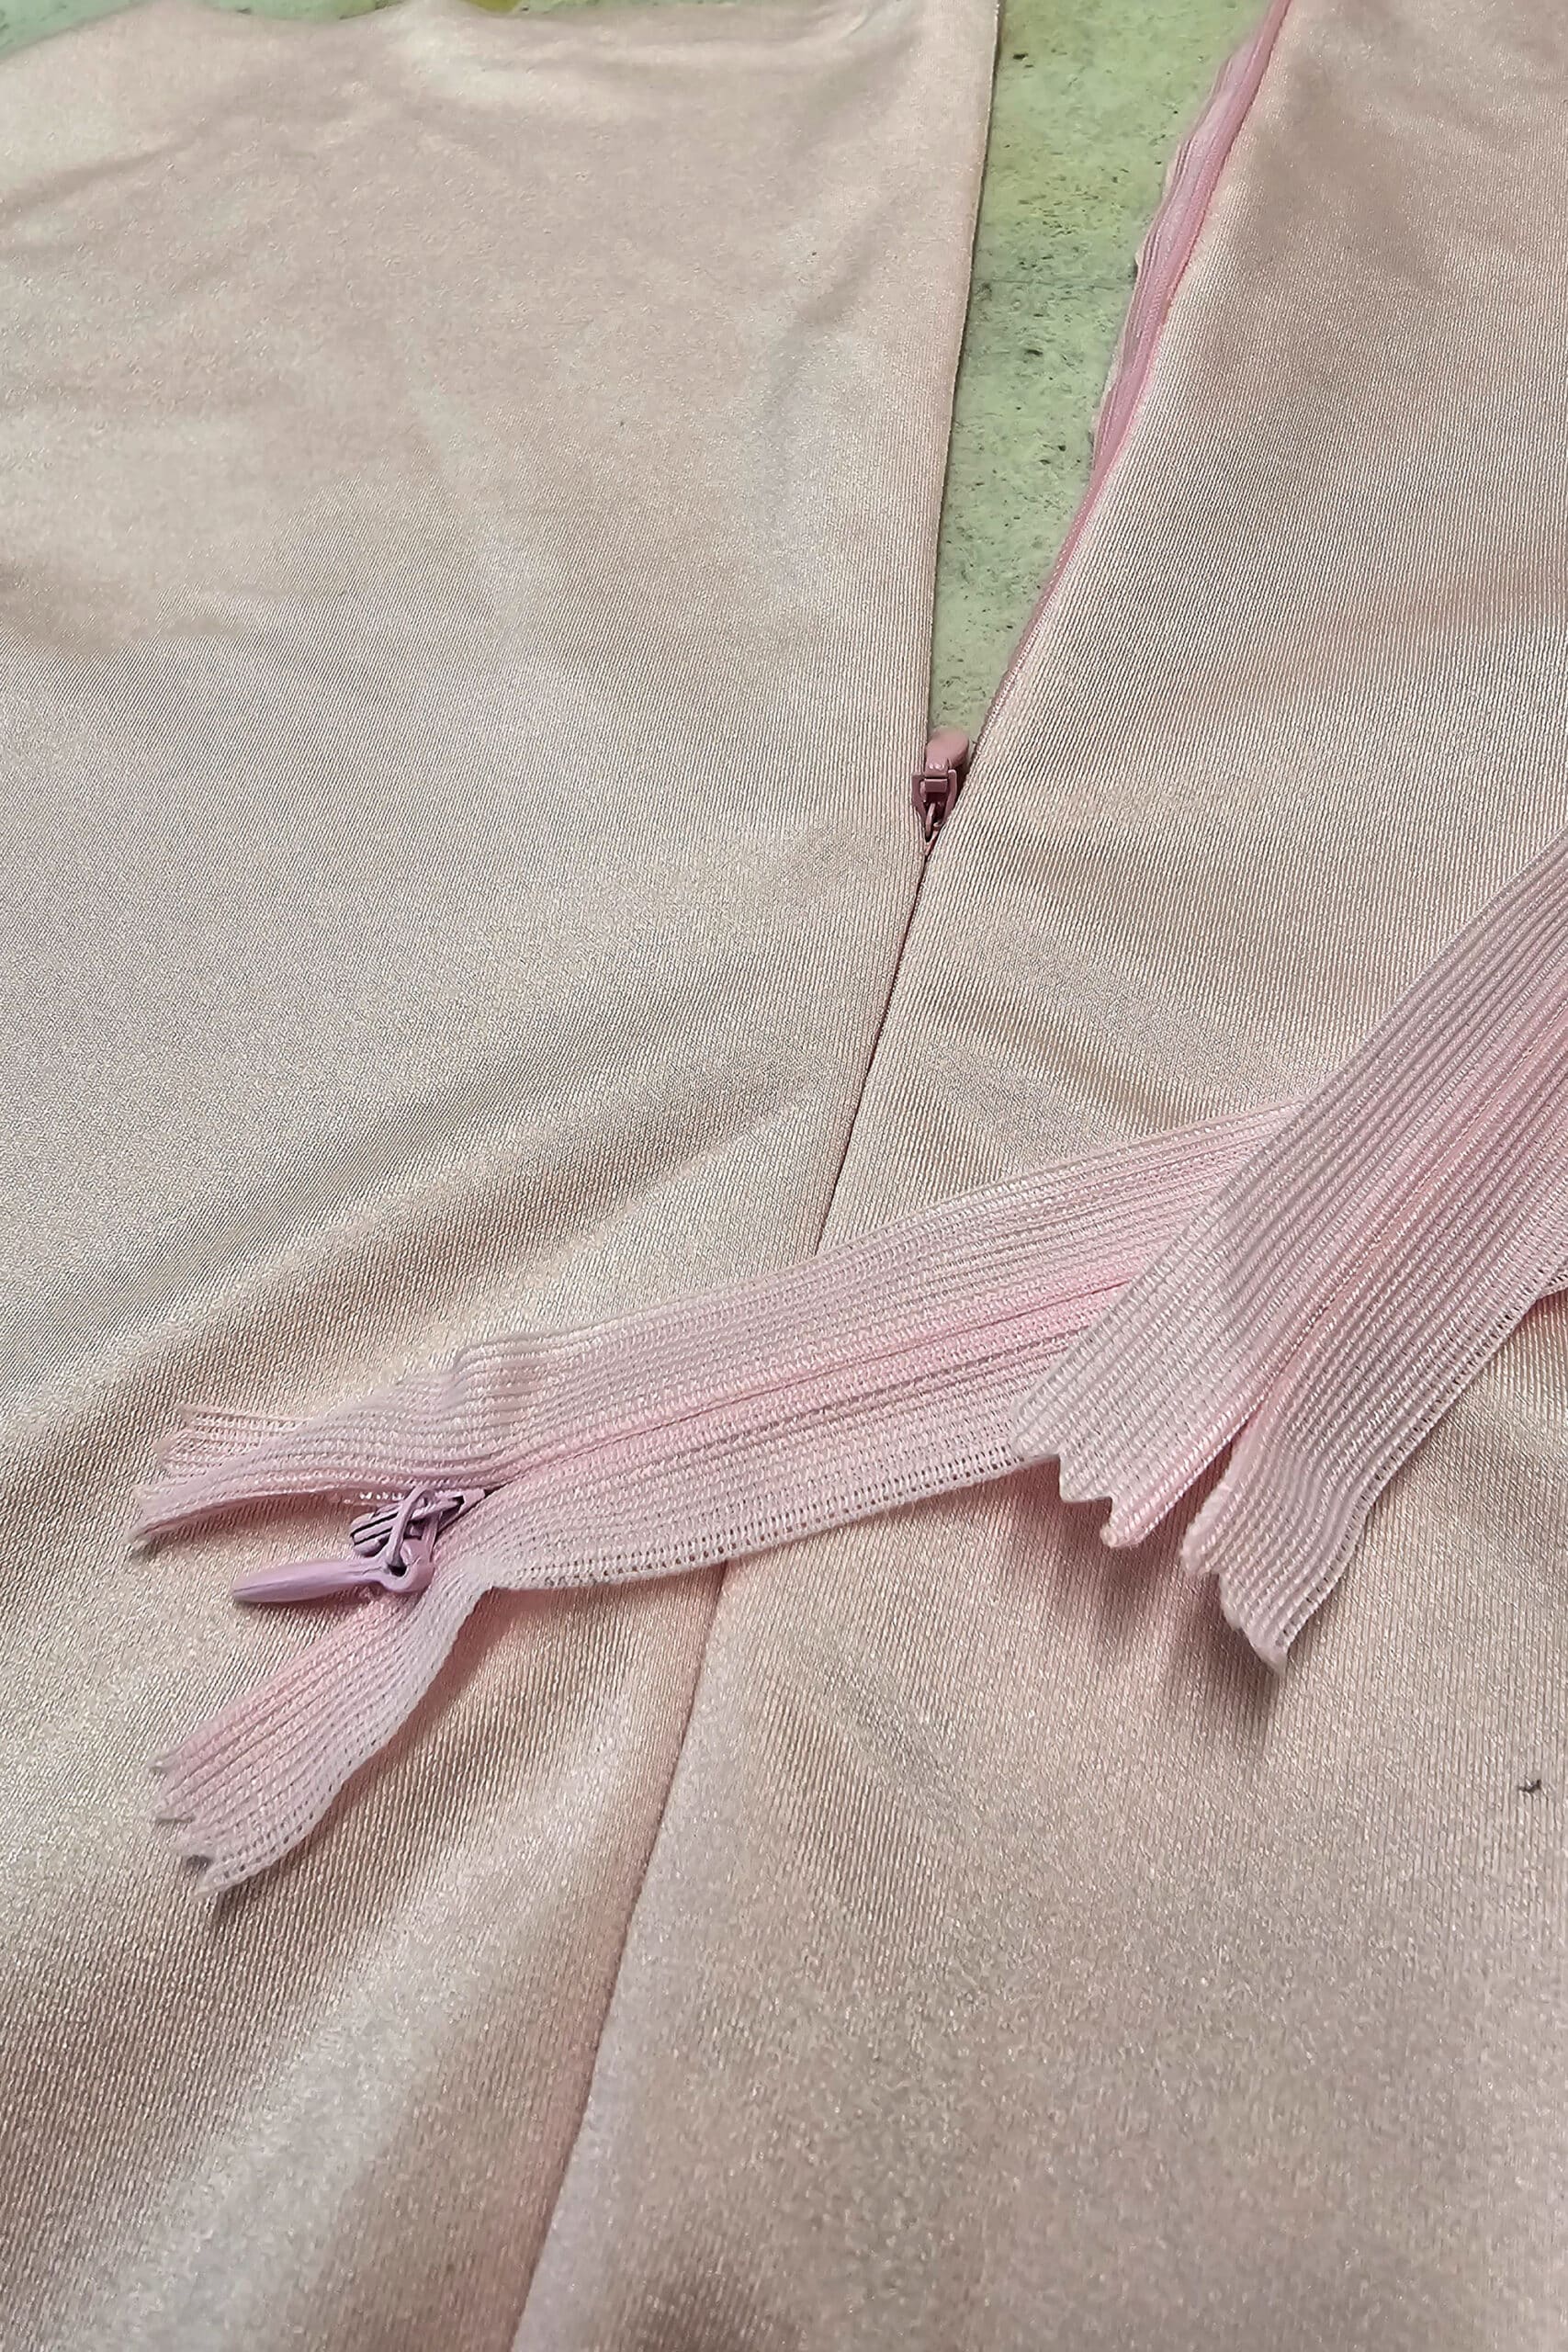
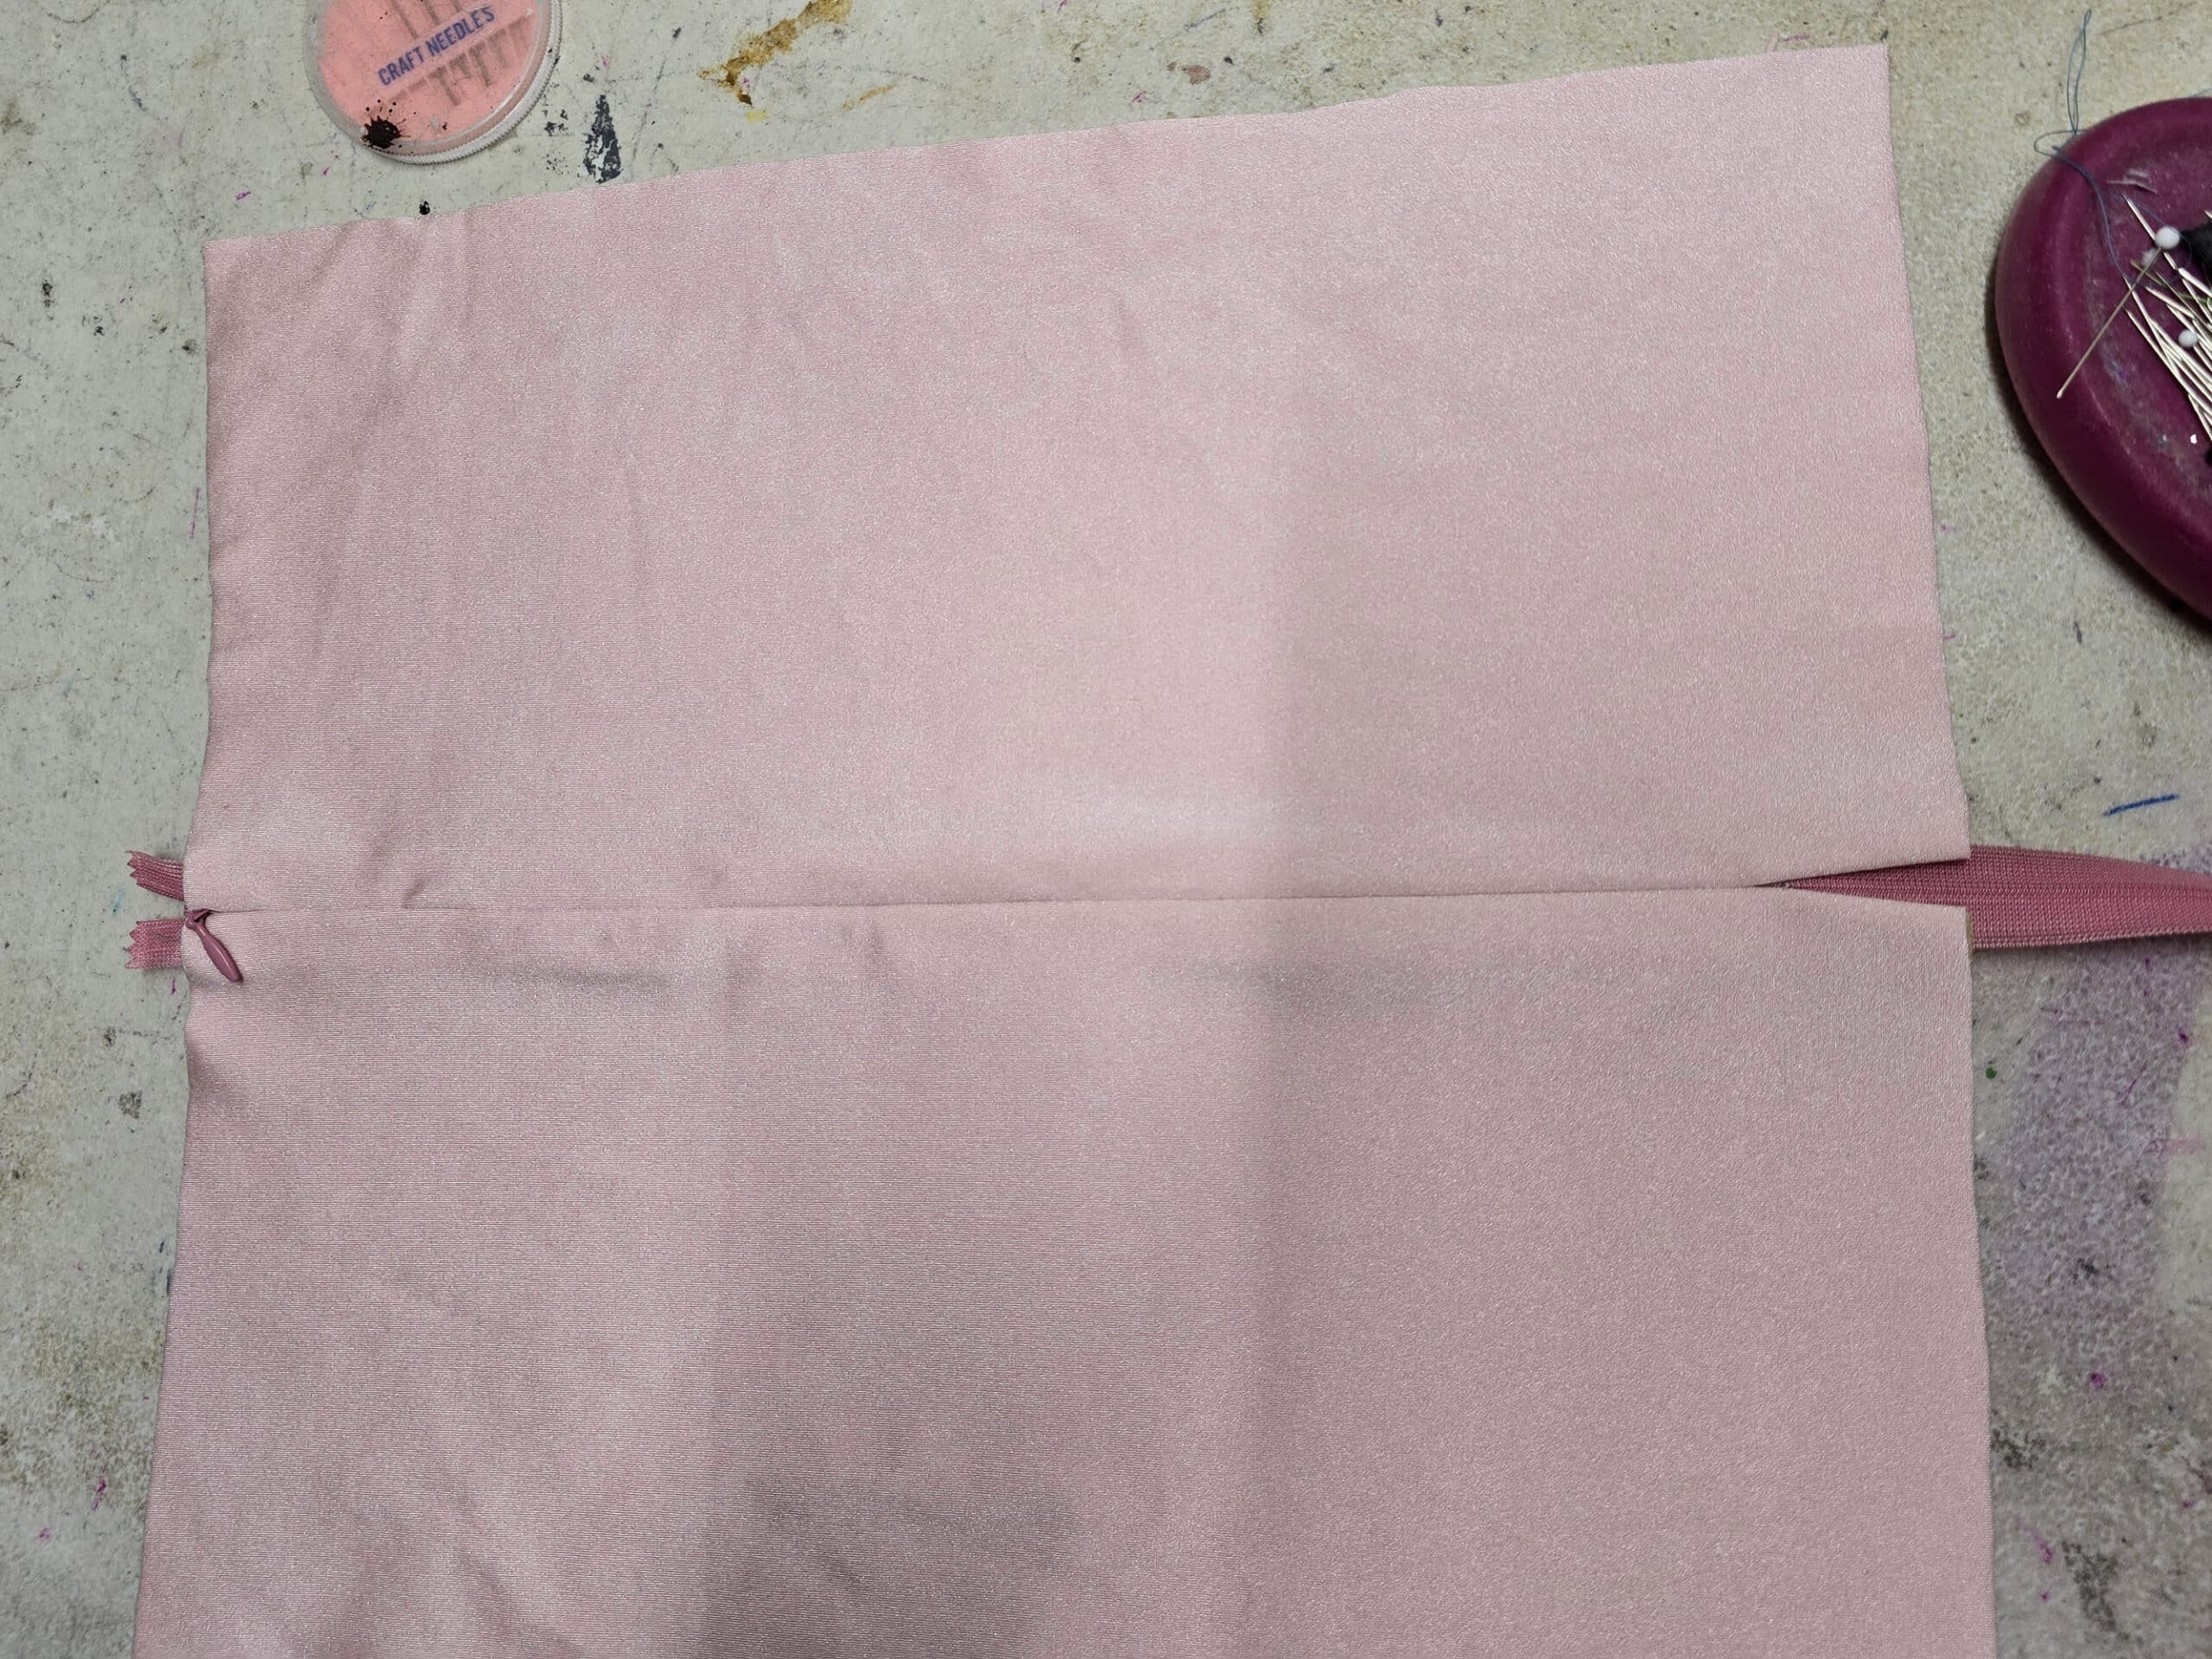
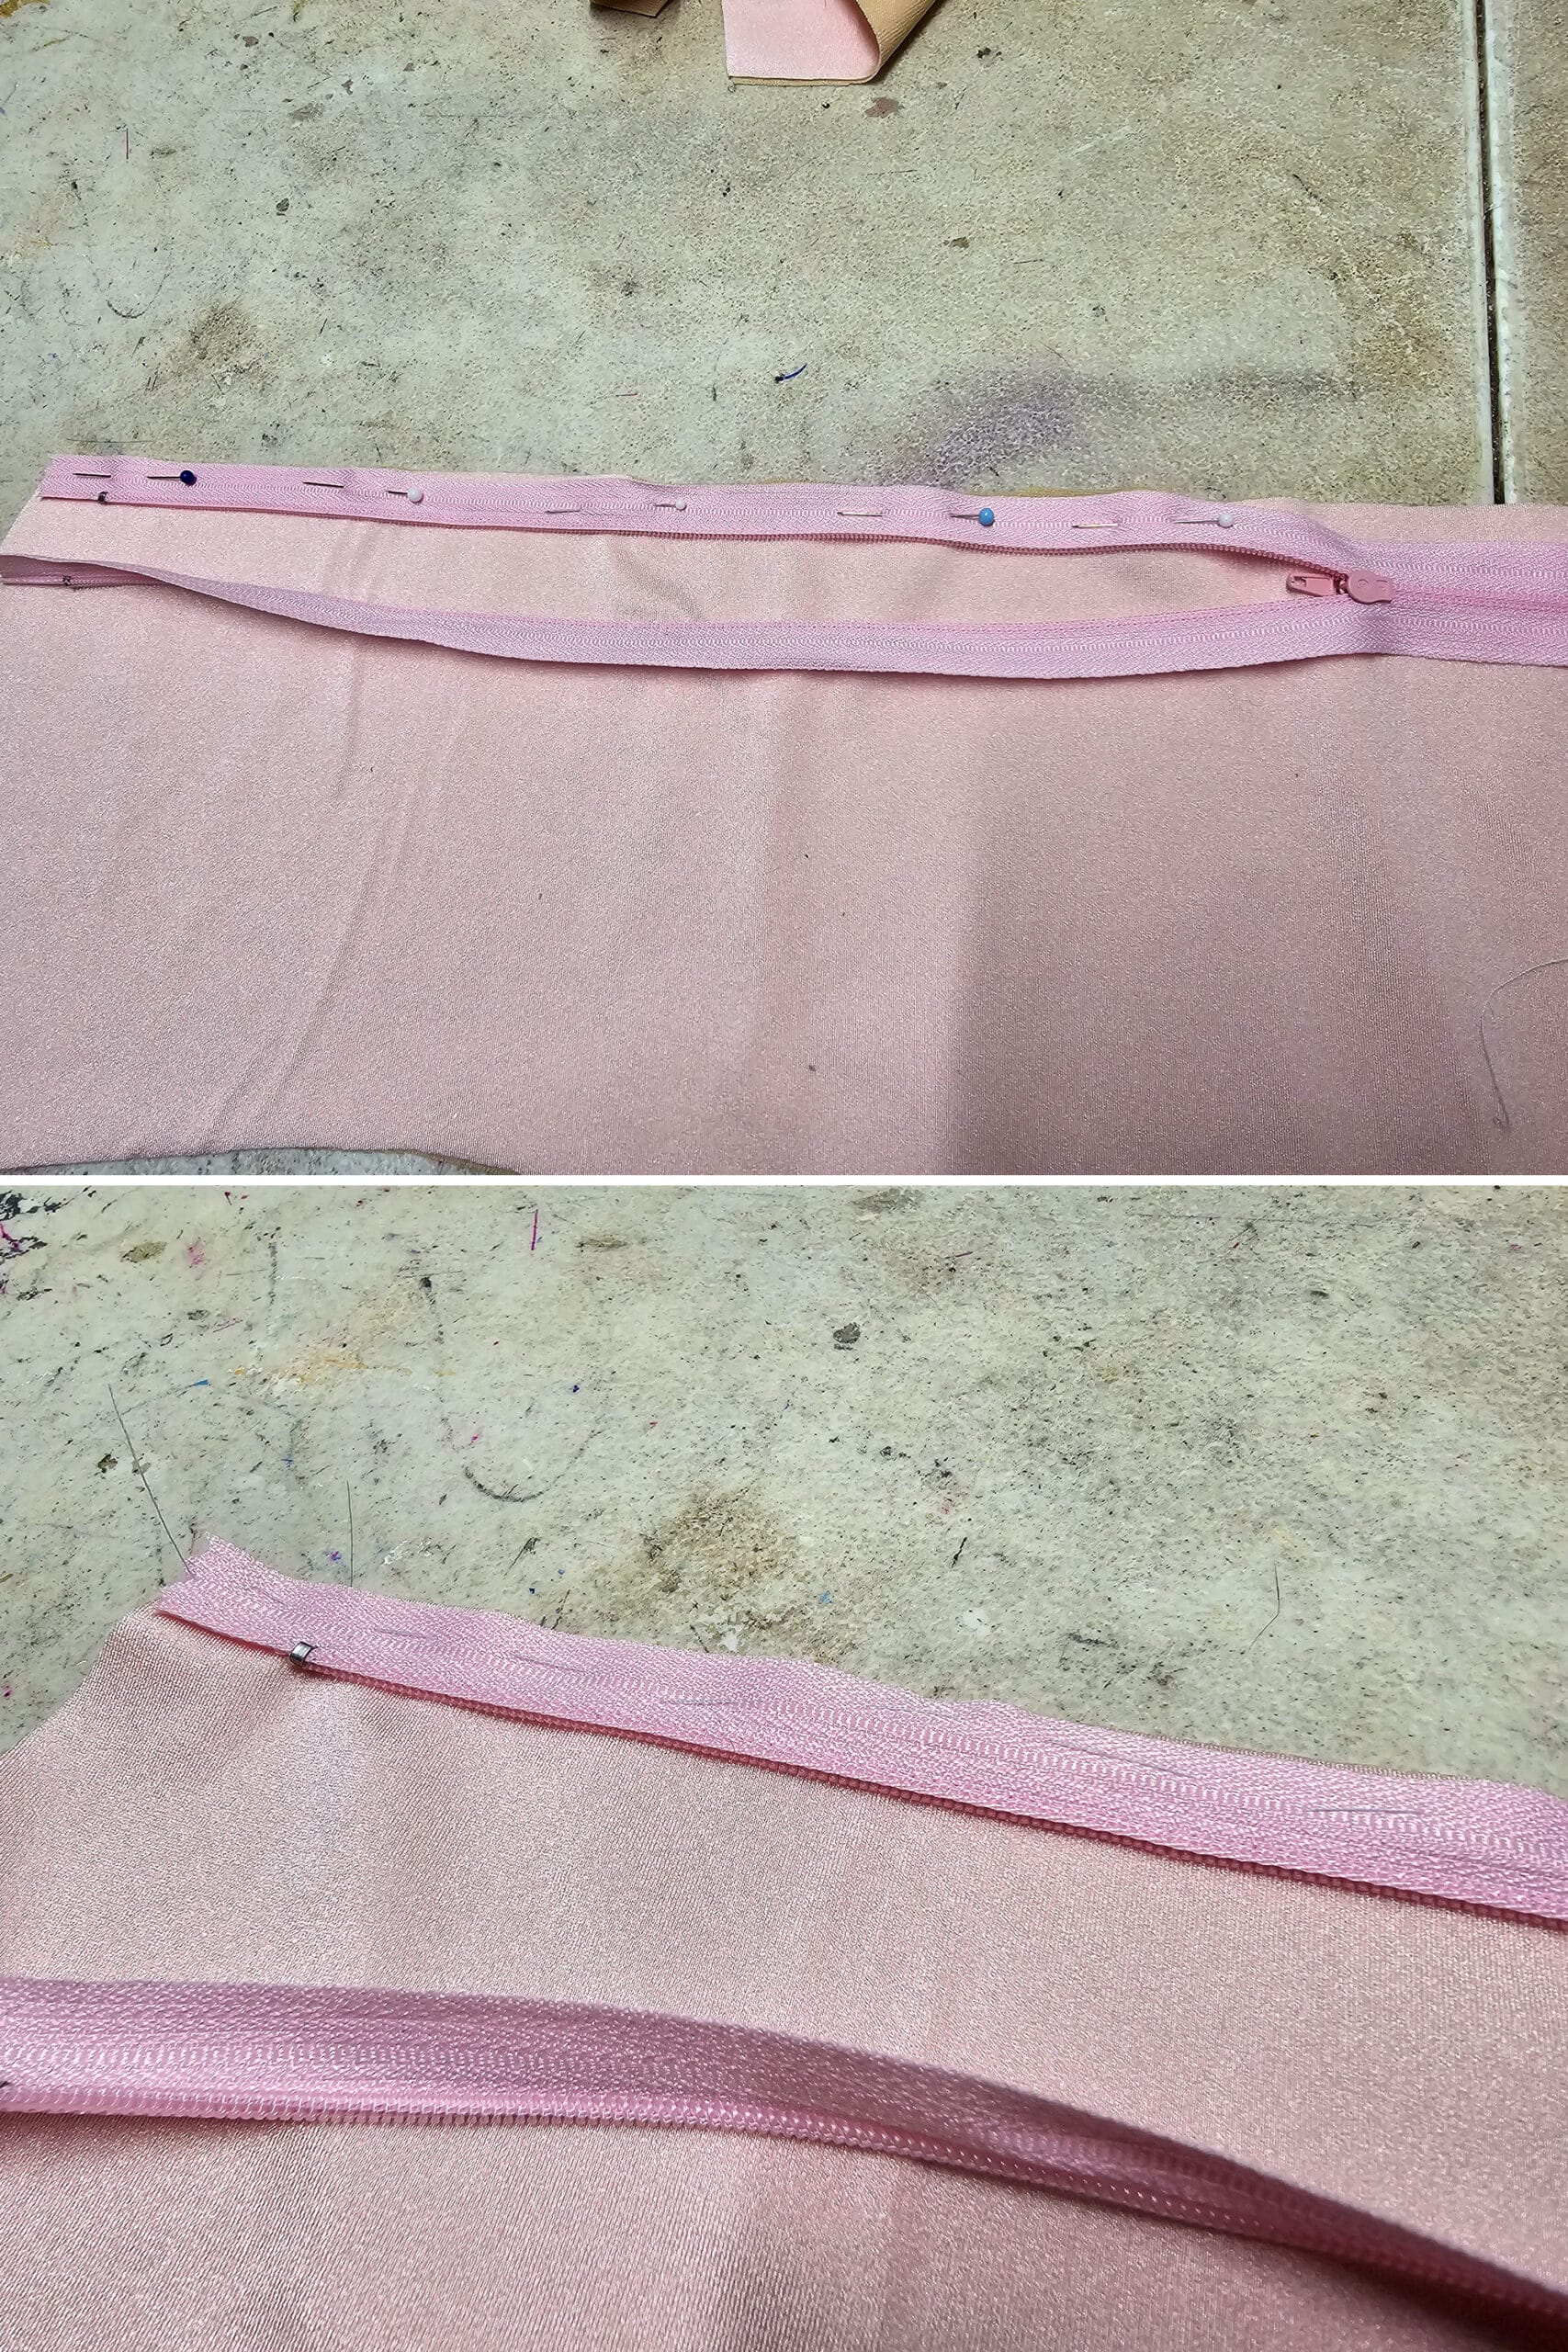
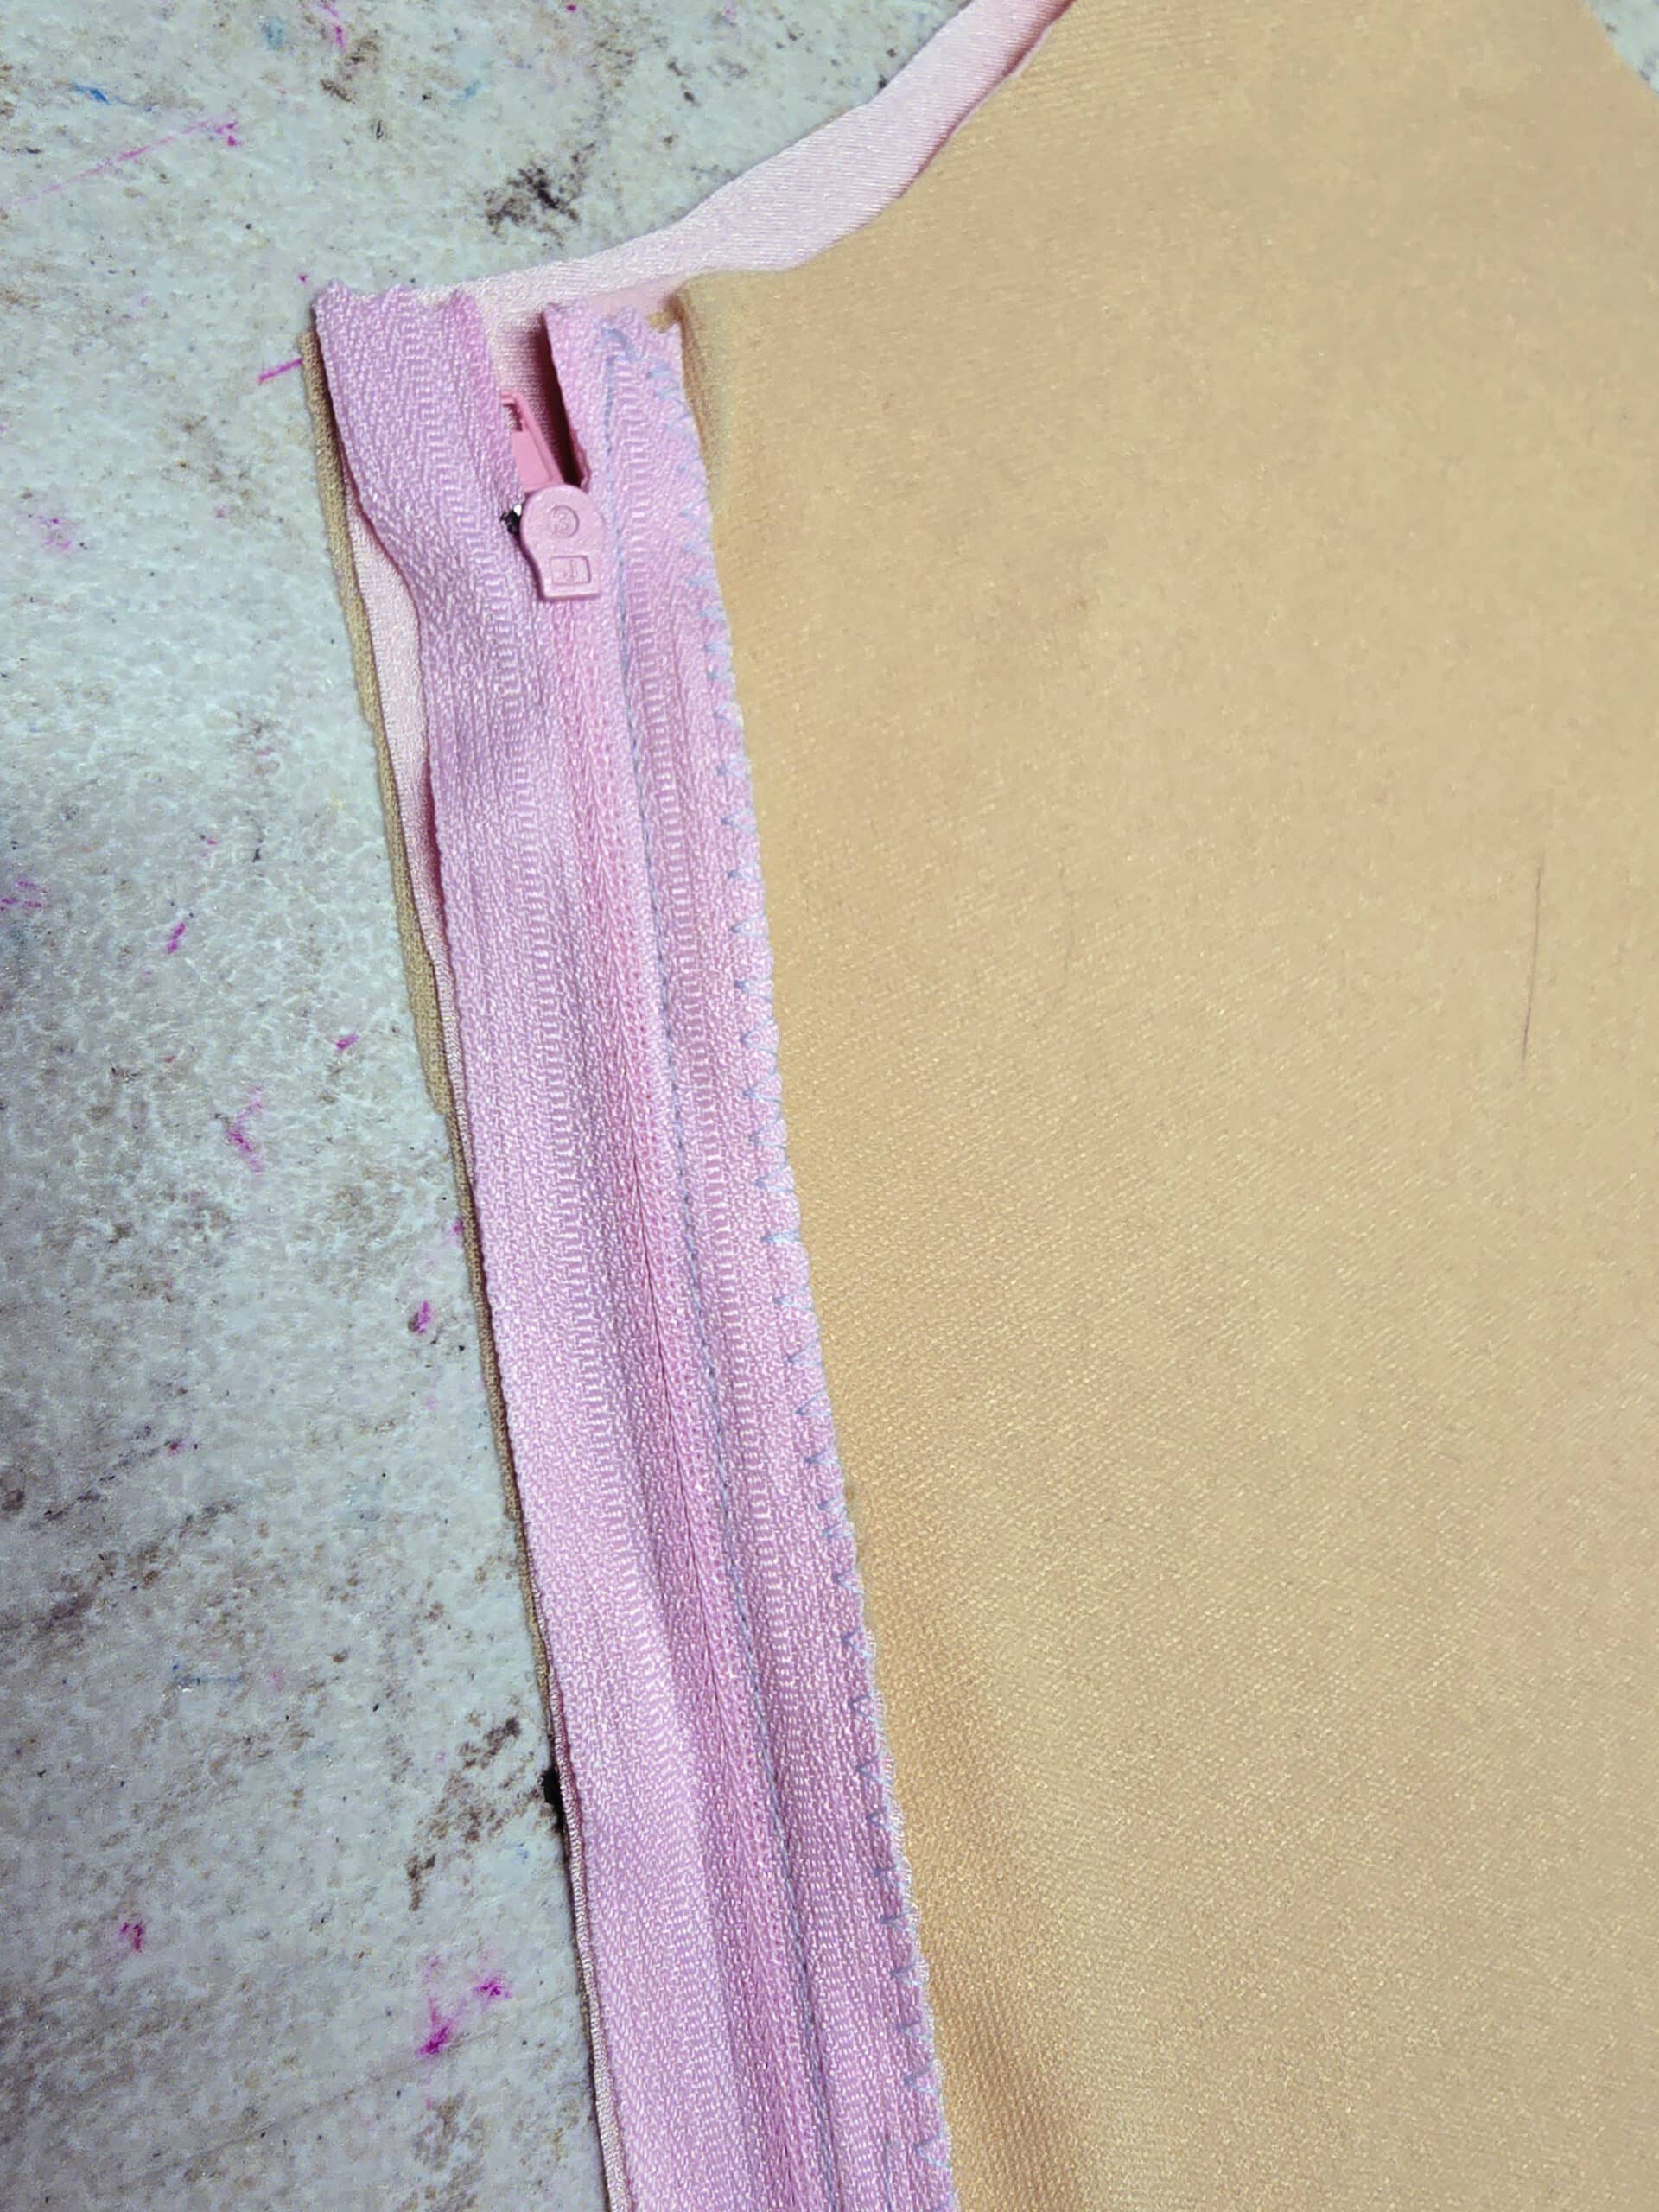
Pin and Baste the Second Side
Position your garment so that the good side of the SECOND side of the garment (the right side, as laid out in the first step) is facing up.
Place the left side of the garment face down on it, right sides of the garment pieces lining up.
Open the zipper such that it will be pinned in flat, with no twists in the loose side of the zipper. See below:
Once again, be really careful to avoid any stretching or warping of the fabric or zipper as you do it.
After you’ve got it pinned in place, I recommend closing the zipper, to ensure everything lines up. If it doesn’t, re-pin and try again!
(This is especially important when you’ve got anything - color blocking, applique, etc - that will extend across both sides, and need to match up at the zipper!)
(Sorry to nag!)
Sew Your Machine Seams
Set your machine up with the regular foot or standard zipper foot.
Once again starting at the TOP edge of the garment, sew a straight seam from the top of the zipper, down to the point where you would like the zipper to end.
IMPORTANT NOTE: TRUST ME, I know you’re going to want to sew from the bottom of the seam up. It took me a while to get out of that habit, way back in the day.
If you sew one side from the top up, and the other from the bottom up - you’re all but guaranteed that things won’t line up.
Close the zipper, and make sure everything lines up - top edges, the zipper stops, any design / horizontal seams from colour blocking that need to match up, and the bottom edges of the fabric.
If everything lays flat and lines up, you’re good to go.
If it doesn’t... pick the last seam out and try again.
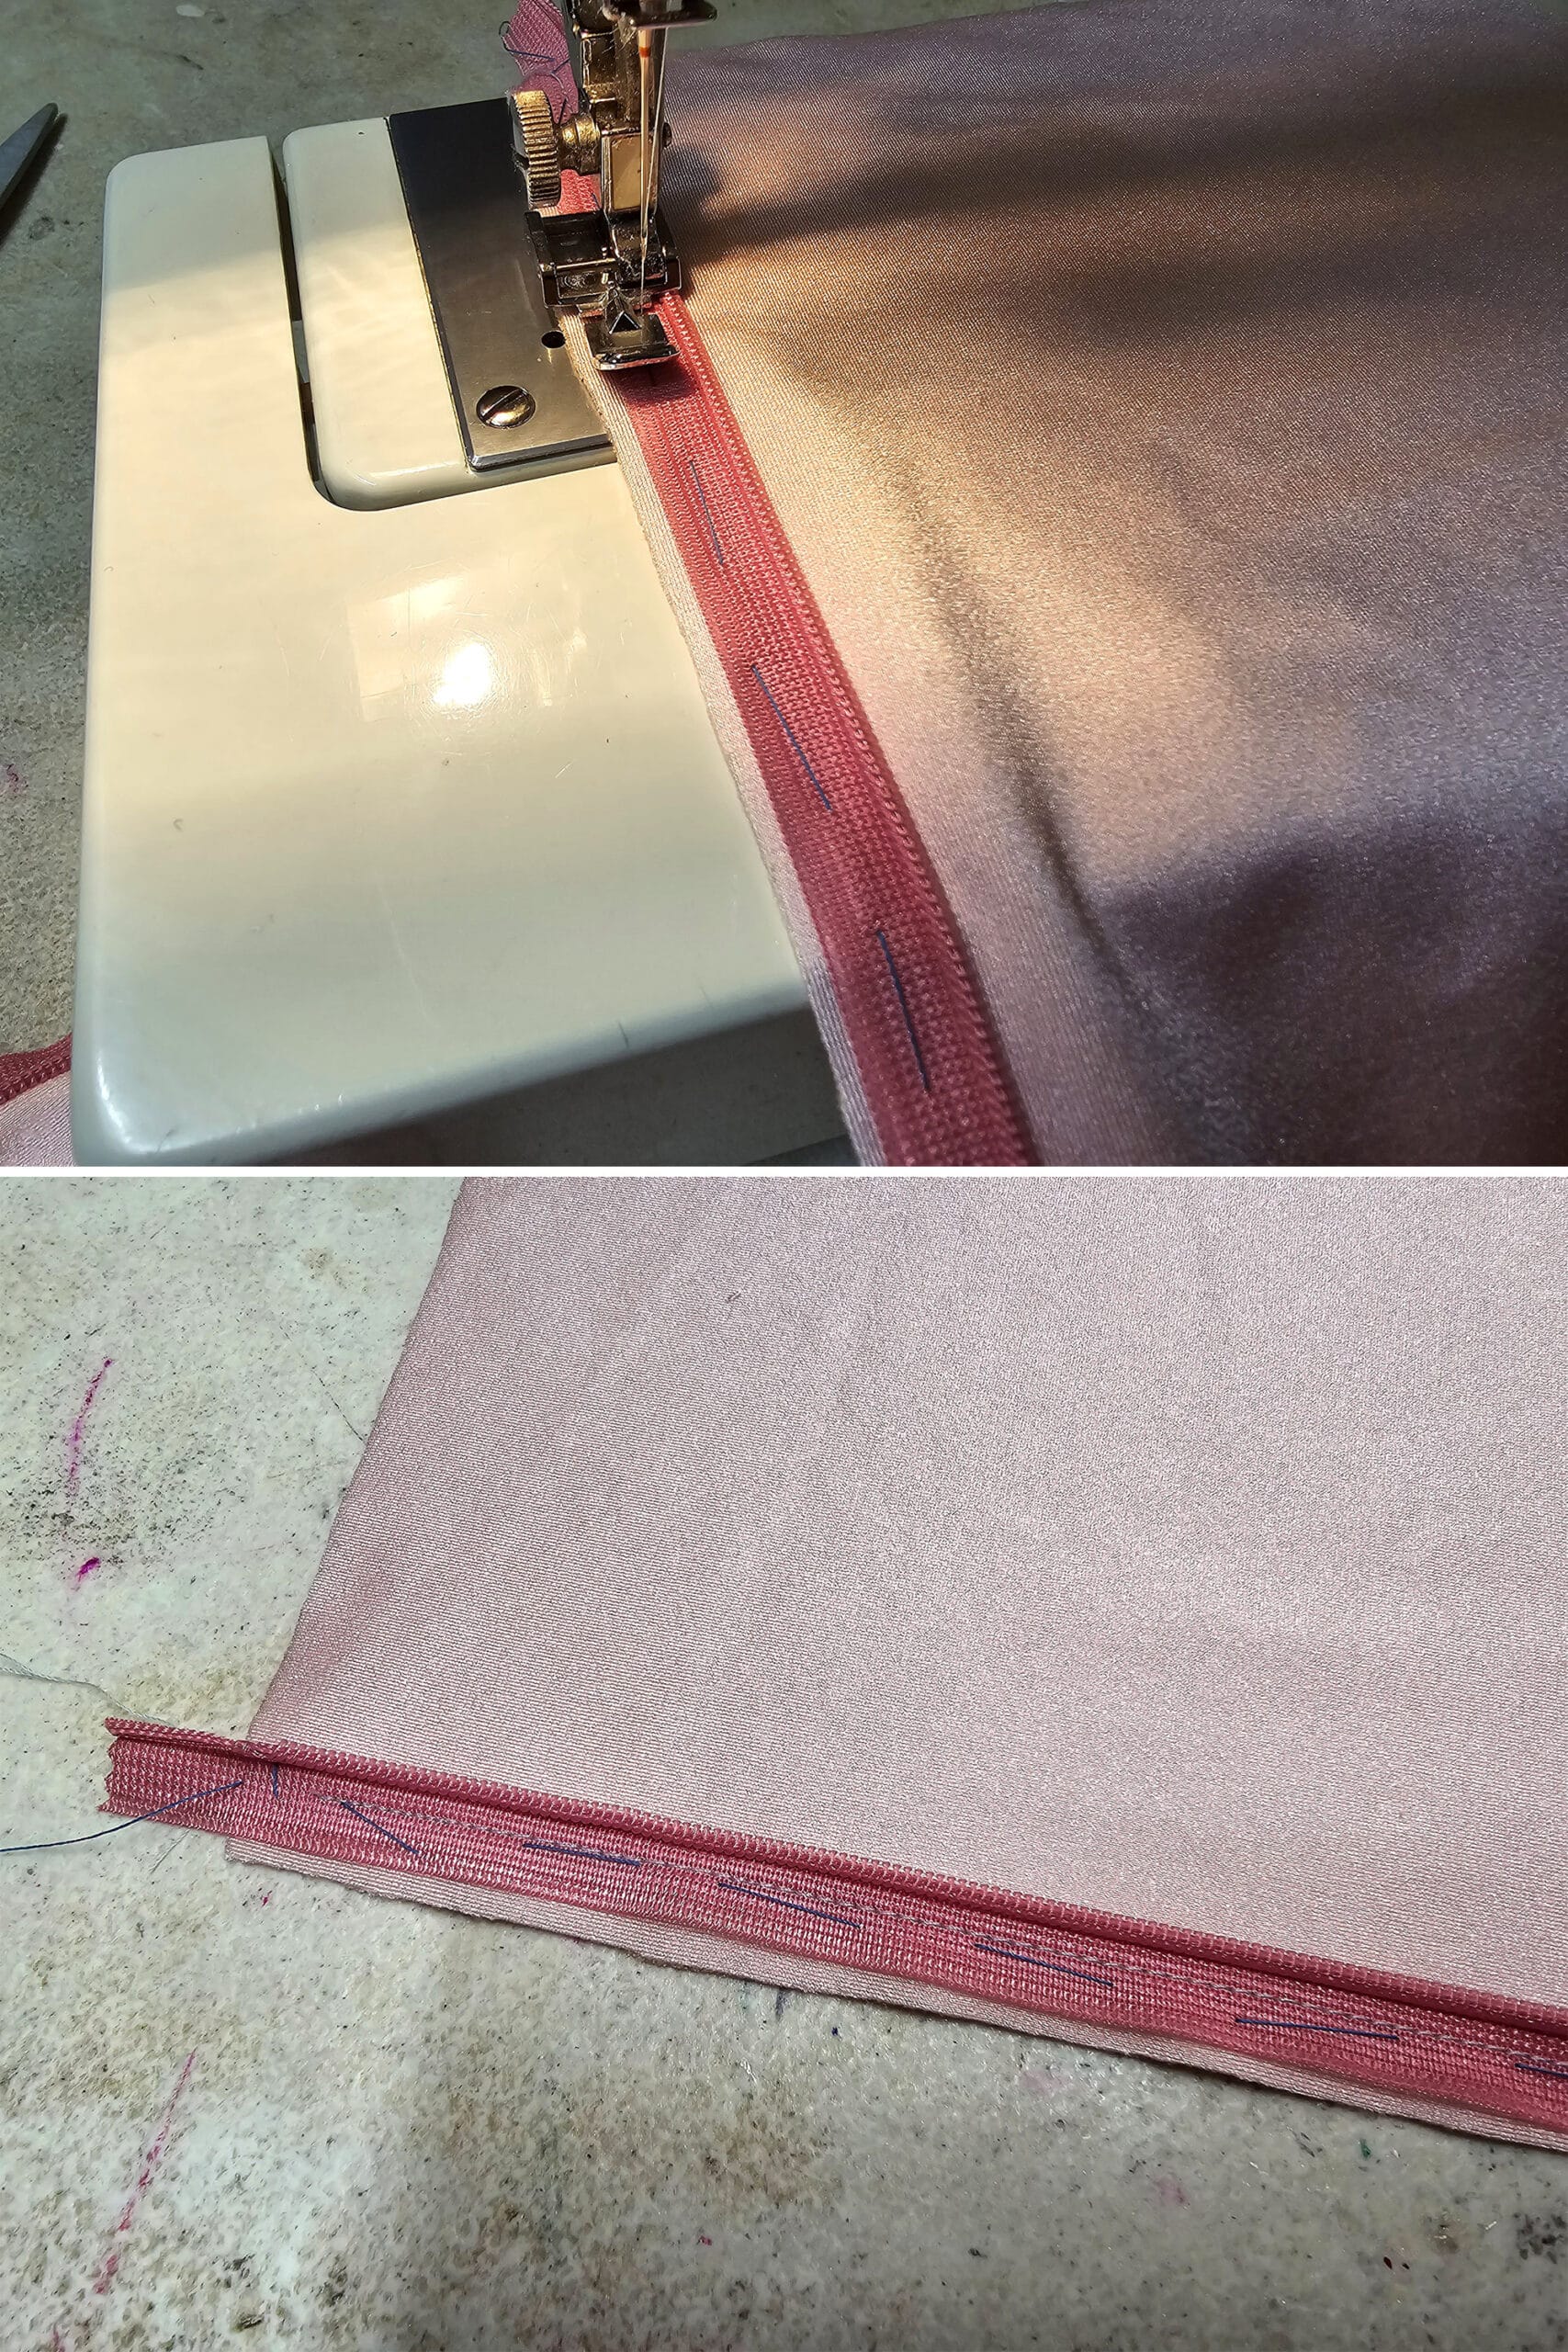
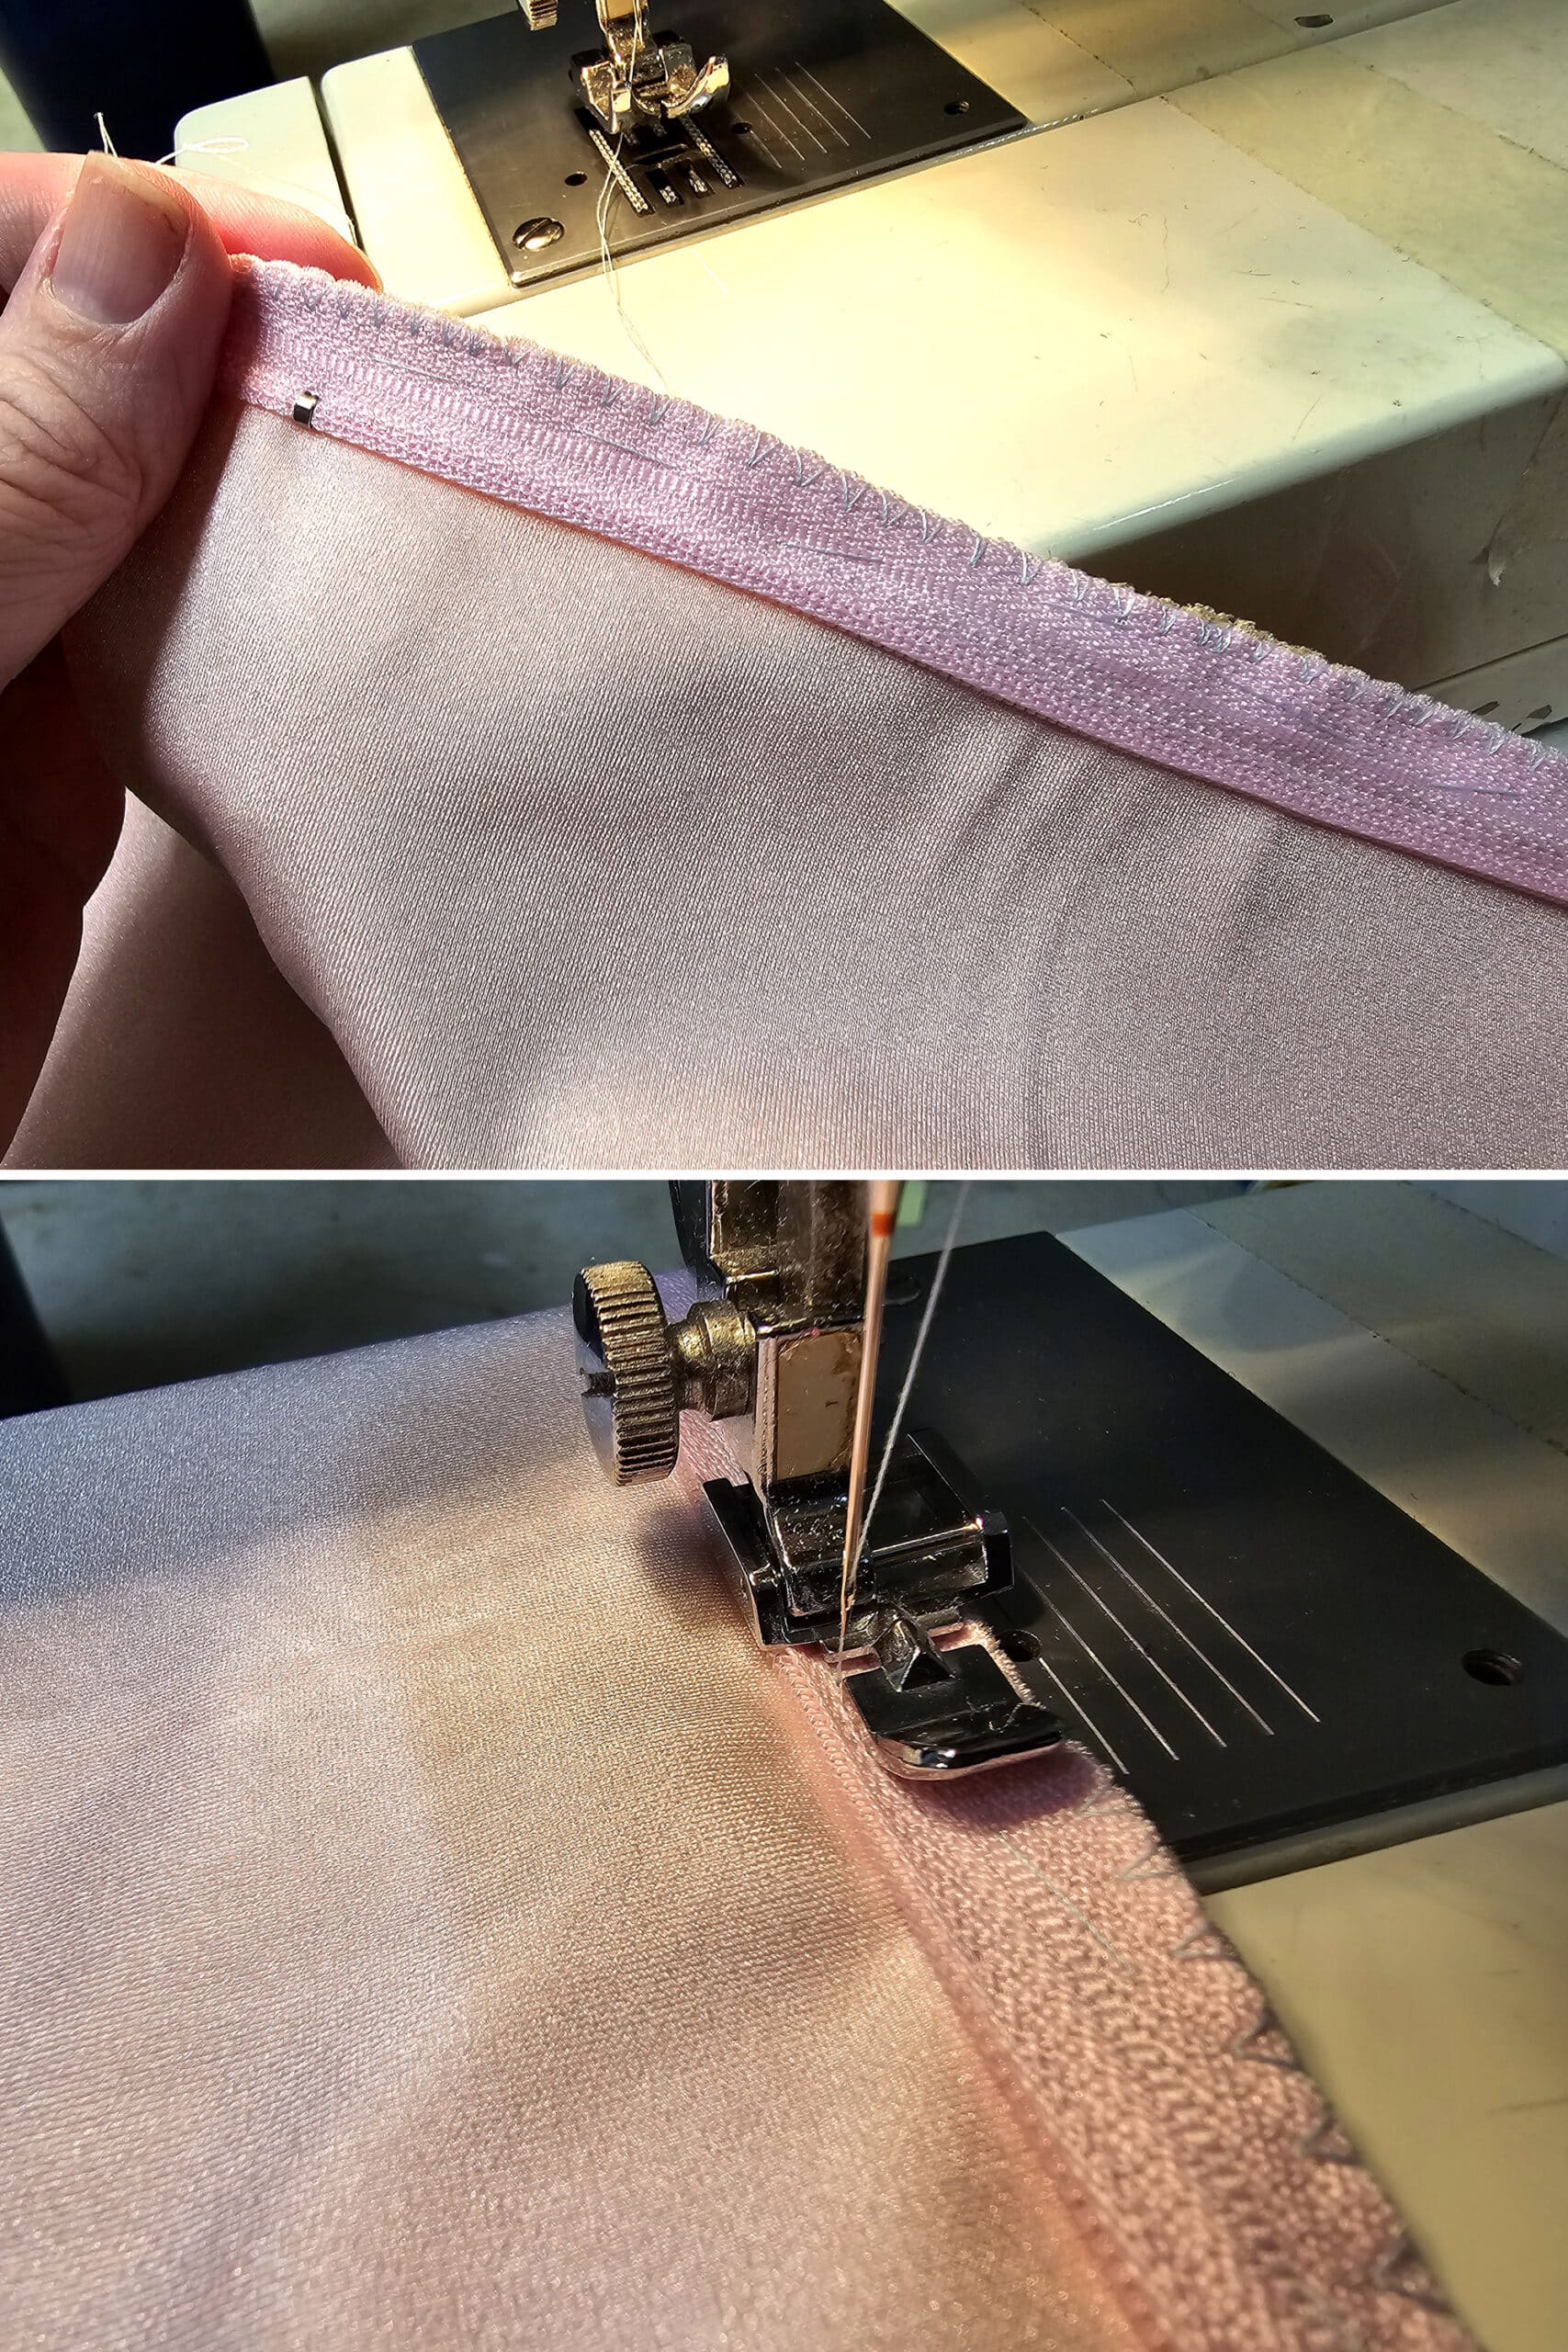
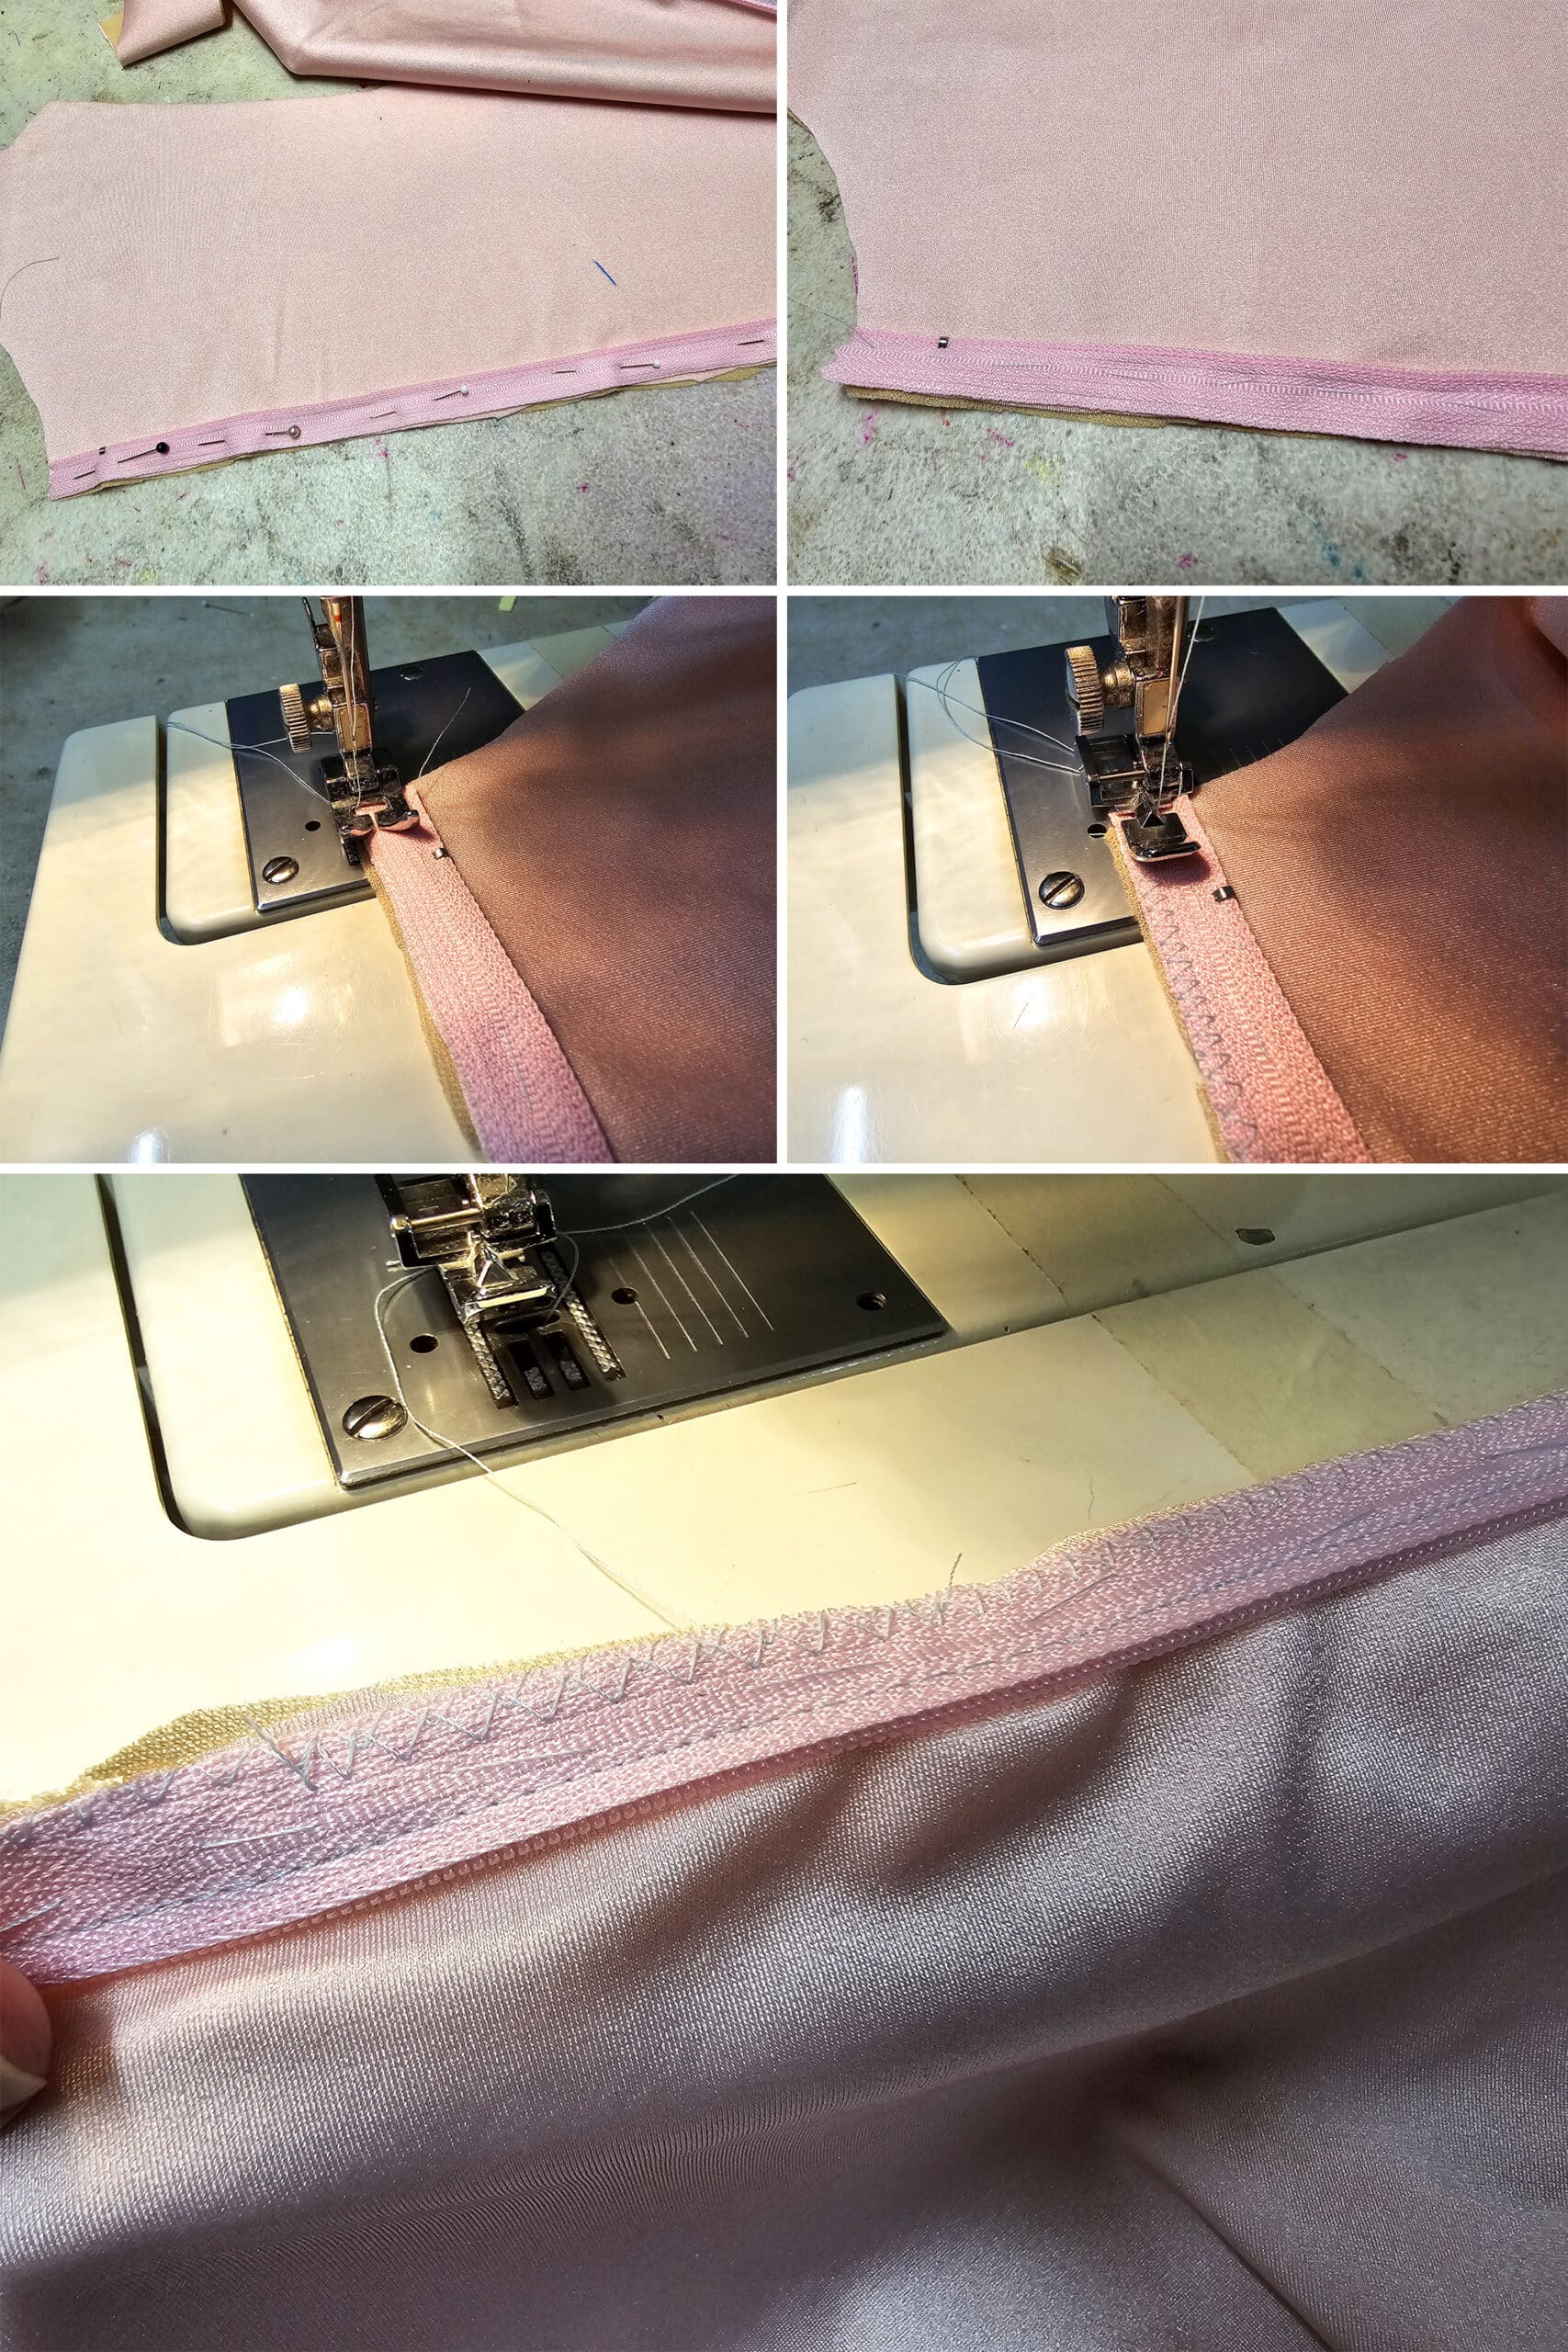
Sew the Second Invisible Zipper Seam
Swap your presser foot out for the invisible zipper foot.
This time around - again, staring from the TOP edge of the garment - you’re going to feed the zipper coil into the RIGHT side of the zipper foot.
Once again, you’ll want to go slowly and carefully, and use your pointer finger to hold the zipper coil open as you go, so it can get close to that inner groove on the zipper.
Check your work one last time - close the zipper and make sure everything matches up where it needs to.
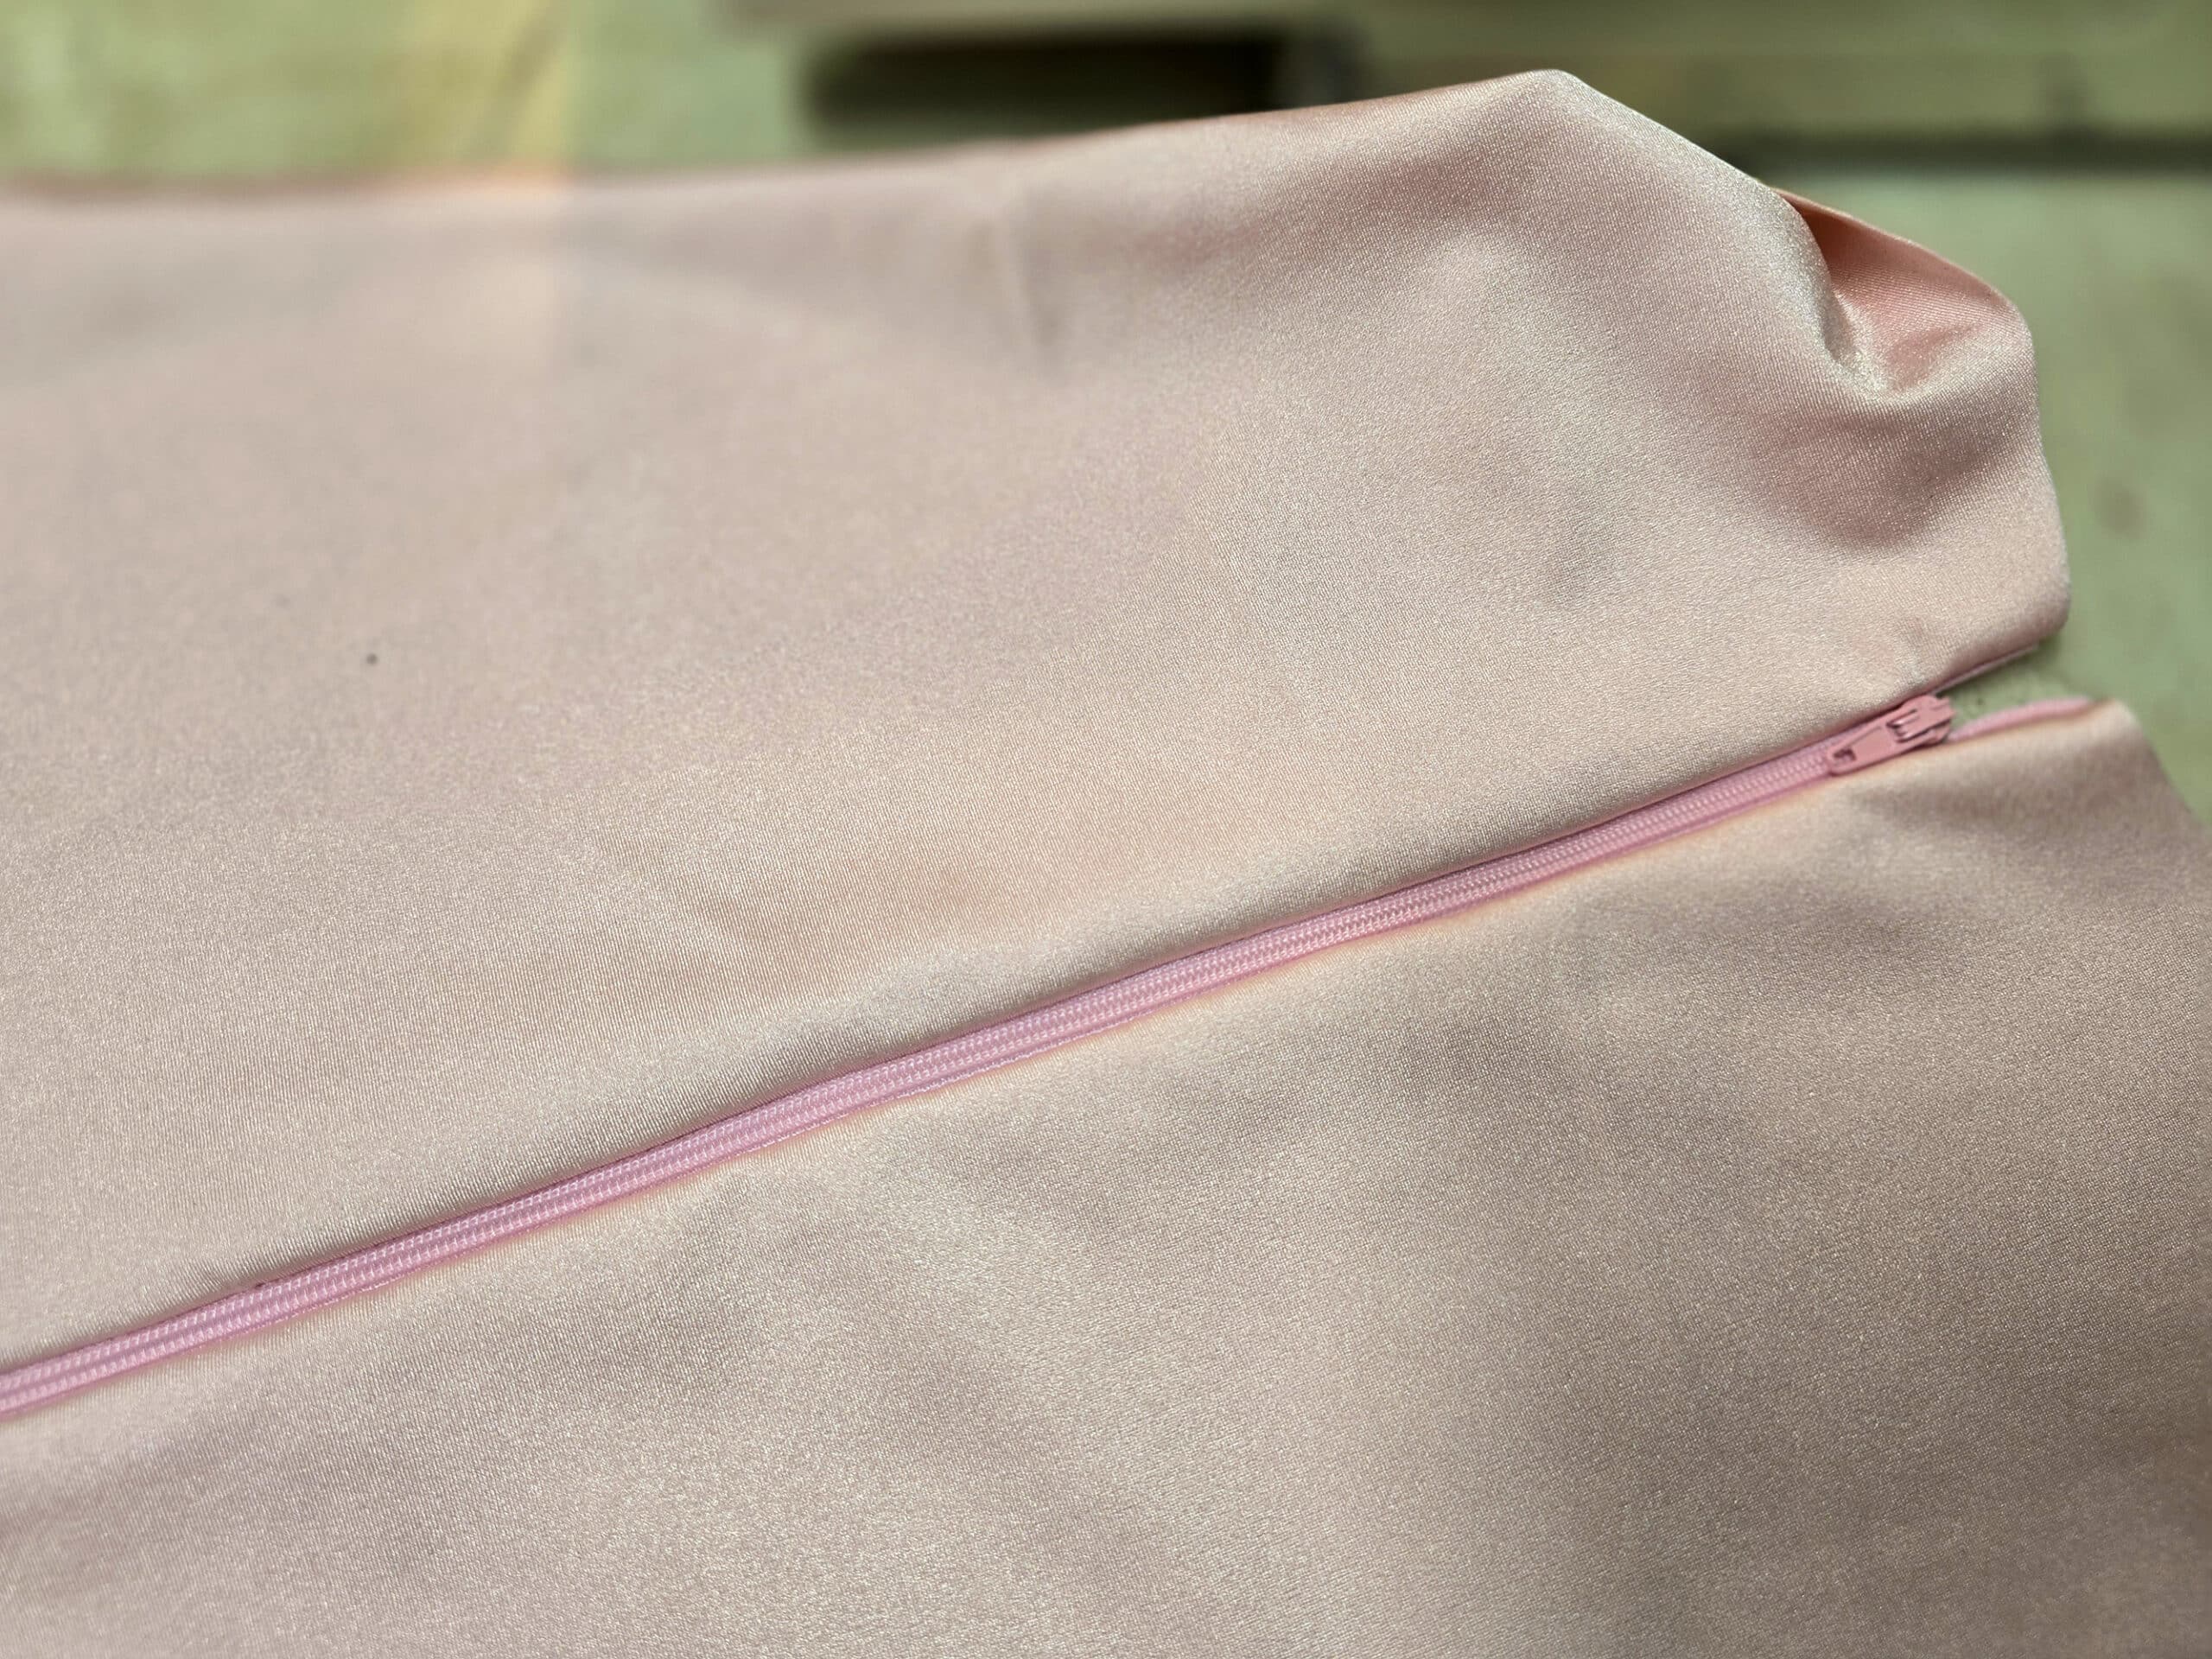
Finish the Seam
Line up the garment pieces so the wrong side of the fabric / zipper application is facing out.
Holding the bulk of the zipper end out of the way, sew a vertical line from the lower edge of the garment, just past the end point of the zipper insertion seams.
I like to use a regular zipper foot for this seam, to get as close as possible to the zipper insertion. The closer you get, the smaller and tighter the little “pocket” you’ll have at the bottom of your zipper insertion.
Finish off this remaining seam however you like. While I usually serge everything, I usually zig zag the edges together for this kind of seam, ending slightly below the first seam.
This gives the seam allowance a little room to spread open, before it hits the zipper. This allows it to lay flatter when worn.
That said, if it’s a really short seam - as pictured - I’ll just do two straight seams (very close together) and leave the raw edge open, as I did on this insertion.
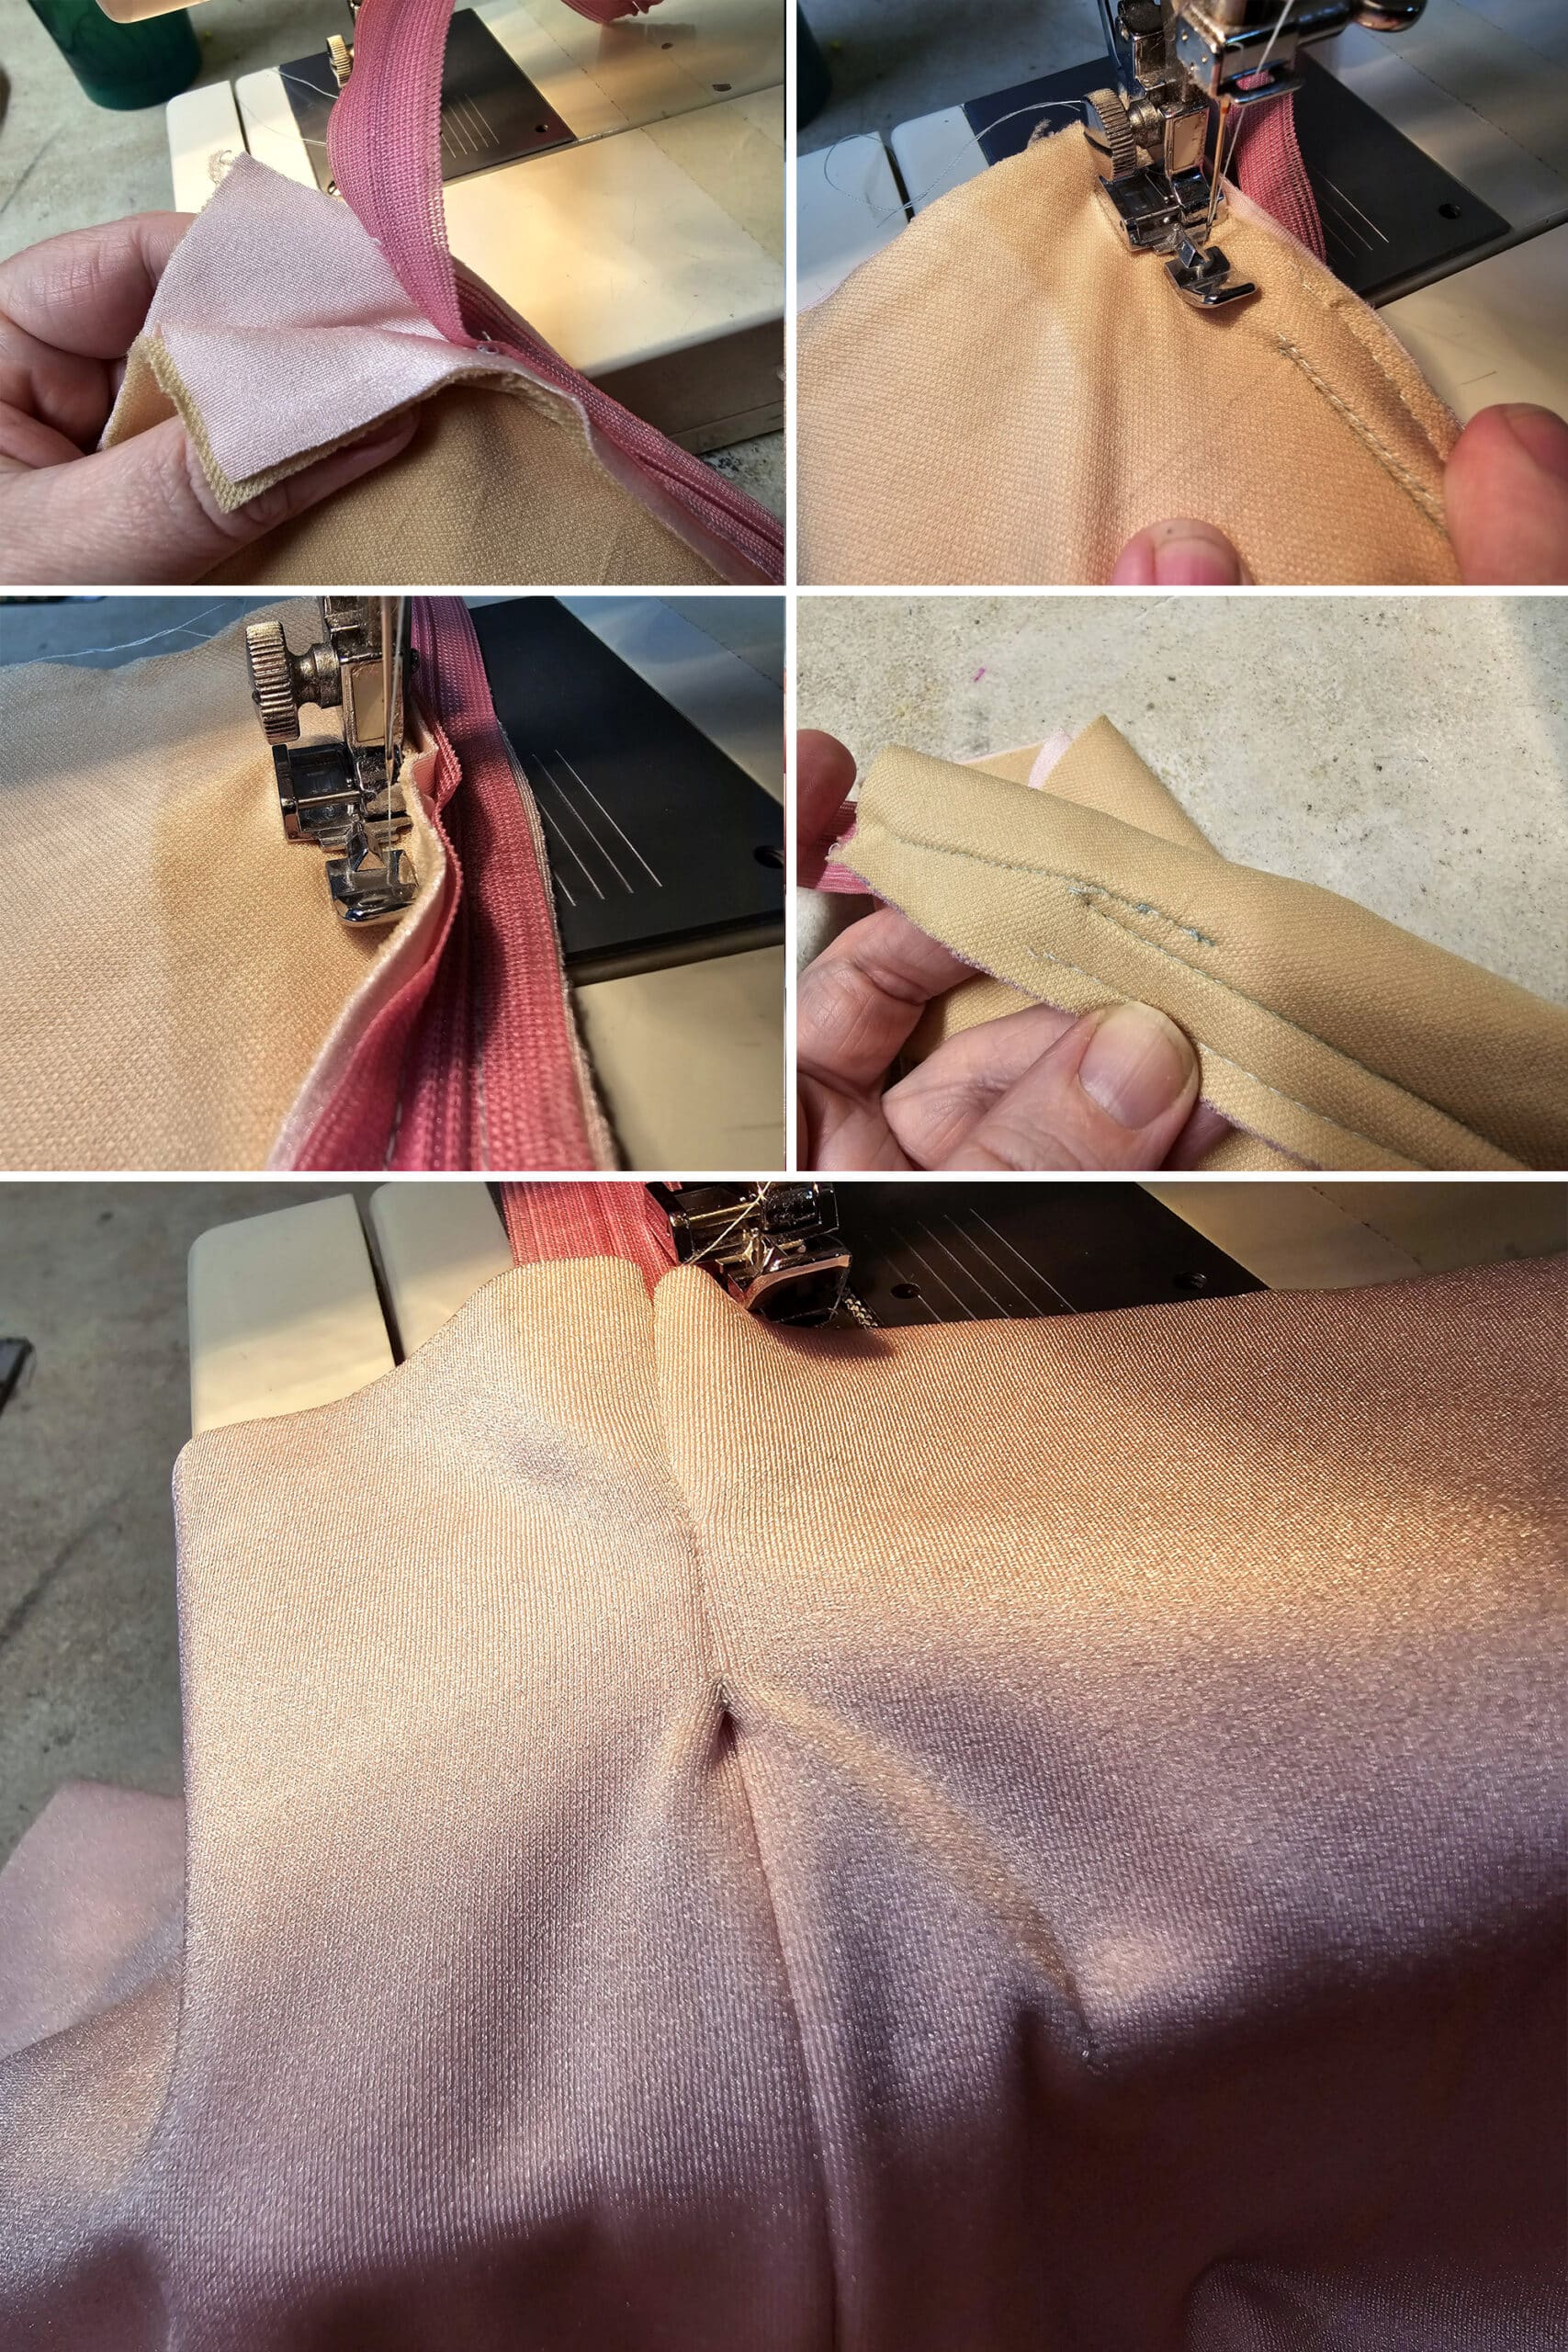
Trim and Finish Off the Zipper Edge
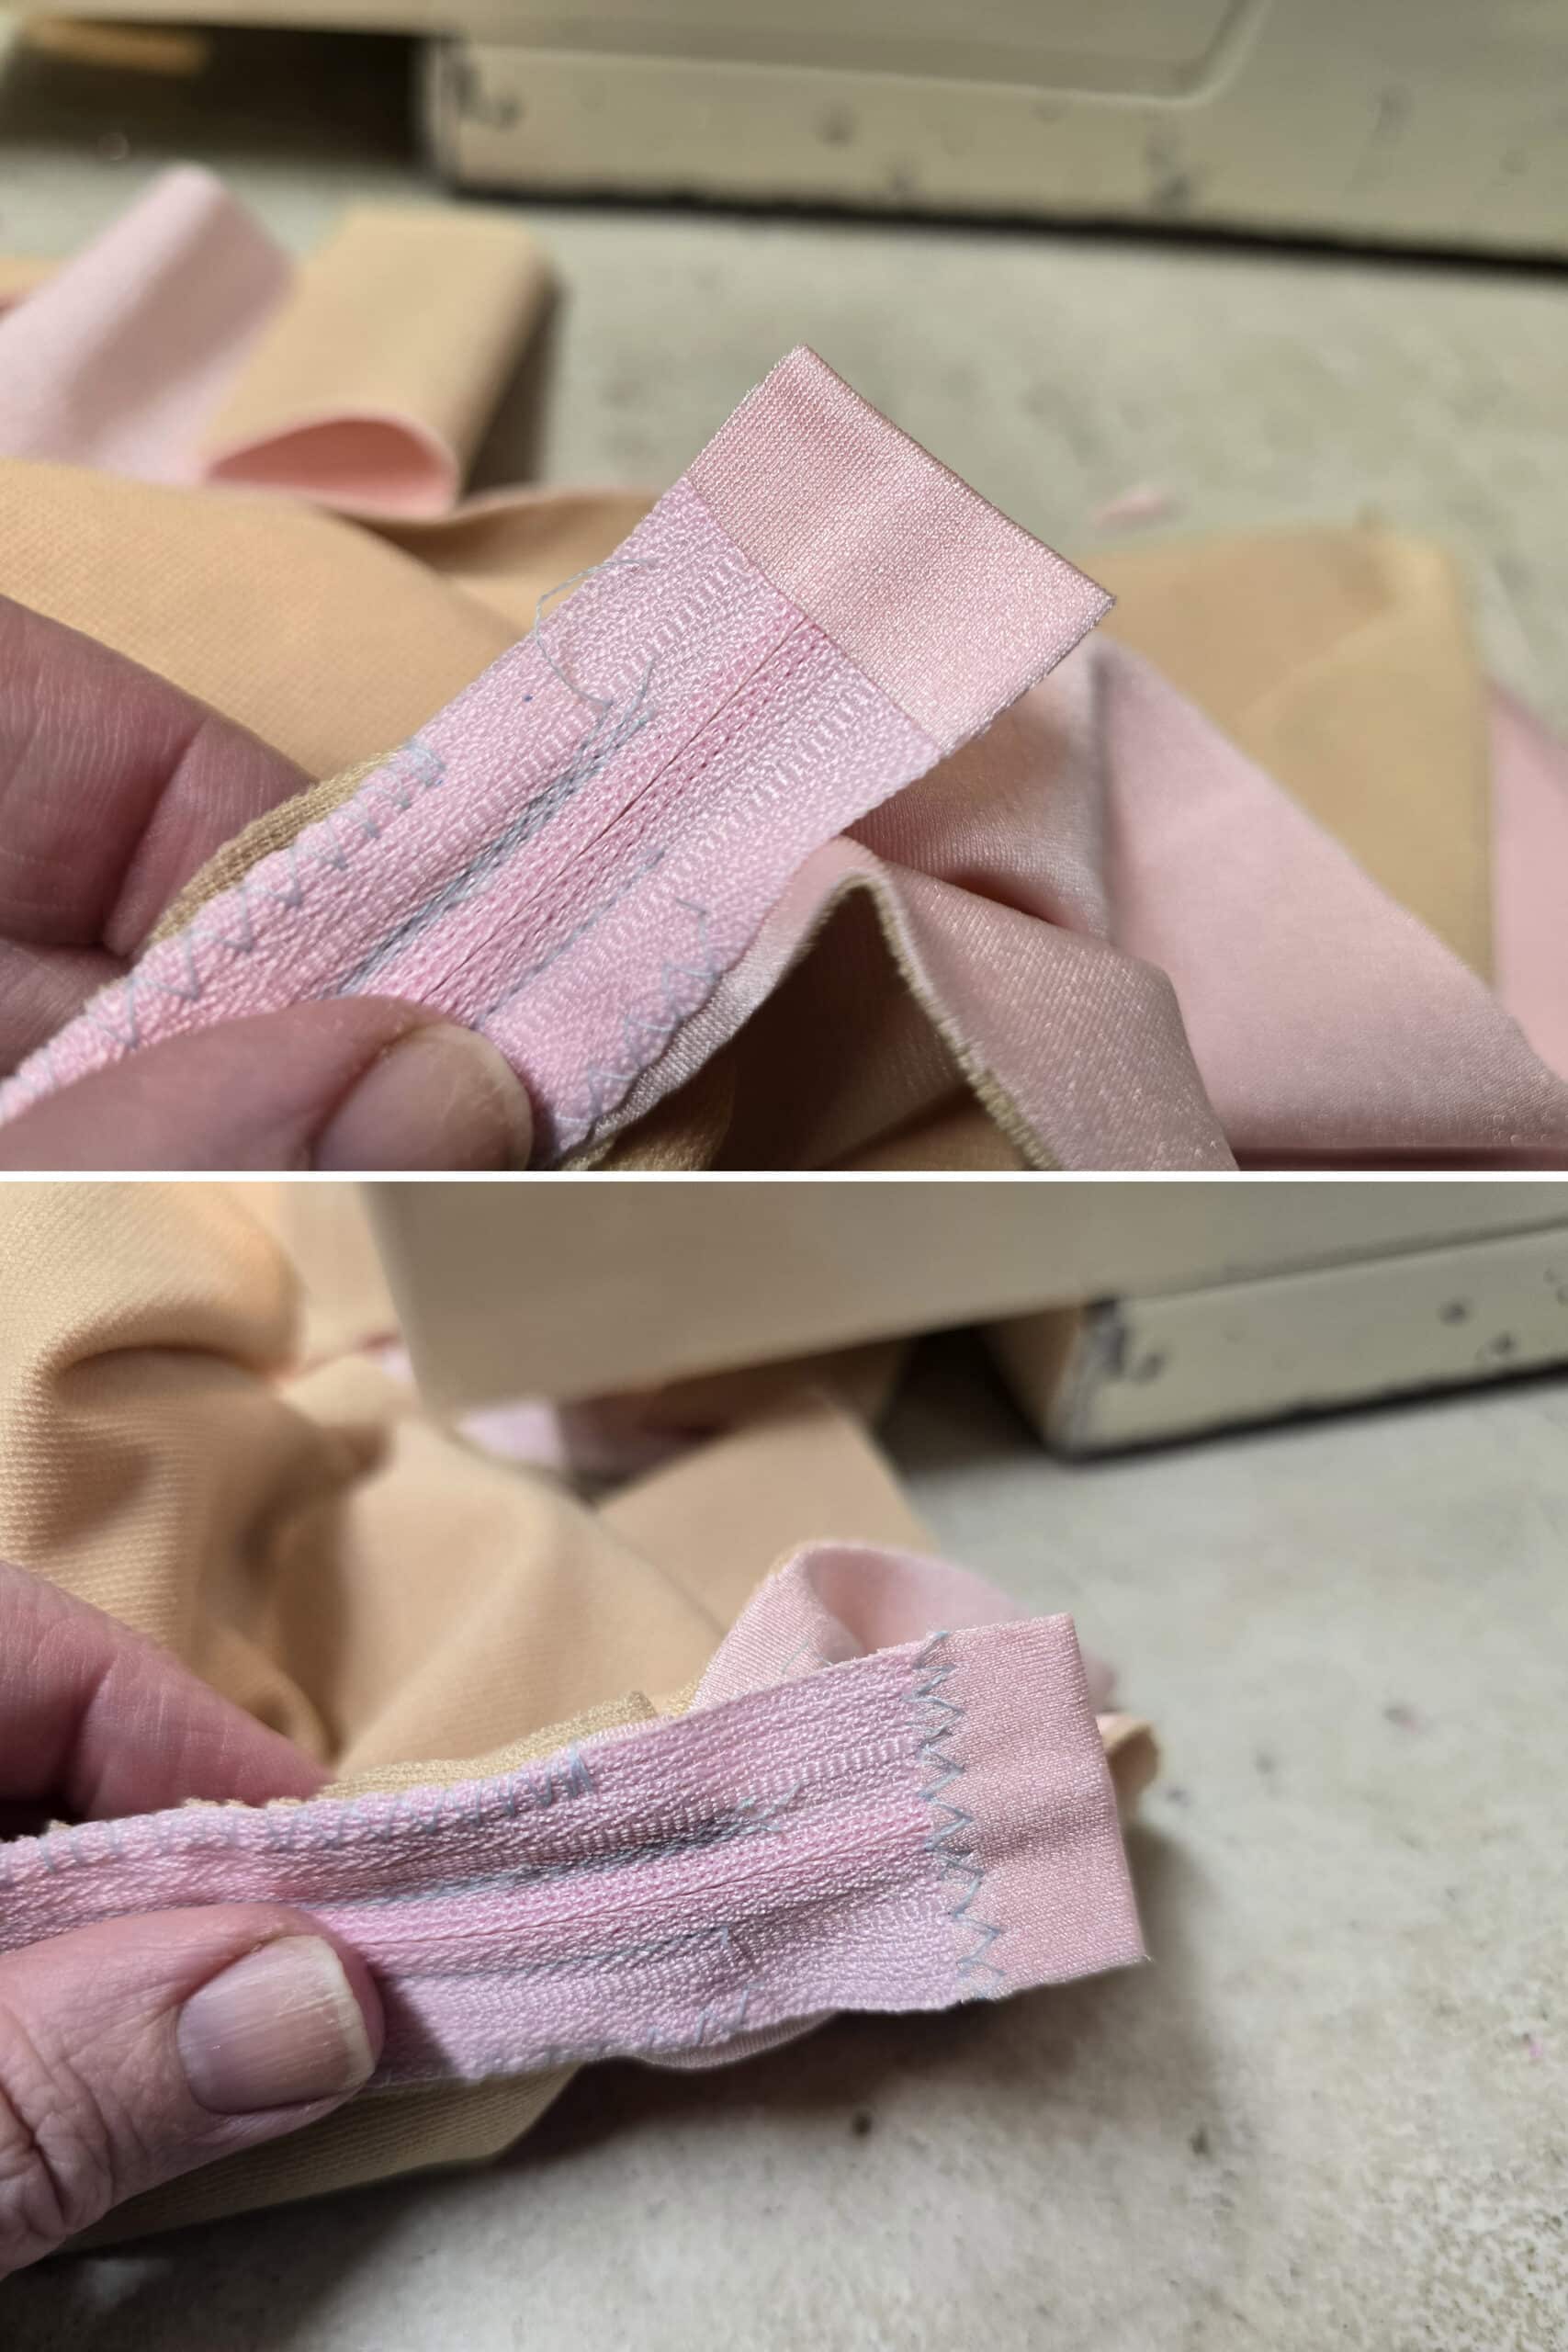
With the wrong side of your garment facing up, cut the excess length off the bottom of your zipper. Discard the extra tape.
I like to leave about 1" below the end of the insertion seams.
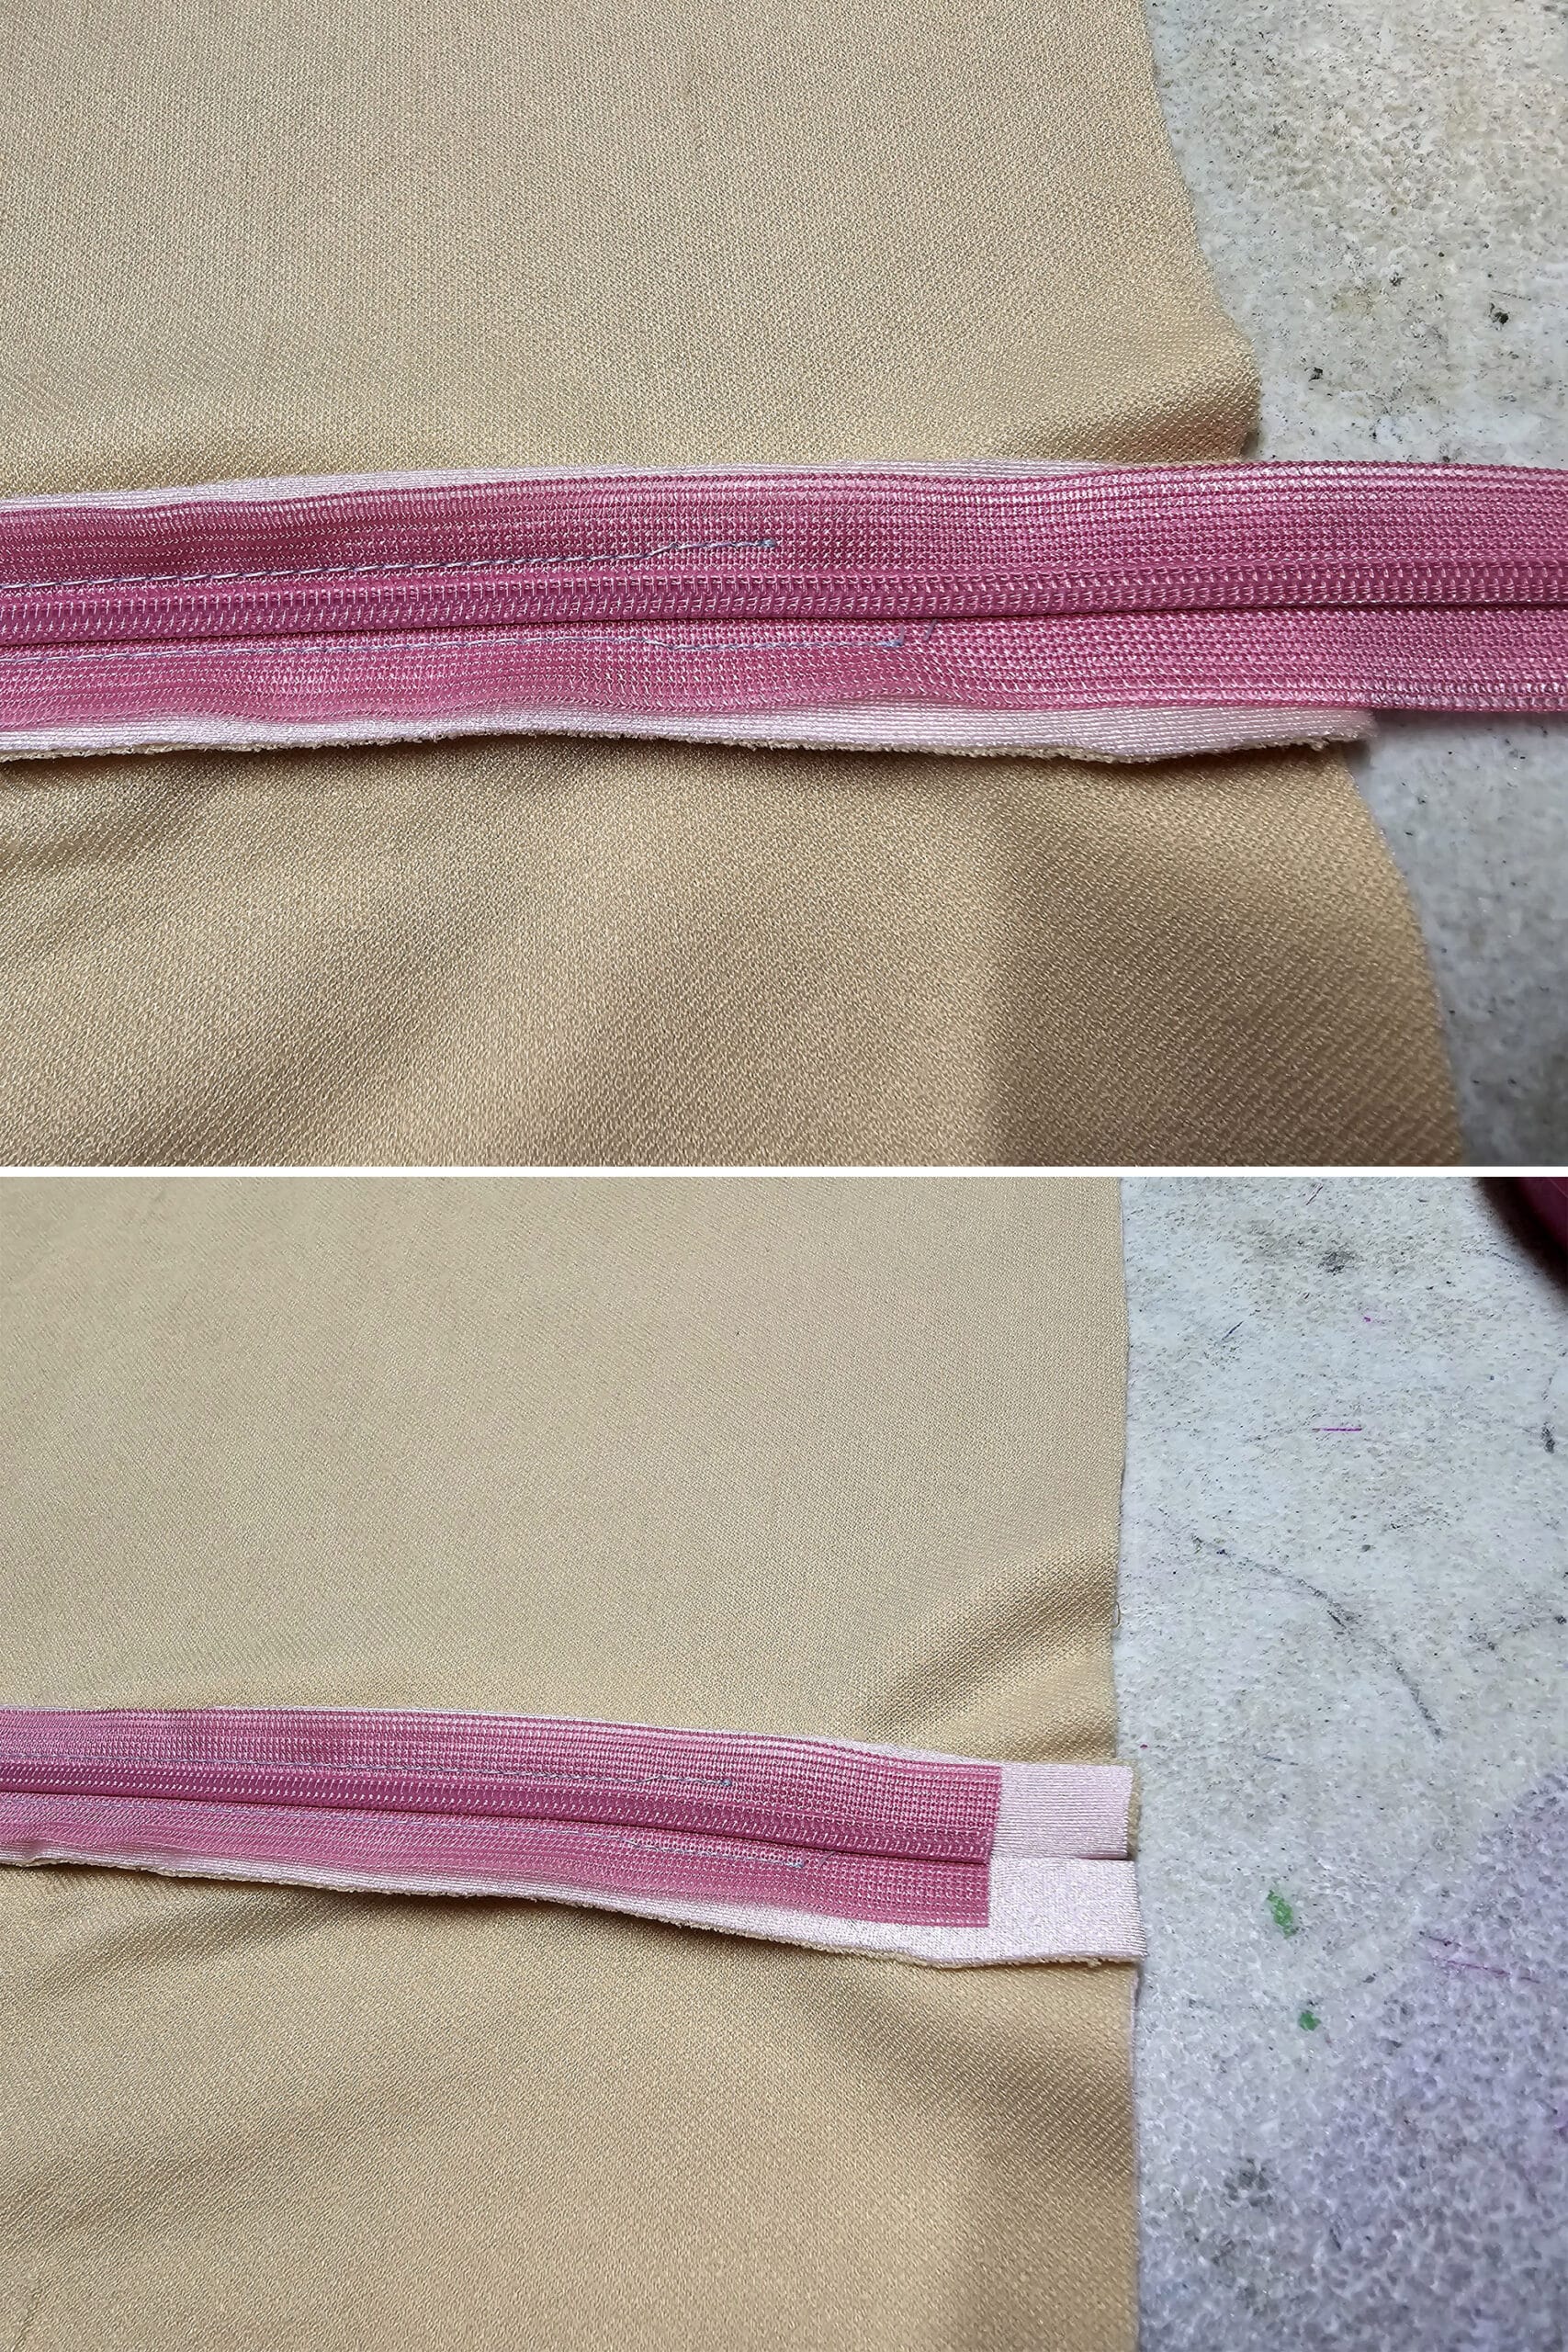
1 - Sew a straight seam across the tape near the cut edge of the zipper, then finish the very end off with a zig zag stitch to kind of bind it.
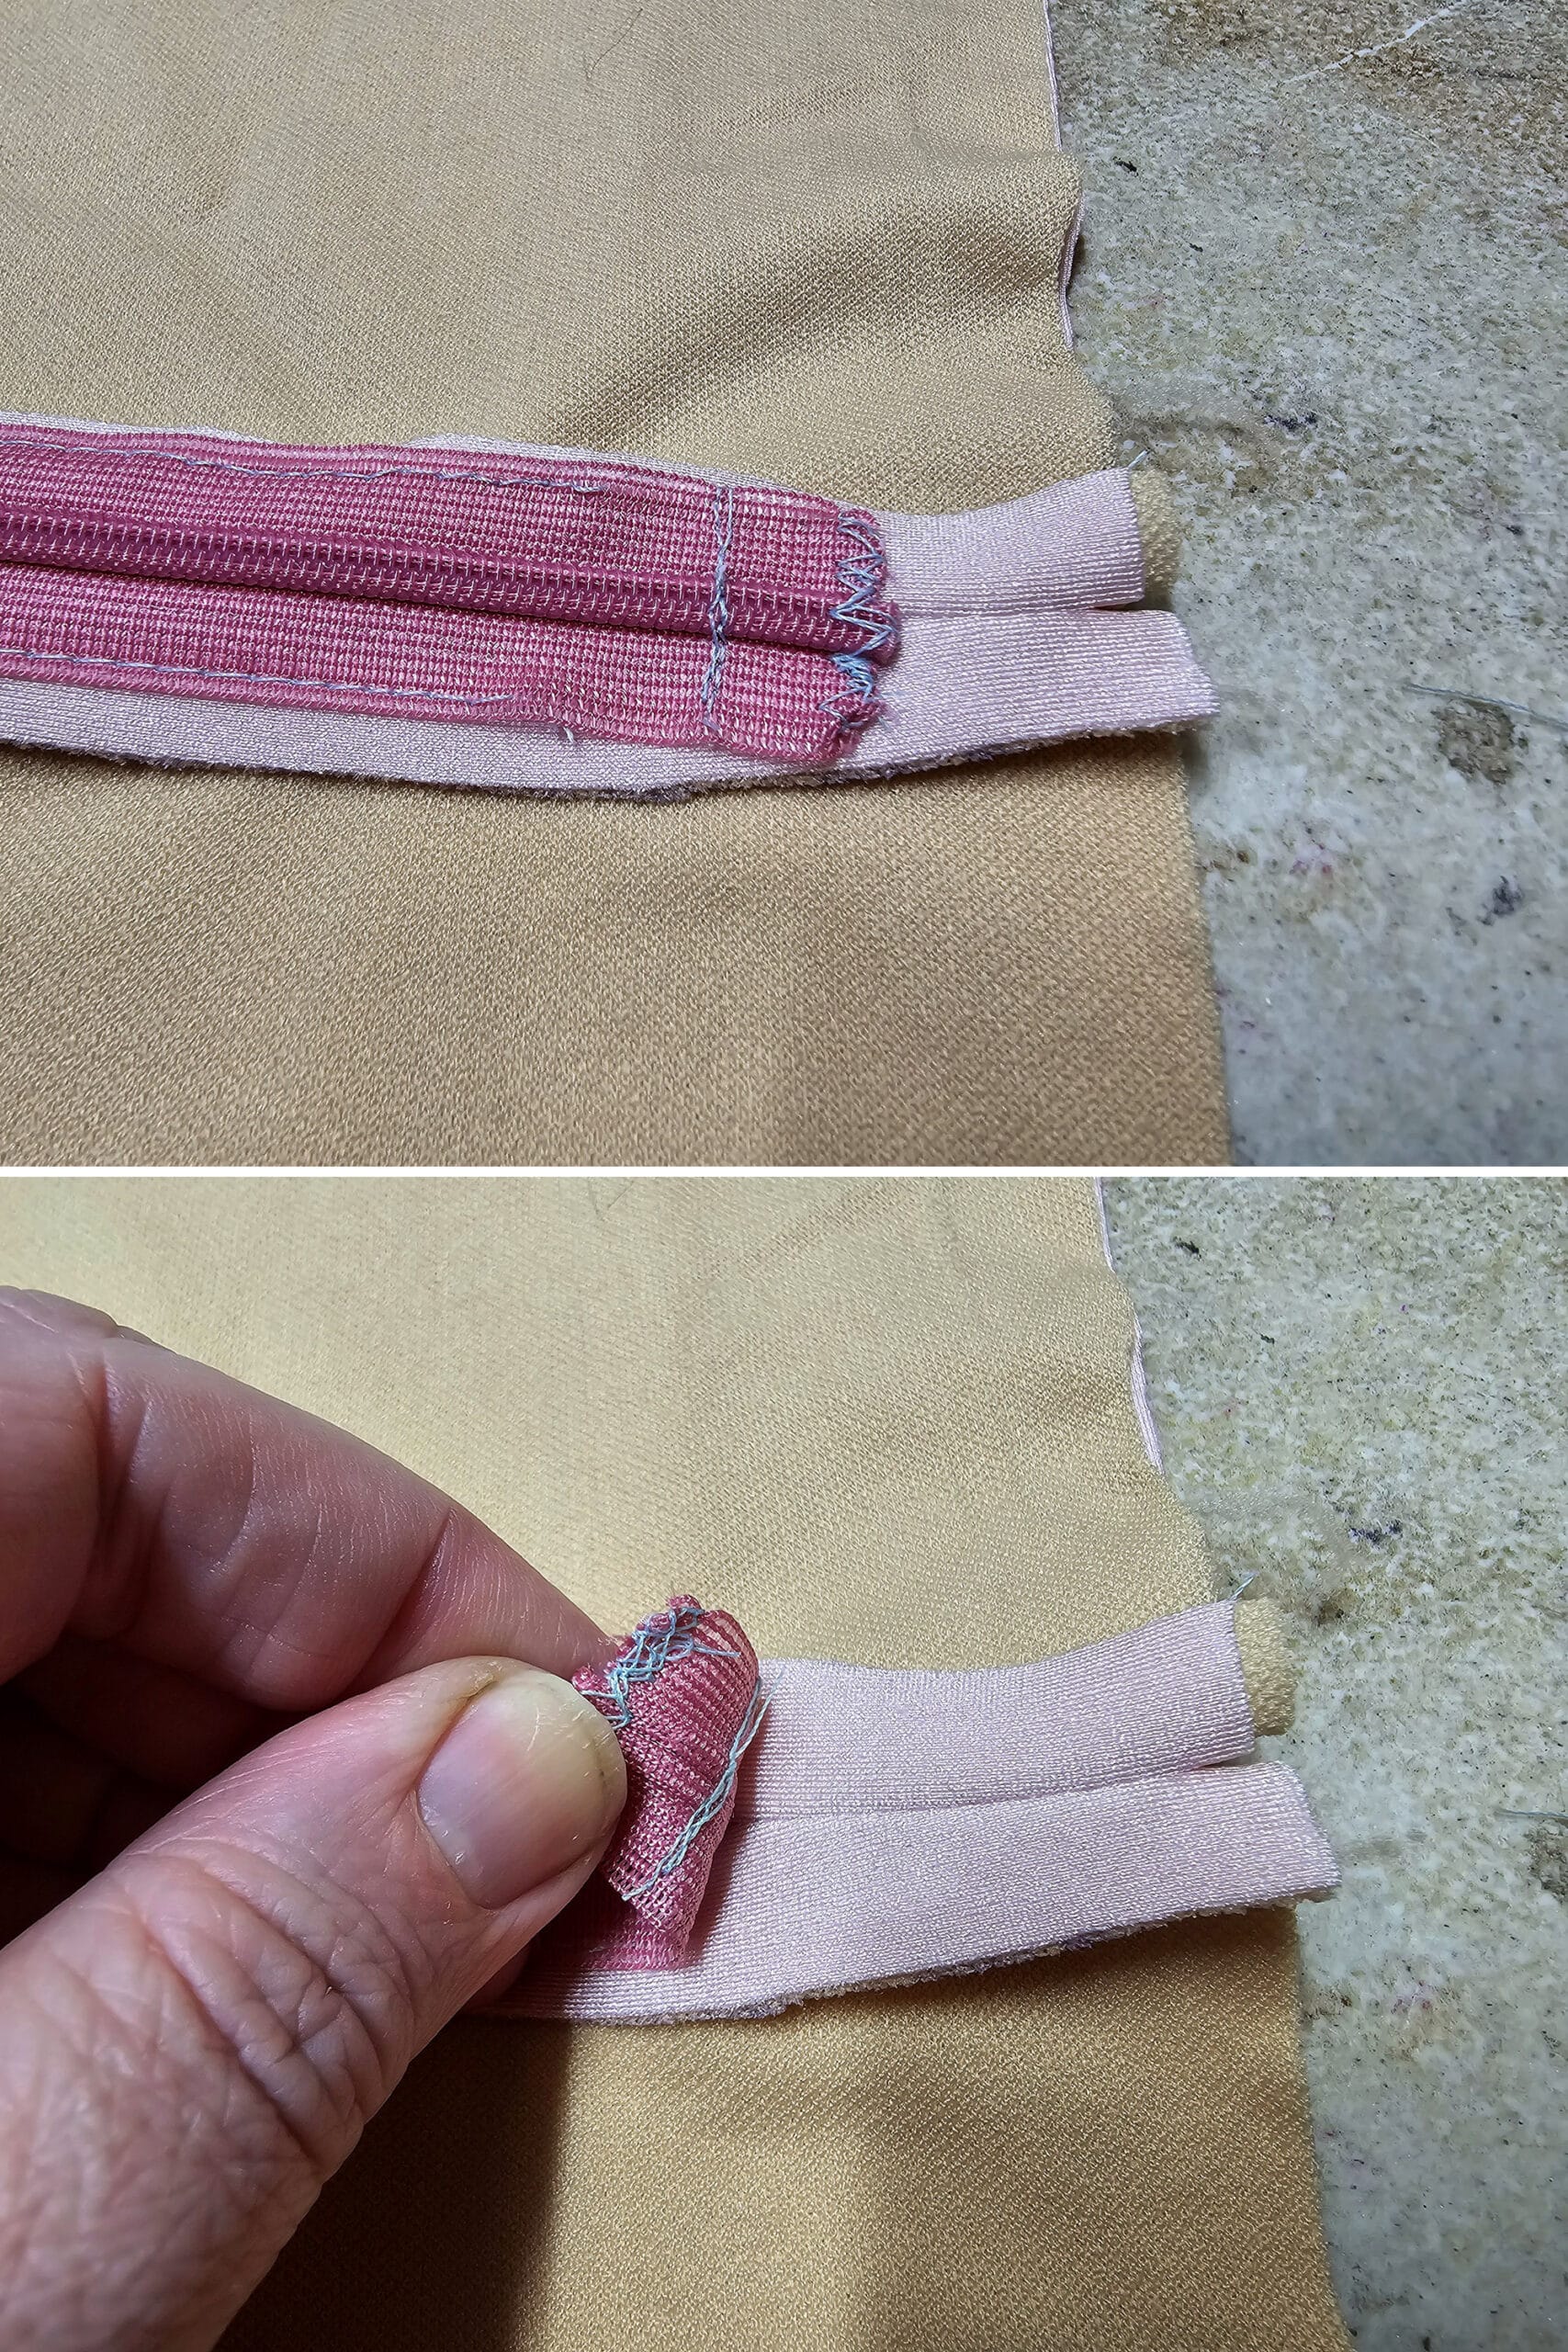
As an autistic with sensory issues, I definitely recommend this method. The cut edge of the zipper - even when zig zagged - can be annoying when it rubs against the skin.
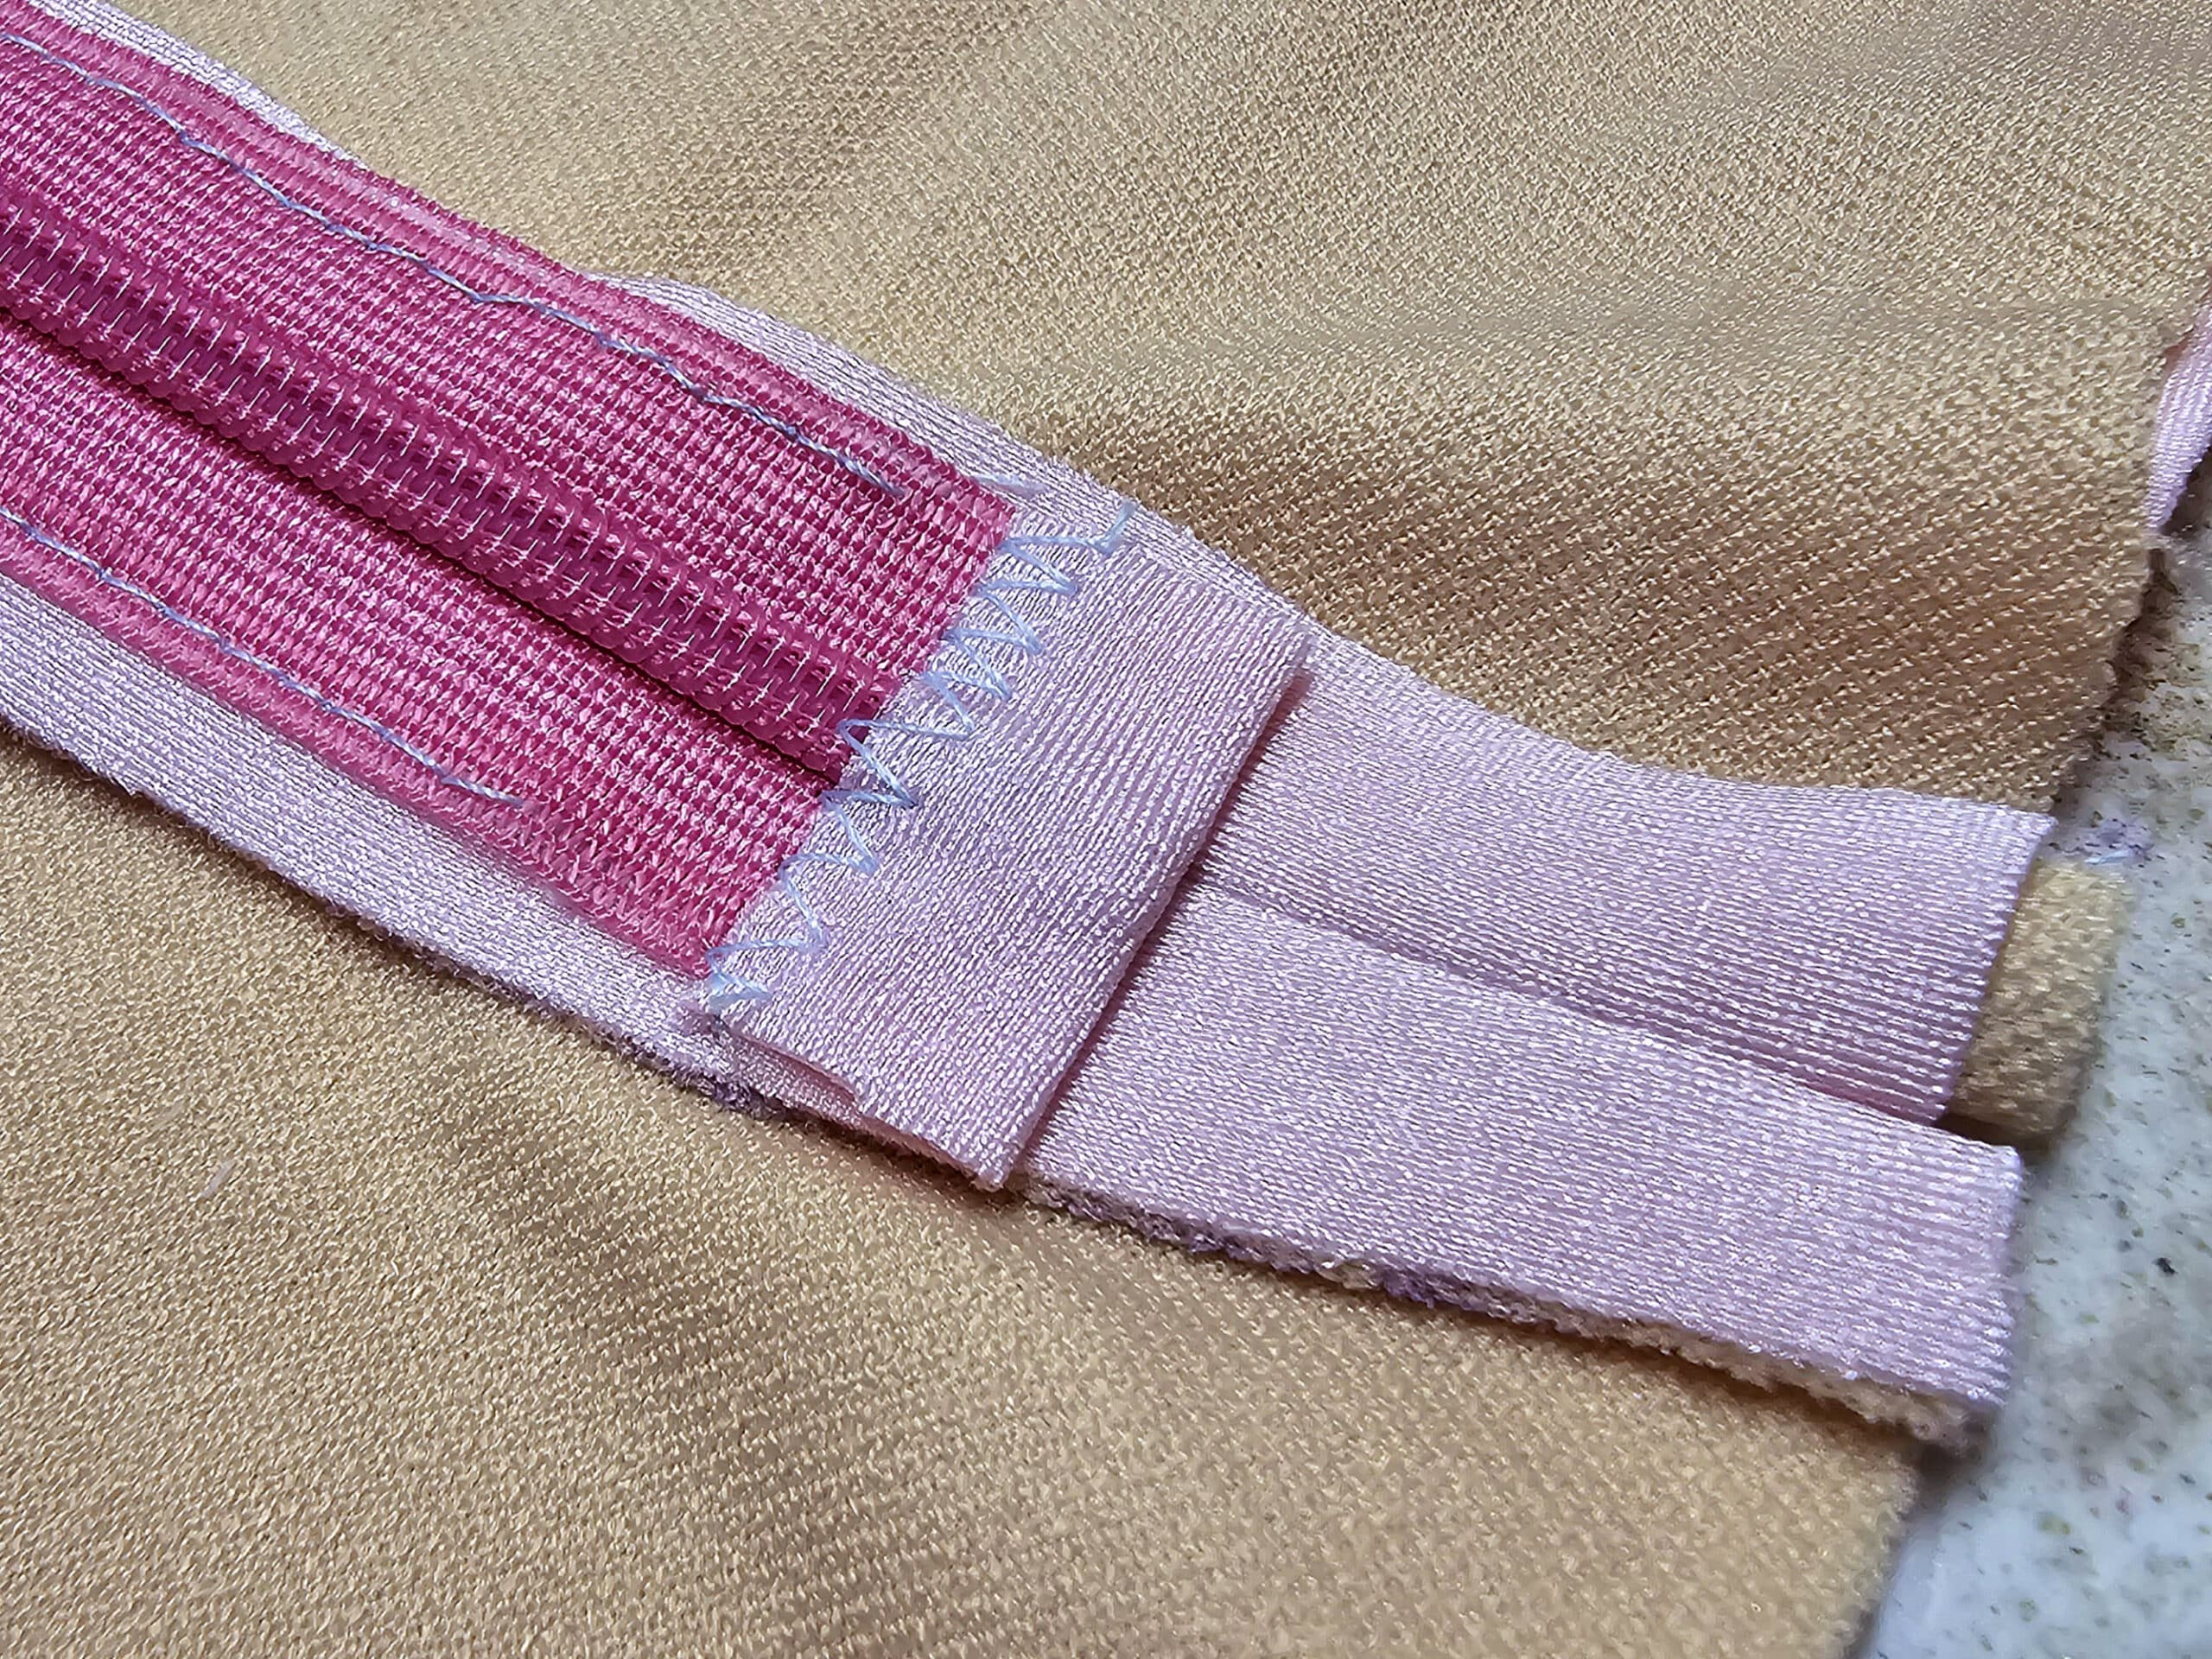
Cut a small rectangle of matching fabric, and fold it over the bottom of the zipper, as pictured.
Tip: I like to spray the wrong side of the fabric piece with temporary adhesive spray before doing this. It just helps everything lay smoother, and is easier to work with.
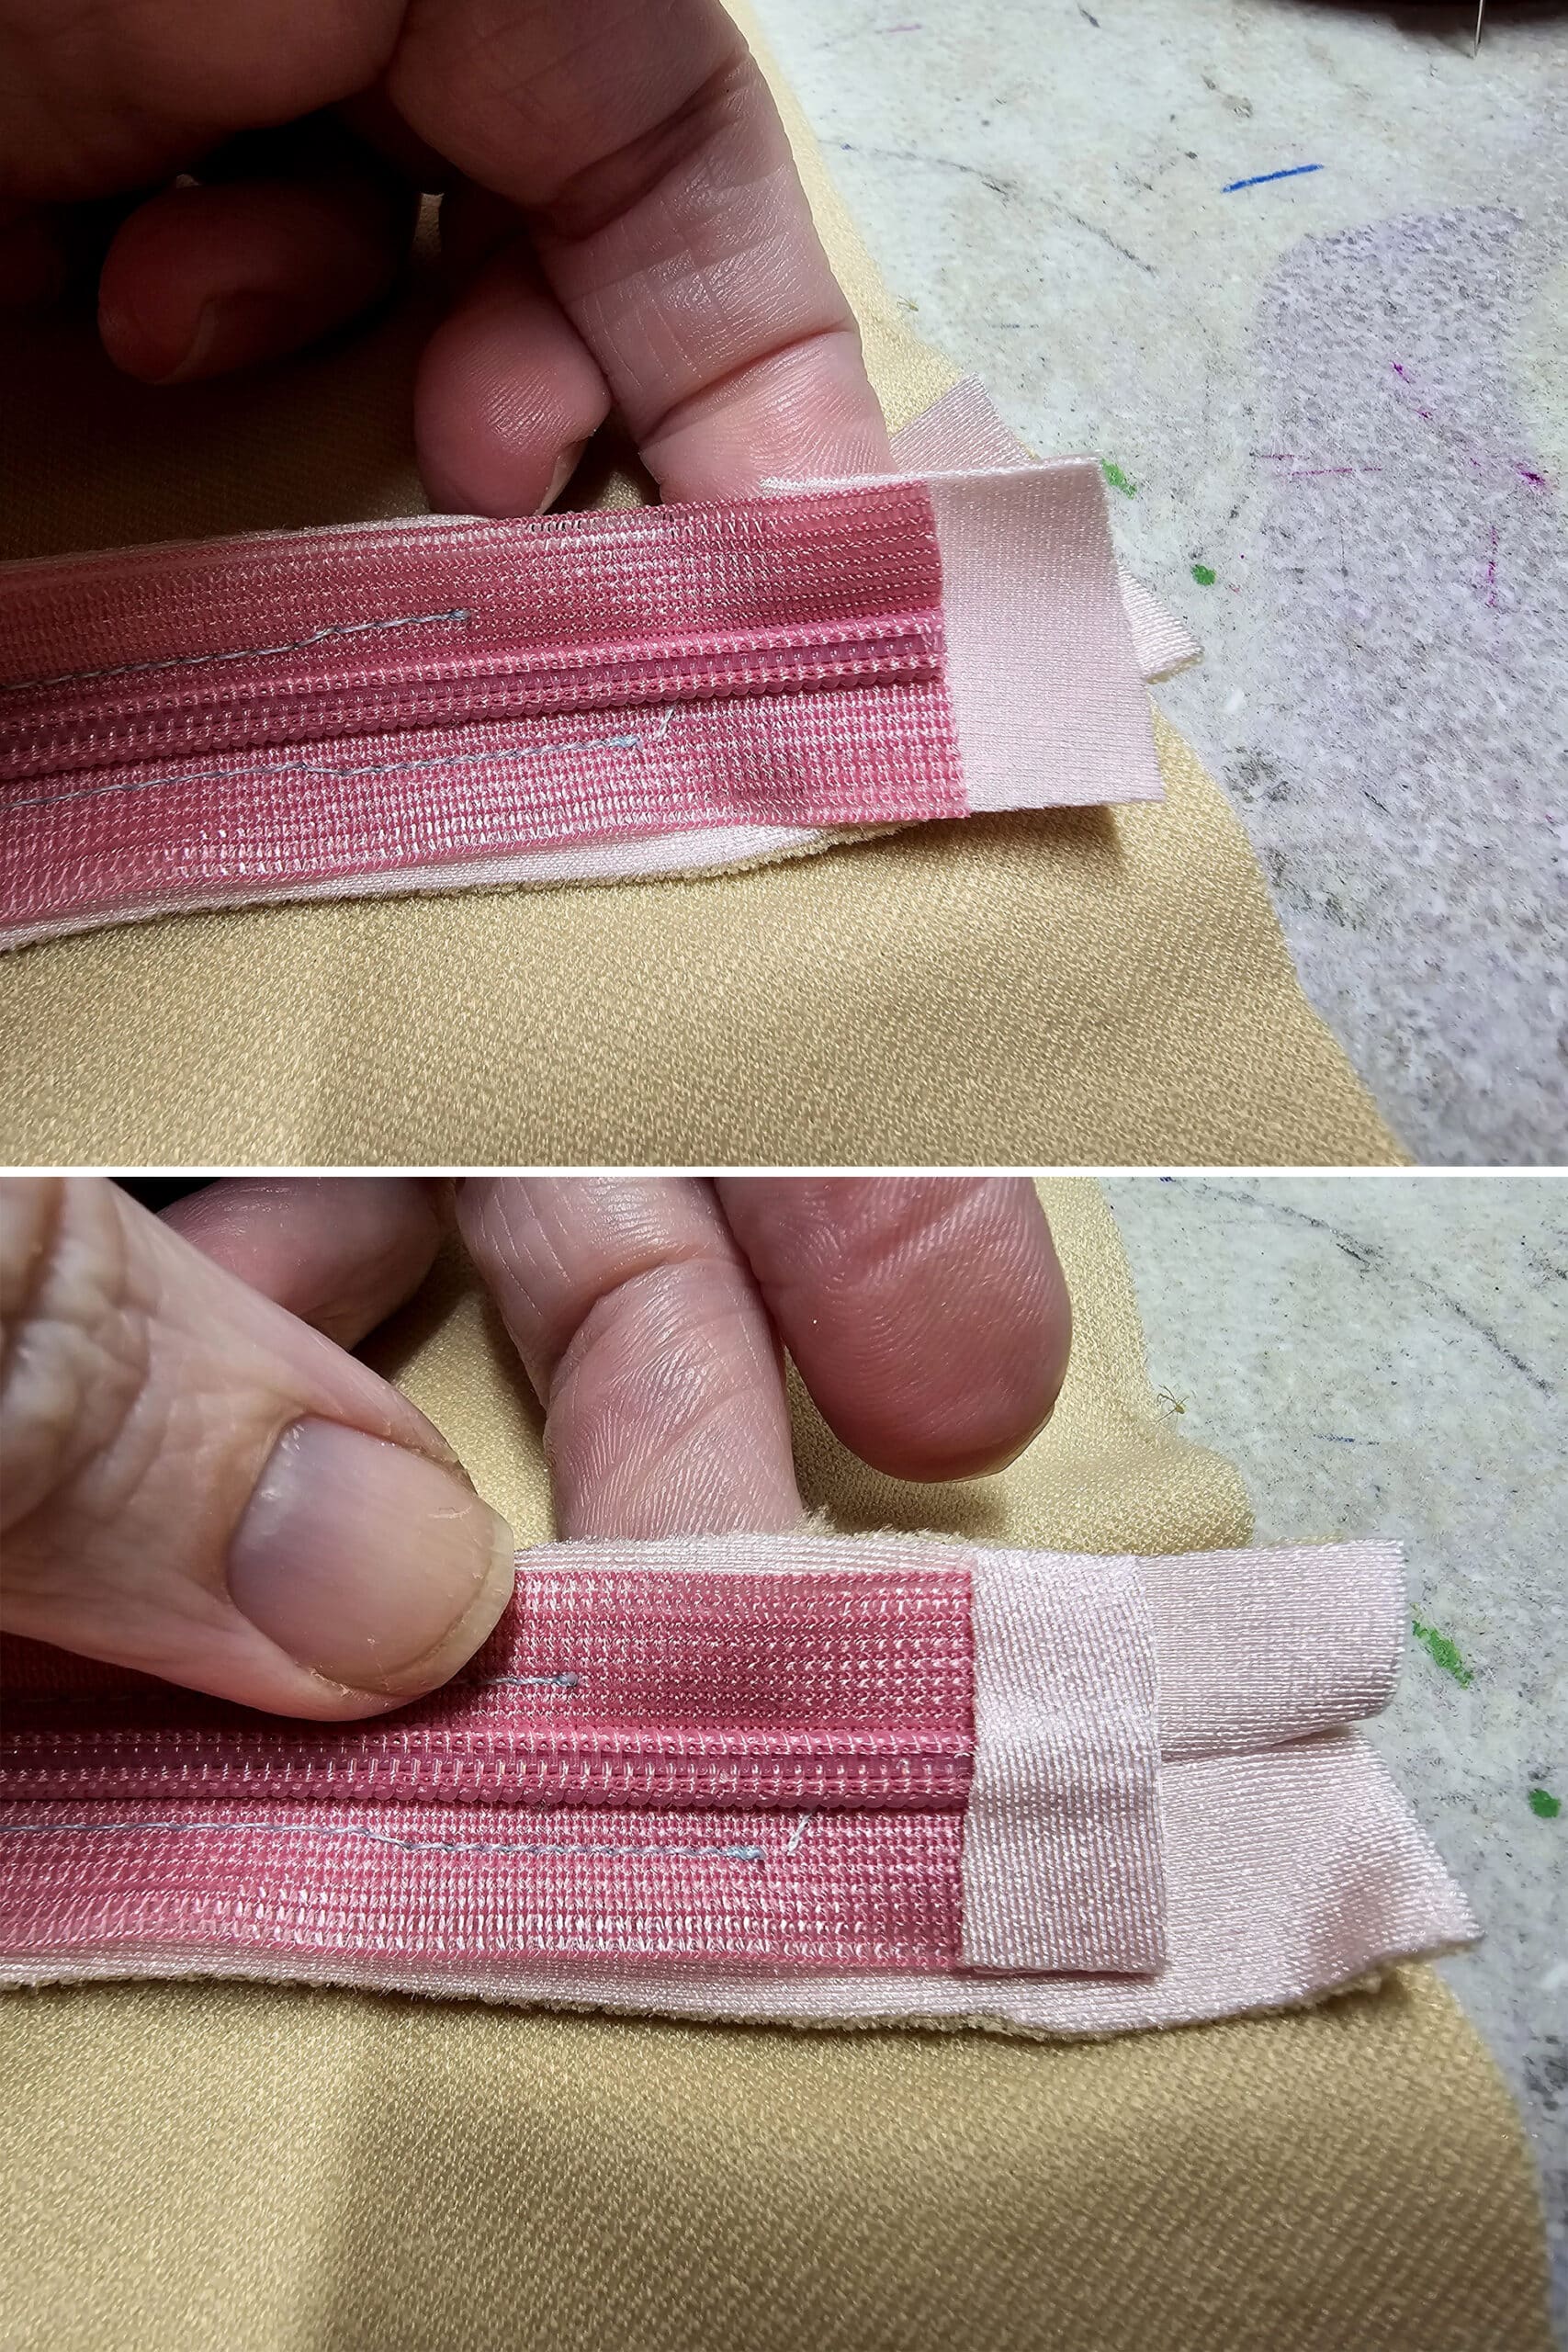
Zig zag the raw/cut edges of the fabric, sandwiching the zipper as shown:
Now, with all that said, let me talk you OUT of using invisible zippers...
Why I Avoid Using Invisible Zippers in Spandex Costuming
As I wrote about in my post on Spandex Costuming Design Principles, I go out of my way to avoid incorporating invisible zippers into spandex garments.
As a kid, I swear that someone broke a zipper at almost every competition.
The image of kids frantically being sewn into their dress minutes before warmup or competing... it was traumatizing, LOL!
I remember hearing about how ballet dancers - Russian ballet dancers in particular - would often get sewn right into the dress, completely avoiding the use of a zipper.
After those dramatic competition scenes... I can definitely see why they’d do that!
Everything I do when sewing spandex is for maximum stretch, which means maximum durability when being used. My seams will generally outlive the fabric they’re sewn into.
Zippers do not stretch, and they’re sewn into an un-stretched outfit.
That’s a LONG section of the center back of a dress that not only doesn’t stretch, but is being pulled in all directions - side to side, up and down, and on various diagonals - by a stretch garment that is stretched over a body.
A body that MOVES, no less.
That zipper doesn’t move the same way with the body, and doesn’t stretch to go along with movements.
Something’s got to give, and - generally - the zipper will fail before the fabric will.
It’s just not comfortable, it’s not durable, and really, it’s just something that performance athletes shouldn’t have to worry about when competing.
Mitigating the Problem
There are a few things you can do to reduce the chance of zipper failure.
1. Leave some extra room in the dress - especially lengthwise - to take some of the stress off the zipper seam.
2. Be REALLY careful to not get any rogue stitches into zipper teeth, and start over from scratch if it happens. Once stitches go into the teeth, the zipper integrity is usually compromised.
3. When doing the zipper up, hold the zipper together as you pull the zipper stop up, to take the horizontal stress off the zipper as it’s been zipped up.
The vast majority of times I’ve seen or heard of people busting their invisible zippers, it’s during zip-up.
A busted zipper can’t really be fixed, either. You can get sewn into the dress as an immediate band-aid, but the whole zipper will need to be replaced.
Depending on the dress design - and how used it is - this can be extremely labour intensive.
Dresses that have been heavily used can be more difficult to lay flat and even, which makes a flat, even zipper insertion even more difficult. (This is why I recommend adding the zipper as early as possible in the dressmaking process!)
There’s a good reason I will work a design around avoiding a zipper unless absolutely necessary!
When you really need a zipper, I highly recommend going with an uglier - but stronger - alternative.
Sewing a Regular Zipper into a Spandex Garment
For my own use - or when sewing for friends, or any clients I can talk into “uglier but stronger”, I use regular zippers.
These are intended for heavier fabrics / medium-weight projects, and are a LOT less susceptible to breakage.
No, they don’t stretch (so they still have the issues there), and they definitely don’t disappear into a “seam” the way invisible zippers do.
They’re definitely a matter of not putting form over function, though.
Also - depending on your reach/flexibility - you can generally do up your own regular zipper. I do NOT recommend doing that with invisible zippers!
Here is how I sew regular zippers into close-fitting garments:
Sew the Left Side of the Zipper
Following the same principles as the invisible zipper insertion (placement, timing, keeping everything flat), pin the zipper right side down to the left side of the garment, and baste it in place.
Just be sure you’re using the actual right side - when it comes to standard zippers like this, the right side is the one with the raised coils and zipper stop!
After anchoring the edge with the zig zag, switch to a regular zipper foot.
Sew a straight seam - very close to the zipper - starting at the top edge, and going down as far as you want the zipper.
Zip up the zipper, checking to make sure everything lays flat and even.
Sew the Right Side of the Zipper
With the zipper closed, place the left side of the garment face-down on the right side of the garment, as pictured:
For each pass with the sewing machine, start at the top of the garment and sew towards the bottom of the zipper application.
Zip up the zipper and check your work - make sure everything matches up and lays flat:
Finishing the Zipper Application
Trim the excess zipper tape from below the end of the zipper insertion.
Note: You can do this before or after doing the remaining seam. In the invisible zipper tutorial, I did it after that seam.
Whatever floats your boat!

As with the invisible zipper, you can do this with a straight seam across it, then finish it with a zig zag.
Or - preferably - use the fabric binding method I described in the invisible zipper tutorial section:
See: Not as pretty of an application. The zipper is anything BUT invisible.
The peace of mind that comes with using a stronger zipper, though? IMHO, it’s worth the trade off.
I would never use an invisible zipper in any skating dress I wear - it’s not worth the stress.
Plus, these are generally in the back of an outfit, AND seen from a distance. Especially if you match your spandex colour well, it’s not THAT visible to an audience.
More Spandex Sewing Technique Tutorials
Interested in learning the basics of sewing with spandex? Here are a few more posts
How to Cut Spandex
Sew Spandex with or without a Serger
Hemming Spandex Skirts
How to Apply Elastic
Appliquing Spandex
How to Make Elastic Straps
How to Install Snaps
Padded Applique
How to Make Bikini String
... and always, be sure to check out our Table of Contents for a full, categorized listing of all of our posts and tutorials!
Thanks for Reading!If you loved this tutorial - or have any questions about it - please leave a comment below! I'll do my best to answer any questions you may have. |


I have been sewing and doing custom sewing for many years and am 86. Your advice about invisible zippers is right on.
Thank you!