

If you're interested in cosplaying Maleficent - or just making the costume, you'll need to know How to Make Maleficent's Staff. Here's how!
Originally published on Celebration Generation on October 8, 2014. Updated and moved over to this blog on 9/16/2021

Remember the Maleficent Costume I made for one of my two Convergence masquerade entries this year?
It's since become our MOST asked about costume, with an insane amount of emails about it.
It was a huge project, my first collaborative masquerade entry, and - I'm SO proud to say! - is apparently the most accurate one out there!
I've since sold it to a lovely woman in Florida, who will be putting it to good use.
However, the nightmare that shipping was for the staff, as well as the high ticket price on the costume?
I don't think I'll be making any more of these. SO... let's teach YOU how to make some of the pieces! (See also: How to Make Maleficent's Horned Headpiece!)
Just want to see more photos of the costume? Check out our Facebook Page album for it!
Today, let's look at making the iconic staff...
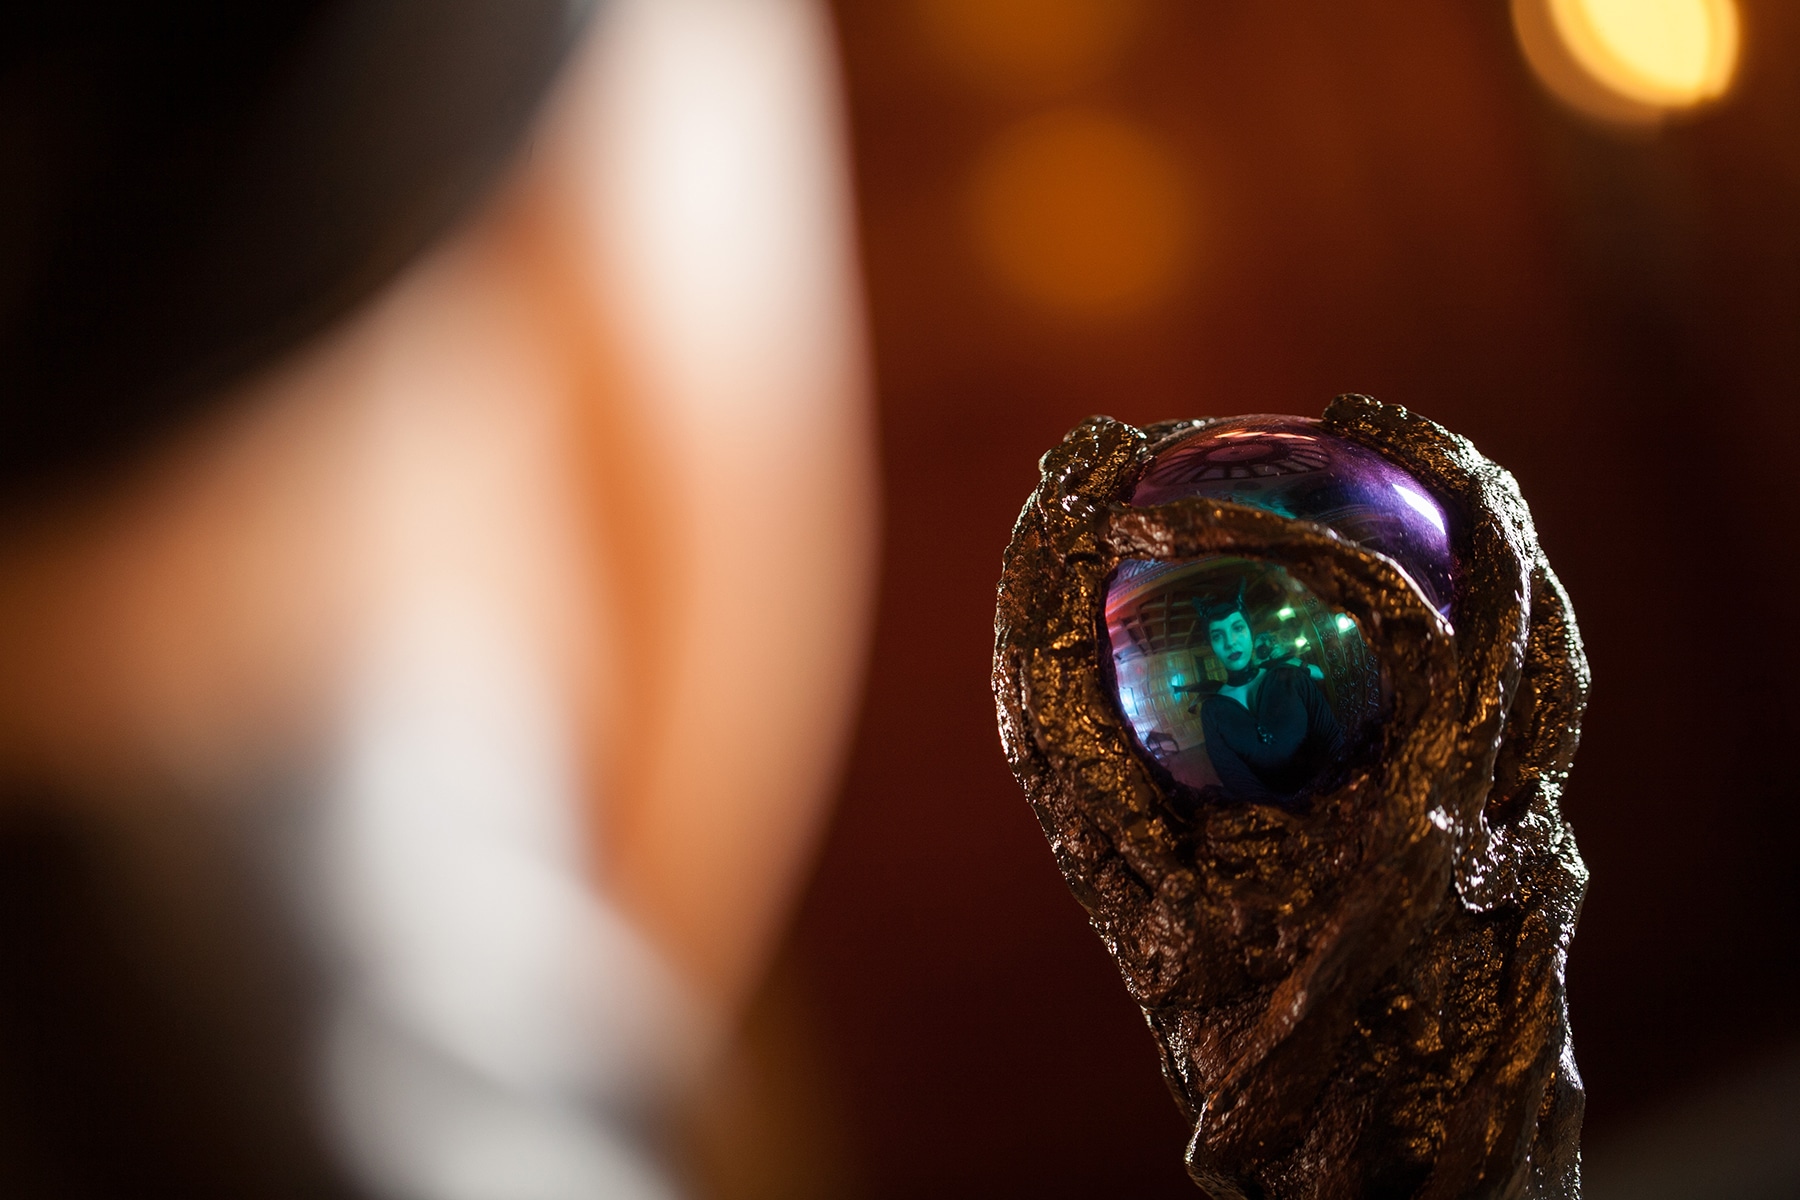
How to Make Maleficent's Staff
You will need:
Heavy paper or newspaper
Small bucket or container for water that you don't mind ruining
Several 4" rolls of plaster bandages
3" garden gazing ball*
Vaseline
¾" - 1" diameter wooden dowel**
Acrylic paints in dark browns, blacks, and grey
Variety of paint brushes
Clear polyurethane varnish
Paper towels and/or toilet paper
* We ordered the "rainbow" one from here, a sthey weren't available on Amazon at the time.
** Length will depend on the height of the person it's for - ours was around 5'.

The gazing ball.
Sculpting a Maleficent Staff
First, cover your work surface and the flood in front of it with heavy paper - The plaster can get EVERYWHERE. I like rosin paper for this.
Fill your small bucket with warm water, and cut your plaster tape into manageable lengths - a foot or two, depending on how comfortable you are with it.
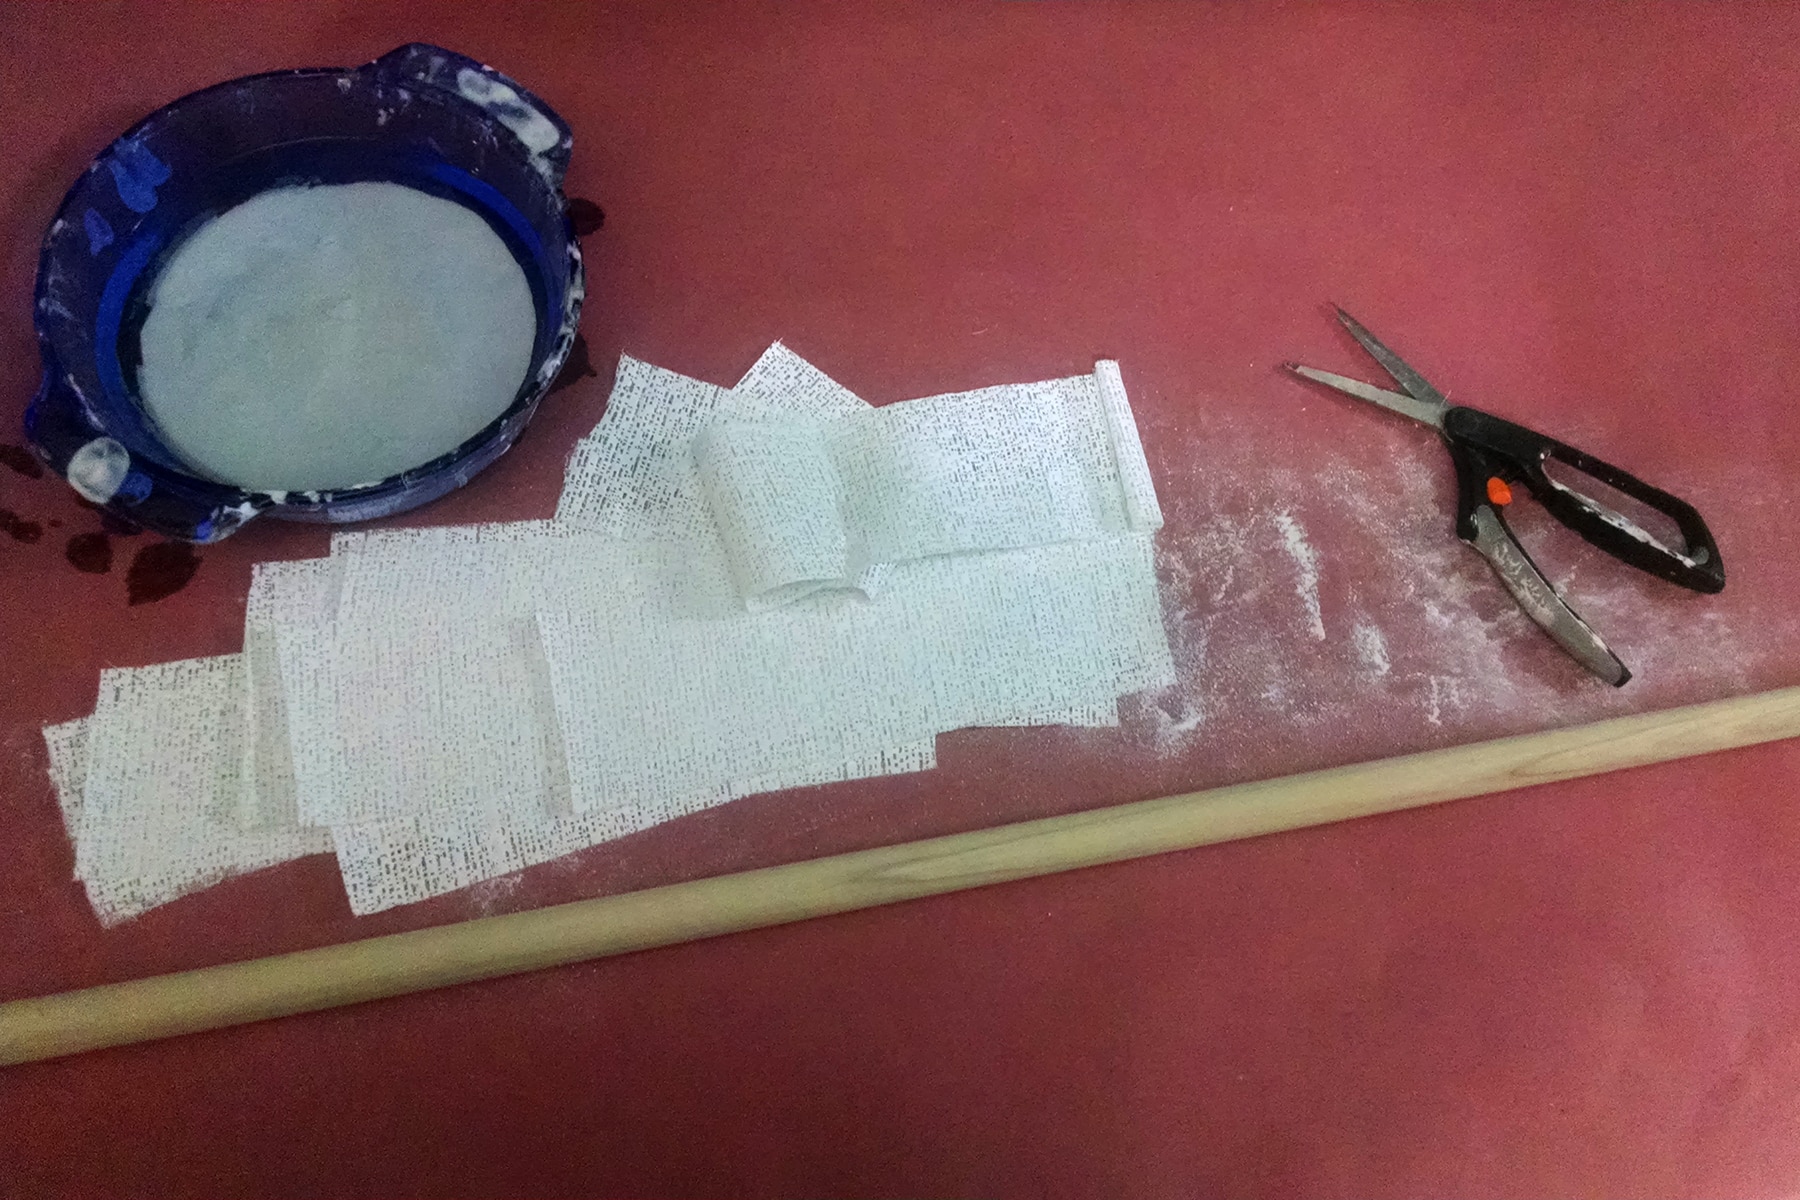
Generously coat your gazing ball with vaseline, set aside (but close at hand!).
Starting at what will be the bottom end of the staff, use the plaster tape to sculpt directly onto the dowel.
One piece at a time, dip a strip of plaster into water, bunch it up lengthwise (to make a long, narrow piece), and apply it to the dowel.
I wind pieces up almost the entire length of it, smoothing with water as I go - you want to get rid of the "mesh" look.

Once I've got the initial bunched pieces applied, I'll go over it with un-bunched pieces, smoothing and sculpting as I go. The goal is to make it look like a gnarled tree branch.
Working quickly and carefully, make three bunched up pieces into long "fingers, attach at roughly equal distances around the top end of the staff.
Secure with more un-bunched plaster, around the dowel.
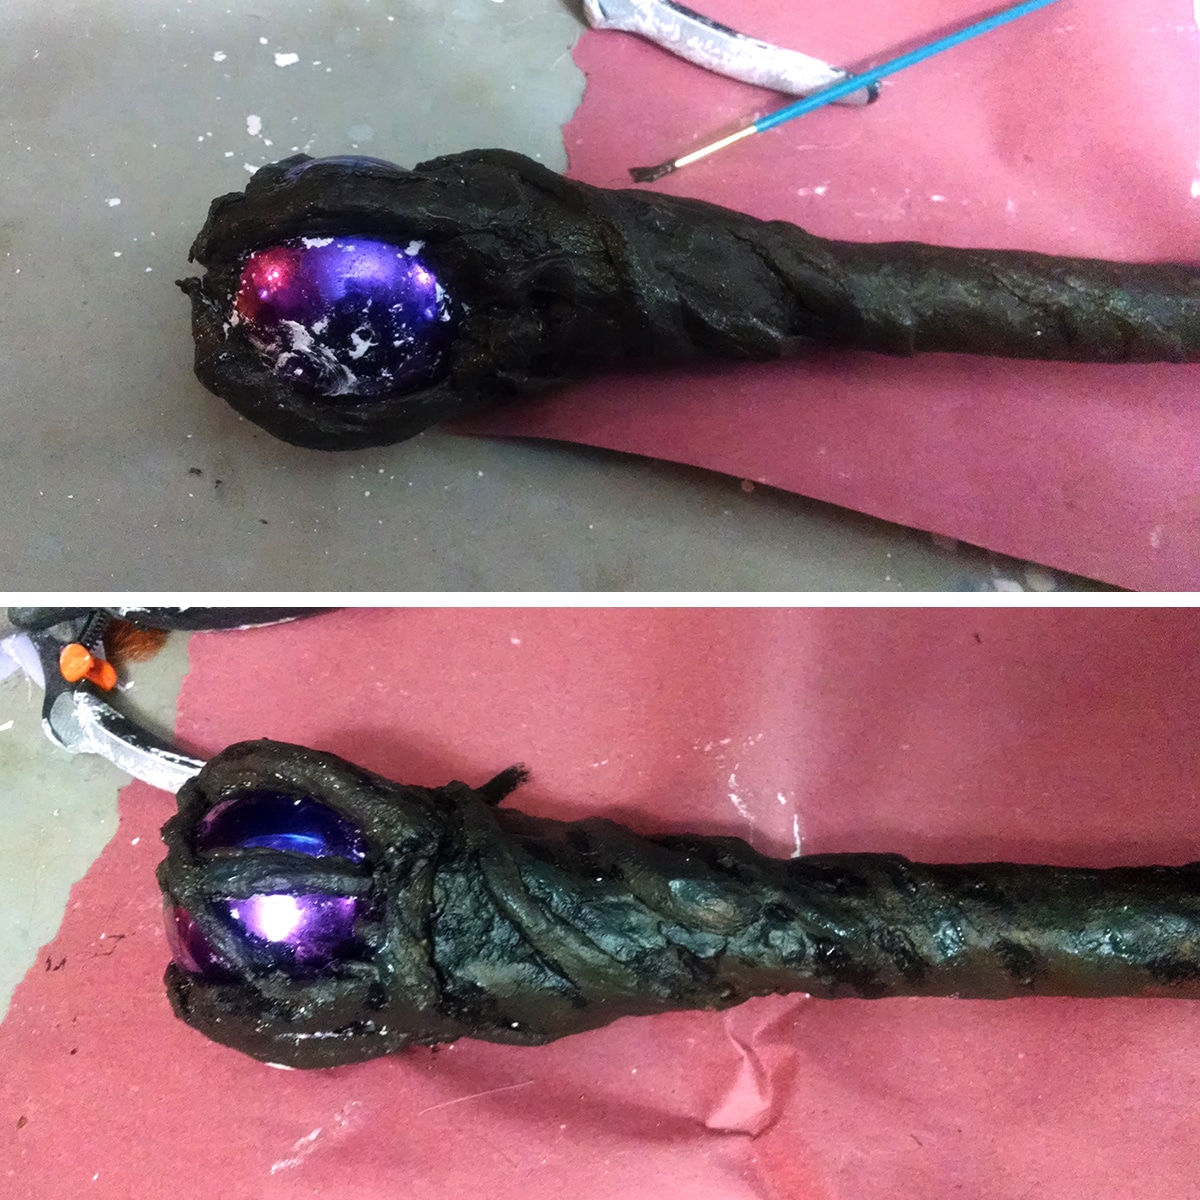
Position the greased-up gazing ball at the top of the dowel, form the 4 "fingers" up and around the ball.
Add a few smaller "fingers" of plaster to connect the original 4 “fingers”, and create more of a branched-off design.
Allow staff to dry completely, usually overnight.

Painting Maleficent’s Staff
Paint the staff all over with 2 coats of a dark brown acrylic paint.
Be very careful when painting up around the gazing ball, and be sure all plaster is hidden by paint. Allow to dry completely.
Using a toothpick or pointed sculpting tool, carefully scrape away any plaster splatter on the gazing ball, and clean up the edges of the "branches" that encase it.
Touch up any newly exposed plaster with more of the dark brown acrylic paint.
Once dark brown paint has dried, use a smallish paintbrush and black paint to paint "shadows" in all of the ruts, etc.
Take a look at movie screencaps for an idea of how much black there should be (it was a VERY dark staff!). Allow to dry fully.
Use a grey acrylic paint SPARINGLY to paint some highlights on the high points of the staff. Allow to fully dry.
Once you're happy with the paint job on your staff, use a soft brush to coat the entire staff (plaster only, not the gazing ball) with polyurethane varnish.
Allow to dry completely, paint a second coat on, and once again allow to dry completely.
Use small pieces of paper towel or toilet paper to GENTLY AND CAREFULLY polish off any remaining vaseline on the gazing ball... and, you're done!

More Cosplay Posts
Looking for more Cosplay tutorials and posts? Here are a few for you:
Cosplay Photography Tips
Katniss Wedding Gown Wings
How I Made the Maleficent Costume
How I Made the MCU Hela Costume
How to Add a Sole to Boot Covers
How to Make Basic Spandex Gloves
How to Make Fancy Spandex Gloves
How to Make Maleficent's Headpiece
How to Make Spandex Boot Covers
Poured Latex Smaug Top
Thranduil Crown Tutorial
Triceracop Costume
Weeping Angel Costume Tutorial
Share the Love!
Inspired by this post? Be sure to take some pics of your handiwork! If you post it to Bluesky, be sure to tag us - @SpandexSimplified.
Also, be sure to follow me on Pinterest, and subscribe to my Youtube Channel, so you never miss out on any of my nonsense.
Well, the published nonsense, anyway!


How to Make Maleficent's Staff
Equipment
- Small bucket or container for water that you don't mind ruining
- Variety of paint brushes
Materials
- Heavy paper or newspaper
- Several 4" rolls of plaster tape
- 3" garden gazing ball*
- Vaseline
- ¾" - 1" diameter wooden dowel**
- Acrylic paints in dark browns, black, and grey
- Clear polyurethane varnish
- Paper towels and/or toilet paper
Instructions
- First, cover your work surface and the flood in front of it with heavy paper. The plaster can get EVERYWHERE.
- Fill your small bucket with warm water, and cut your plaster tape into manageable lengths - a foot or two, depending on how comfortable you are with it.
- Generously coat your gazing ball with vaseline, set aside (but close at hand!).
- Starting at what will be the bottom end of the staff, use the plaster tape to sculpt directly onto the dowel. One piece at a time, dip a strip of plaster into water, bunch it up lengthwise (to make a long, narrow piece), and apply it to the dowel. I wind pieces up almost the entire length of it, smoothing as I go - you want to get rid of the "mesh" look.
- Once I've got the initial bunched pieces applied, I'll go over it with un-bunched pieces, smoothing and sculpting as I go. The goal is to make it look like a gnarled tree branch.
- Working quickly and carefully, make three bunched up pieces into long "fingers, attach at roughly equal distances around the top end of the staff. Secure with more un-bunched plaster, around the dowel.
- Position the greased up gazing ball at the top of the dowel, form the 4 "fingers" up and around the ball. Add a few smaller "fingers" to connect and create more of a branched-off design.
- Allow staff to dry completely, usually overnight.
- Paint the staff all over with 2 coats of a dark brown acrylic paint. Be very careful when painting up around the gazing ball, and be sure all plaster is hidden by paint. Allow to dry completely.
- Using a toothpick or pointed sculpting tool, carefully scrape away any plaster spaltter on the gazing ball, and clean up the edges of the "branches" that encase it. Touch up any newly exposed plaster with more of the dark brown acrylic paint.
- Once dark brown paint has dried, use a smallish paint brush and black paint to paint "shadows" in all of the ruts, etc. Take a look at movie screen caps for an idea of how much black there should be (it was a VERY dark staff!). Allow to dry fully.
- Use a grey acrylic paint SPARINGLY to paint some highlights on the high points of the staff. Allow to fully dry.
- Once you're happy with the paint job on your staff, use a soft brush to coat the entire staff (plaster only, not the gazing ball) with polyurethane varnish. Allow to dry completely, paint a second coat on, and once again allow to dry completely.
- Use small pieces of paper towel or toilet paper to GENTLY AND CAREFULLY polish off any remaining vaseline on the gazing ball... and, you're done!


Leave a Reply