

After months of no sewing at all, I offered to make a dress for a friend. It was a fun challenge, as it involved some traditional dressmaking techniques that I don’t often use in spandex costuming. Here’s how I made it!

So, it’s been a minute, huh?
Back in May, the tendon damage in my feet had repaired enough to be able to get back into the studio and sew... and that’s when started to learn the extent of damage to my shoulder, wrist, and elbow tendons.
So, I’ve been mobile... but not sewing.
Note: If you’re new here / to my social media, I suffered massive tendon damage in early 2020, by taking 4 Cipro antibiotic pills, and have been recovering ever since. I wrote about it on my skating blog: Floxed by Cipro. Cipro is nasty stuff!
Recently, a creative friend had a skating competition coming up, and all kinds of ideas for what she wanted for a dress. I figured it was about time to test my limits, and see what my upper body tendons could do.
This is one of those dresses that looks really simple to the untrained eye, but is actually a fair bit of specialized work.
Cathleen’s design involved different sections of mesh - black and beige - cutting across the back of a 2 piece back.
The reason for the 2 piece back is to allow for a relatively deep center back seam, to follow the curve of her back and allow for a proper fit.
I COULD have just sewn the mesh and spandex pieces to the back in a more normal way - some attached before the back seam was sewn, some appliqued on top - but her design was actually a great candidate for essentially “moving darts”.
If I looked at the center back seam as essentially a curved dart, I could redistribute it across the various pieces used to construct the back.
This would get rid of the need for a center back seam, and prevent that seam from cutting across sections of mesh.
It’s not a technique I use often in spandex design, but it’s one of the basic things you learn for traditional pattern drafting with blocks - I used it a lot when making wedding dresses, back in the day.
Here’s how it all went down:
Design
Cathleen designed the dress herself, sending me the sketch to work with.
We went over a few options for the skirt (2 layers of mesh was the original idea), and I suggested that a solid, single layer spandex skirt would go better with the bodice design.
Mesh can be more flowy, and spandex would look better as a solid, angular thing.
I would be doing the base construction and mailing it to her for finishing - she’ll be crystalling it.
(See my posts Crystalling on Spandex and Everything You Need to Know about Rhinestones for more information.)
The Fabric
Due to time constraints and the current situation where I live, we decided to use fabric that I already had on hand - luckily, I had enough of what she needed!
The base is a shiny black milliskin nylon spandex, with a matching black stretch mesh.
I also used a light beige stretch mesh and beige swimwear lining.
Patterning the Dress
The Base Pattern
We cheated a bit on the base pattern of the dress - it was simply a trace of the dress pattern I’d made a previous dress for her out of, with a minor adjustment to the upper arm.
So, all of the sizing had already been taken care of in this case.
See my posts How to Measure for Spandex Costuming and Basic Pattern Alterations for info on how to get this far with a store bought pattern.
Because her design was asymmetrical, I placed the center front of the pattern on a folded length of exam table paper, placing the bodice and brief parts together, as I would be re-drawing a different skirt line for this dress.
I cut out both the front and back pieces (2), and drew in the new skirt line on both.
The Bodice Front
Cathleen’s design involved 2 long slashes of black stretch mesh cutting across the bodice on a diagonal.
While it was to be fully lined, I never know what the judges are thinking, and tend to err on the conservative side, when it comes to placement.
No sense annoying a judge - in a subjective sport - because they don’t like that you have the *appearance* of sheer fabric over the general area where a nipple would be!
So I drew it out, used rolls of tape to indicate rough chest placement for visualization, and got Cathleen’s approval on my sketched-out rendering of her design onto my pattern.

Then, it was on to the back - the FUN part!
The Bodice Back
As there would be no vertical seam in the back, I trimmed the seam allowance off the center back of each of the two back bodice pieces.
Then, I drew a rough outline of the design, matching the outer sides to the corresponding sides of the front bodice.
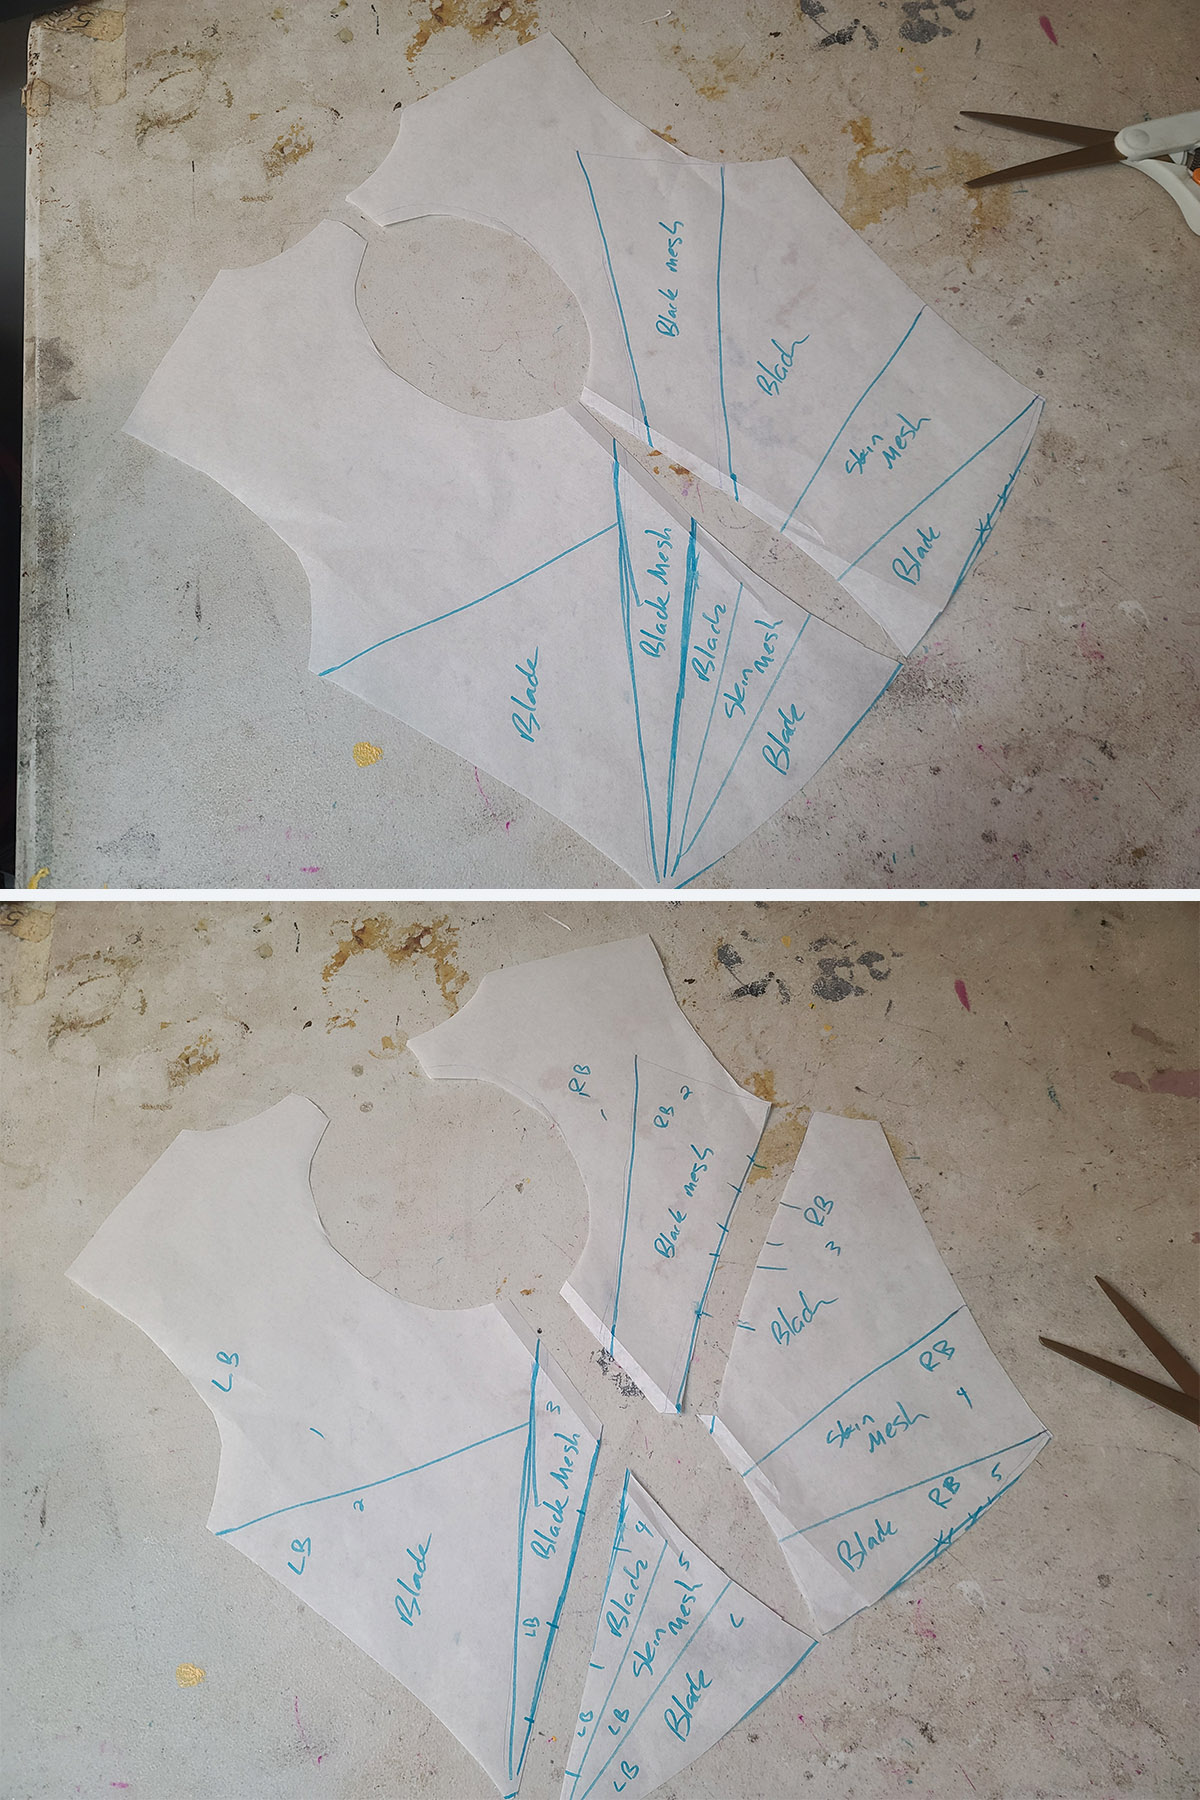
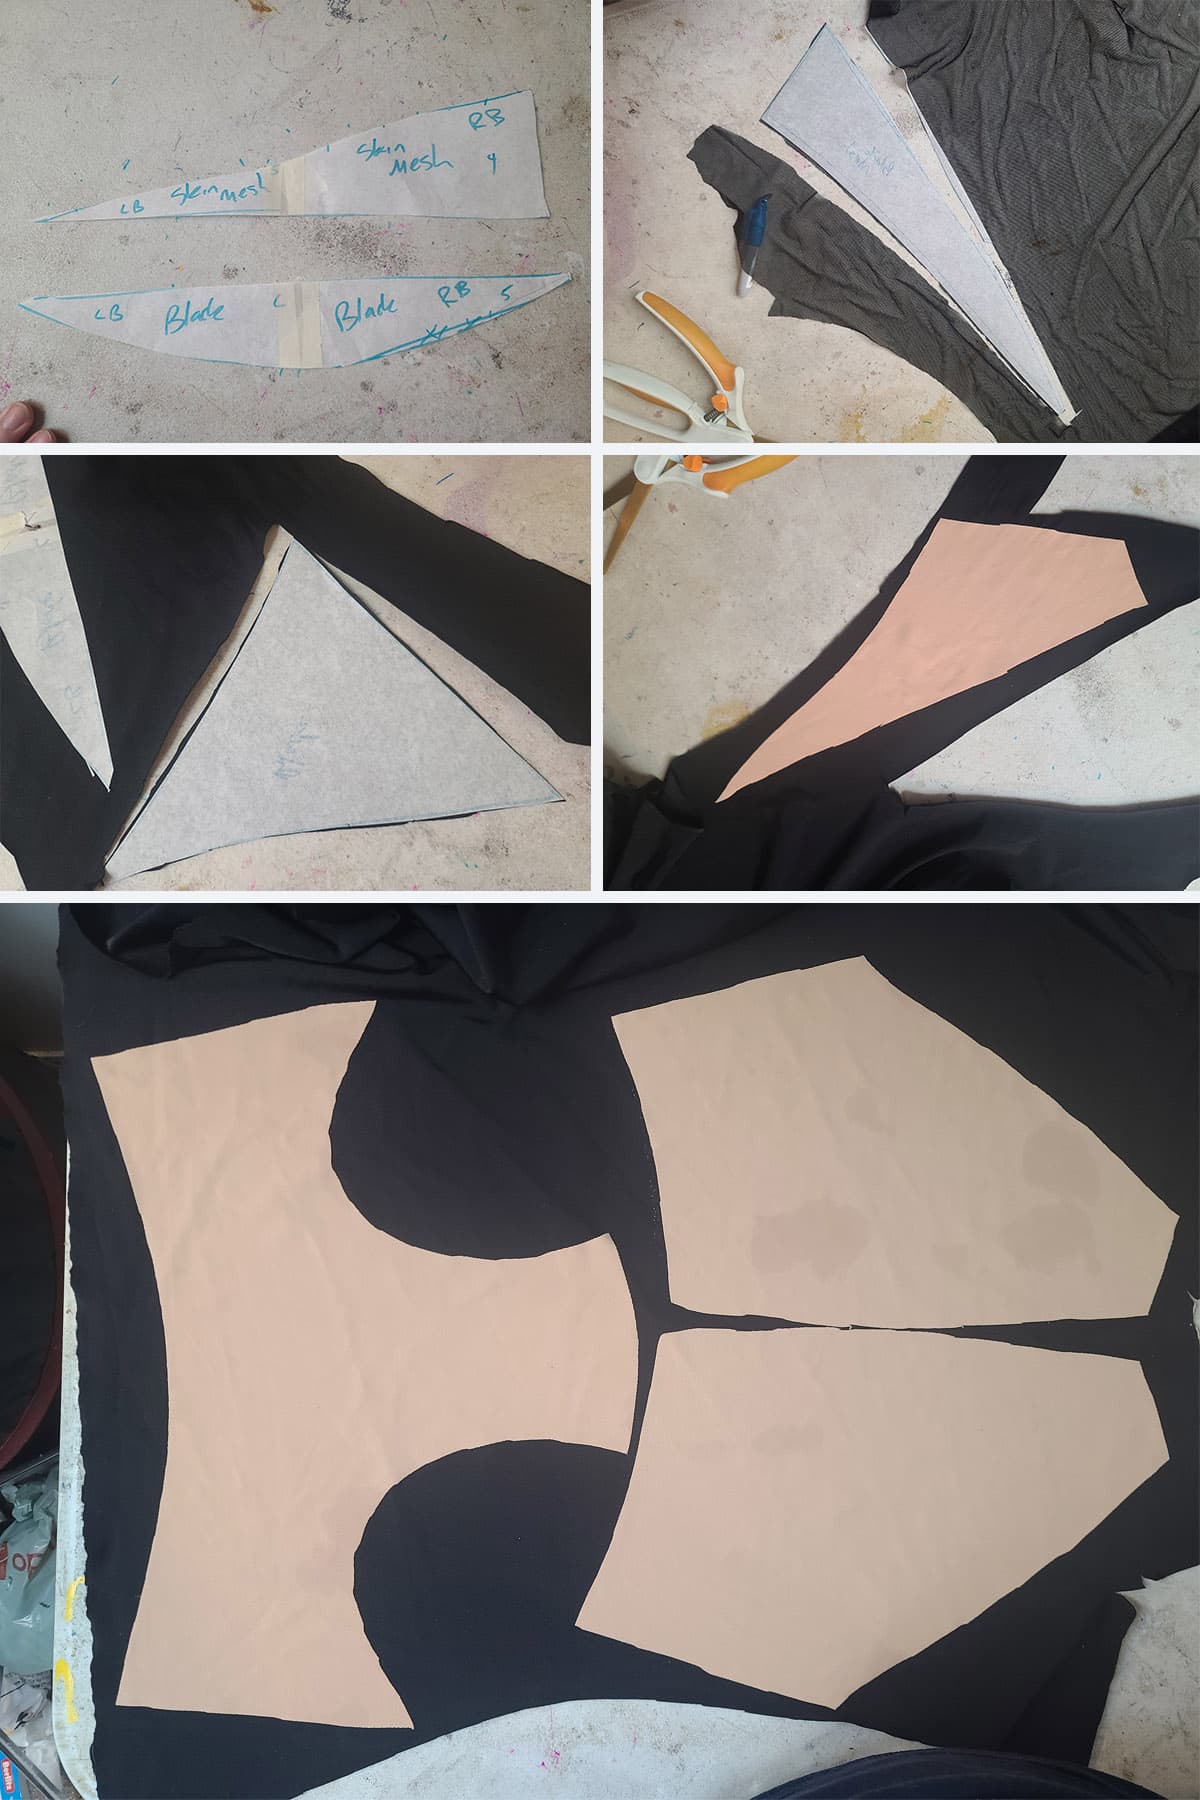
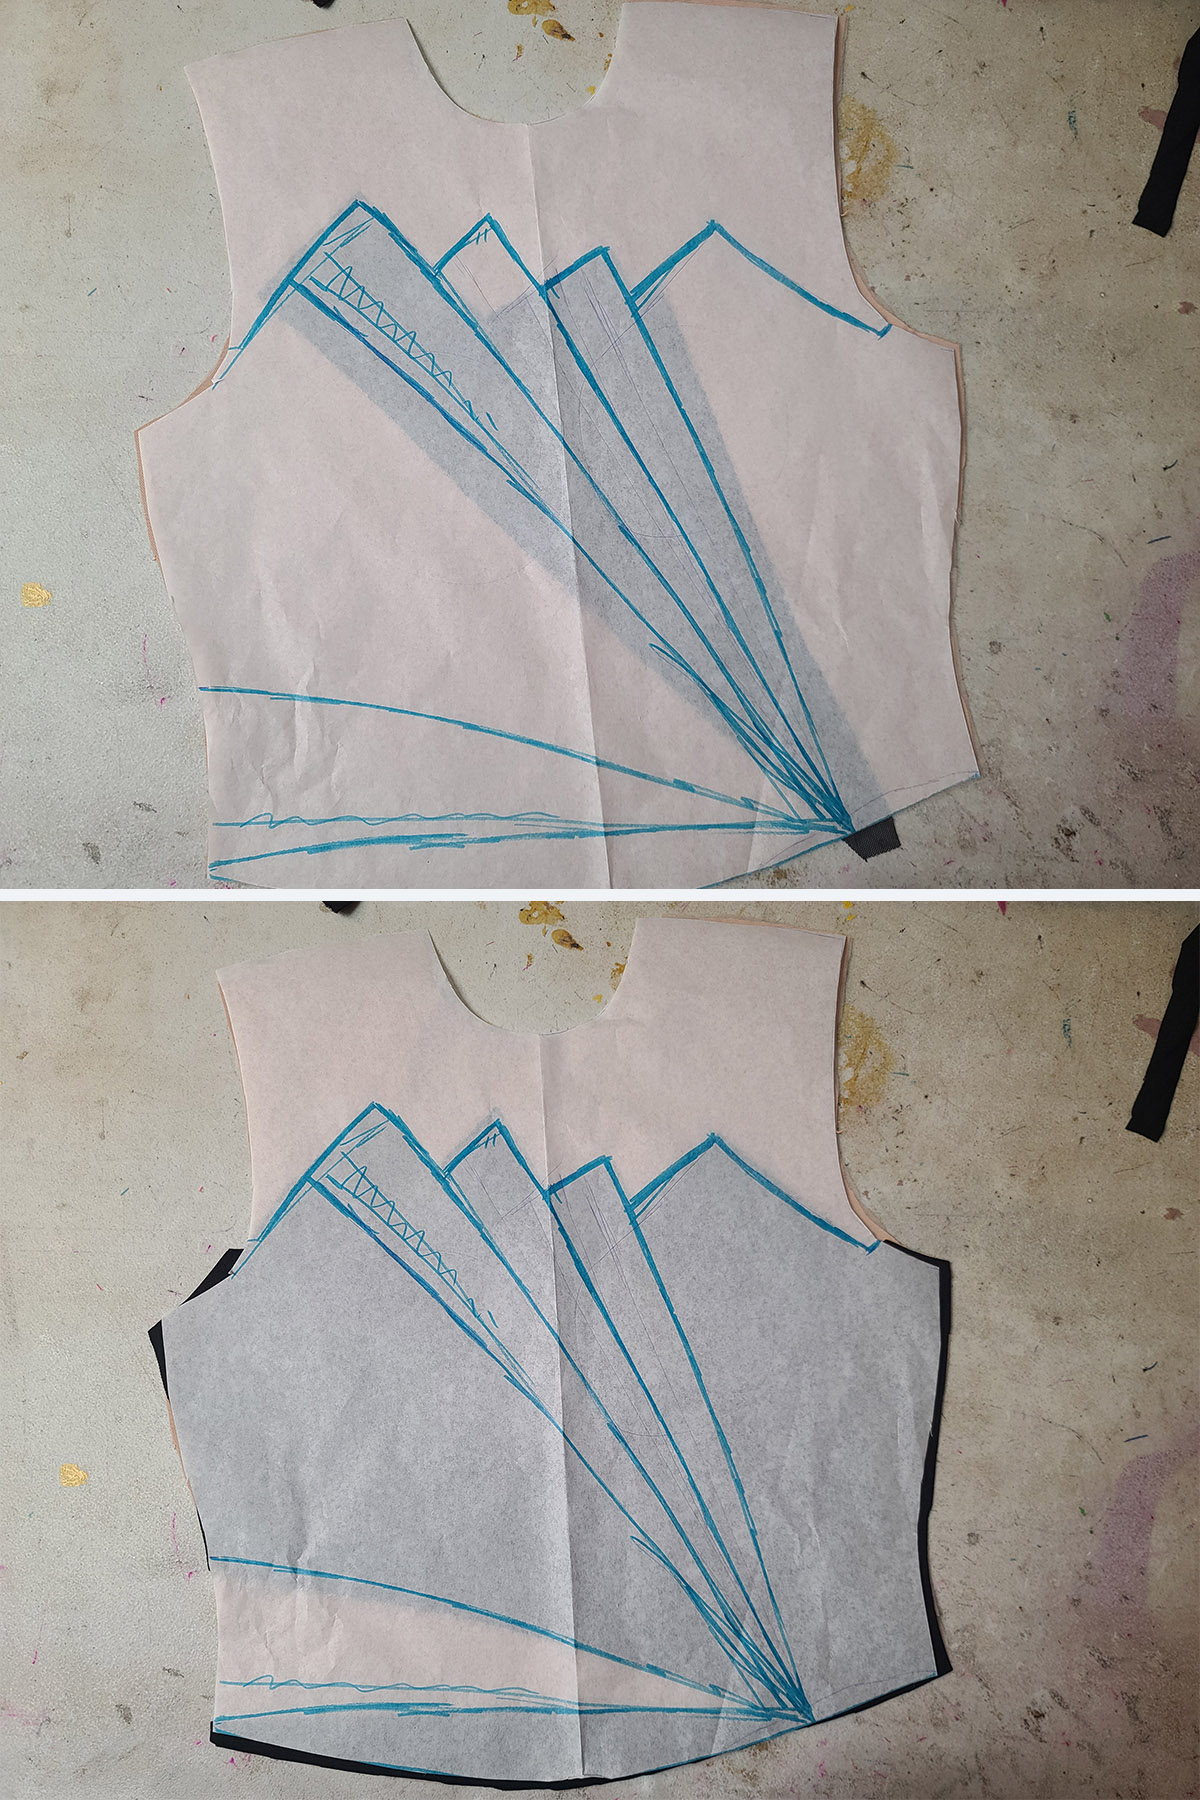
From there, I marked every section of pattern (right side up!!) with the following info:
1. Which half of the pattern the piece belonged to. RB = right back, LB = left back.
2. Which fabric the piece would be used for - black (spandex), black mesh, or skin mesh.
3. A number. Starting at the shoulder and working down - separately for each side - each section was numbered in order. This would help if anything was misplaced.

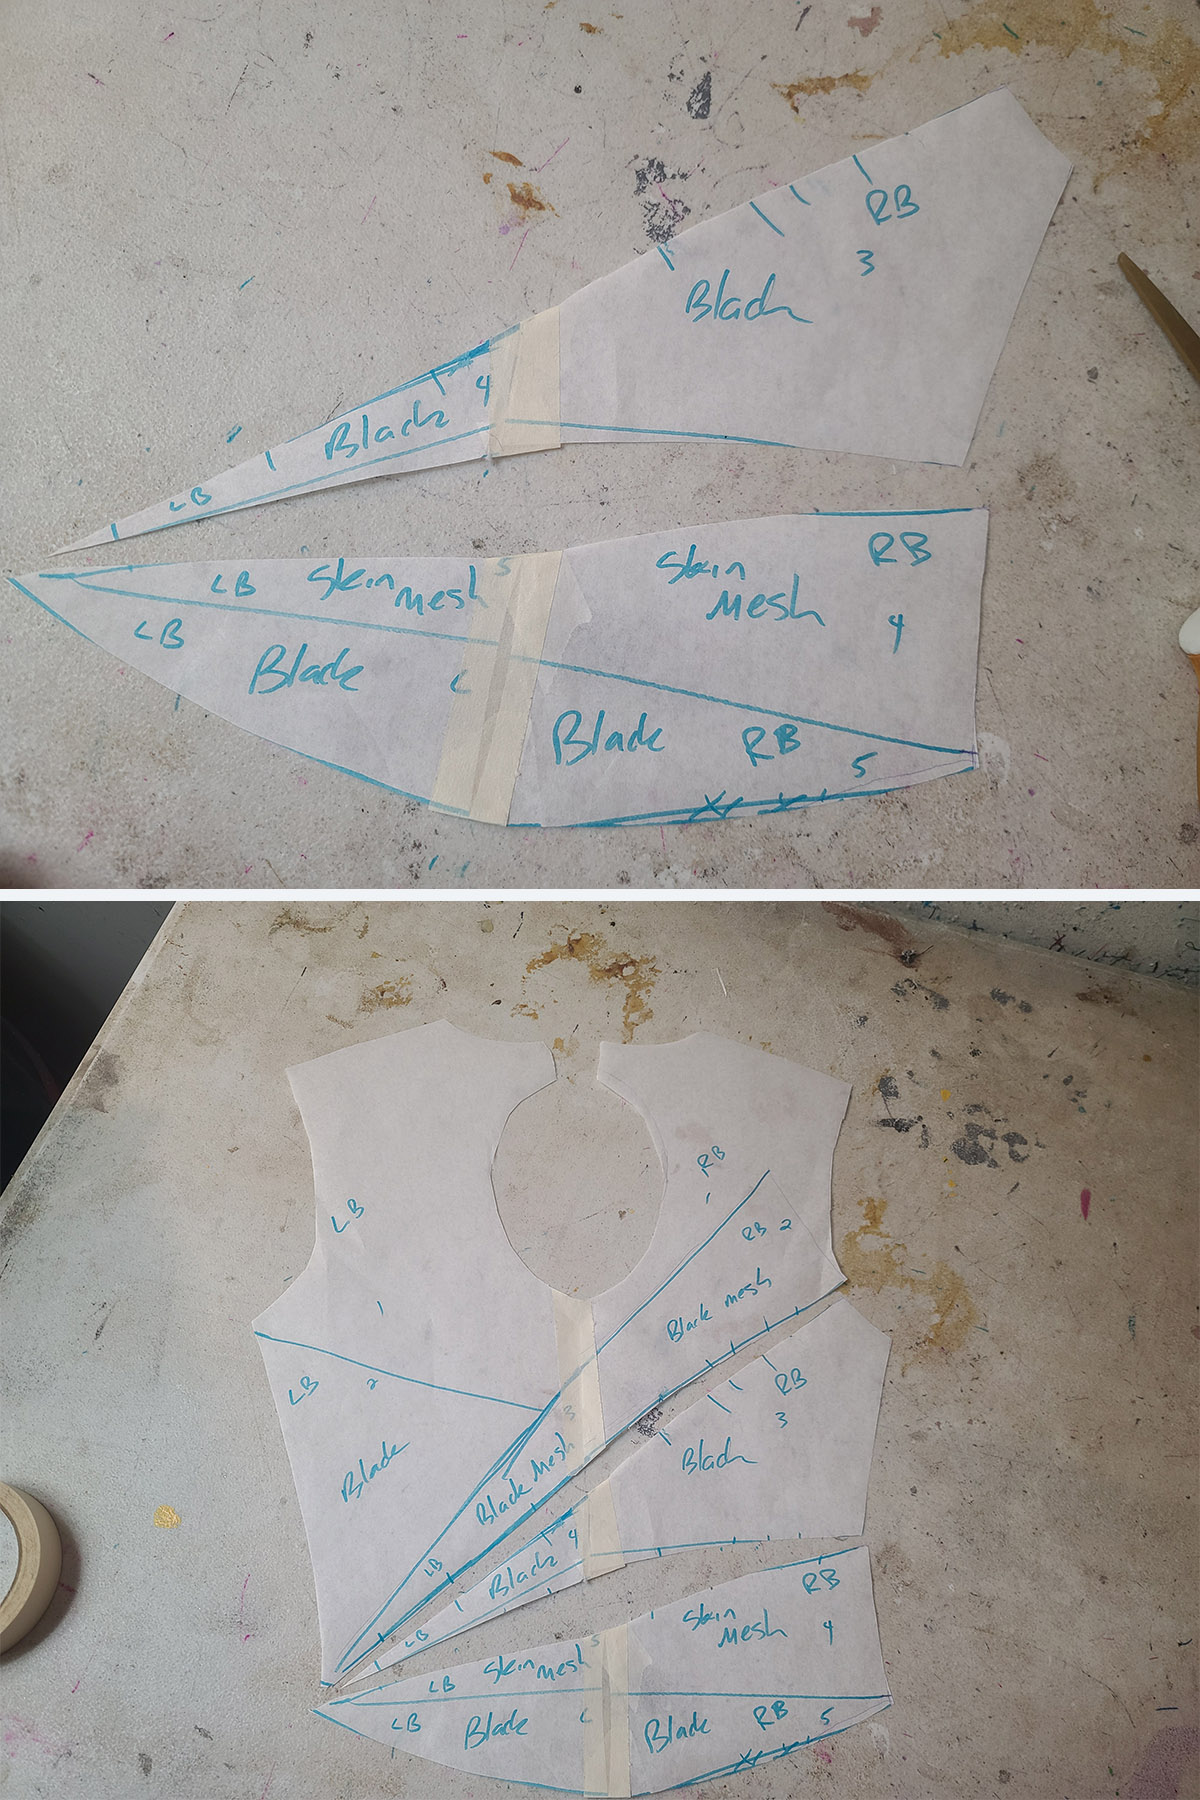
Once everything was labeled, each piece was cut out, then taped to the corresponding section of the other back bodice pattern:


Once laid out, it was clear that I would be able to redistribute the center back seam into two long slash-like “dart” seams going diagonally across the back.
This would involve assembling 3 separate roughly horizontal sections of back bodice, sewn together as structural seams.
2 of the 3 pieces would also involve appliqued pieces sewn onto them, prior to sewing those structural seams.
Cutting the Fabric
The Lining
The front bodice, sleeves, and brief pieces were all cut from swimwear lining, as-is.
When cutting out the back bodice pieces, I made note of which was the “good” side of the lining (the side that I would have facing up, under the mesh), and placed my pattern pieces over it, facing right side up.
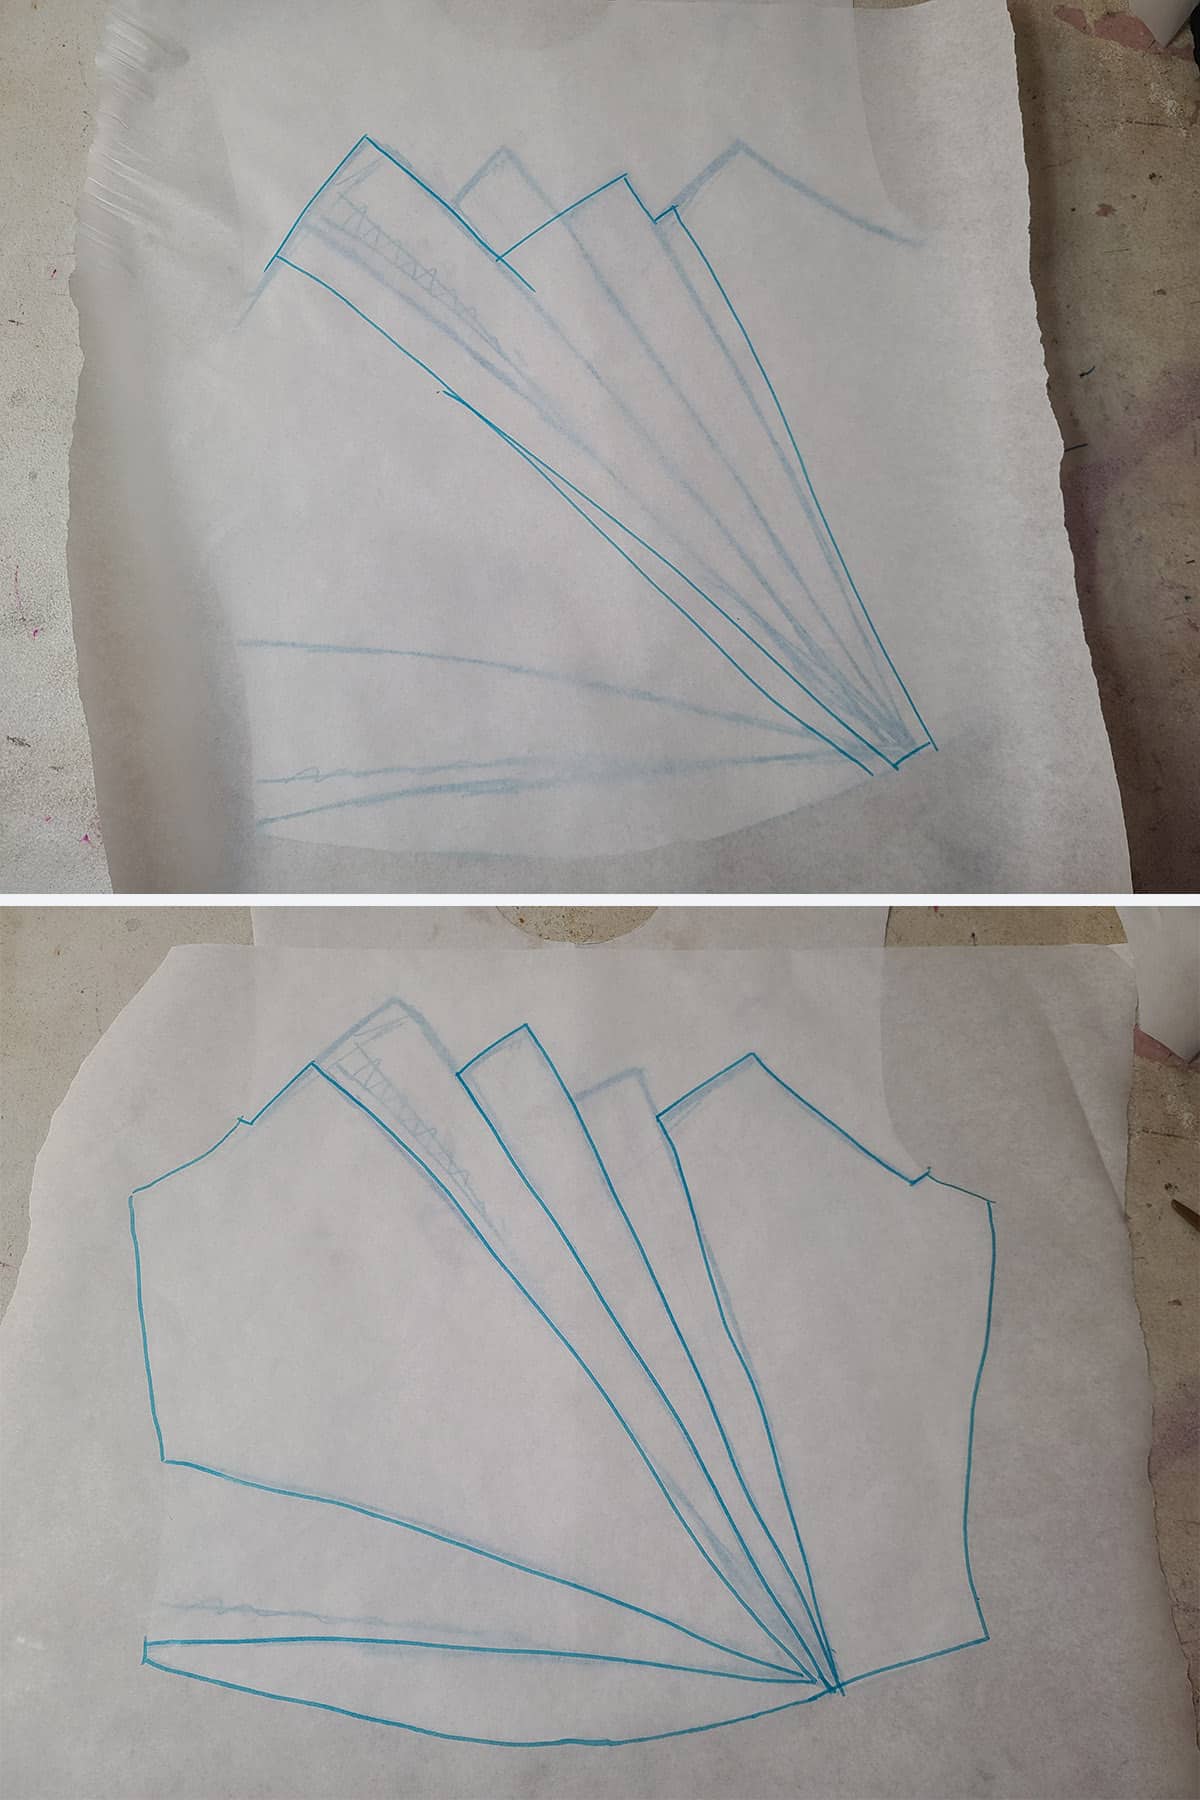
I cut out the 3 back pattern pieces, manually adding a seam allowance to the edges involved with the “darts” cutting across the back.
None of the other edges required the addition of a seam allowance, as they were already built in to the original pattern - the “darts” were new joins, and therefore did not have a built in allowance for the seams.

Beige Mesh
I sprayed the right side of the front bodice lining, as well as the right side of the top and bottom pieces of the back bodice and both sleeves with Odif's 505 Temporary Fabric Adhesive.
Those were carefully placed sticky side down onto the beige mesh, smoothed out, and cut.

Black Spandex & Black Stretch Mesh
I used a fresh piece of exam table paper to trace out what would become applique sections across the back.
As the bottom edge of the black mesh triangle on the back was also the full length of one of the “dart” edges, I added a seam allowance there.
I also added a narrow “tab” to part of the top edge of this piece, to layer underneath the section of black spandex that would be placed on top.
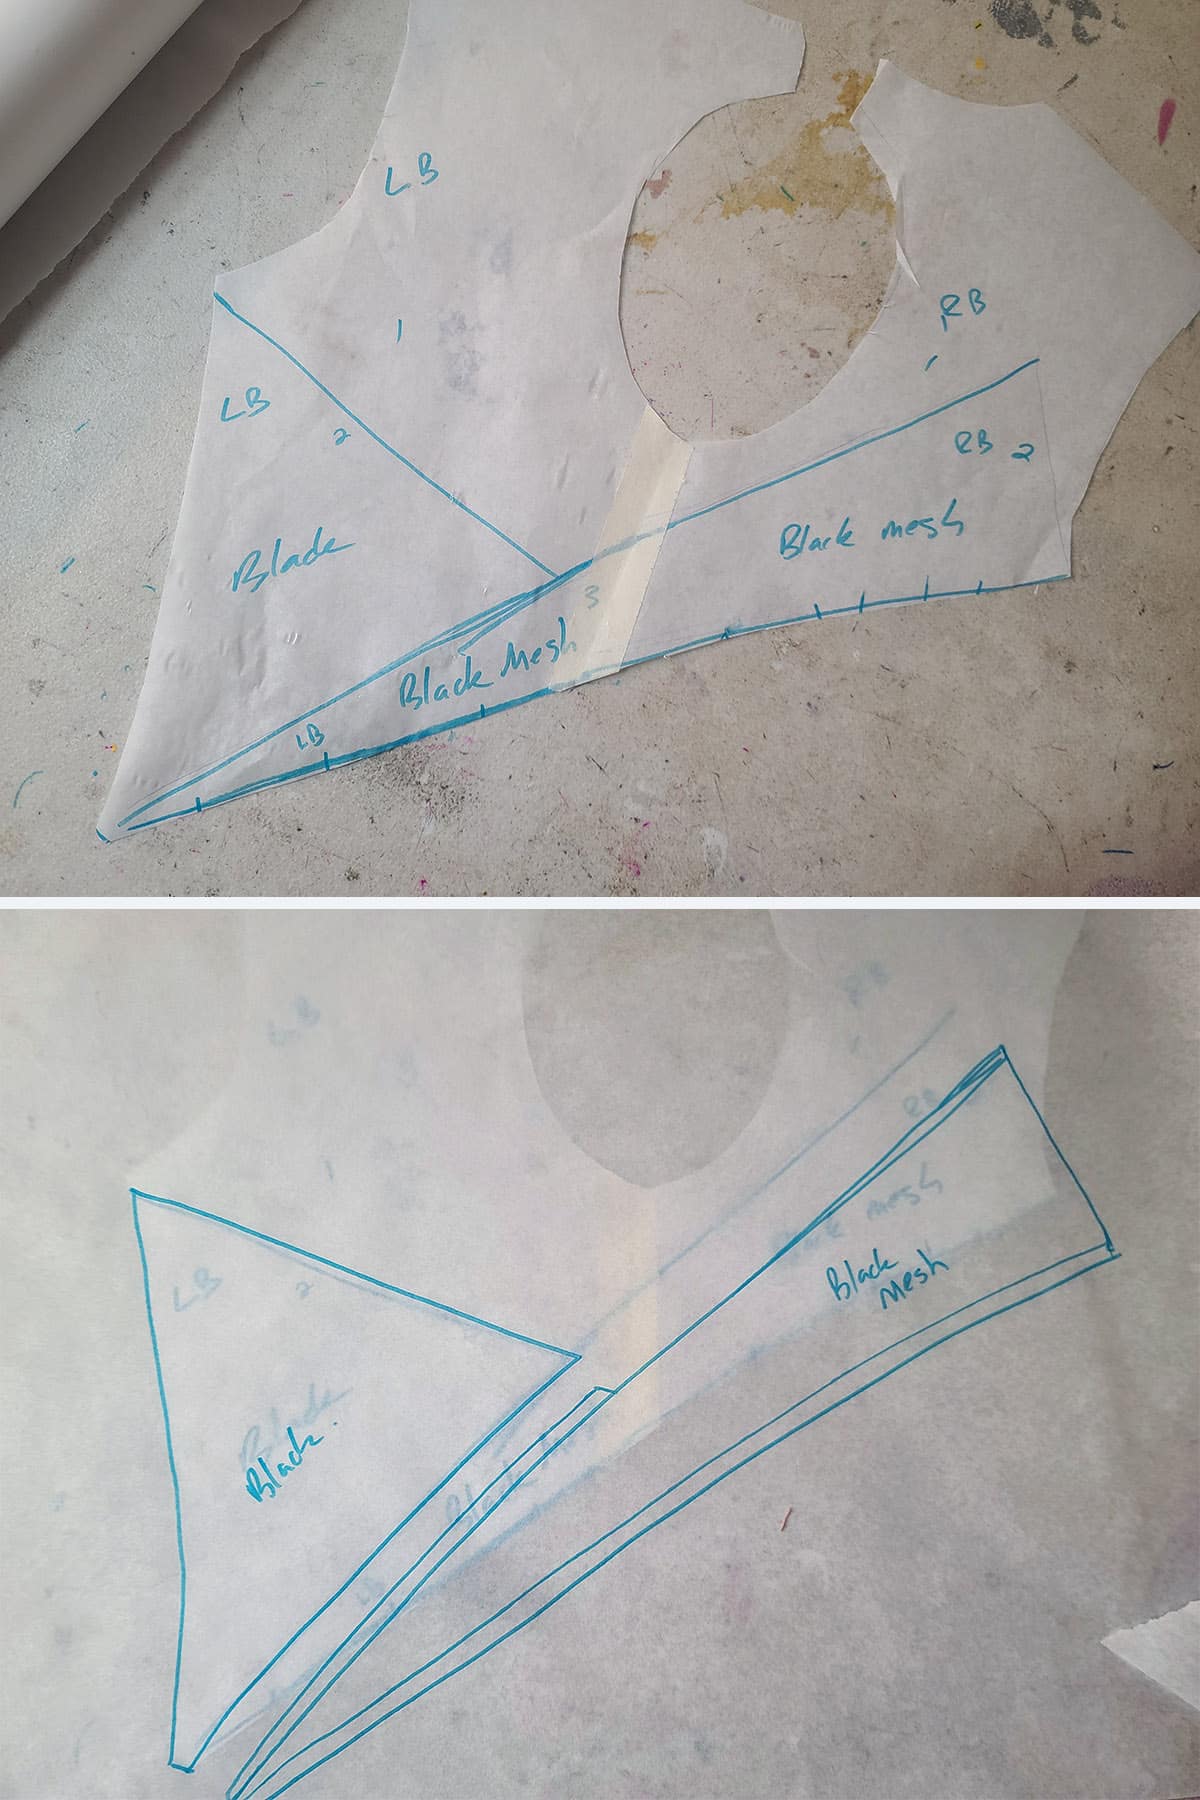
The black spandex appliques on the top and bottom pieces of the back (as well as the front piece) were traced as-is, as they didn’t require any special treatment / seam allowances / etc.

The black mesh piece for the front was cut out as one large piece that spanned across both black mesh “slashes”, with a bit of a tab on either side. The tabs would layer underneath the black spandex.
I sprayed the RIGHT sides of each pattern piece with Odif's 505 Temporary Fabric Adhesive, and adhered them to the WRONG sides of the fabric they would be cut from.
As I described in my How to Cut Spandex post, gluing pattern pieces makes life a LOT easier.
I also sprayed the right sides of the brief lining pieces and the middle back piece, adhering them to the wrong side of the black spandex.
Then I used sharp scissors to cut everything out.
Skating Dress Assembly
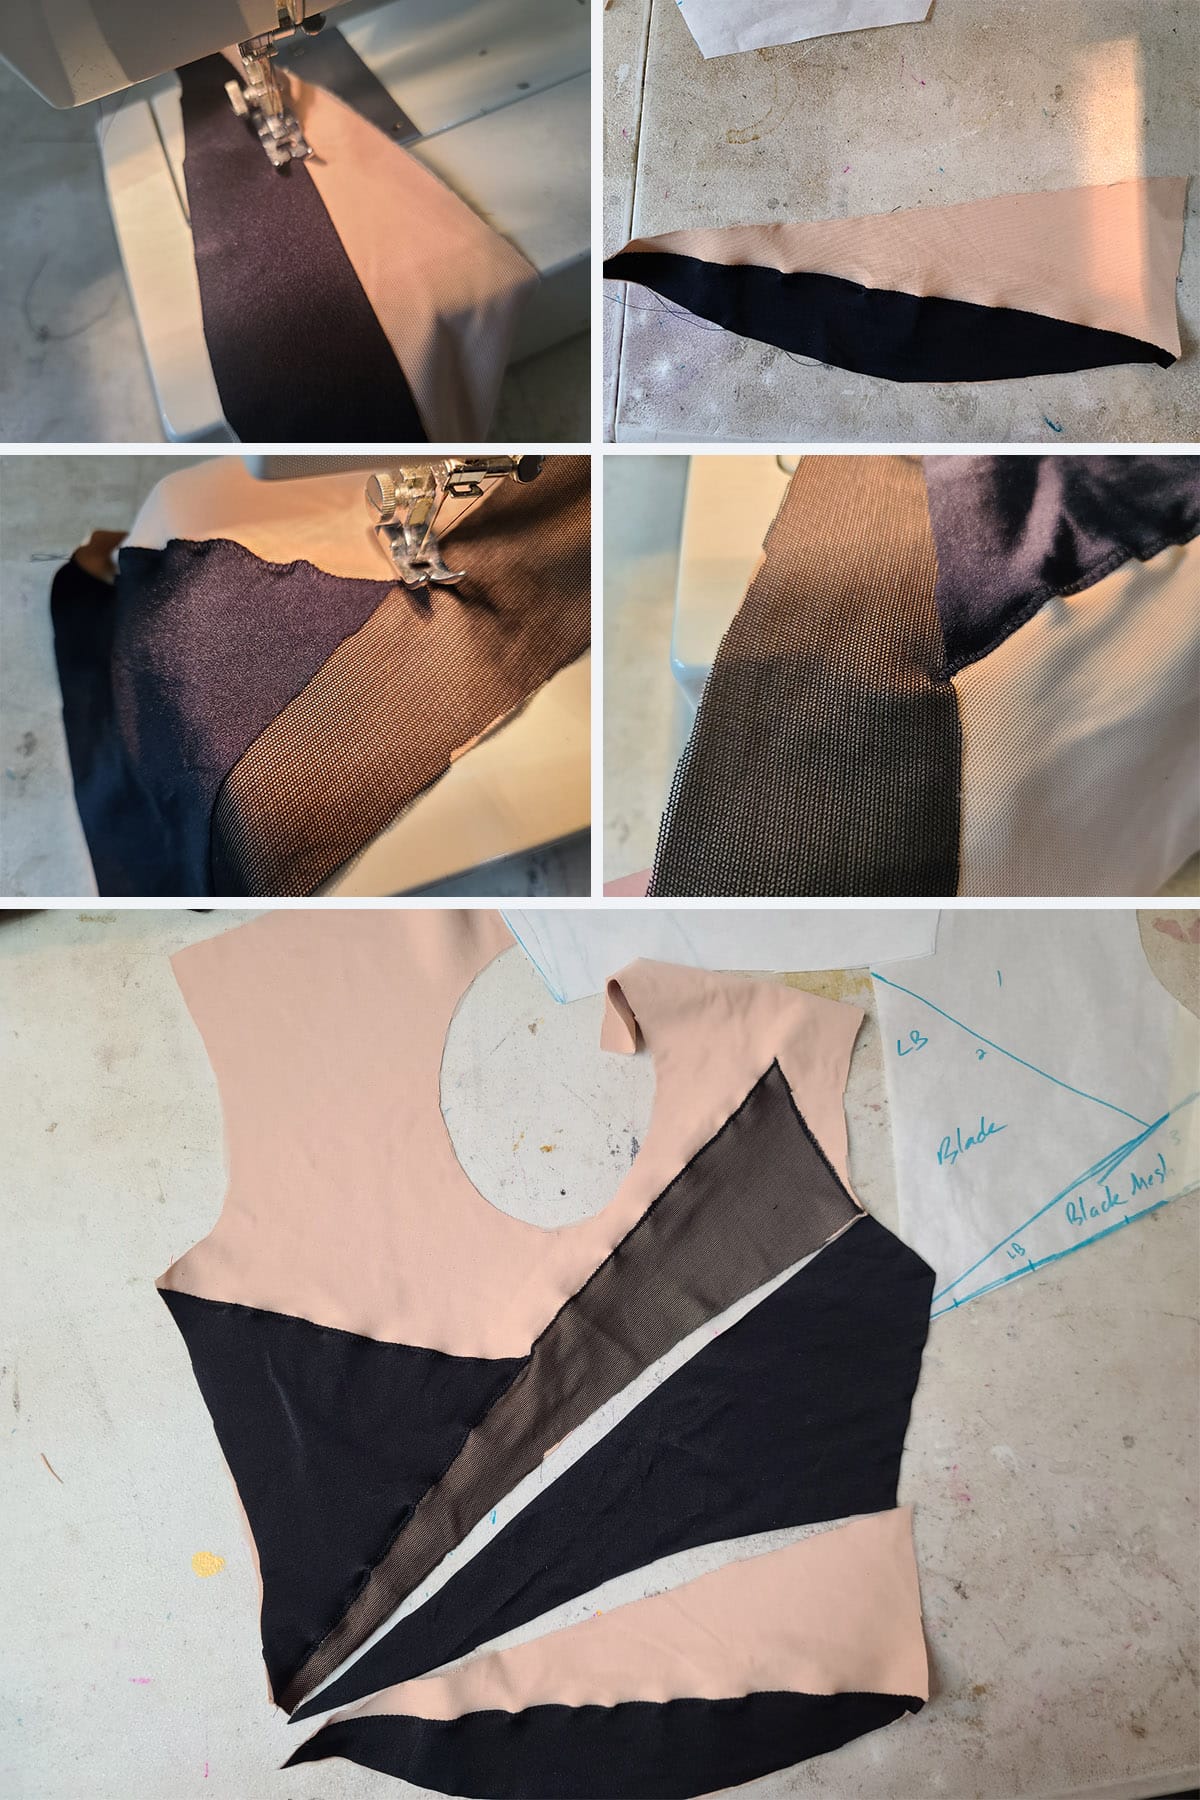
Back Applique
For the top back piece, I sprayed the WRONG side of the black mesh piece with adhesive. (This is the side that the pattern had previously been adhered to), and placed it on the mesh/lining piece.
Then I sprayed the wrong side of the black spandex piece, and placed it, lining it up over the “tab” of mesh, to create a straight line from the top of the mesh part, to the end of that slash.

The black spandex that would go across the bottom back piece was also sprayed and adhered in place over the mesh/lining piece.

I loaded up my sewing machine with black thread (I like Gutterman and Mettler brands of polyester thread), and appliqued the black mesh and spandex pieces down to the top and bottom back pieces.
The middle back piece was just left as-is, and didn’t require applique.
Note: See my How to Applique Spandex post for full details on how I applique.
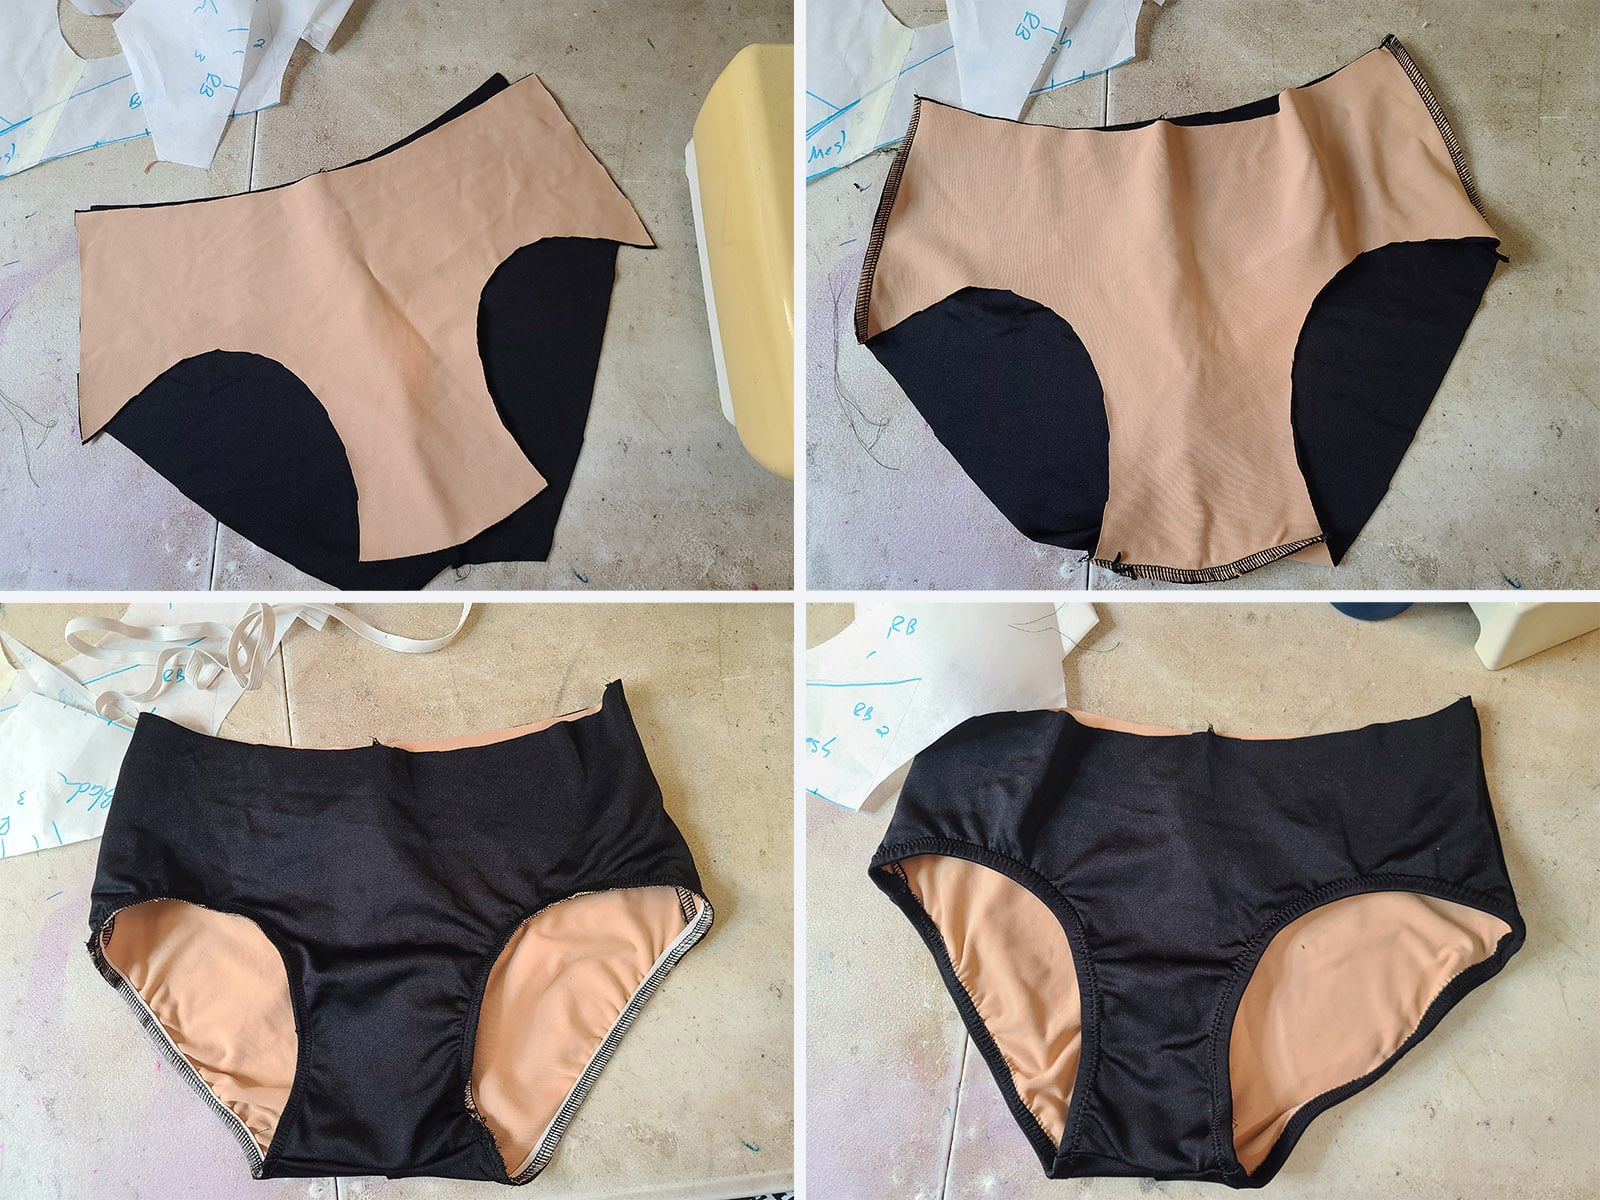
Briefs Assembly and Elastic
I had black thread already in my serger, so I assembled the briefs and added the elastic at this point - I would need to swap the thread out for beige in order to sew the back up.
See Pull-on Figure Skating Skirts and How to Apply Elastic for details on assembling the briefs.
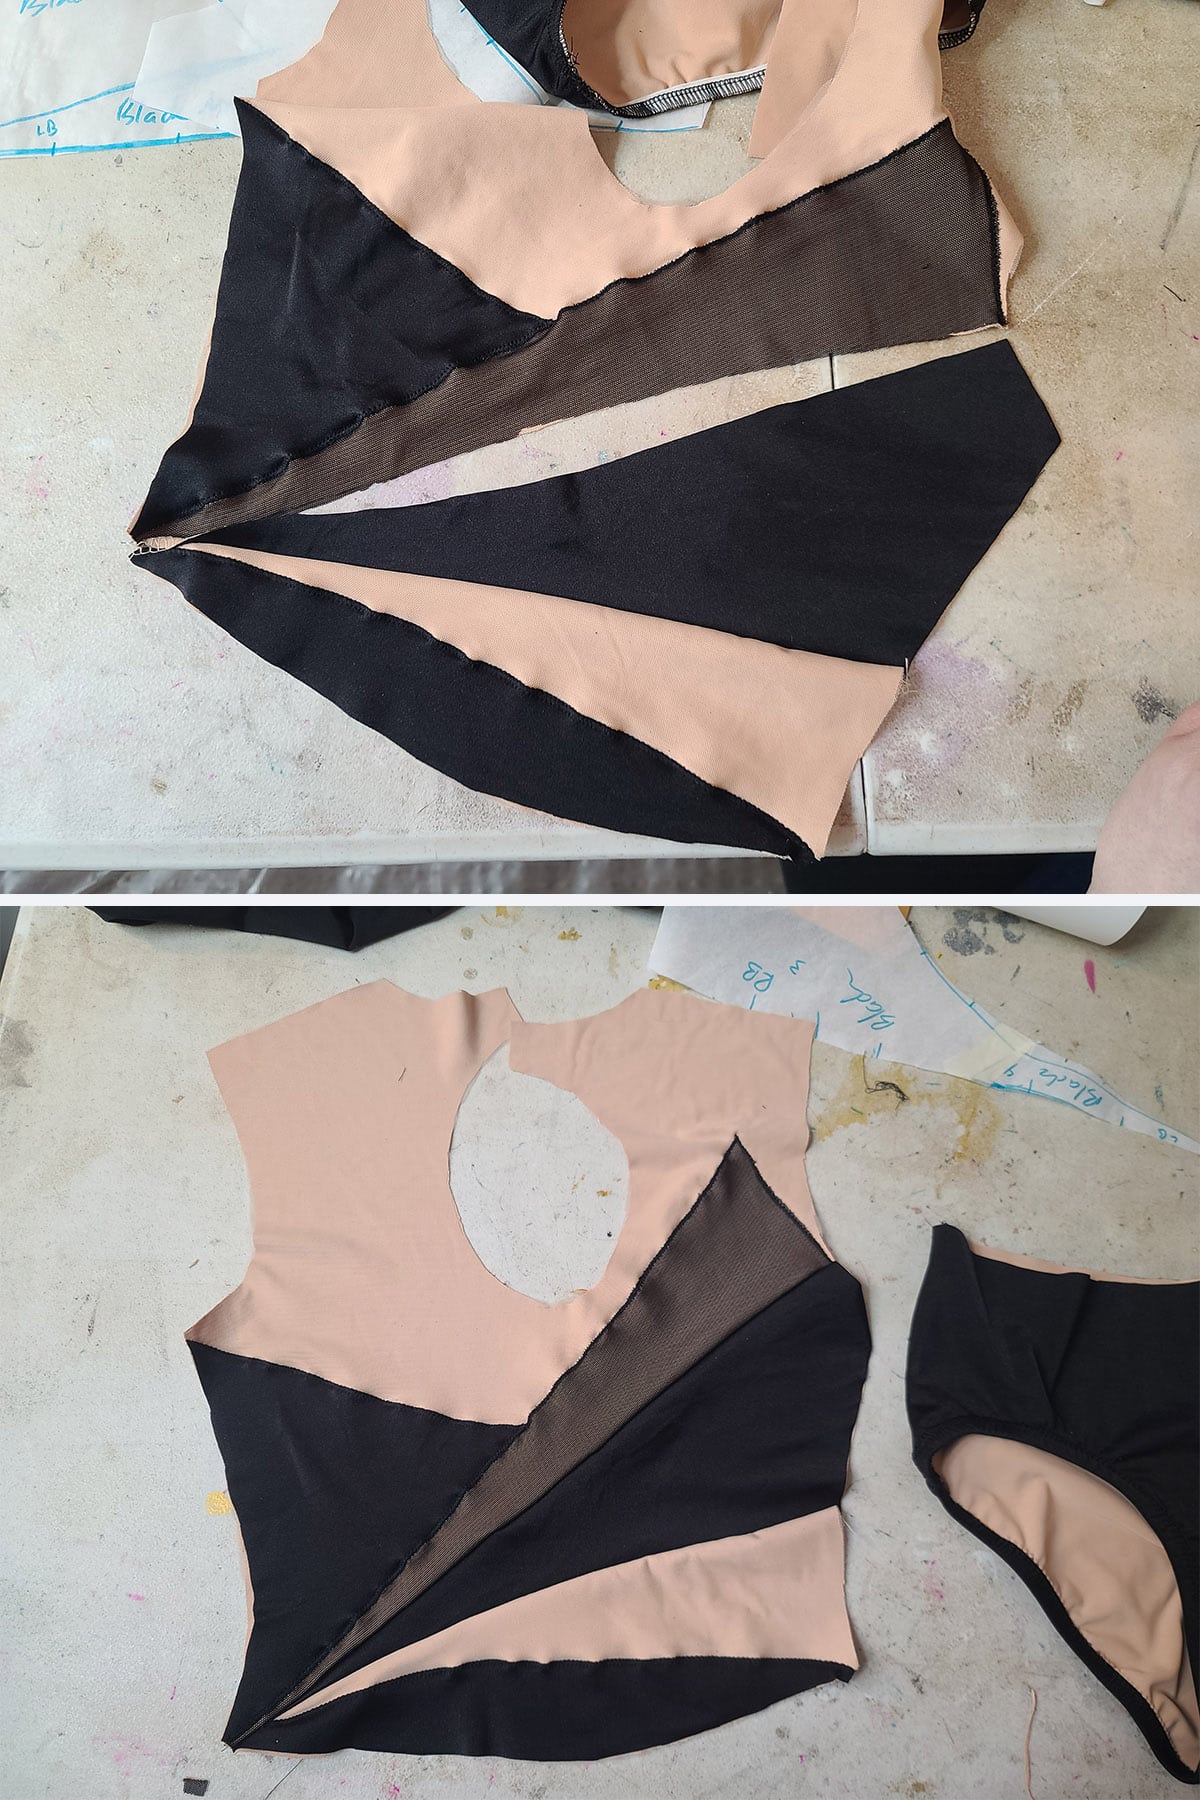
Back Seams
Once the brief was assembled, I swapped the black thread out for beige.
While the garment IS fully lined, there is always the chance of one of the seams flipping to be under a mesh section, and if I were to use the black thread, it could potentially show through.
Then I sewed the 3 back sections together.
(See How to Sew Spandex With or Without a Serger for details on sewing spandex together).
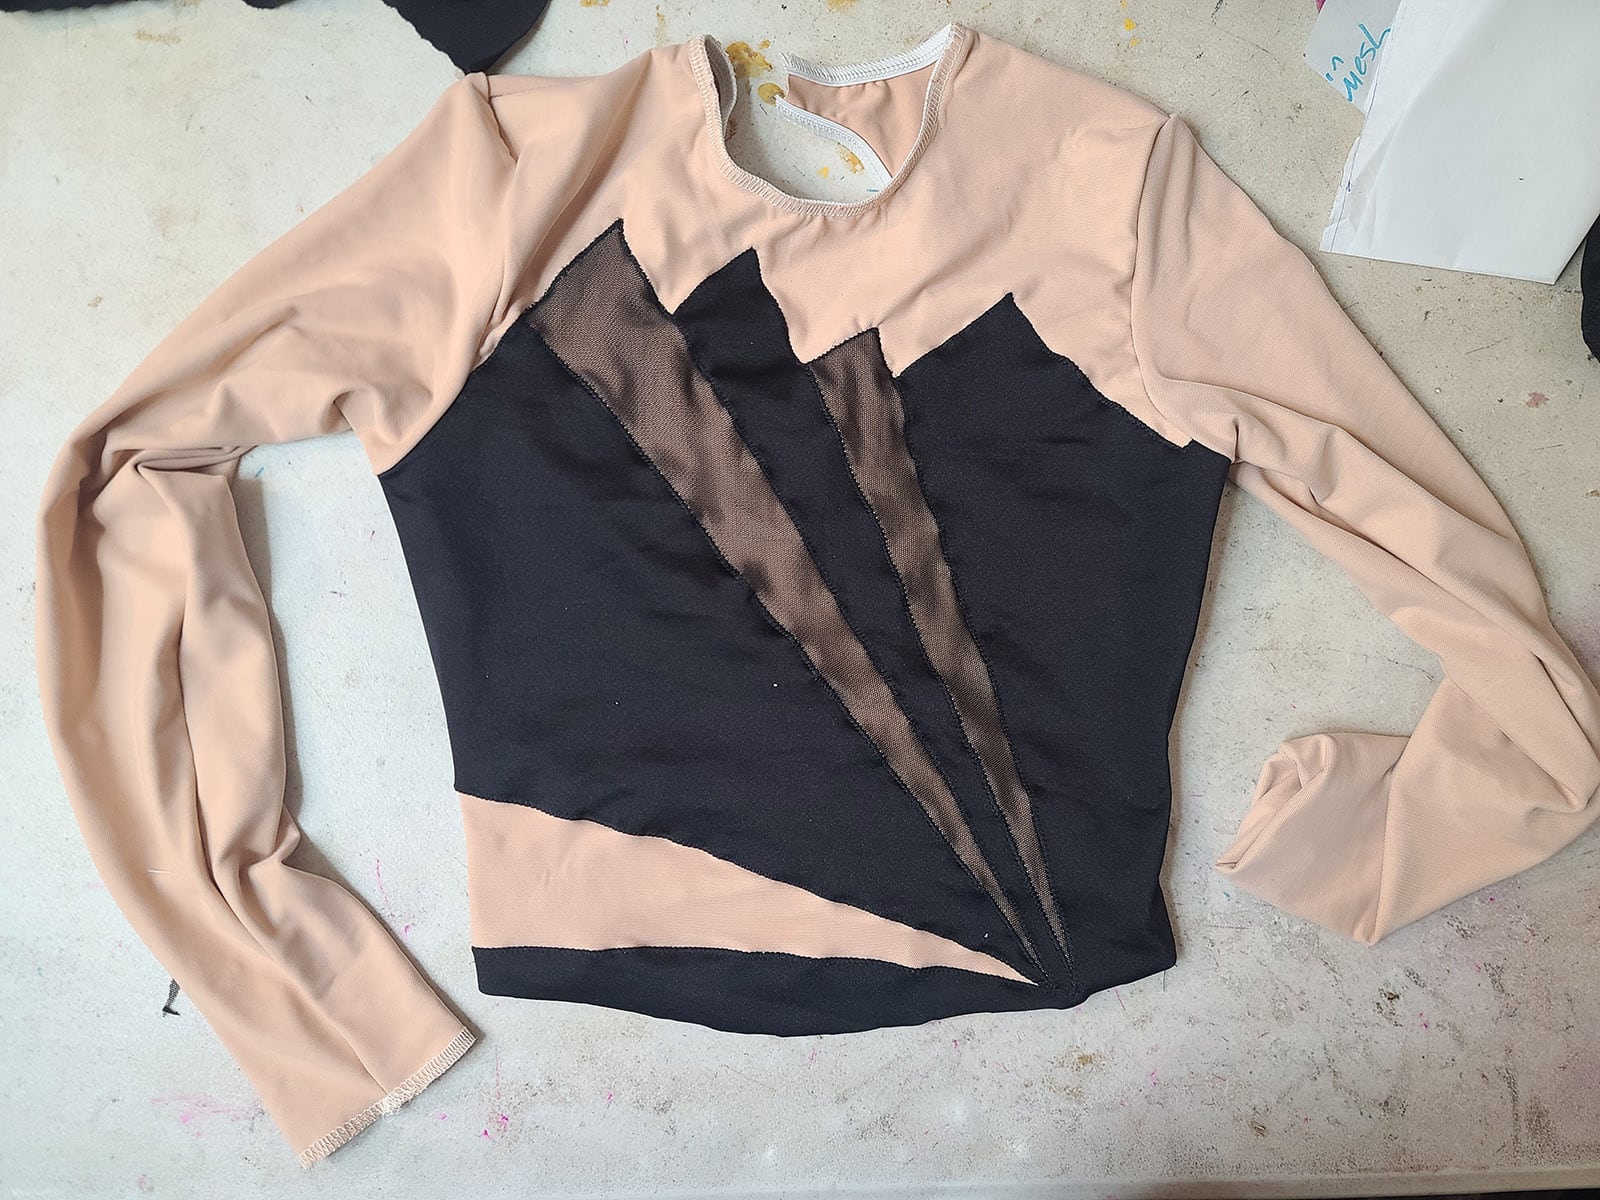
Front Bodice Applique
I sprayed the WRONG side of the black mesh front piece and adhered it down to the beige mesh/lining piece, using the original bodice pattern as a placement guide.
Then I sprayed the WRONG side of the black spandex front piece with spray adhesive, and set that piece in place on top of the black mesh.
Once again, I used the original exam table pattern piece to confirm placement location.
The semi sheer nature of the paper is what makes it such an excellent patterning paper!
Once I was happy with placement, I pinned it into place and used black thread to applique it all down.


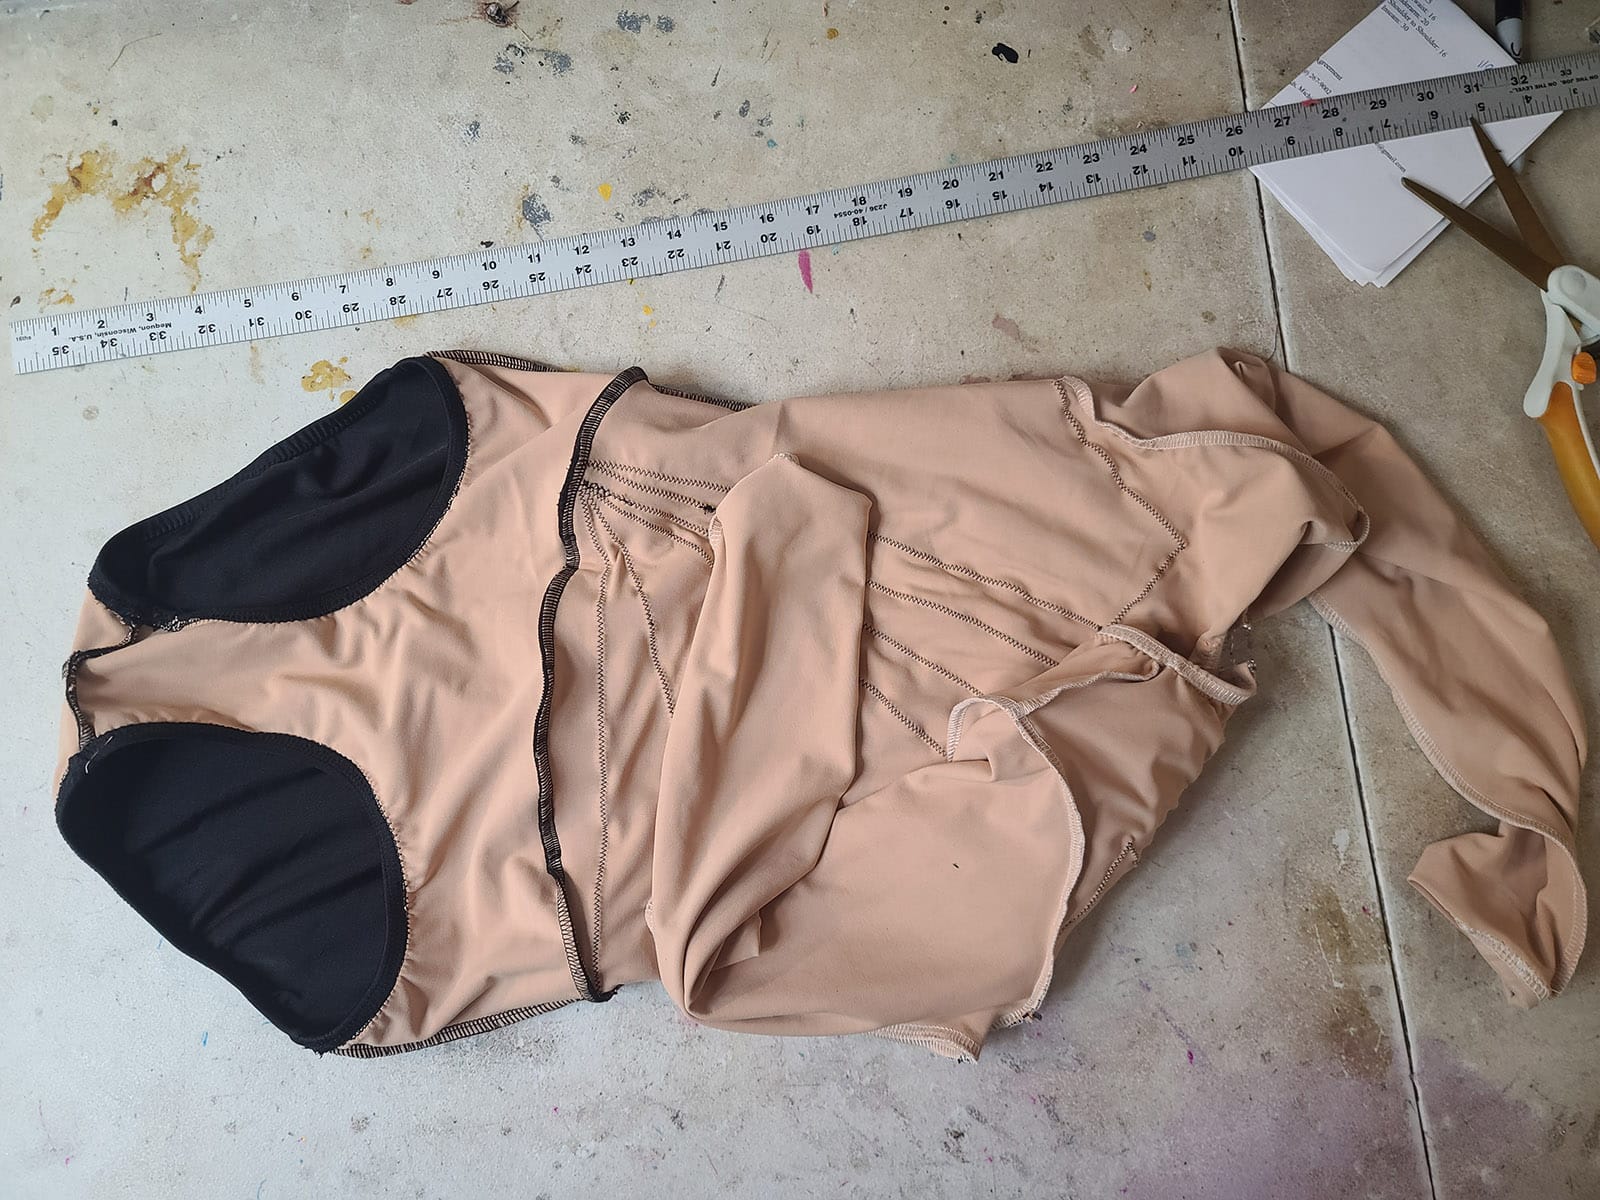
Bodice Assembly
With the beige thread still in my serger, I sewed (in order:)
1. The shoulder seams
2. The sleeves to the bodice
3. The arm seam on the side with the all-black side seam on the bodice.
4. The arm seam all the way down the side bodice seam on the side that has a beige section to the seam.
5. Both wrist openings.
6 The neck and keyhole elastic. (How to Apply Elastic).
With the black thread still in my regular sewing machine, I stitched a black straight seam (stretched!) very close to the serger seam on the black sections of the side of the bodice seam that I had serged.
This would allow for a solid seam the entire length of that side seam, beige where it needed to be (under the beige mesh), and black in the black sections.
Otherwise, the entire seam would be beige, and that would show against the black sections of spandex.

At this point, I swapped my serger thread back to black, and serged the remaining side bodice seam.
Finally, I swapped out the thread on my regular sewing machine for beige. I finished off the elastic, hemmed the wrist openings, and installed a butterfly hook.
Skirt
I patterned, cut, and assembled the skirt.
As with all skirts, the “Waist” edge of the skirt was cut to at least the dimensions of the BODY - not the bodice pattern. If you cut it to match the bodice width, if can pull across the front of the dress.
That doesn’t look great on any dress, but would be especially disastrous on one that was as fitted as this one!
I cut it a bit longer than I figured she’d need, so she had the option of shortening it. Where we were on such a tight deadline, it was better to have a skirt too long, than one too short.
Given the nature of spandex - and the design - she could simply trim back any excess, if needed. The spandex will not fray, and doesn’t NEED to be hemmed.
I did do a flat rolled serger hem anyway, see How to Hem Spandex for details on hemming spandex.

Final Assembly
At this point, all 3 pieces were individually complete and just needed to be sewn together.
I pinned the skirt to the briefs, lining up the sides and being EXTRA careful that the front of the skirt was over the front of the briefs.
The wrong side of the skirt was against the right side of the briefs; the right side of the briefs was facing out, with the right side of the skirt also facing out.
From there, I turned the bodice inside out and set the briefs/skirt piece inside it, such that the right side of the bodice was facing the right side of the skirt.
Again, I checked to ensure that the front bodice was aligned over the front brief/skirt piece, and pinned everything in place.

From there, I serged around the entire “waist” seam, sandwiching the skirt between the bodice and the briefs.
And then it was done, ready to be shipped and crystalled!

The Tendon Update
Unfortunately, my hand was not as impressed with the project. The shoulder and elbow held up moderately well - some minor fallout for a few days - but the wrist and thumb did NOT.
So, it’ll probably be another while before I sew again / do another blog tutorial - sorry about that!
More Figure Skating Sewing Tutorials
Want some more skating related sewing content? Try these on for size:
Basic Skating Dress Tutorial
How to Hem Spandex
Bodyshirts for Male Figure Skaters
How to Draft Skating Skirt Patterns
How I Made That: Flames Skating Dress
Figure Skating Skirts
How I Made That: The Pink & Black Skating Dress
How I Made That: The Ursula Dress
How to Make Scrunchies
How to Make Skate Covers
How to Pattern and Make Waterfall Skirts
How to Make Soakers
Proper Care of Figure Skating Dresses
Share the Love!
Be sure to take some pics of your handiwork! If you post it to Bluesky, be sure to tag us - @SpandexSimplified.
Also, be sure to follow me on Pinterest, and subscribe to my Youtube Channel, so you never miss out on any of my nonsense.
Well, the published nonsense, anyway!


Leave a Reply