

How I Made That: The Maleficent Costume
Originally published on Celebration Generation on July 17, 2014. Updated and moved over to this blog on 9/16/2021

As soon as I saw the first trailers for Maleficent, I knew I'd HAVE to make it. Here is an overview of how I made the Maleficent Costume!
As soon as I saw the first trailers for Maleficent, I knew two things:
1. I NEEDED to make that one gown from it
2. EVERYONE would be making that costume.
SO, I teamed up with my friend Jo (model) and Bill (makeup), and patiently awaited the movie premiere. The movie did not disappoint, and I immediately set about making this beast of a costume!
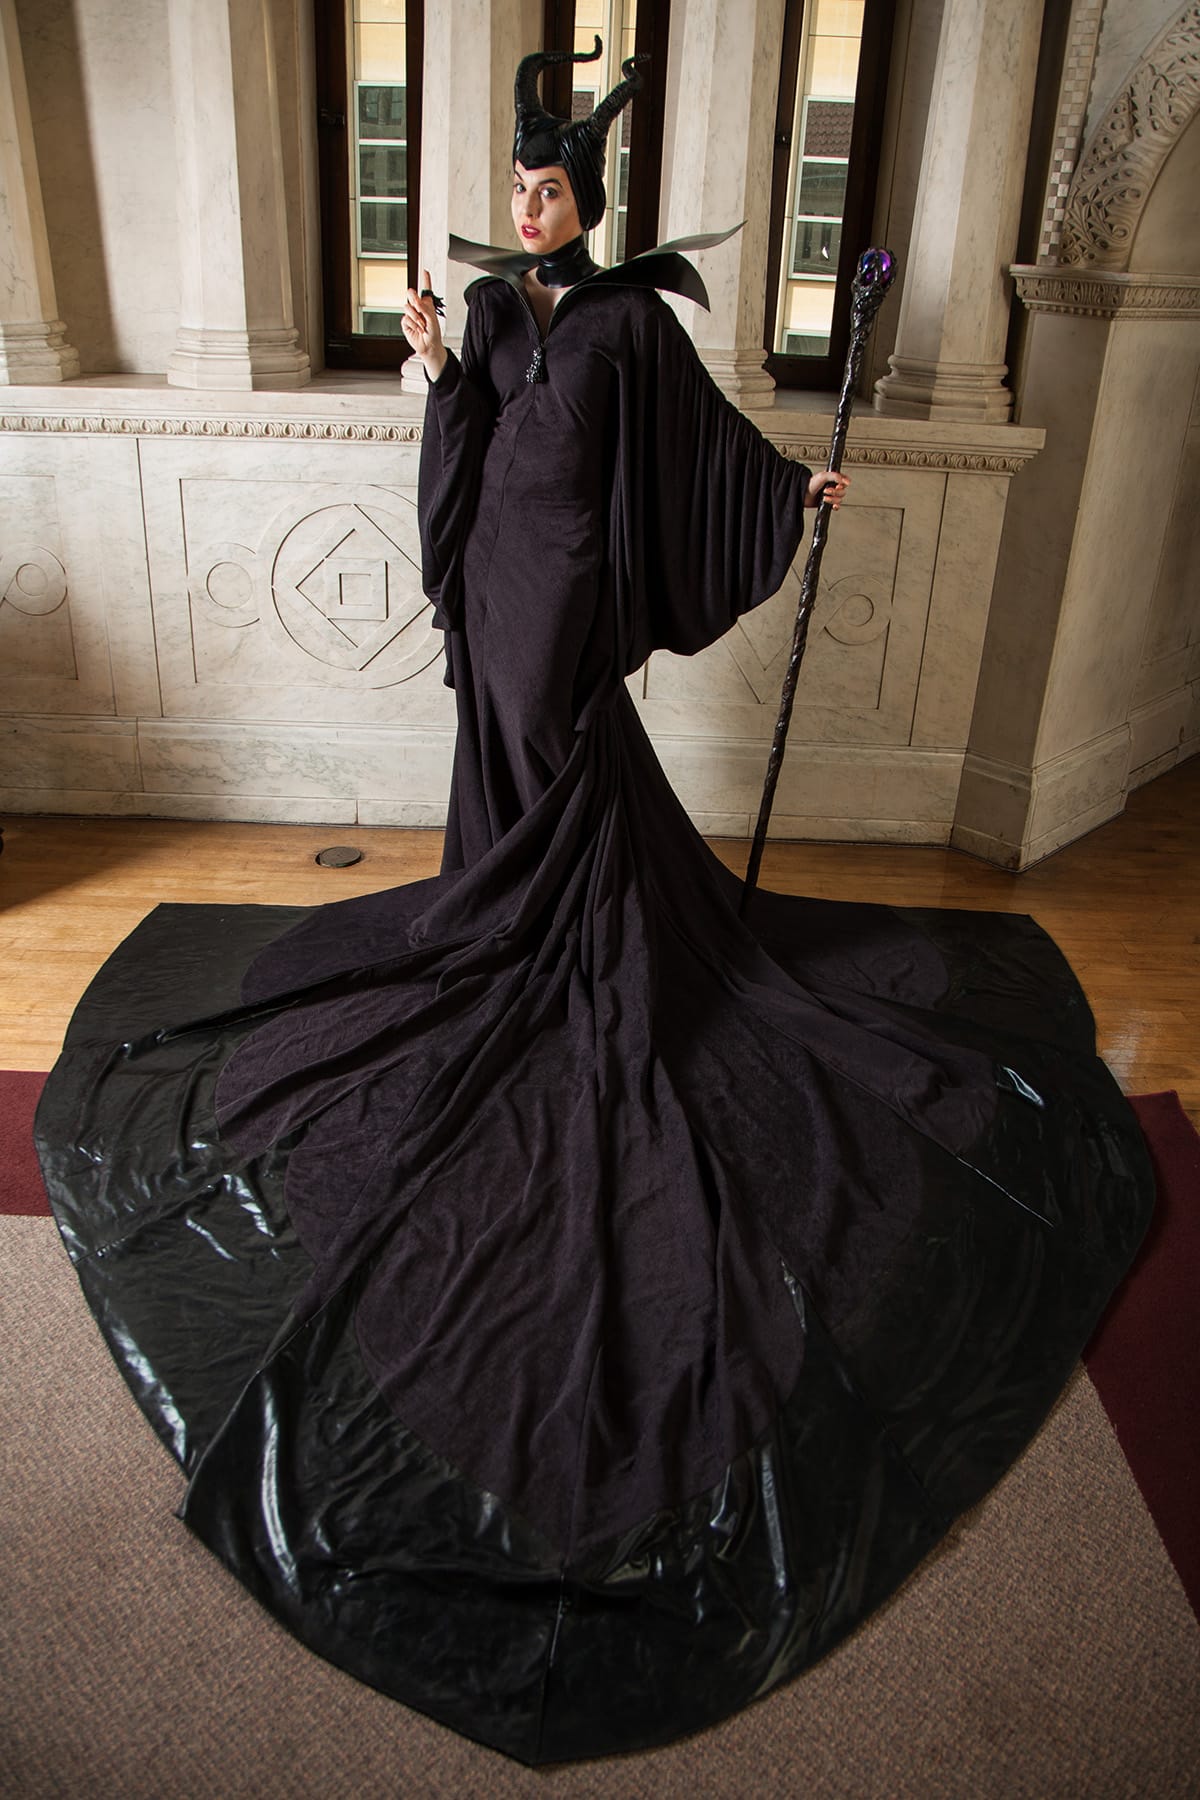
While it looks like a very simple costume on the surface, it's a great example of making something complicated look easy.
Not only is there a lot of directionality with the "pleats" - something to keep in mind throughout the dress body, sleeves, and the 8 panels of the train! - but the train itself is a feat of engineering.
You see, the dress itself is quite lightweight, and easily wearable. The train is a monster - to be movie-accurate meant there would be a LOT of it.
In order to make the train itself easy to wear, it's internally supported, to not exert any drag on the dress itself.
You'd never know by looking at it, huh? Jo was amazed at how easy it was to walk around in it!
I made everything you see here, from the headpiece to the ring, to the staff - which started as a wooden dowel!
Here’s an overview of how I made it:
How I Made The Maleficent Costume
Maleficent’s Dress
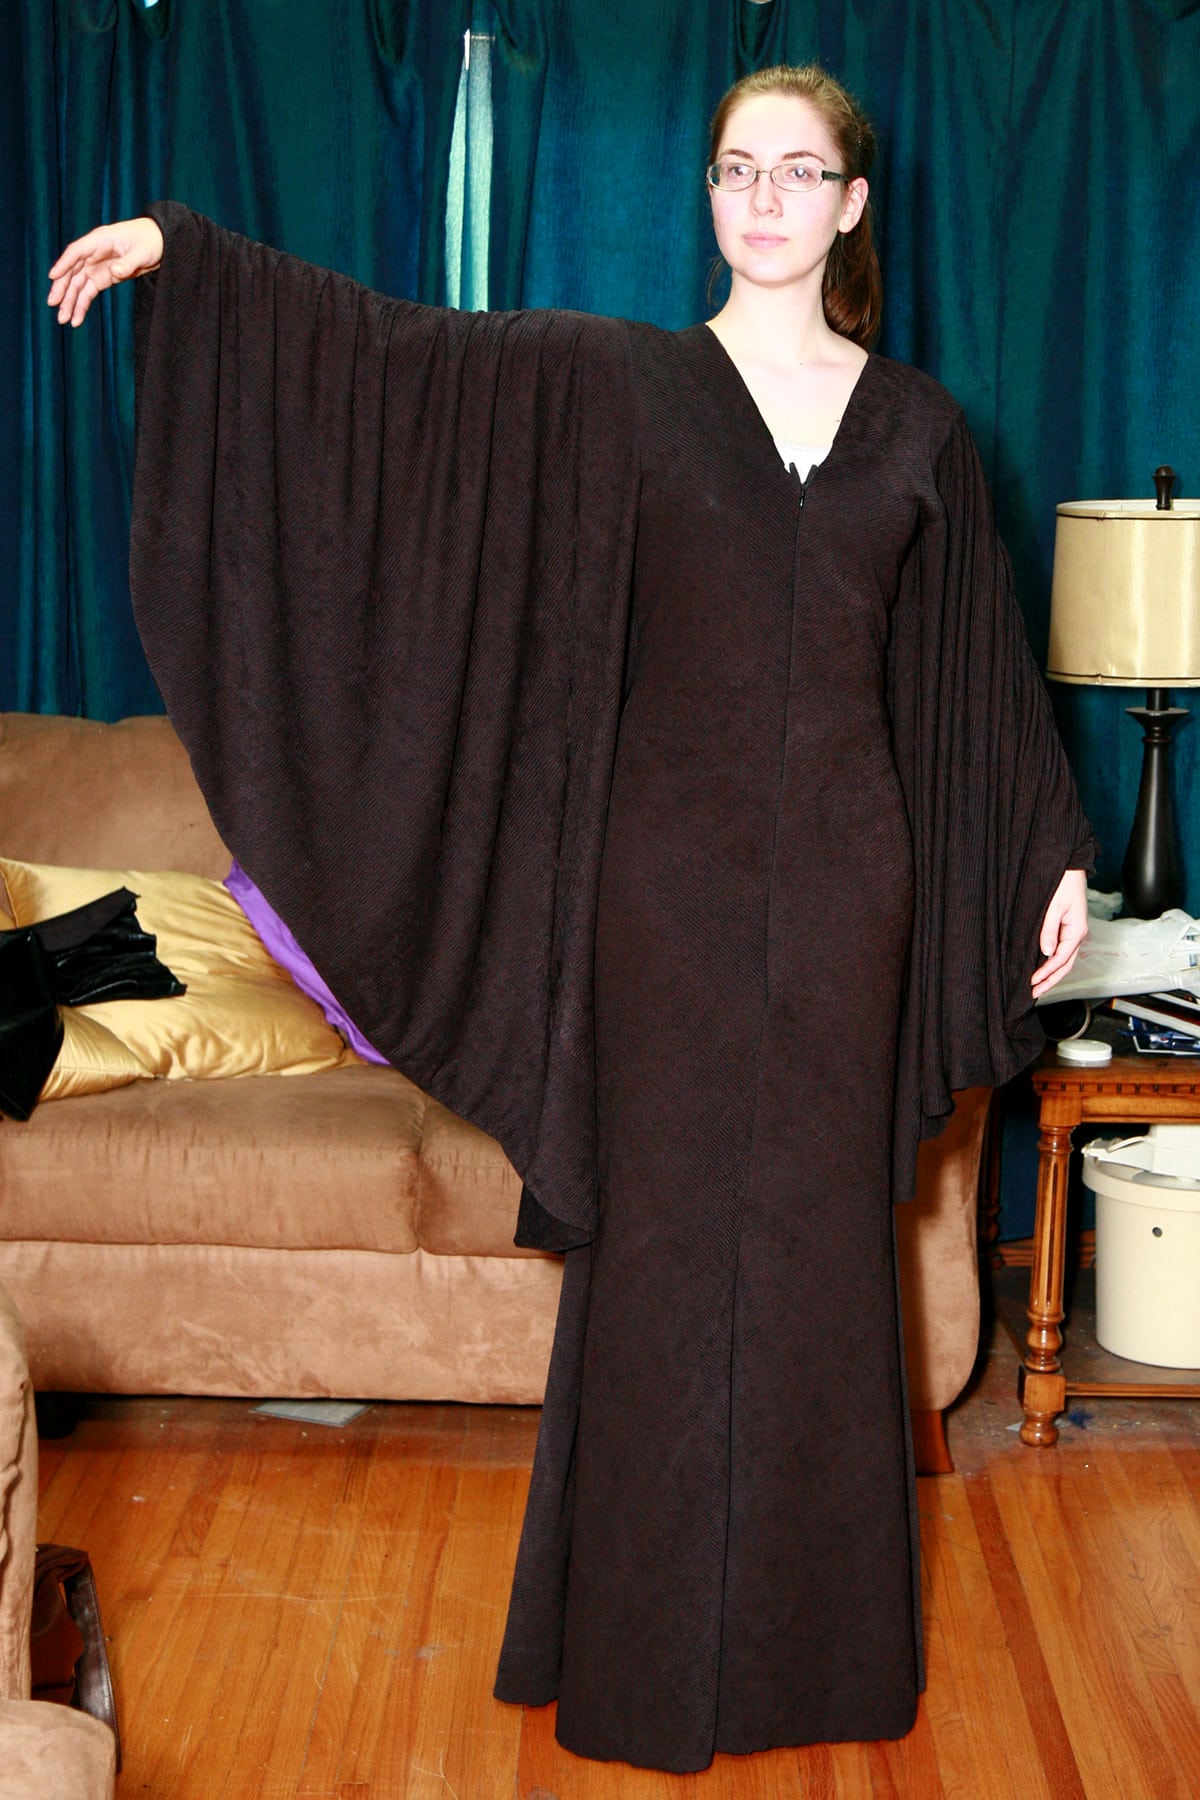
I drafted the dress from scratch, using a textured black spandex I found in a local fabric warehouse.
It was cut on the bias, so that the horizontal textured lines became diagonal, forming sort of a chevron / V style down towards the center front and center back of the dress.
The front had an invisible zipper, which eventually had a rhinestoned “bird skull” shaped zipper pull attached to it.
The back of the dress featured a fake lapped zipper up the center back, as that’s how it appeared from the few pre-release images I’d found online.

The Engineering
Just below the waist - in the back - is where I had to do some engineering for the extremely large, very heavy detachable train.
Inside the back of the waist, I stitched a small section of non-stretch fabric. This would support the hooks, etc I was adding.
To that section, I sewed a length of woven nylon strapping - picture what duffle bags tend to have for handles.
This was centered at the waist seam, with both ends extending around the front of the wearer and being secured around the front of the torso.
Basically, she’d put the dress on, pull the straps to the front, secure them together, then zip up the front of the dress.
On the outside of the back of the dress - at that secured section - I had sewn a strip of bra back hook and loop tape, over another short look of nylon strapping that attached one half of a butterfly style swimsuit closure to the dress.
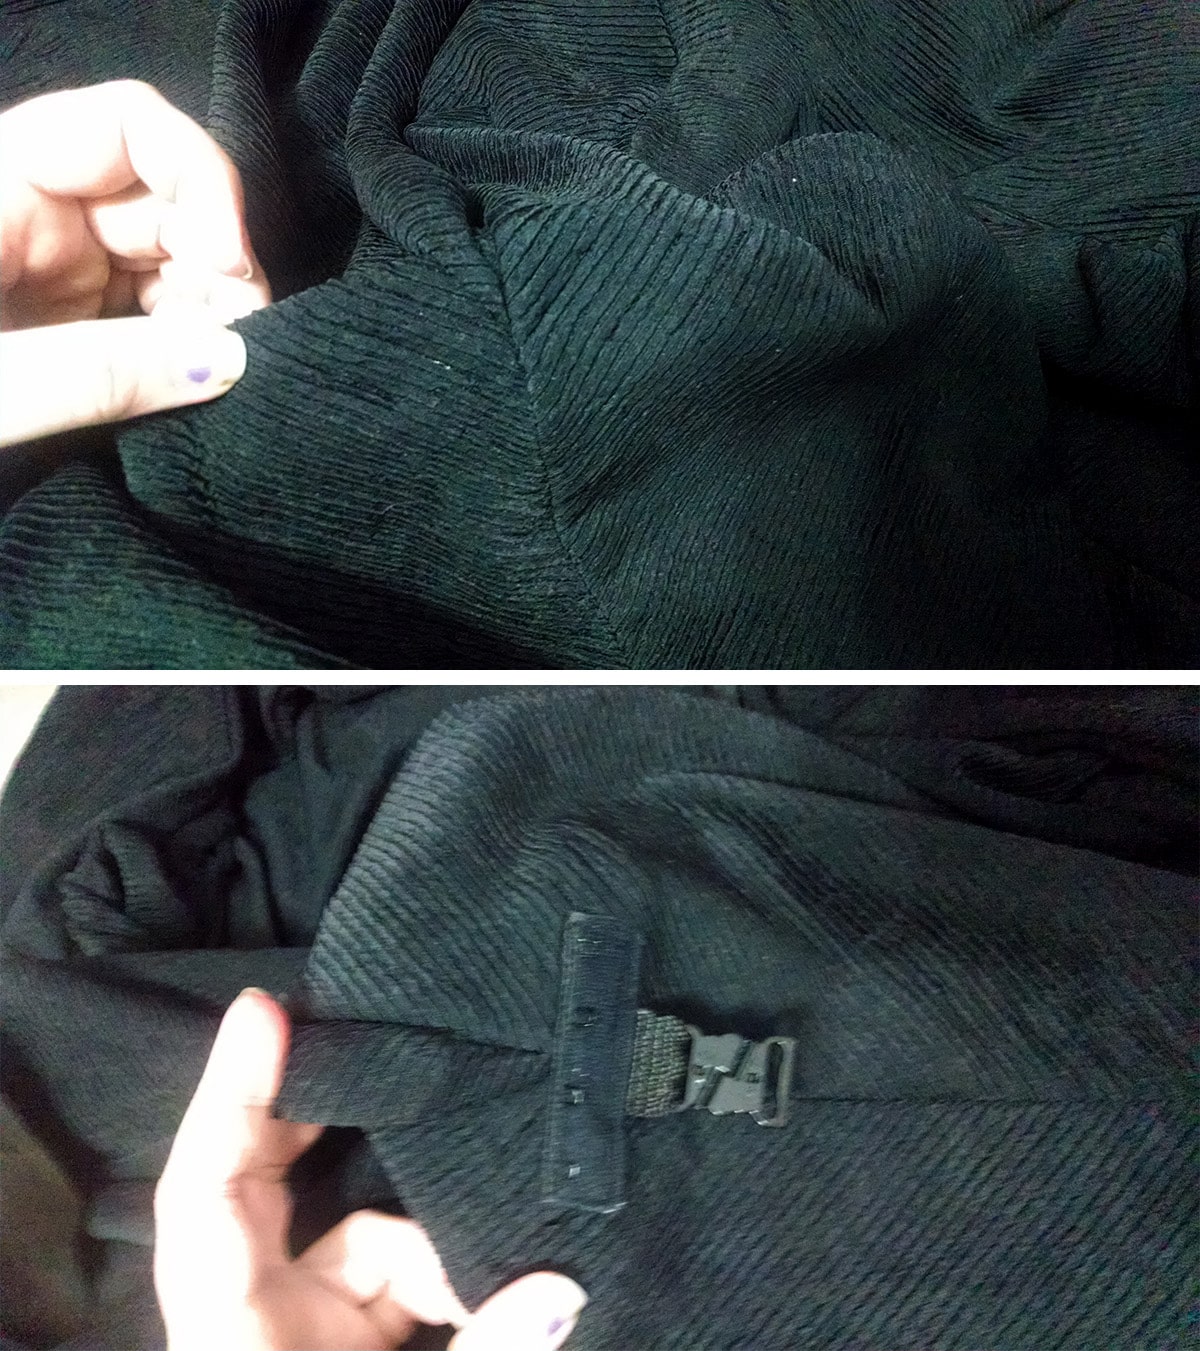
The bra hooks would secure the top edge of the train, while the nylon strapping would connect to another section of nylon strapping that was attached to the train, to take the actual weight of it.
The sleeves were large, gathered batwing style sleeves. I gathered them along the top end of the arm, and stitched the equivalent of the under arm seam right into the side of the body of the dress.

Maleficent’s Detachable Train
Patterning and Cutting
The train was a BEAST to make.
It was so big, I had to ask a pastor friend to let me use the event space in her church to pattern and cut it out!

I used 36" Wide Rosin Paper for patterning, as it was big/long/strong enough to handle it.

The textured fabric was cut at an angle, but not quite on the bias - the length of the pieces prevented them from fitting on the fabric at a true bias angle.
The Panels
Each section of train was actually 3 pieces:
- The full piece was cut from shiny black metallic spandex.
- An almost pull piece was cut from the textured fabric. This was bonded to the wrong side of the shiny black metallic spandex.
- A smallish piece of the metallic black spandex was also bonded to the wrong side of the main shiny piece, just UNDER the curved bottom edge of the textured spandex.
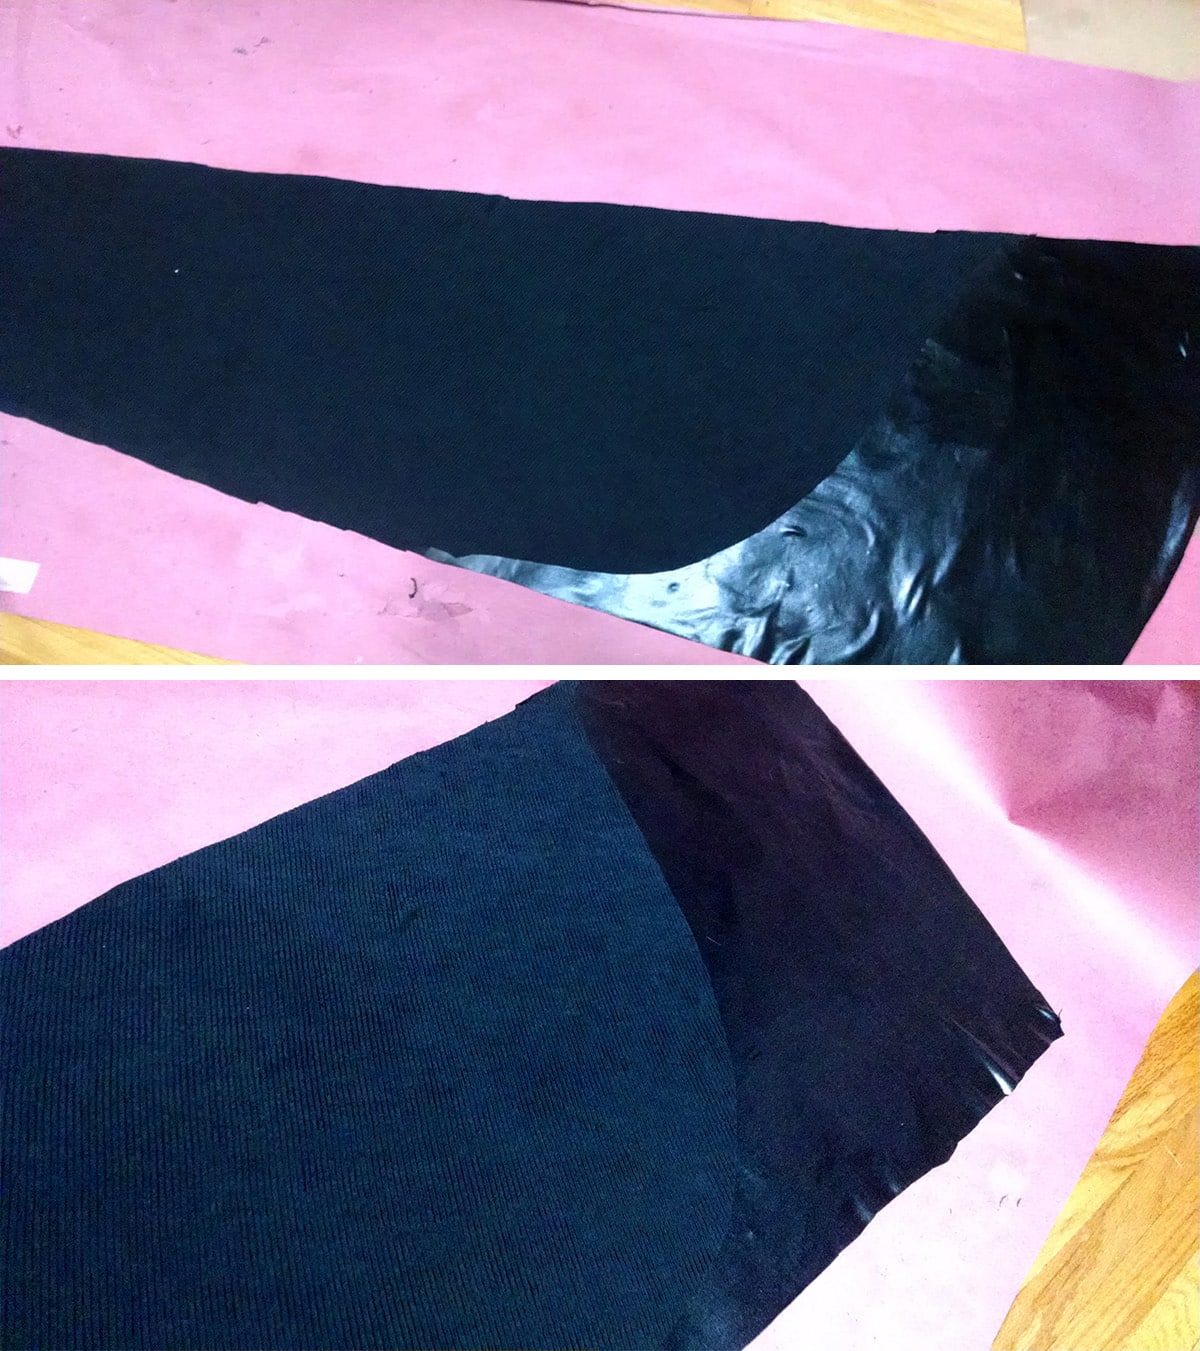
The textured spandex was then appliqued down to both layers of shiny spandex - see How to Applique Spandex for more details on appliquing spandex.
Assembling Maleficent’s Train
The panels were all sewn together, and serged around the edges for a hem.
The top edge was gathered slightly, before I sewed the hook section of some bra tape to it, to match up with the loop side sewn to the outside back of the dress.
A length of nylon strapping was sewn in several places along the center back seam, ending in the other half of the butterfly style swimsuit clip, from the dress.

To wear, the butterfly hook was clipped onto the dress portion - allowing the strap around the waist to take the weight of the train, rather than the dress itself.
Then, the bra hooks were attached. They didn’t take any weight, it just hid the clip situation going on underneath it.

This is the collar velcored in place on one side of the collar, yet to be attached on the other side. More on that in a bit!
Maleficent’s Winged Collar Piece
I used some construction paper to hash out a rough pattern, and taped it together to see how it worked with the dress, on a mannequin.

After some fussing around, I decided to simplify it - I decided that a smoother finish was more important than getting the curves absolutely right.
As the collar piece would be made from Worbla Thermoplastic Sheet, the seams to create the 3D look were an issue- I didn’t want seams!
So, I redid the pattern, and tried it out with my model. Close enough!

Along what would be the inside of the collar, I extended the pattern out 1.5" or so, in sections.
These would be bent backwards and used as fixed flaps to adhere velcro to.
The dress itself had the soft side of the velcro sewn down along the inside of the collar.
The hook side would be attached to the TOP side of these collar flaps, to be tucked inside the collar and connected to the downward-facing loop side.
I used a heat gun to mold, shape, and attach the collar pieces into a single piece that would be lifted onto the model, over her head.

From there, it was painted with several coats of Black Plasti-Dip Spray, and allowed to cure for a few days.
Finally, strips of velcro were glued onto the flaps and clamped into place as they cured.

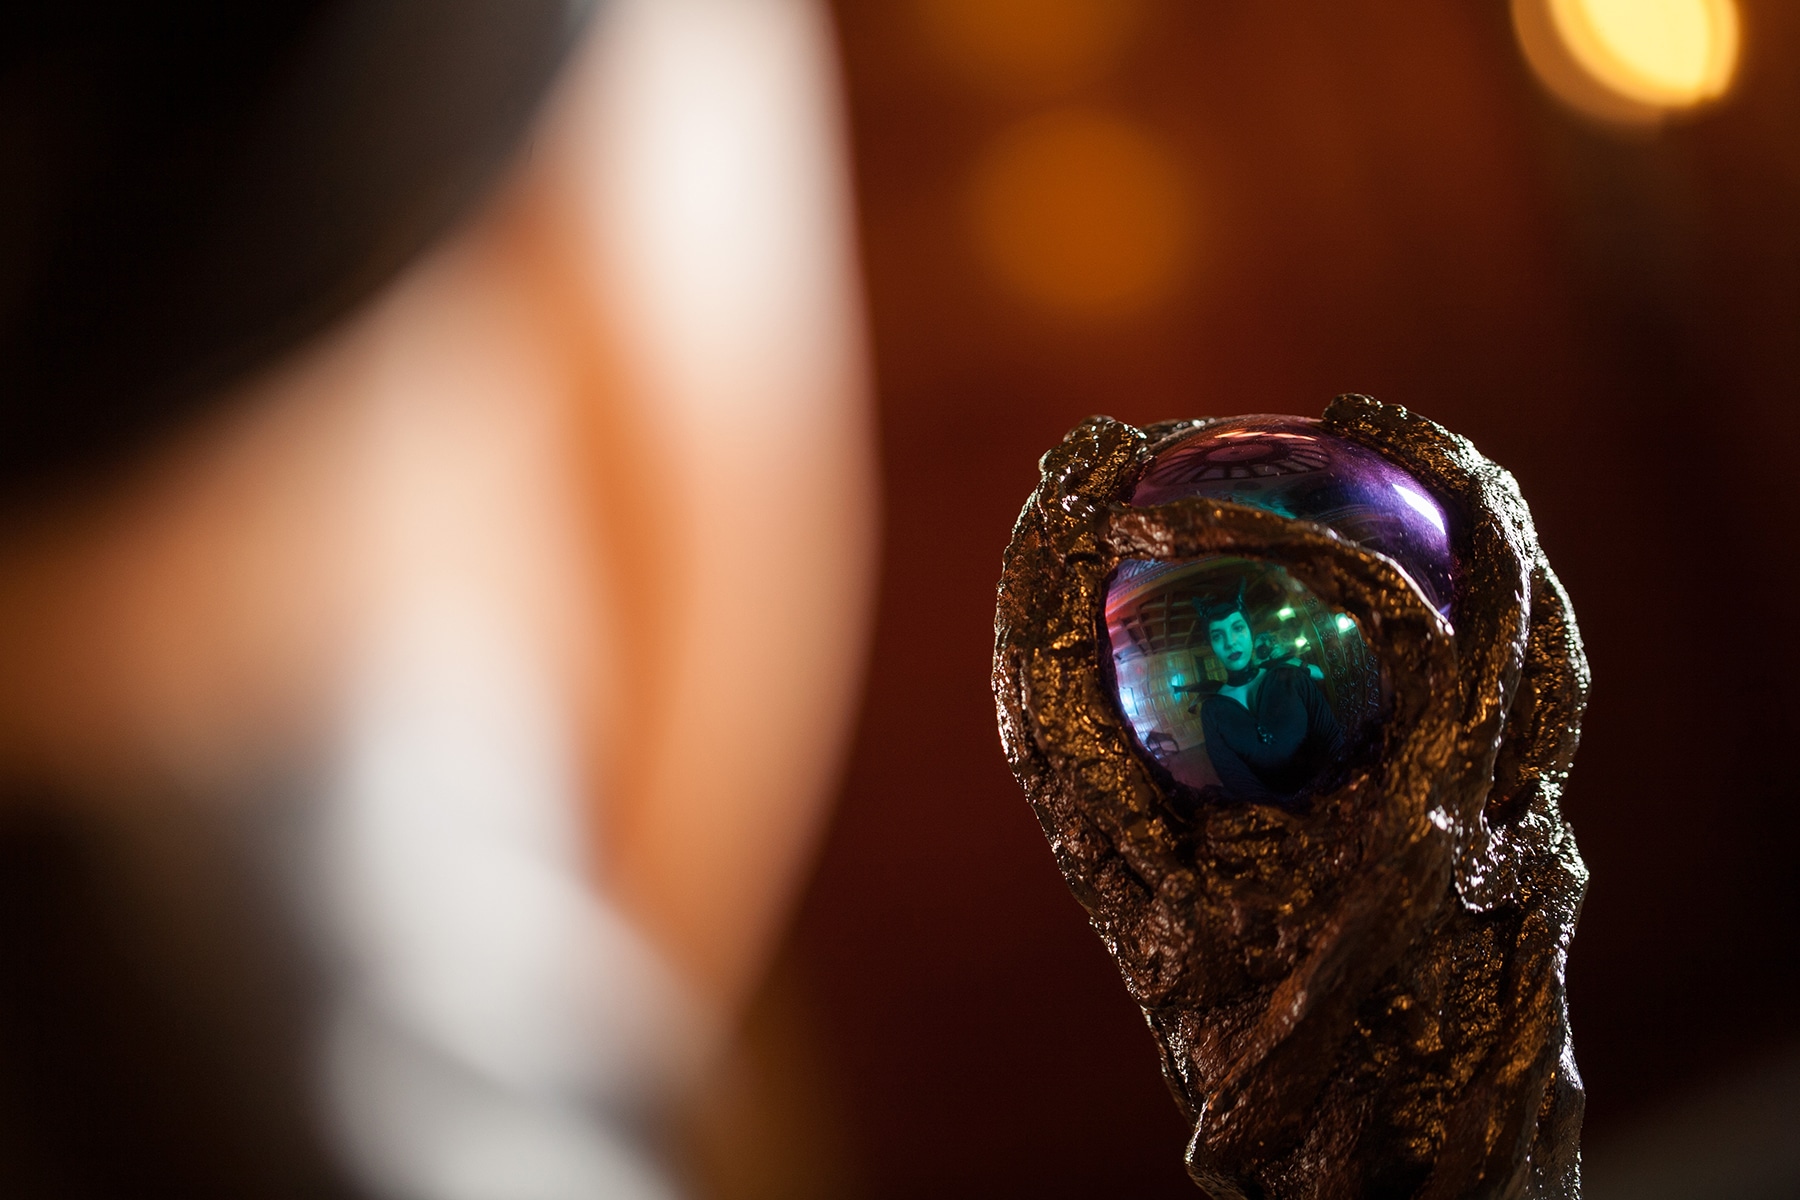
Maleficent’s Staff
I wrote a whole separate post on how this was made: Costuming & Cosplay Tutorial : Maleficent’s Staff
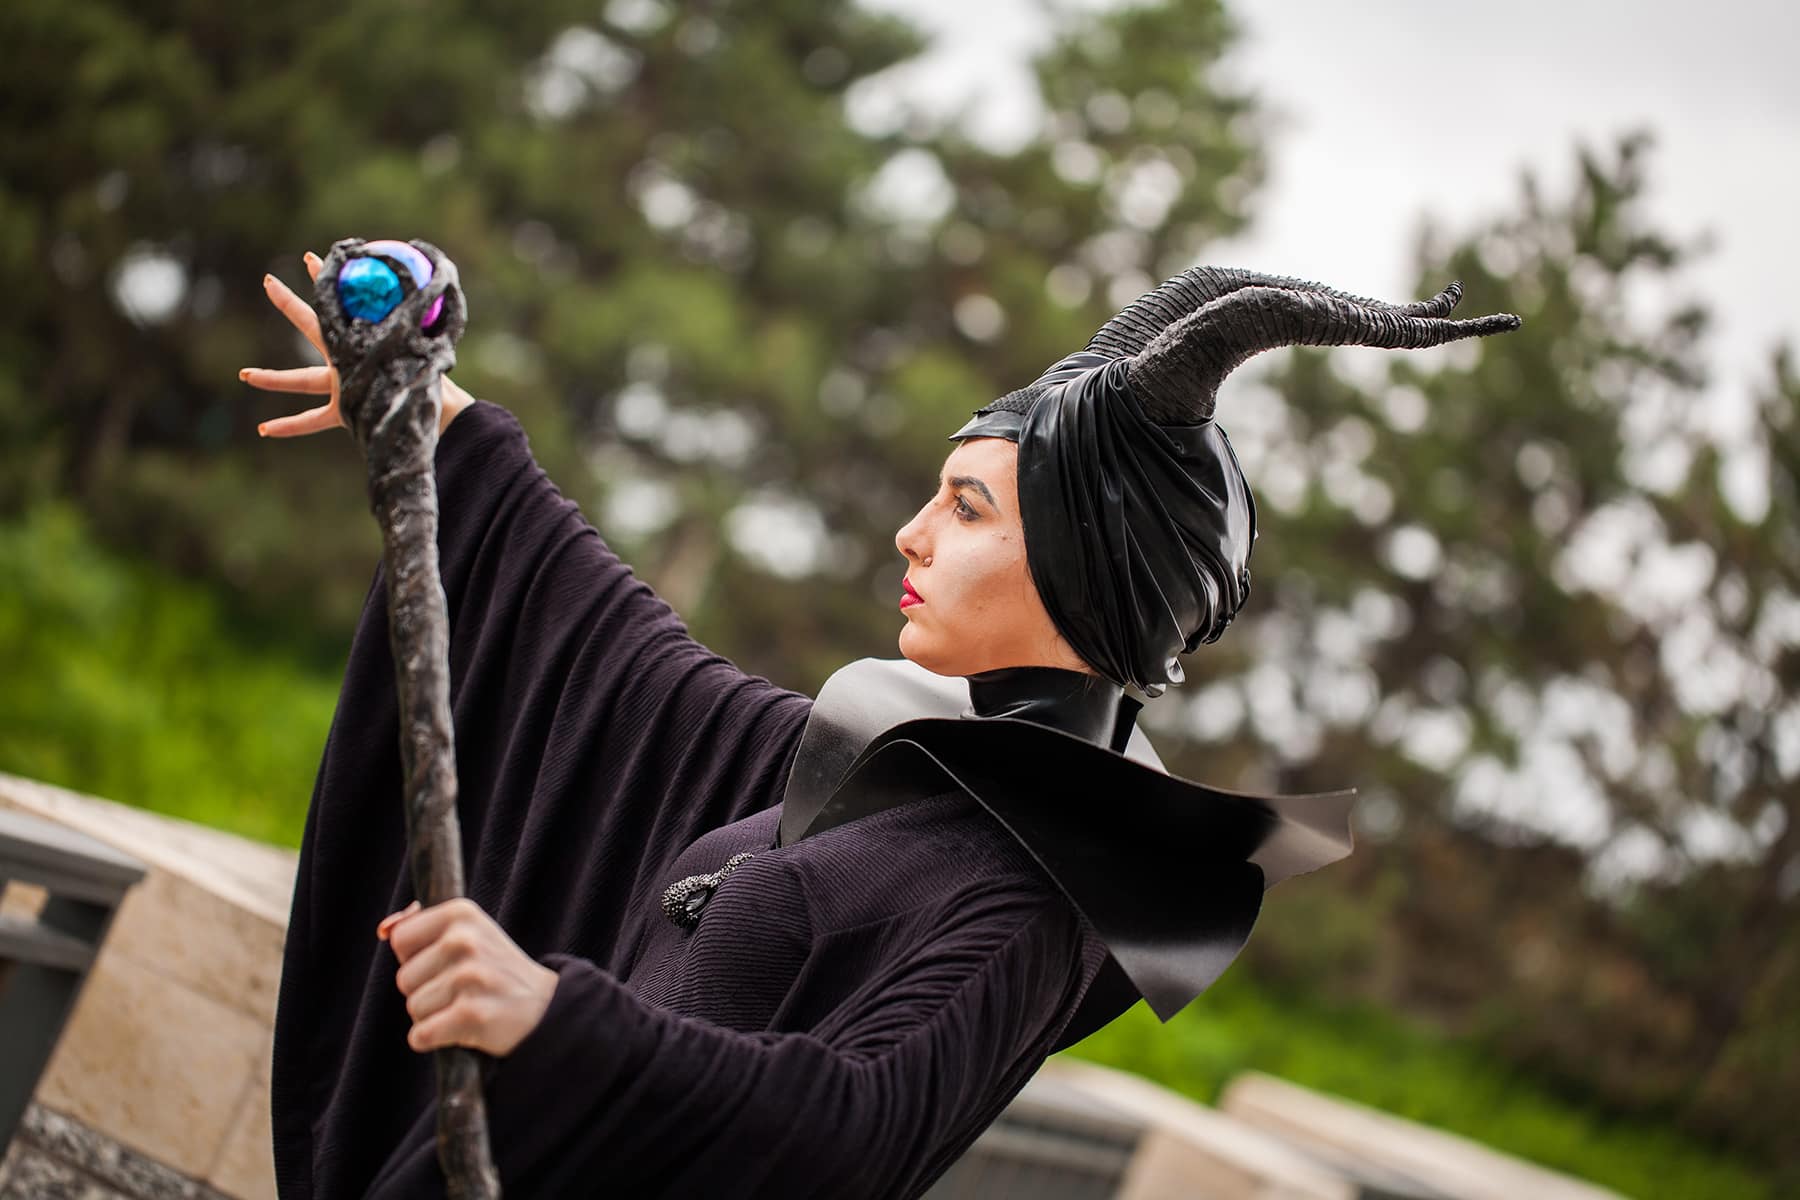
Maleficent’s Horned Headpiece
I wrote a whole separate post on how this was made: How I Made That: Maleficent’s Horns / Headpiece
Maleficent’s Accessories
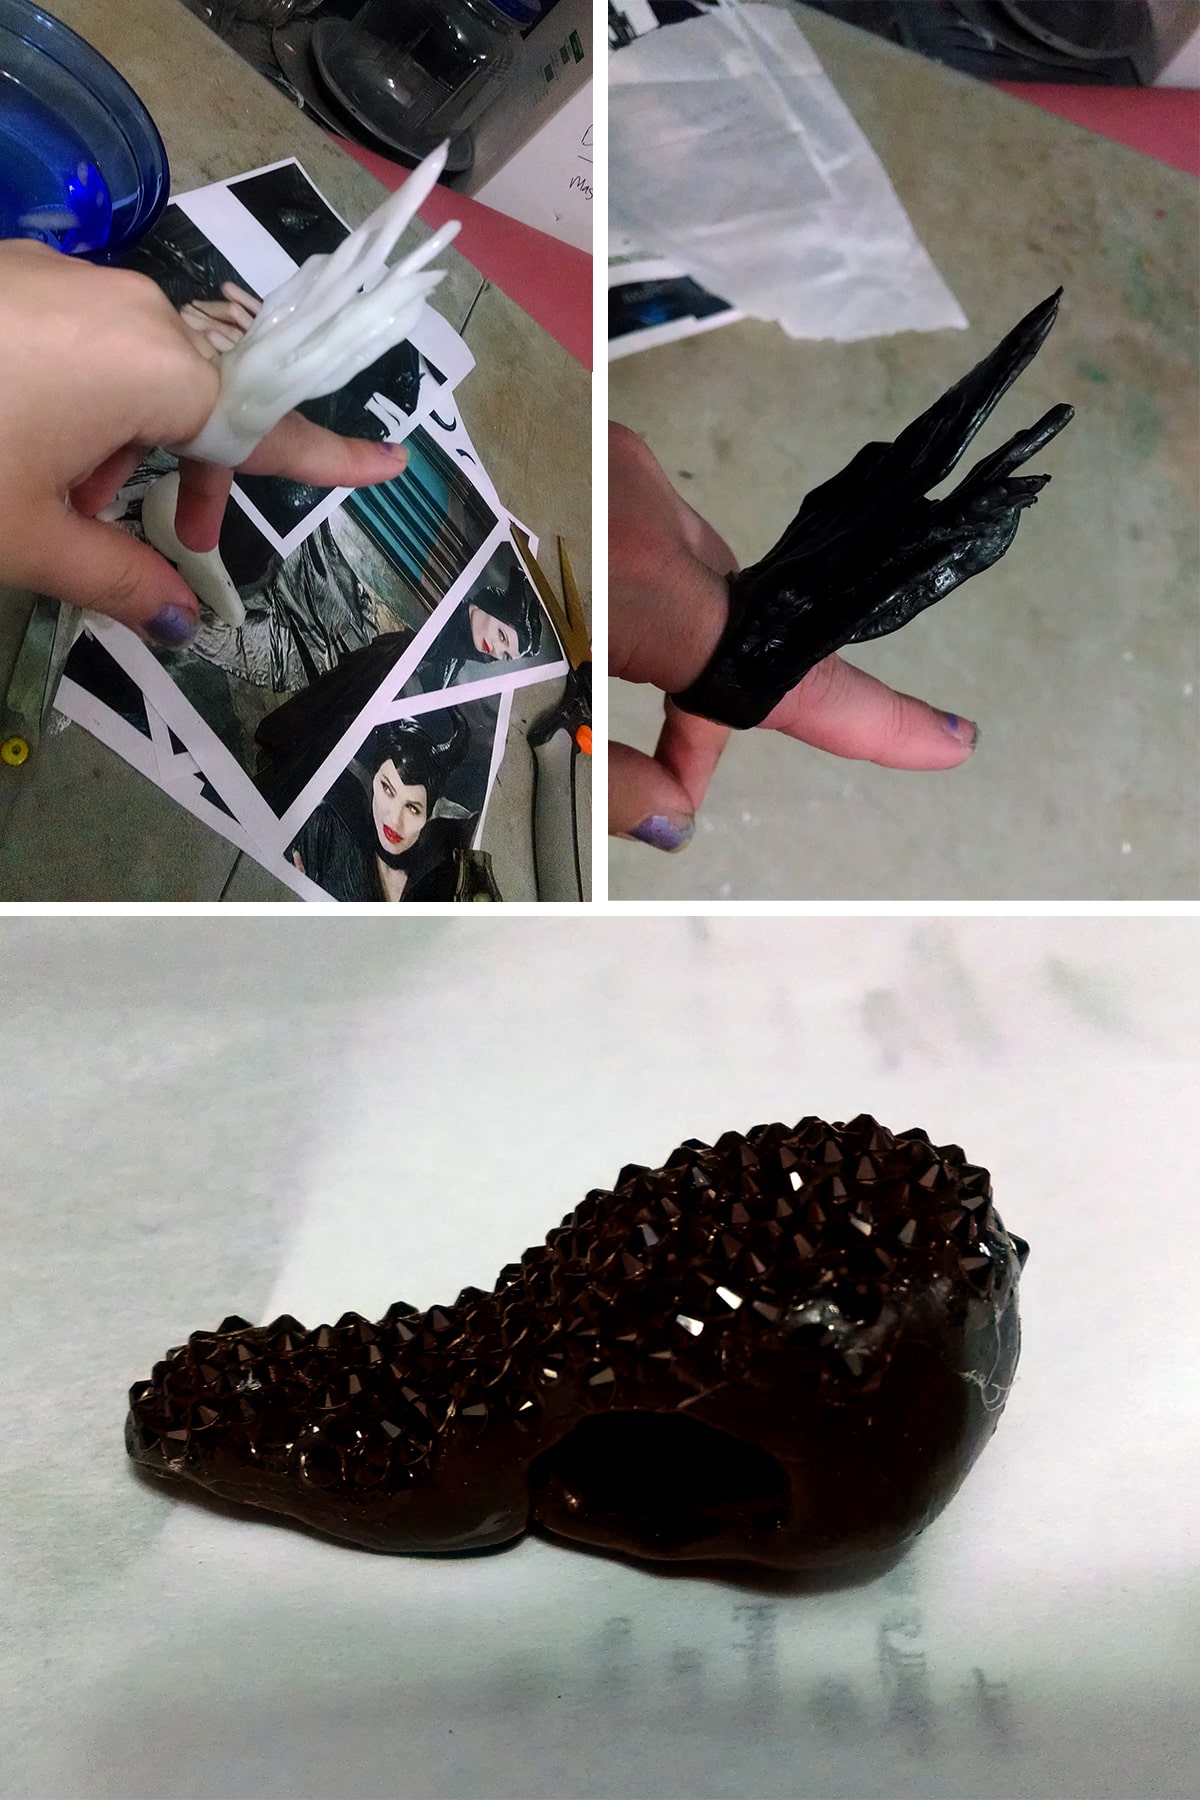
I used blown-up photos I’d found online to show me some details for the ring, and for the “bird skull” zipper pull.
For both items, I used Instamorph Theromoplastic.
This is an AMAZING crafting product - little beads of plastic that melt in hot water and can be sculpted to whatever you want. (See my Thranduil Crown Tutorial for more details!)
Once I was happy with the pieces, I mixed some black craft acrylic paint with Pros-Aide No-Tack adhesive to make PAX paint, and completely covered both pieces.
The Pros-Aide makes the paint stick to the plastic really well, and gives it a more durable finish.
Then, I used tiny SS12 Black Rhinestones to adorn the zipper pull, glued on with original formula E-6000 Adhesive.
Yes, I usually recommend using E-6000 Fabri-fuse - for many reasons - but the original formula works much better for this use.
Be sure to see my Crystalling on Spandex tutorial for details and warnings about using E-6000, btw.
Anyway, that’s about it!
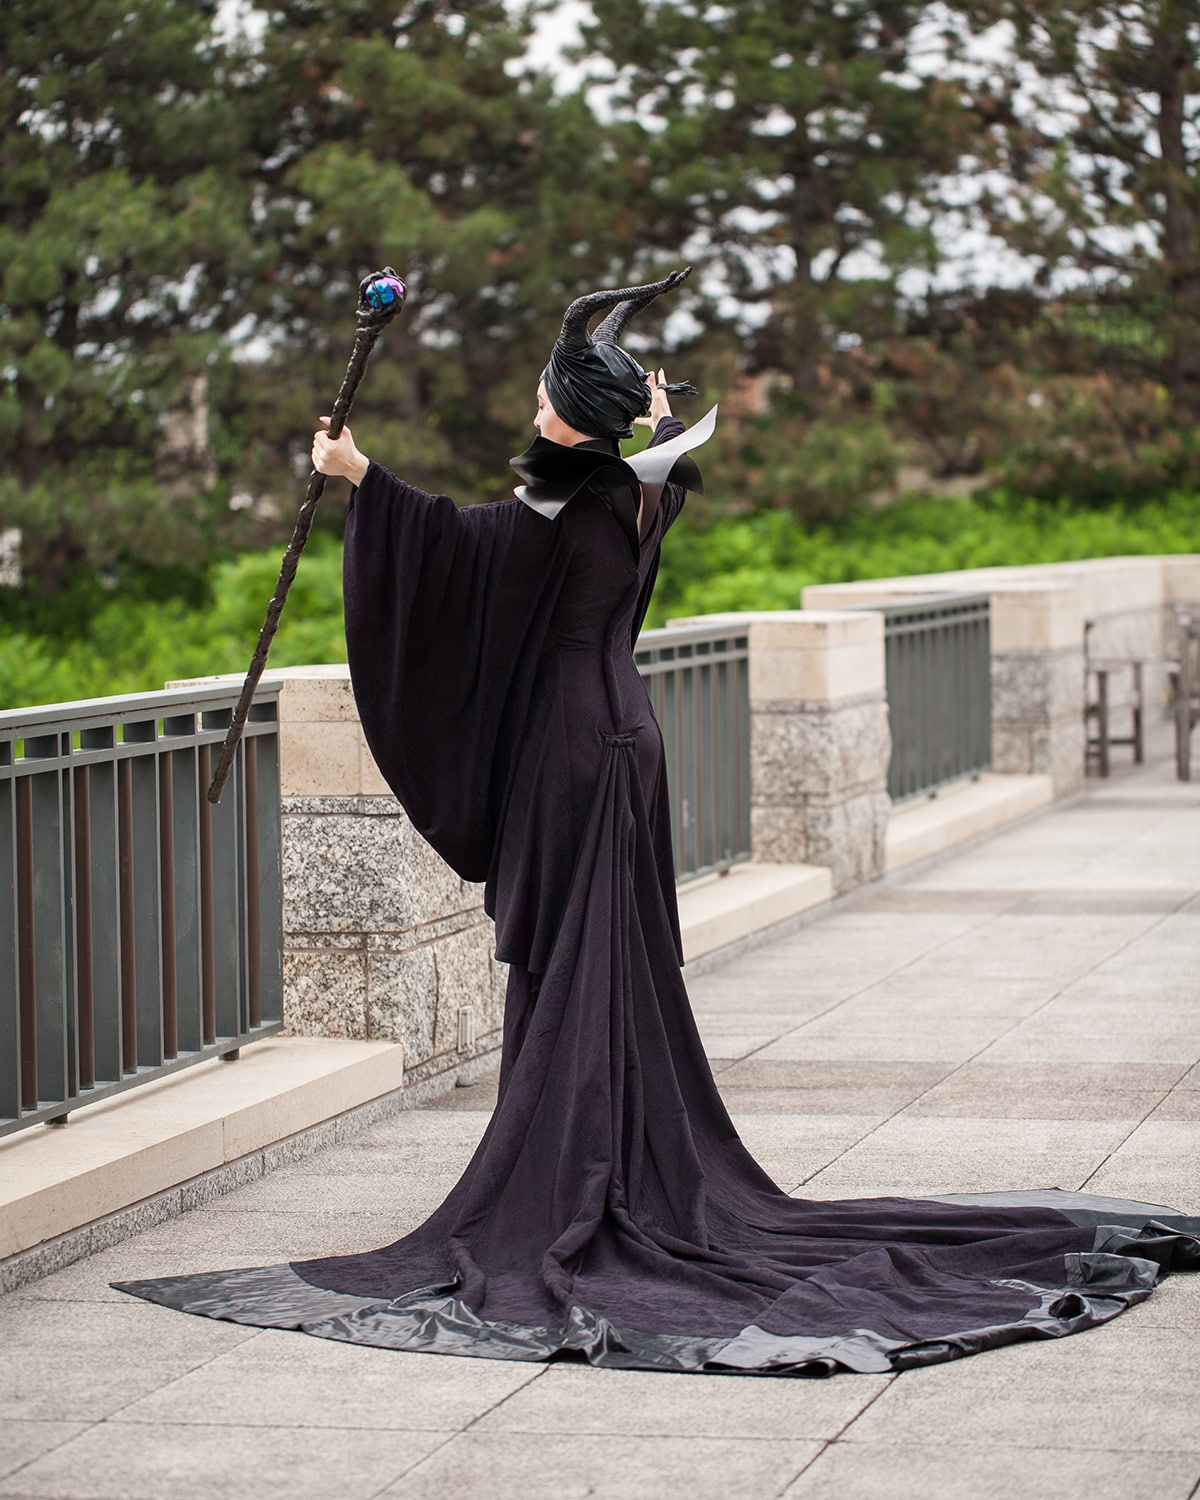
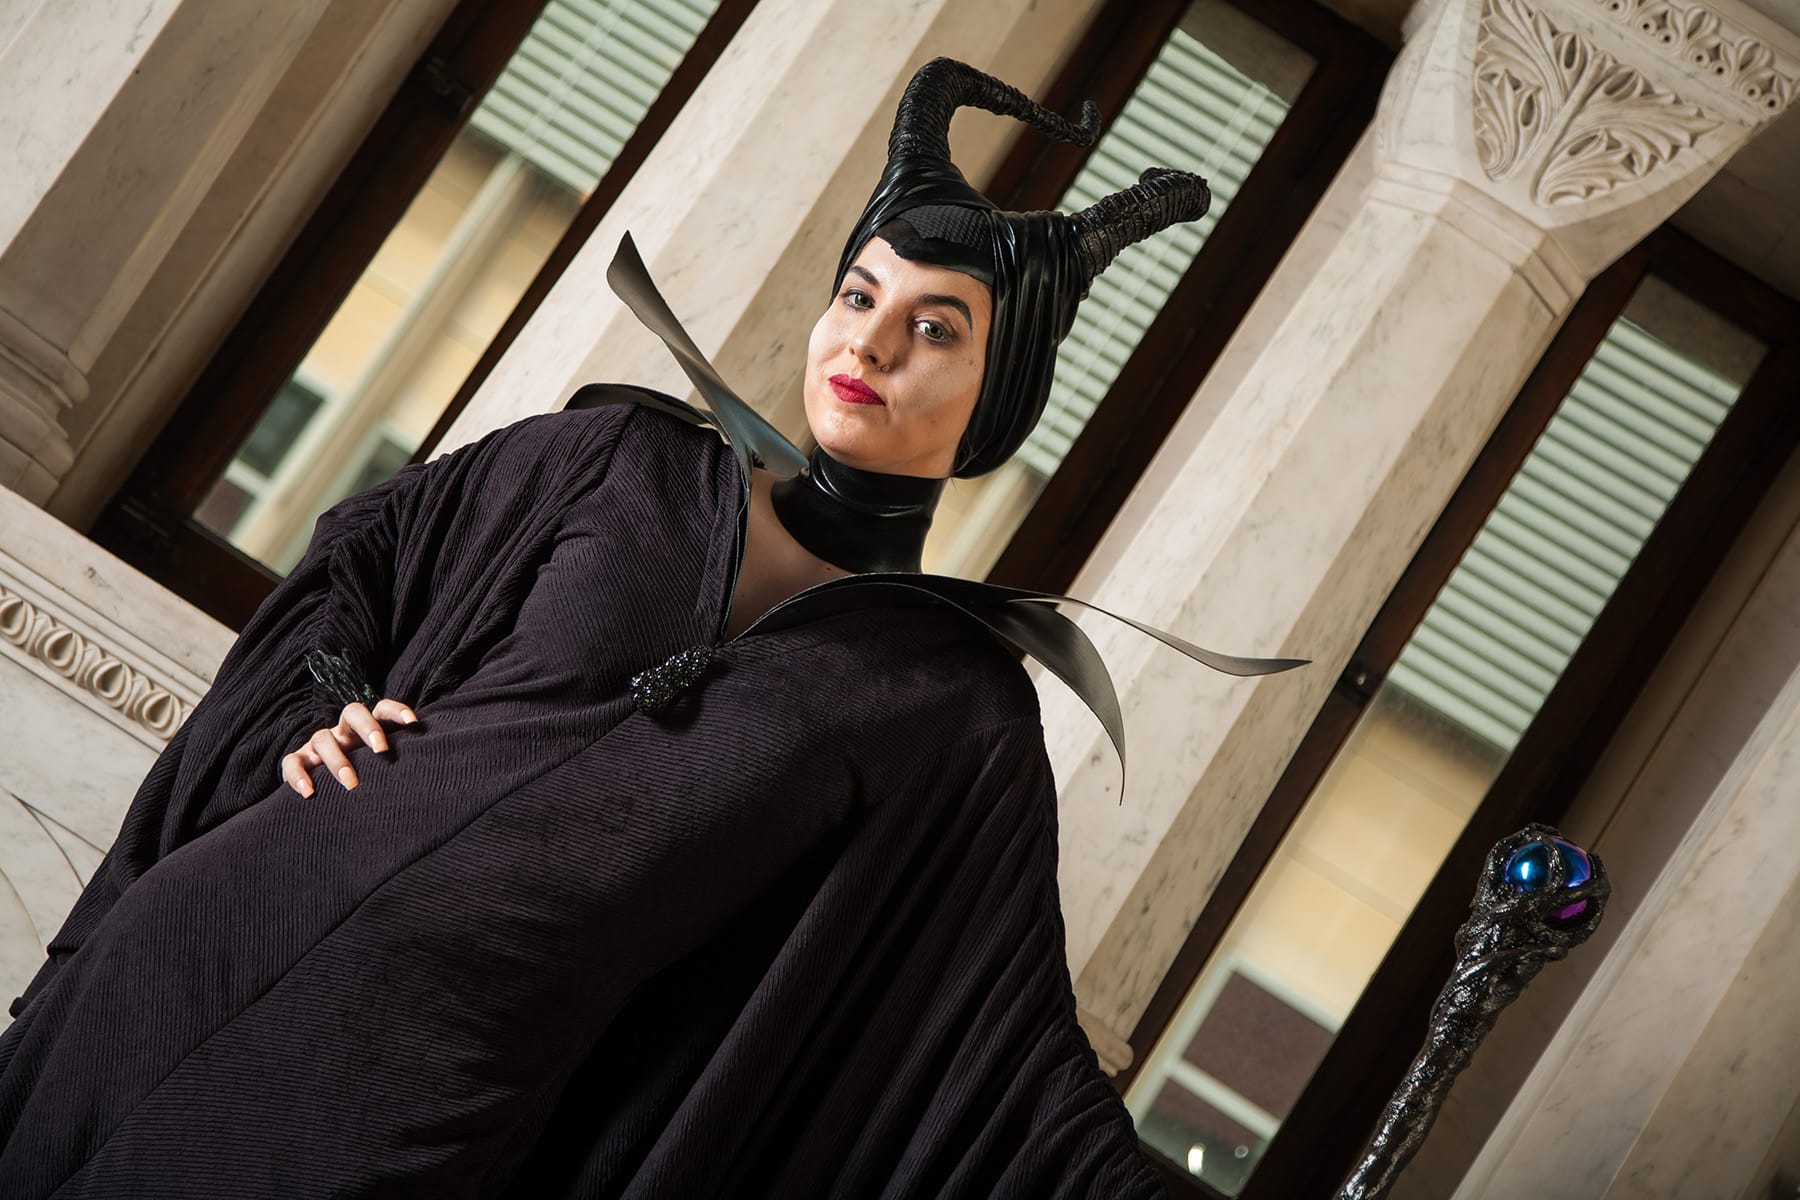
Maleficent Costume Photos
I’m very proud of this one, had to share the photos from our recent photoshoot:


For more photos from the shoot, click here.
Photography by Michael Porter, Celebration Generation LLC, all rights reserved. Feel free to share these by direct link, but please ASK if you would like to use the photos without a direct link here.
Entire Maleficent Movie Costume by me!
Makeup by Bill Hedrick
Model is Jo O'Hanley
More Cosplay Posts
Looking for more Cosplay tutorials and posts? Here are a few for you:
Cosplay Photography Tips
Katniss Wedding Gown Wings
How I Made the MCU Hela Costume
How to Add a Sole to Boot Covers
How to Make Basic Spandex Gloves
How to Make Fancy Spandex Gloves
How to Make Maleficent's Headpiece
How to Make Spandex Boot Covers
Maleficent Staff Tutorial
Poured Latex Smaug Top
Thranduil Crown Tutorial
Triceracop Costume
Weeping Angel Costume Tutorial
Share the Love!
Be sure to take some pics of your handiwork! If you post it to Bluesky, be sure to tag us - @SpandexSimplified.
Also, be sure to follow me on Pinterest, and subscribe to my Youtube Channel, so you never miss out on any of my nonsense.
Well, the published nonsense, anyway!


Superbe réalisation, merci pour le tuto!!!!