Bodyshirts are a popular costume option for male figure skaters: a garment that's a shirt with an attached brief. This shows how to make them.

Some of the most frequent questions I get - and have, since day one - have been about making figure skating shirts and costumes for male skaters.
There really aren’t even a lot of different patterns out there, much less actual resources.
So, today I’m writing the first in what will be a series of posts addressing figure skating costumes for men and boys.
I’ll eventually get to pants - both practice and competition - as well as one-piece suits, but today, I’m going to address body shirts.
Body shirts are one of the most popular options when it comes to men's figure skating outfits, and a very customizable costuming technique.
Let’s get to it!

A young boy's figure skating costume. The dress shirt is spandex, attached to the briefs - a body shirt.
What is a Bodyshirt?
Ever wondered how male figure skaters can tuck their shirts into their skating pants and NOT have them come untucked while competing, even throughout all kinds of contorted moves?
When that shirt isn’t getting untucked or twisting, it’s usually because they’re wearing a bodyshirt.
A body shirt is a figure skating garment - practice or competition - that consists of two main pieces:
Above the Waist
The shirt as you see it when wearing pants. This can be of any fabric - usually stretch, but that’s not required - in many different styles.
They can look like a T-shirt, or a button-down. Long sleeves or short, collared or not.
Some can be quite fitted, while others may be flowy.
Basically? They can look like anything you want them to.
Below the Waist
Below the waist is a specially designed (I’ll get to design in a bit) brief, which closes with snap fasteners.
This allows the skater to pull the shirt on over their head - regardless of style - without any zippers.
It also allows for easy access to use the washroom, without the need to completely disrobe - which can be important for both time and comfort reasons. Some rink washrooms are COLD!

My husband might enjoy his figure skating attire a little too much, LOL!
Bodyshirt FAQ
Why do male skaters wear body shirts?
When they’re looking for a “shirt and pants” look, the body shirt is an easy, convenient, and comfortable way to keep the costume where it’s supposed to sit, without twisting or lifting.
Think about the women’s bodysuits trend in the 90s, with the snaps in the crotch - same thing.
Where can I find a pattern for bodyshirts?
Jalie’s 2802 Bodyshirt Pattern is kind of a gold standard when it comes to making bodyshirts - though you may need to make some minor alterations.
Mind you, it’s basically the only one out there, so it’s gold standard by default!
That said, you can definitely use pretty much any top pattern you want. All you’ll need is a well-fitting brief/trunks pattern to attach it to!
Kwik-Sew 2881 (Out of print, check Ebay and etsy!) has a great pattern for trunks that can be altered (more on that in a bit) to have a snap closure.
It also has a decent pull-on turtleneck, short sleeve shirt that can be used for the top portion - with some alteration. (It’s far too long to use as-is)
What fabric do I use for making a body shirt?
When it comes to the top, you can use whatever fabric you like, just keep in mind that you’ll need it to move with the skater.
If it’s something billowy, you can feel free to use non-stretch fabric. For something tight, use a good 4-way stretch spandex.
Do you need to line a bodyshirt for figure skating?
The bottoms shouldn’t be lined - no one will see them. Too much bulk COULD result in the briefs being seen through the pants, though - so keep it thin!
As for lining the top, that’s going to depend on a few things:
- Temperature. If it’s for a cold rink/skater that can’t handle the cold, you can definitely line it for comfort!
- Outer fabric thickness: If the fabric is really thin, lining can help - both in terms of structure and opacity. Sometimes you find a gorgeous fabric that’s just a little too sheer, after all!
Additionally, there can be sensory issues to consider. If the wrong side of the outer fabric is itchy or unpleasant in any way, lining can be a great comfort.
Can I use a bodyshirt for other sports?
Yes! These are common for both artistic roller skating and various forms of Latin dance, jazz, etc.
I’ve used them for a few professional wrestler garments, too. Basically, anything really active, where you want the look of a tucked-in shirt.
Should I flip the elastic when making a bodyshirt?
This is a matter of preference. Personally, I like to flip them, as I think it looks more professional, and it’s also more comfortable on the skin.
However, with the fit of the skating pants I make - and the thickness of the fabric I use for them - I don’t have much worry of “VPL” (visible panty line!) showing through.
If the pants that will go over the body shirt are light in colour, thin fabric, and/or tight, I would recommend NOT flipping the elastic.
NOTE: You should decide whether or not you’ll be flipping the elastic before you cut your pattern out.
If you won’t be flipping it, remember to remove the fabric allowance from the leg openings of the pattern.
That is to say, trim the leg openings by the thickness of the elastic. If your elastic is ⅜" thick, cut back your leg openings by ⅜" all around. This is from the leg opening ONLY - leave the crotch seam alone!
Anyway, when you're assembling briefs and will not be flipping the elastic, you'll want to make a slight adjustment to my directions (a bit further down):
When flipping the ½" of the bottom edge, flip it towards the WRONG side of the fabric. Tuck the end of the elastic under the flipped fabric, and sew that elastic to the wrong side of the brief.

If you won't be flipping your elastic, be sure to remove the elastic allowance from your pattern, as shown here. The red line is your new cut line, the grey area represents the width of the elastic.
What Colour Should I Make the Trunks?
Generally speaking, I’ll match them to the pants - but the vast majority of boy’s skating pants I make are black, so that’s an easy choice.
In some cases, you may want to match the briefs to match the top of the shirt - especially if the top is made from spandex. As long as it’s not a heavy spandex or darker than the pants, this is a perfectly reasonable option as well.
If you are making this bodyshirt to go under lightly coloured pants that aren’t super thick, it’s best to match it to the skater’s skin tone.
You know how white bras will show from under a white tshirt, but skin tone bras will not? Same concept.
Can I use a ready-to-wear shirt for figure skating?
You can! See towards the bottom of this post for the section dealing with that.

How to Make Bodyshirts for Male Figure Skaters
I’ll be using Jalie’s 2802 Bodyshirt pattern - altered for my husband’s size and fit preferences - to do a walk through on making a basic body shirt.
As the fabric for this was not only thin, it had a white background, I used lining. As mentioned earlier, you don’t need to line body shirts as a general rule - just if the circumstances make sense to!
This is for a t-shirt style. If you’re doing a different style shirt, just make the shirt part first, and pick this up when I get to the briefs - it’ll be the same from there.
Materials for Making A Body Shirt
Pattern (I used Jalie’s 2802 Bodyshirt Pattern)
Spandex for top and briefs.
Lining (optional)
Thread for sewing machine (and serger, if using)
Elastic - I use ⅜" Braided White Elastic.
Halo / “Open Ring” Snaps*

This is the brand I can usually find near me.
Equipment for Making a Body Shirt
Scissors (I love Fiskar scissors)
Sewing machine
Serger (Optional)
Thick chunk of wood*
Rubber mallet*
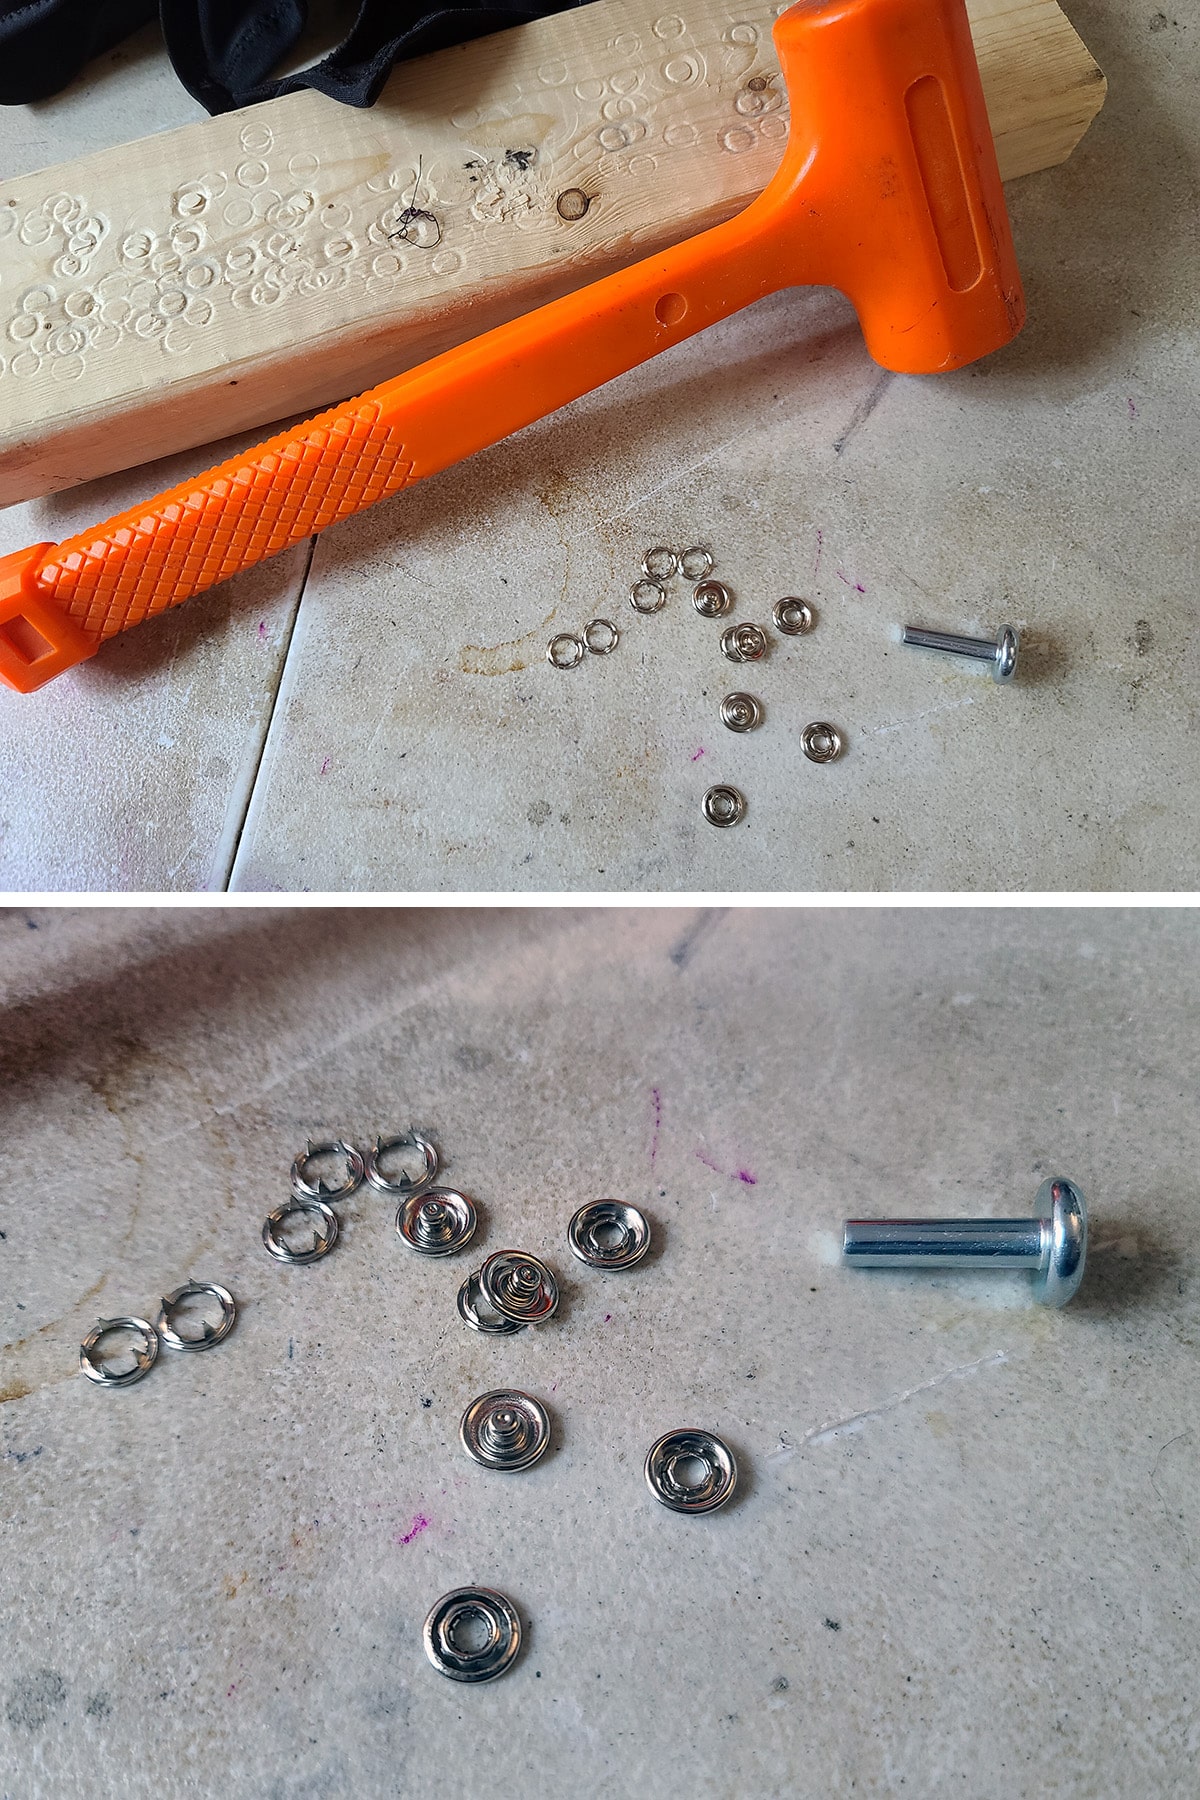
The chunk of wood protects your work surface, while also providing a stable surface to hit your fastener over!
* If you haven’t used halo snaps before, make sure that the package you get includes the applicator tool - you usually can buy them with or without (refills).
Also, while I’ve never used one before, there IS the option of buying a specialty tool to apply ring snaps.
As I haven’t used one, I don’t have any tips or feedback on how well they work - I just wanted to mention that it exists as a possibility!
If you use a specialty tool like this, I’m pretty sure you won’t need the mallet or wood, though.
Make the Shirt
How you do this is going to vary wildly based on what your shirt is, or if you’re even making one!
For a basic t-shirt skating outfit, as shown:
Get the Collar On
- Sew the shoulder seams.
- With the right sides together, fold the collar in half, stitch the two short ends together.
- Flip the collar such that the right side is facing outward, with the long edges touching each other.
- Optionally: zig-zag or use a very narrow serger seam to sew the long edges of the collar together. This makes for easier handling when applying the collar to the shirt body.
- Fold the collar so the short side seam (center back) is on one end. Place a pin in the far end - this is how you find the center front. Do the same for the center back of the shirt body.
- Find the center front of the shirt - folding it so the shoulder seams and side seams meet is a quick way to do this. Mark that spot on the neck opening.
- Pin the center front of the collar to the center front of the shirt body, and the center back seam of the collar to the center back of the shirt opening.
If one side of your collar is nicer, pin it such that that side is facing DOWN, against the right side of the shirt.
- Sew the collar to the body, stretching the collar to meet the body, and stretching the collar/body together as you go. (See my How to Sew Spandex post for more details!).

Assemble the Shirt
- Sew the sleeves to the shirt body along the shoulder openings.
- With right sides together, sew the side seams of the shirt, from the bottom of the body to the end of the sleeve.
- Hem the edge of the sleeves, set the shirt aside.

I hemmed the sleeves AFTER taking these pics and didn't realize til now!
Make the Briefs
Sew the Briefs
- With right sides together, sew the side seams of the briefs.
- I like to serge the bottom edge of each piece - NOT together - just to give it a nice finish. You can zig-zag (NOT stretching!) or leave it raw if you prefer.
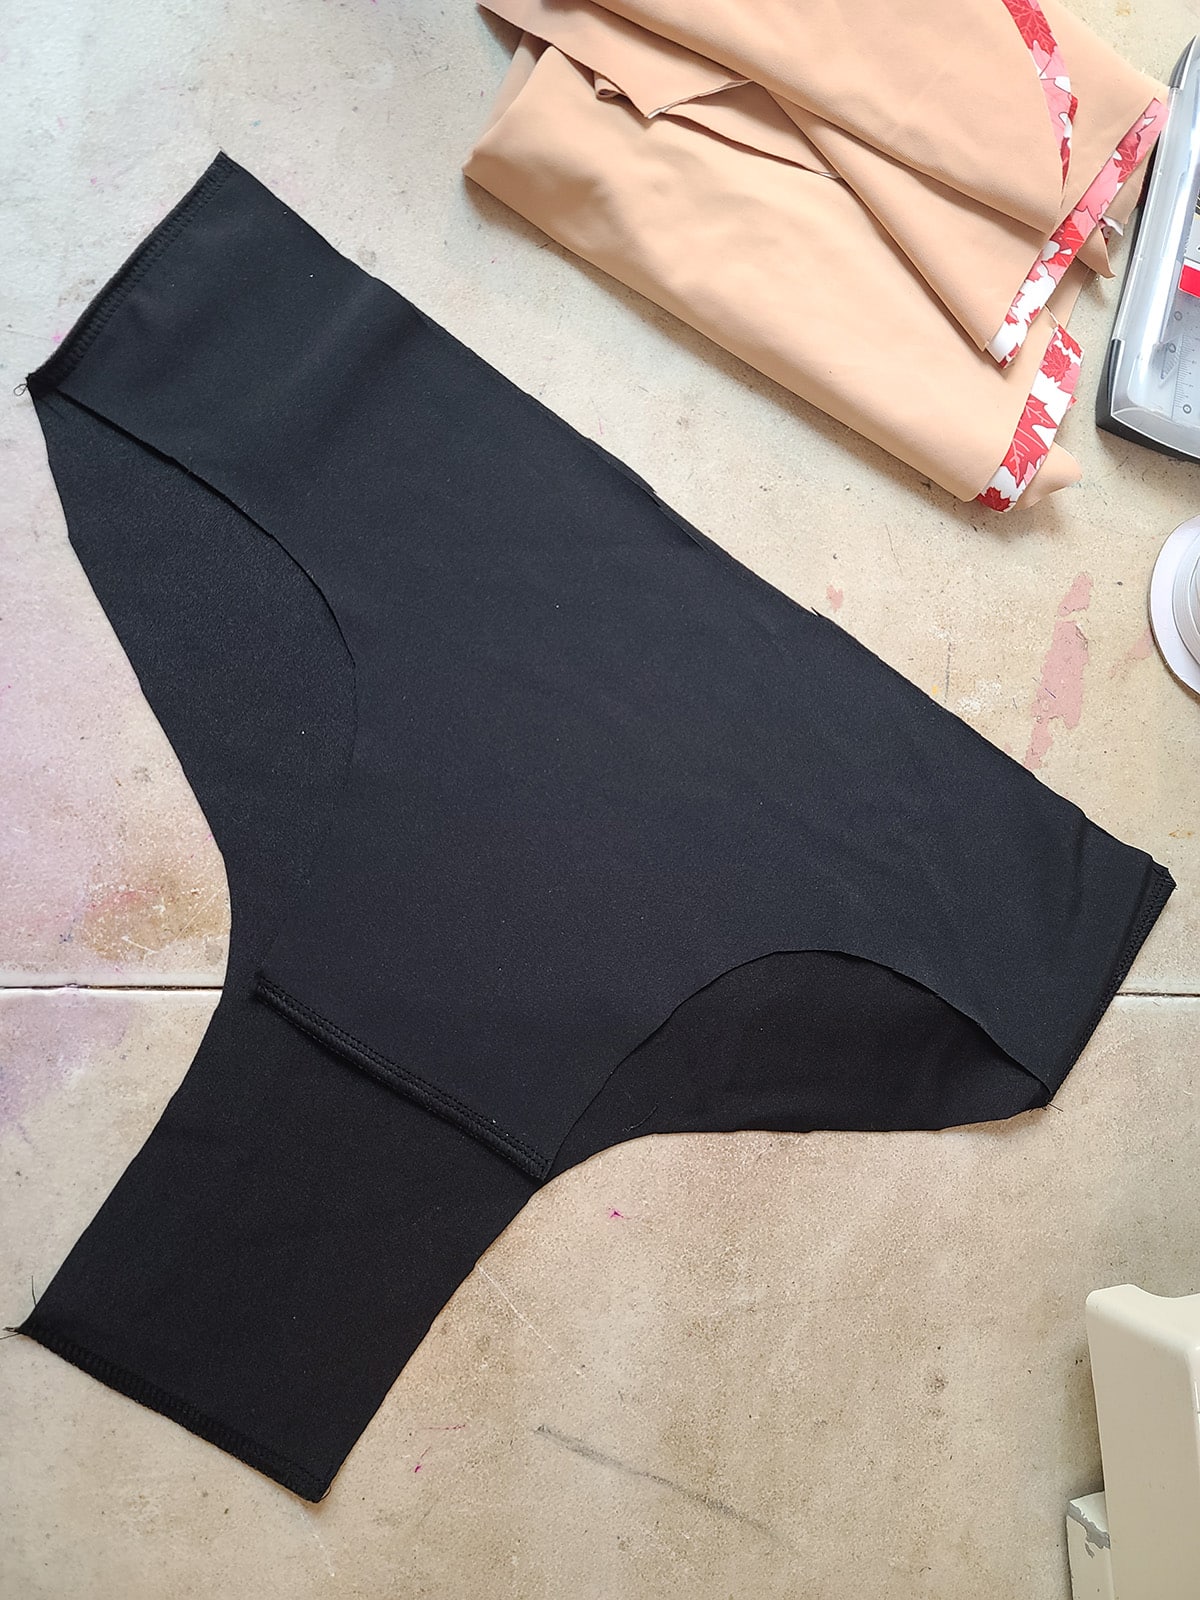
- I like to measure elastic myself. I lay the brief pieces flat and measure elastic straight from one bottom edge to the side seam, and from the size seam straight across to the second bottom edge, as shown.
Then I cut 2 elastics this length.

- Fold ½-3/4" of the bottom edge towards the right side of the brief (right side touching right side).
Note: If you are using a very flimsy fabric for the briefs, you may want to reinforce the bottom ½" of the briefs with some iron-on seam tape, or a thicker fabric.
While the halo snaps work just fine without reinforcement on normal weight lycras, they can pull out of weaker/thinner fabrics.
Leg Elastic Application
- With that fold tucked under, apply elastic to the WRONG side of the brief.
I start it out with no stretching for the first 1", then measure the elastic straight across the leg opening (as shown previously), holding the elastic at the side seam, and stretching both elastic and fabric together as I stitch to the side seam.
Then I hold 1" from the end of the elastic against the wrong side of the brief, 1" away from the end of the leg hole I’m sewing, ensuring no twisting.
Once again, stretching both elastic and brief together until I get to the 1.5" point.
- Fold ½" of the remaining brief under, so that the right side edge is against the right side of the brief, continue sewing that last 1" to the folded bottom edge of the brief, with no stretch.
- If any elastic is hanging over the edge - extending beyond the fold - I trim it back at this point.

- Repeat elastic application on the other leg opening.
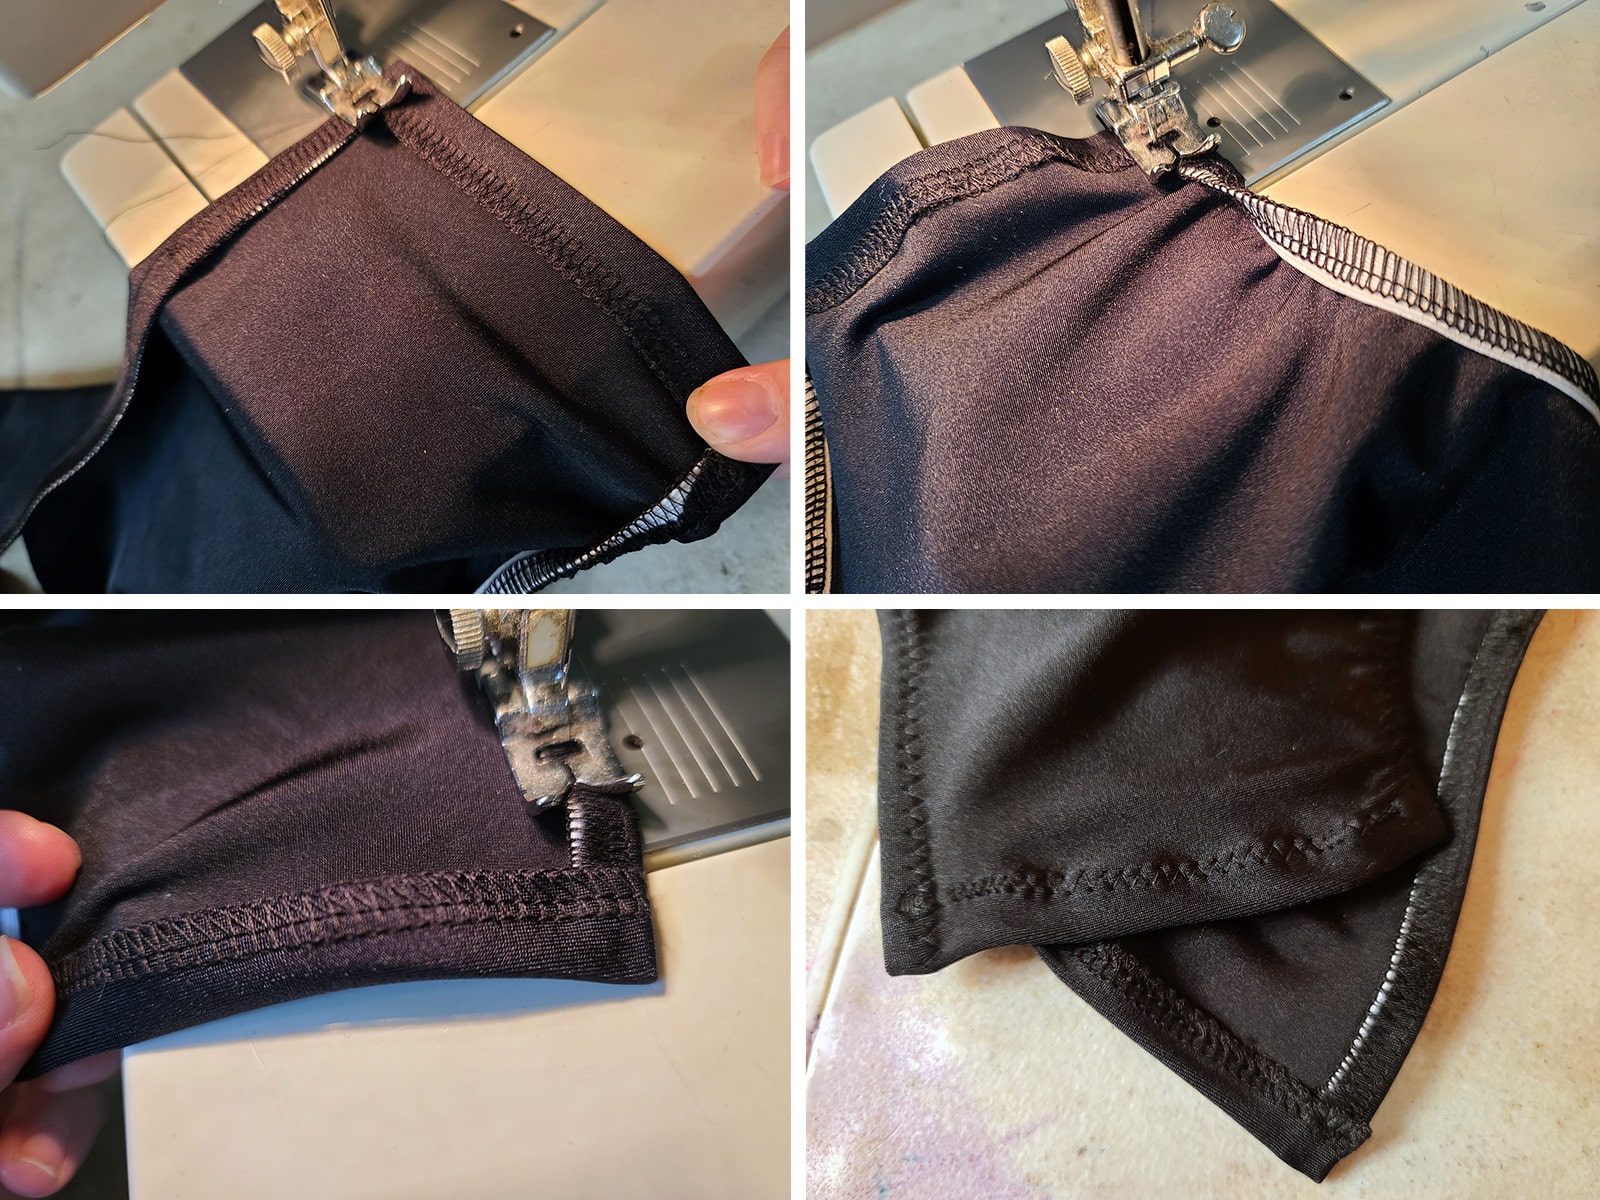
- Once both leg elastics are applied, flip both bottom edges of the brief so the wrong side of the flap is facing the wrong side of the brief, enclosing the edge of the elastic, as shown:

Finishing the Leg Edge
- Starting across one of the bottom edges, hold the folded section in place, stretching slightly to flatten/even everything out.
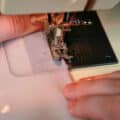
- Using a medium-wide zig-zag, stitch across the raw/finished edge, ending at the leg elastic on the other side.
- Drop your needle, turn the brief, and stitch down the elastic all the way along that leg opening, ending at the second bottom edge.
- Drop the needle, turn the brief. As with the first edge, hold the folded section in place, stretching slightly to flatten/even everything out.
- Stitch across the raw or finished edge, ending at the beginning of the second leg opening.
- Drop the needle, turn the garment, and stitch the elastic down all the way along the second leg opening, ending at your starting point.
- Stitch back and forth a few times, remove from the sewing machine, and trim your thread ends.
Sew the Shirt to the Brief
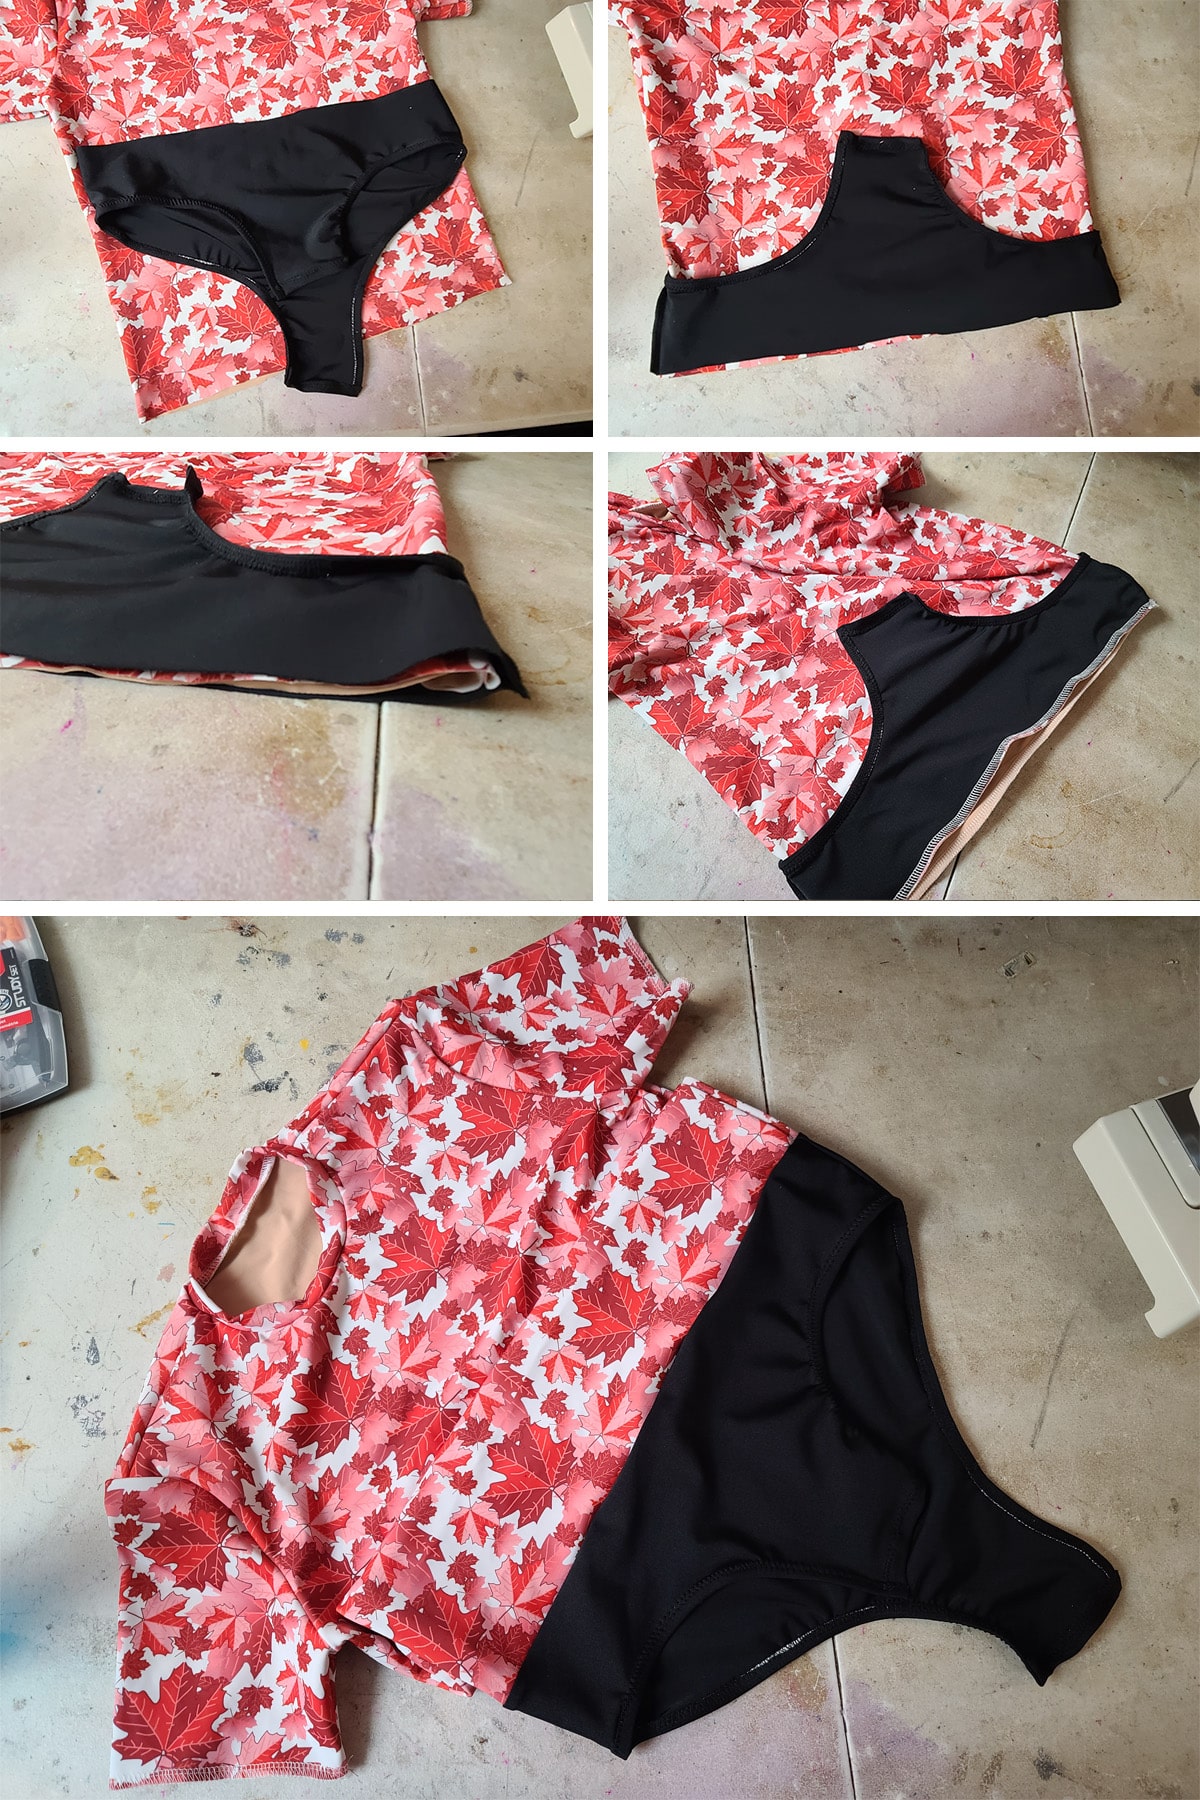
At this point, you should have a finished shirt part with a raw edge at the bottom, and a finished brief with a raw edge at the top.
- With the right side of your shirt facing out and the right side of the brief facing IN, place the briefs around the shirt, matching the raw edges together.
VERY IMPORTANT: Make sure that the front side of the brief (the shorter one) is facing the front of the shirt (the side with the lower neckline, in this case), and the back side of the brief (longer) is against the back of the shirt.
- Lining up the side seams - pin if you need - stitch the brief to the shirt around the entire raw edge (waist seam), stretching together as you go.
- Trim your threads at the end, flip the brief down so the right sides of both top and bottom are facing out. Double-check that your fronts are attached to each other, and that you didn't sew the briefs on backward!
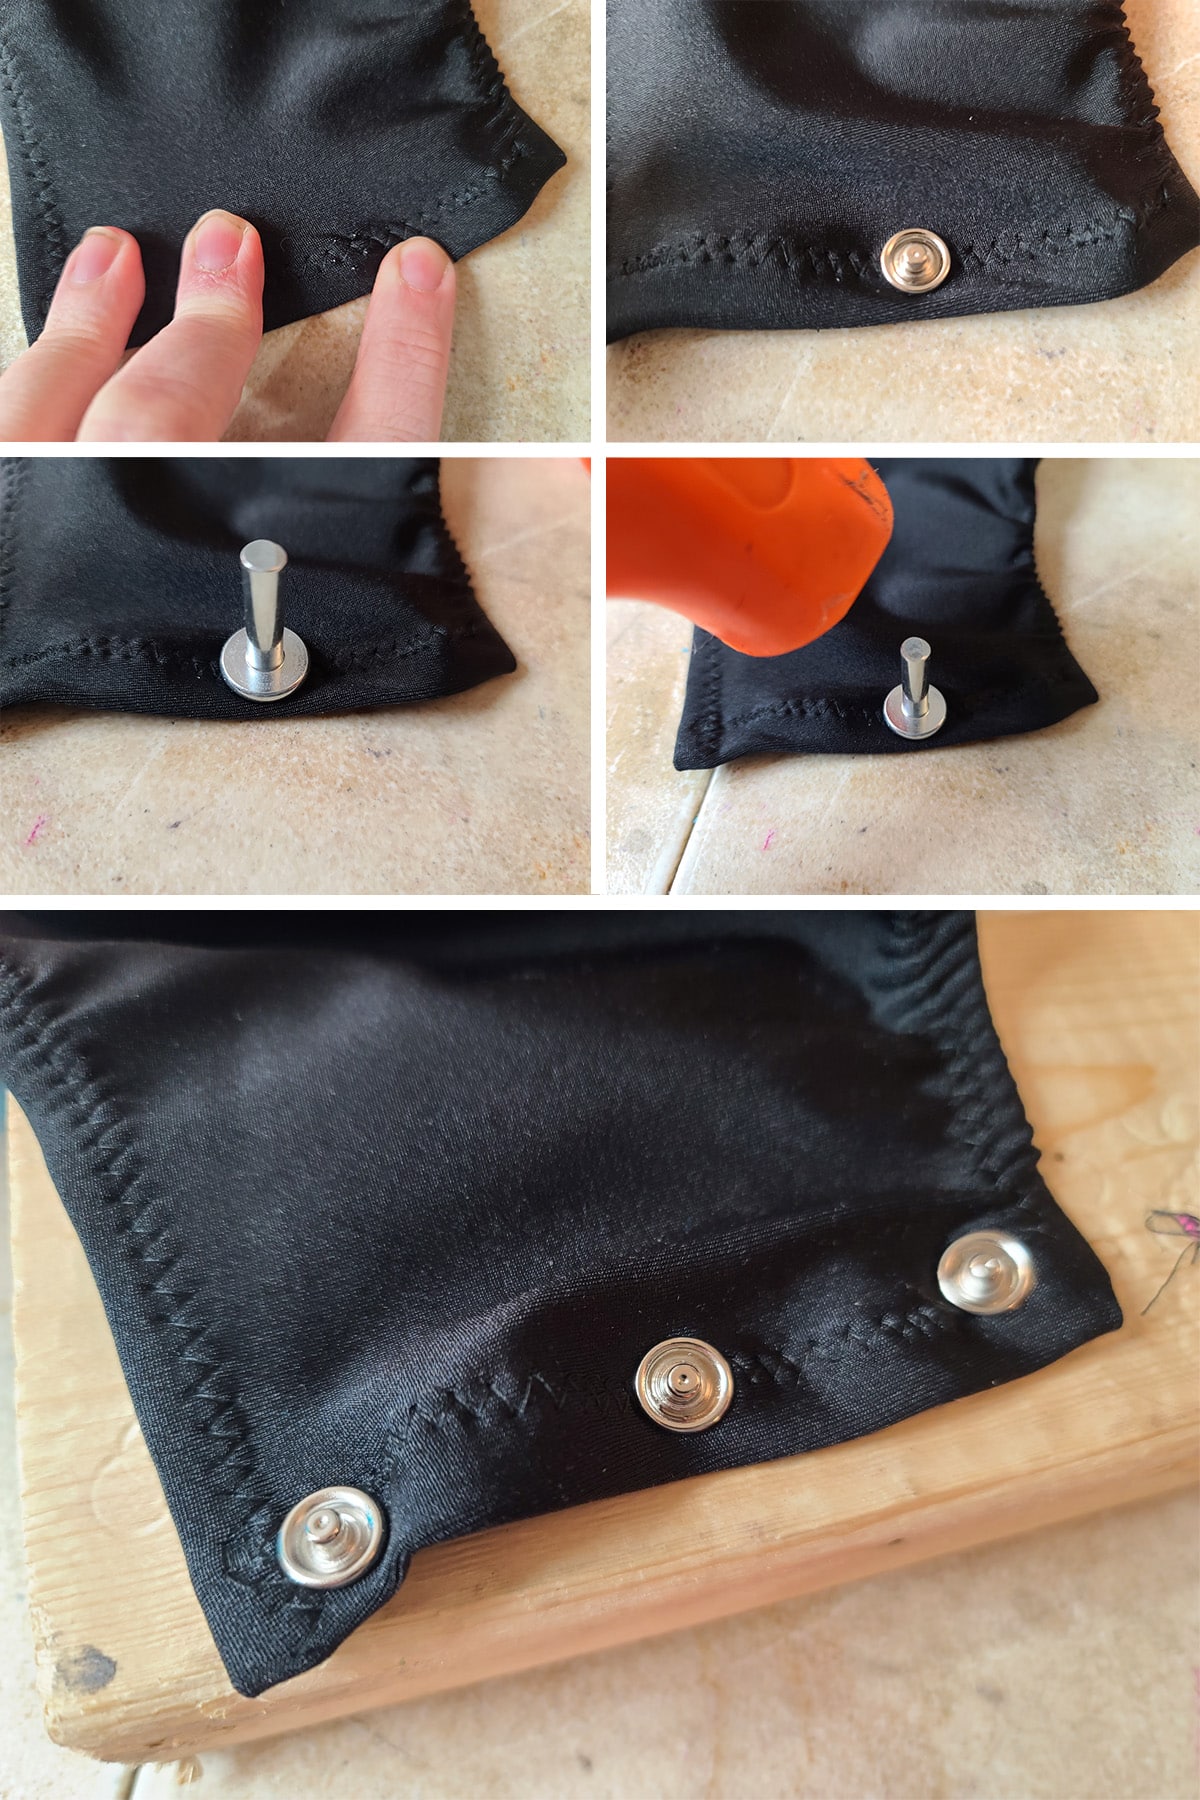
How to Install the Open Ring / Halo Snaps
Before getting started with actually installing, it's good to count and sort your pieces. I generally use 3 sets of snaps - you can use as many as you want, though.
For 3 snaps, you'll need 12 pieces:
6 of the "prong" type pieces.
3 of the "male" / post-type pieces.
3 of the remaining pieces - like a doughnut shape.
Separate them into 2 groups - the post pieces with 3 of the prong settings in one pile, and the remaining pieces in the other. Set the "post" group aside, so you don't get them mixed up.
Installing the "Doughnut" Side
First of all, identify which side of the snaps will be going face down onto the prongs:

- With the WRONG side of the BACK brief facing up, locate the center of the bottom seam. Position it to be centered over your piece of wood.
- Stretching the brief slightly, position a prong setting behind it - so coming up from the RIGHT side of the back brief piece.
- Poke the brings through the fabric, so they are visible on the wrong side, as shown.
- Position a “doughnut” piece over the prongs, ensuring that they are centered properly, and all of the prongs are lined up with the receptacle/channel.
- Careful to avoid moving anything, position the snap tool over the doughnut piece, firmly whack it a few times with the rubber mallet. Aim to hit it straight down.

- Check your application, making sure there are no prongs outside of where they were supposed to go. If you missed any, gently remove the assembly (I use pliers, CAREFULLY), and start again.
- If it’s good, repeat two other times, just inside the elastic application on either side of it.

Installing the "Post" Side
- With the RIGHT side of the FRONT brief facing up, locate the center of the bottom seam. Position it to be centered over your piece of wood.
- Stretching the brief slightly, position a prong setting behind it - so coming up from the WRONG side of the front brief piece.
- Poke the brings through the fabric, so they are visible on the right side, as shown.
- Position a “post” piece over the prongs, ensuring that they are centered properly, and all of the prongs are lined up with the receptacle/channel.
- Careful to avoid moving anything, position the snap tool over the post piece, firmly whack it a few times with the rubber mallet. Aim to hit it straight down.
- Check your application, making sure there are no prongs outside of where they were supposed to go. If you missed any, gently remove the assembly, and start again.
- If it’s good, repeat two other times, just inside the elastic application on either side of it.
Test the connections to make sure everything was put on the appropriate sides / places.
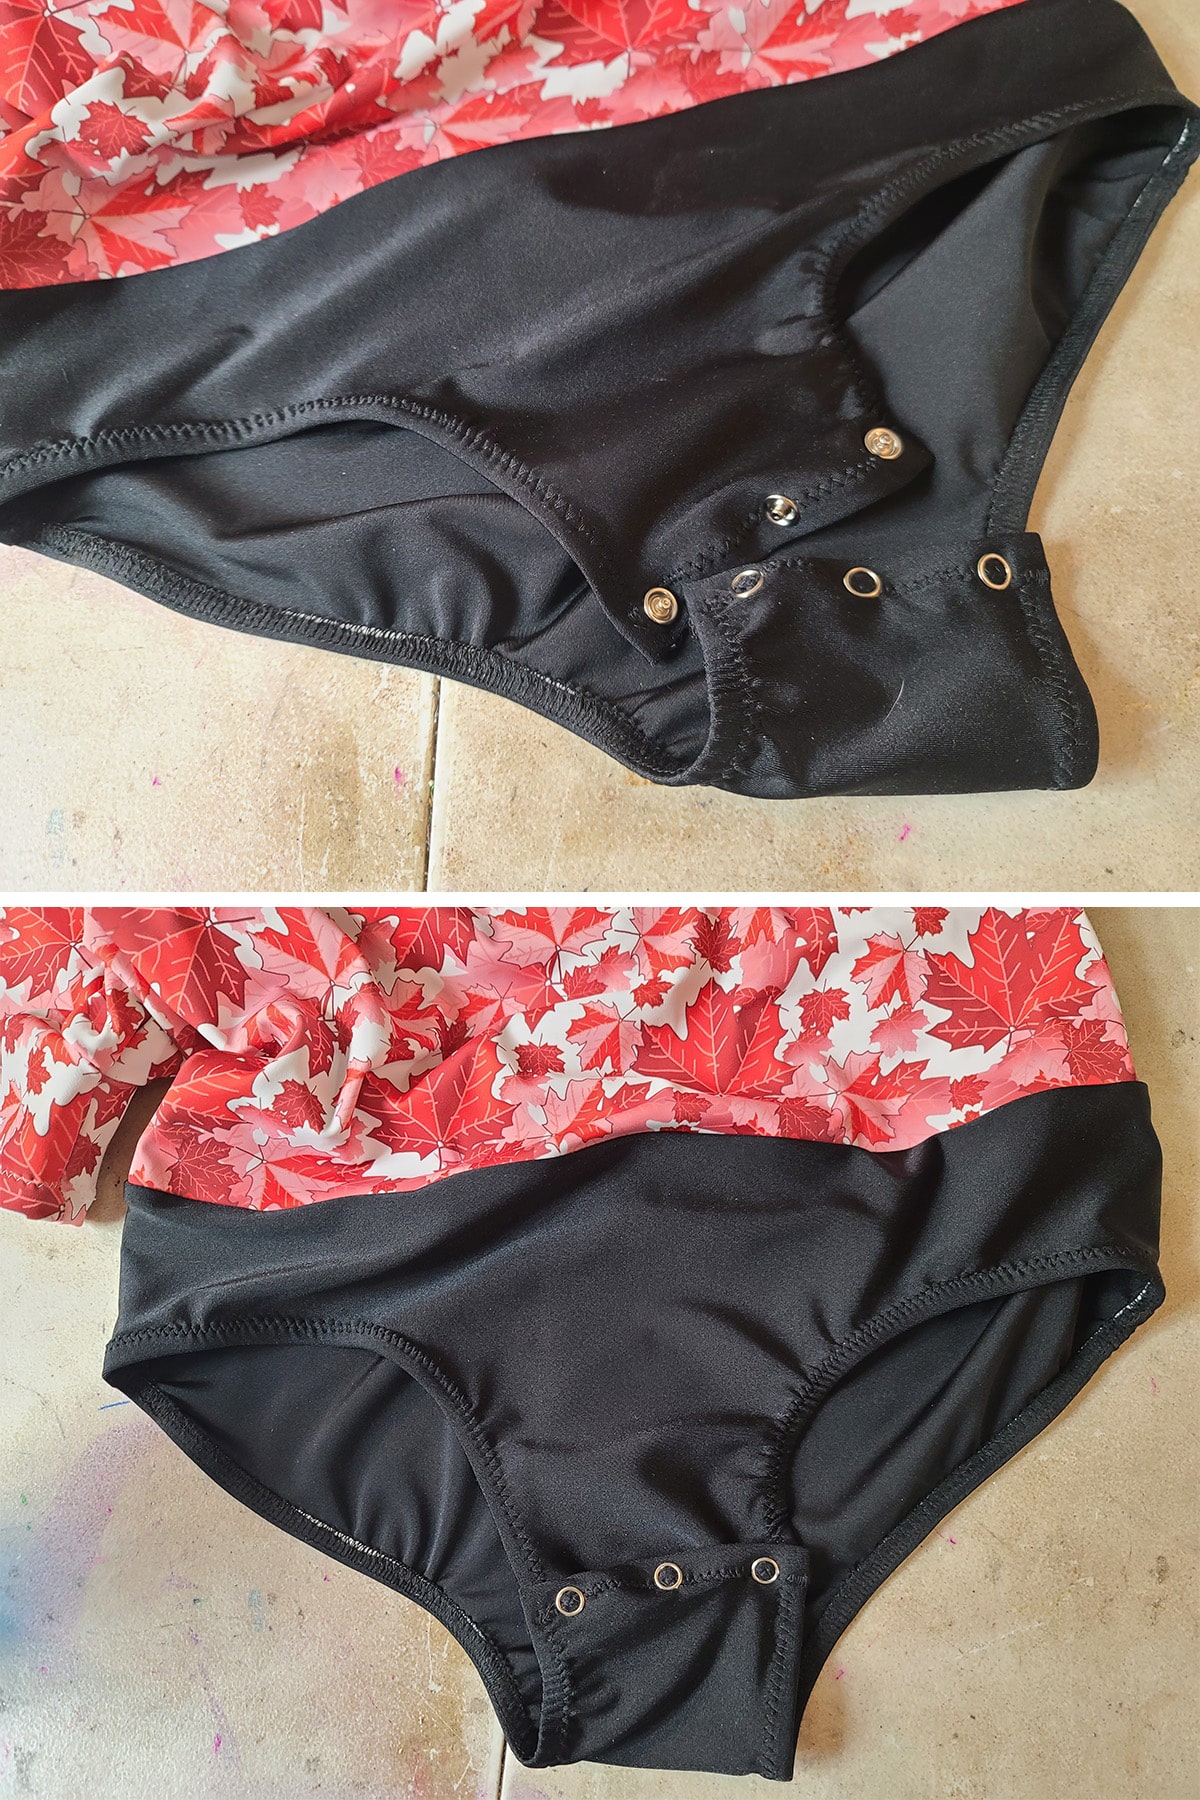
Aaaaaand you're done!

Wearing A Bodyshirt
If you're wearing a dance belt, put that on first. If not, you can wear underwear under the bodyshirt, if you want.
Put the body shirt on, pull the back snaps up over the front of the briefs, snapping the two pieces together.
Put your skating pants on over it.
Done!
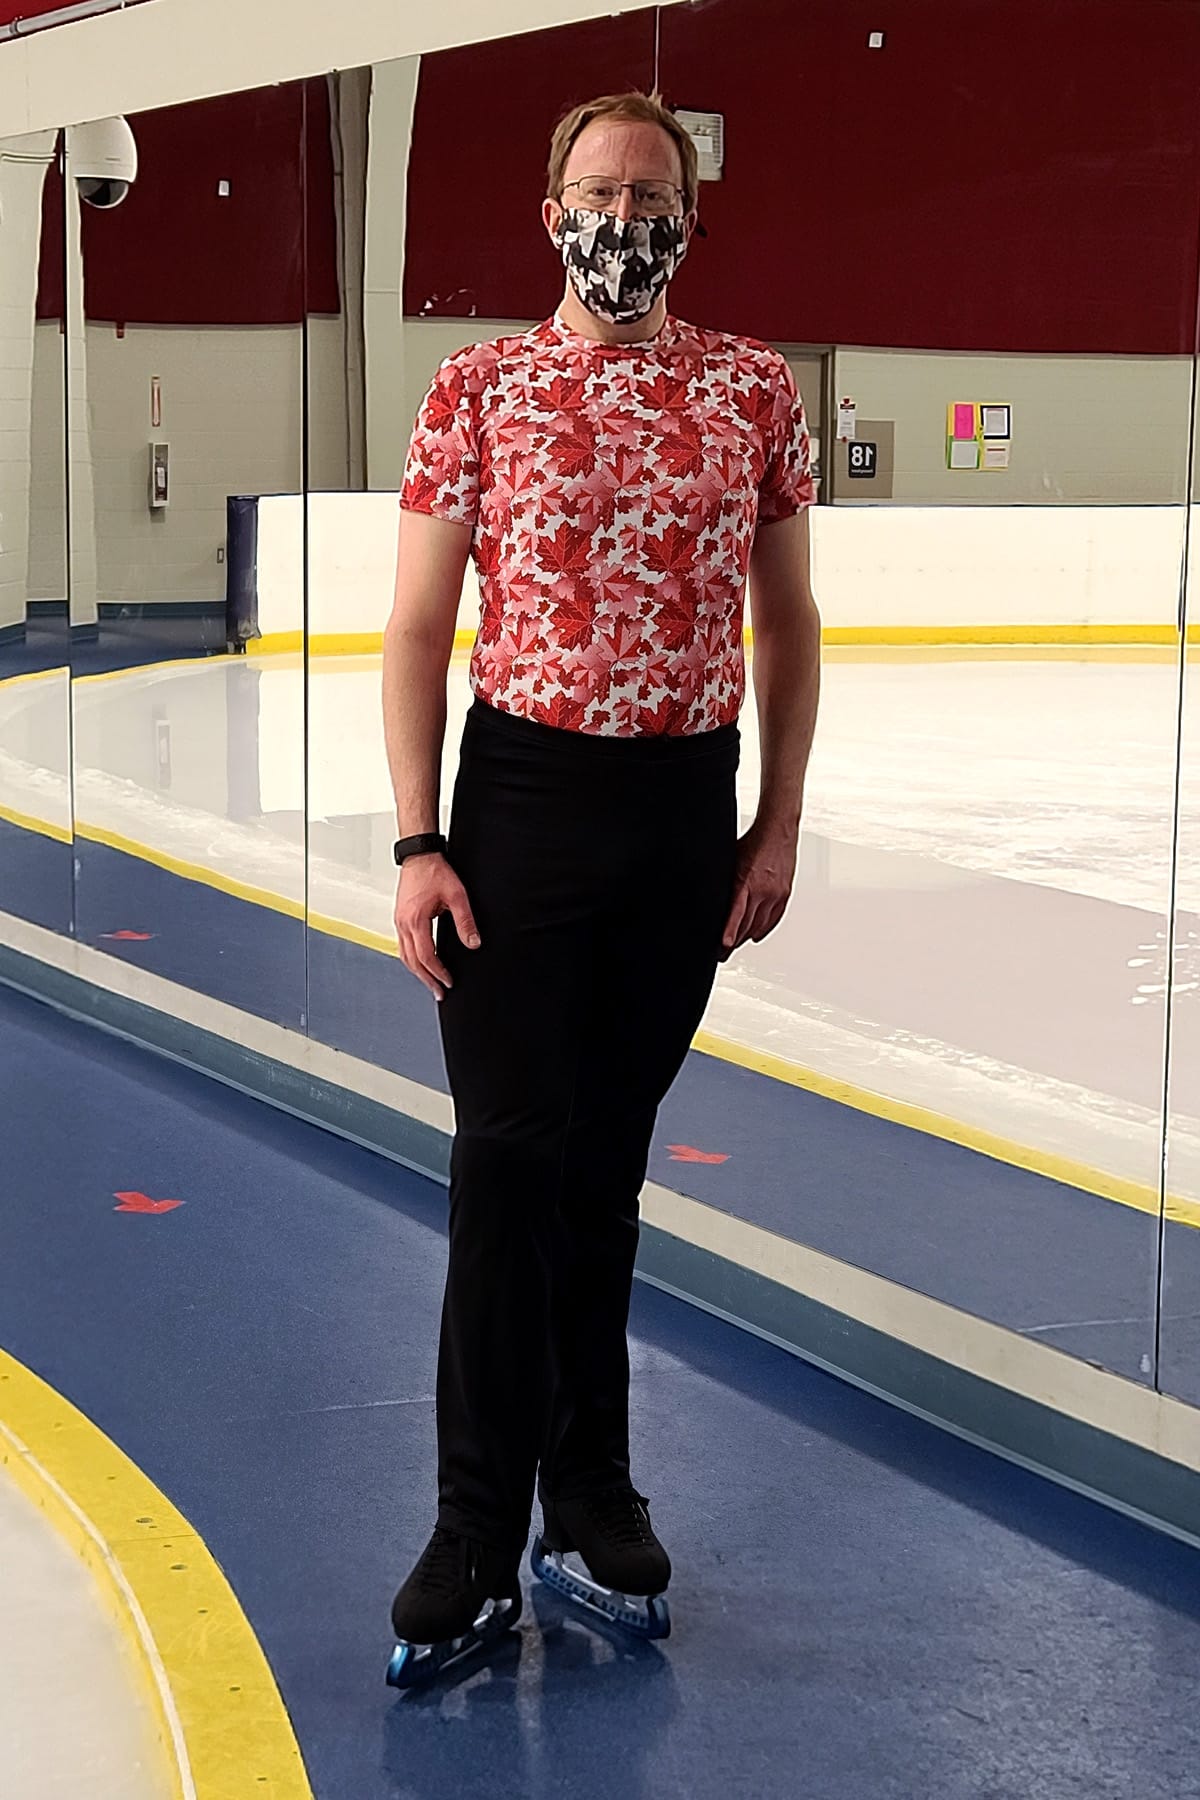
Says my husband:
"I love these for skating. They're super comfortable, and it's nice not having to worry about a shirt being untucked or moving around at all. It feels more ... official?... than just wearing a random t-shirt. Gives me confidence!"
How to Alter A Briefs Pattern for Snaps
Have a great ready-made shirt to use - or a pattern for one - but your briefs pattern doesn’t involve snaps? Here’s the workaround.
First off, have a well-fitting briefs pattern.
I like Kwik-Sew 2881. It’s out of print, but there are definitely copies out there if you search the web!
As an alternative, you can trace a favourite pair of underwear or swim trunks, as long as they’re well-fitting (ie: not at all baggy). You want them to come up to just under the waist.
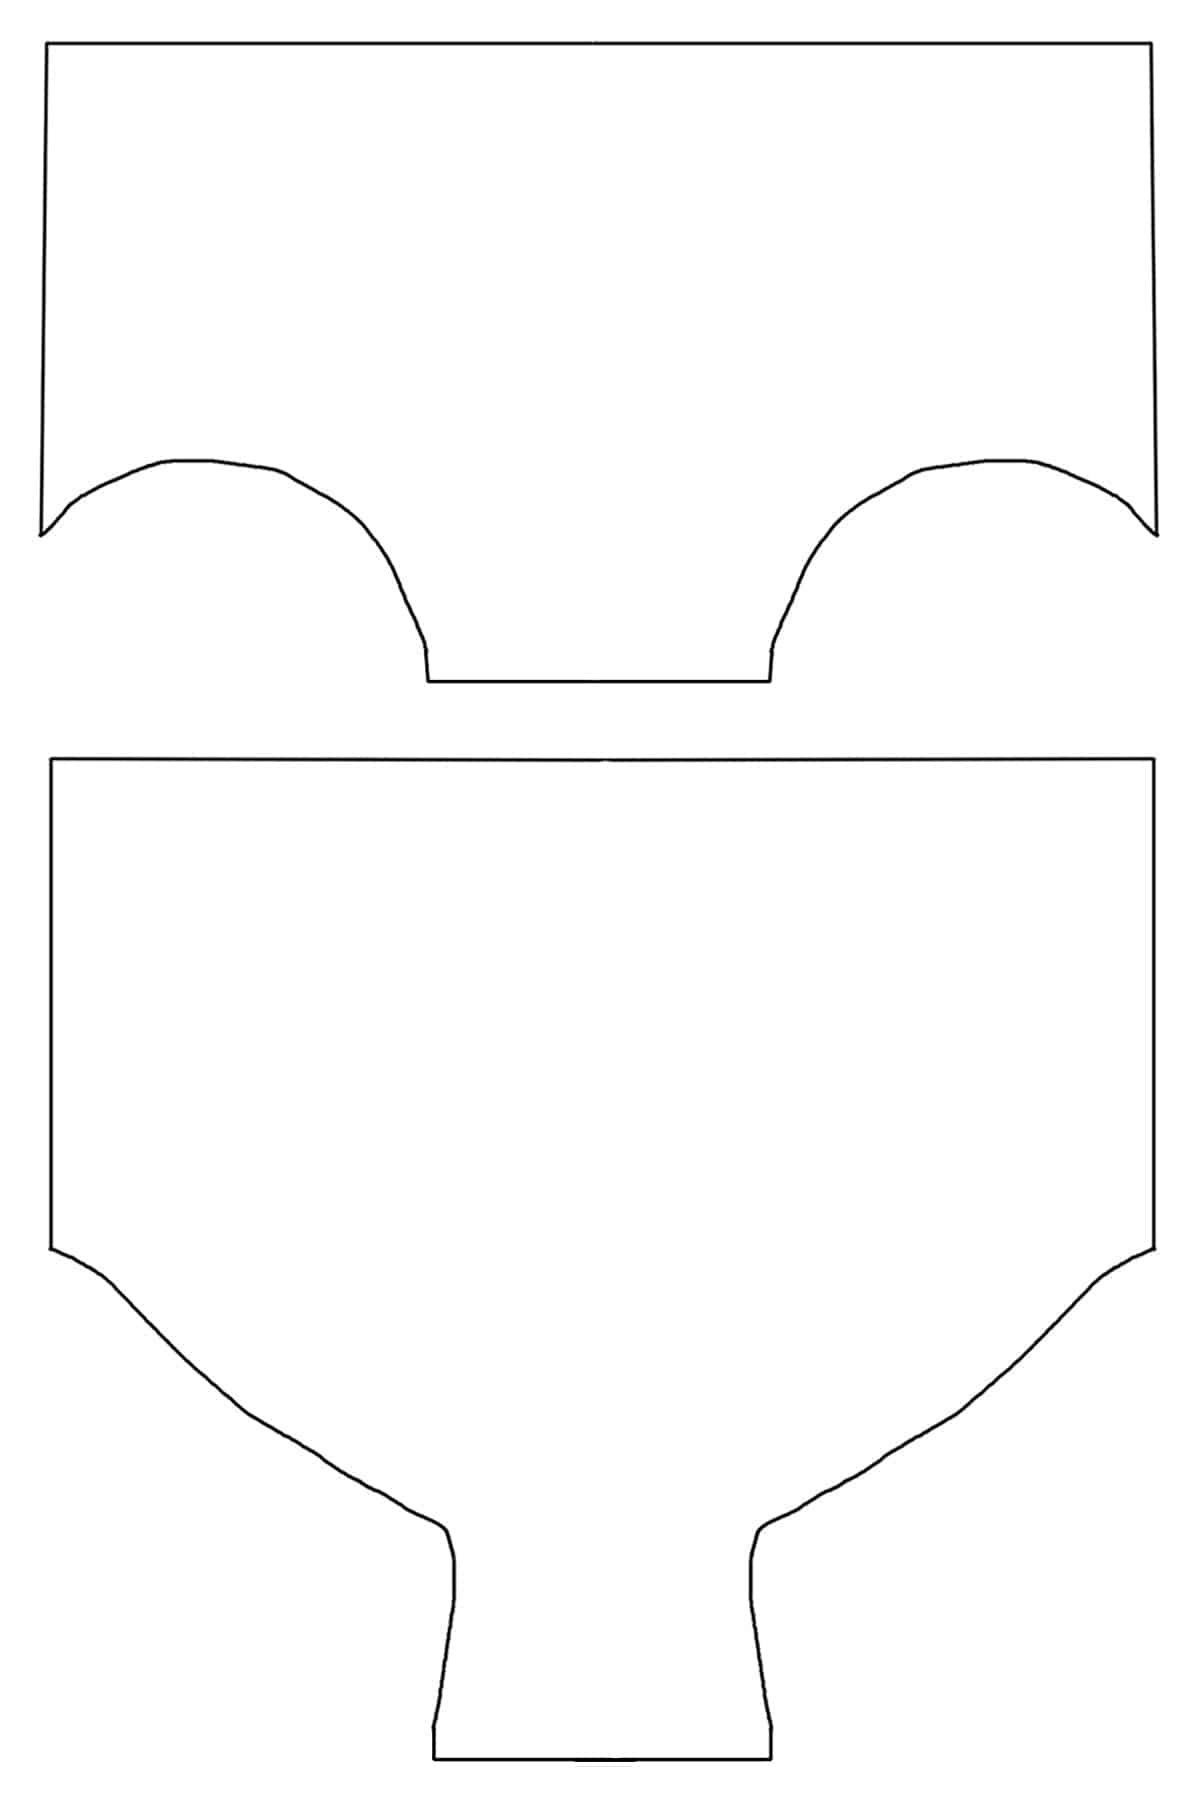
For the purposes of diagramming, I’m assuming you have a pattern that is already known to fit, and is a “cut on the fold” style.
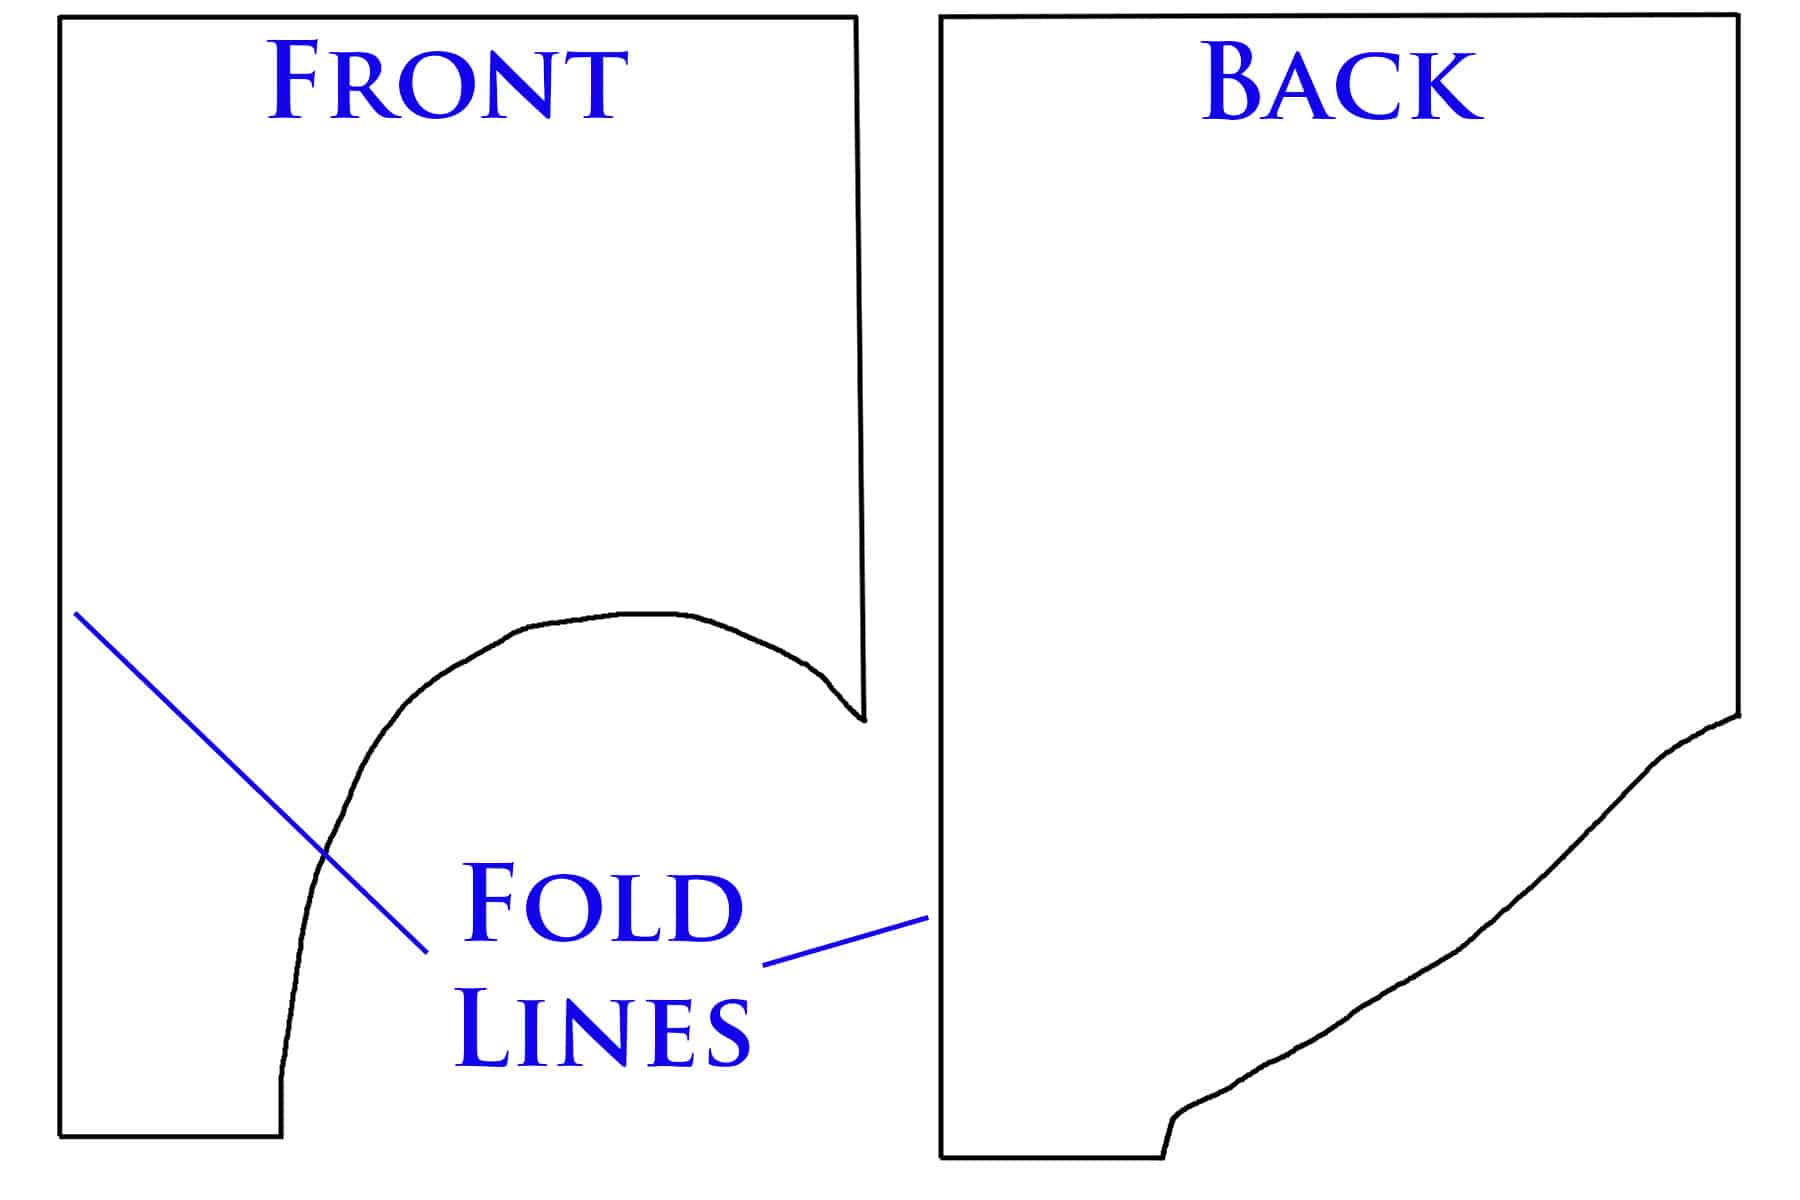
A basic trunks pattern.
The idea is to elongate the back of the crotch, to make it easier to snap - so it can pull under / forward and be snapped towards the front of the body.
- Lay your pattern pieces out as shown, to keep track of what is going where.
- A few inches from the bottom edge of the front (this will depend on the size of the wearer, and the style of the pattern), mark a line that’s perpendicular to the center fold, as shown.
Ideally, you want this to start around the point the leg hole starts to curve out to the side seam, but really... do what makes sense for your pattern.
- Cut along the line you just drew, moving that bottom section over to the back brief pattern.
- Lining the center fold edge/line up, tape this little section onto the back piece, as shown. The former-bottom edge of the front should be taped right to the bottom edge of the back piece.

- Lay these pieces out on a fresh piece of paper (I like to use exam table paper for patterning.
- Draw an extension of each pattern, ending ½" away from the new bottom edge of the piece, as shown. This will be the allowance for the flap.
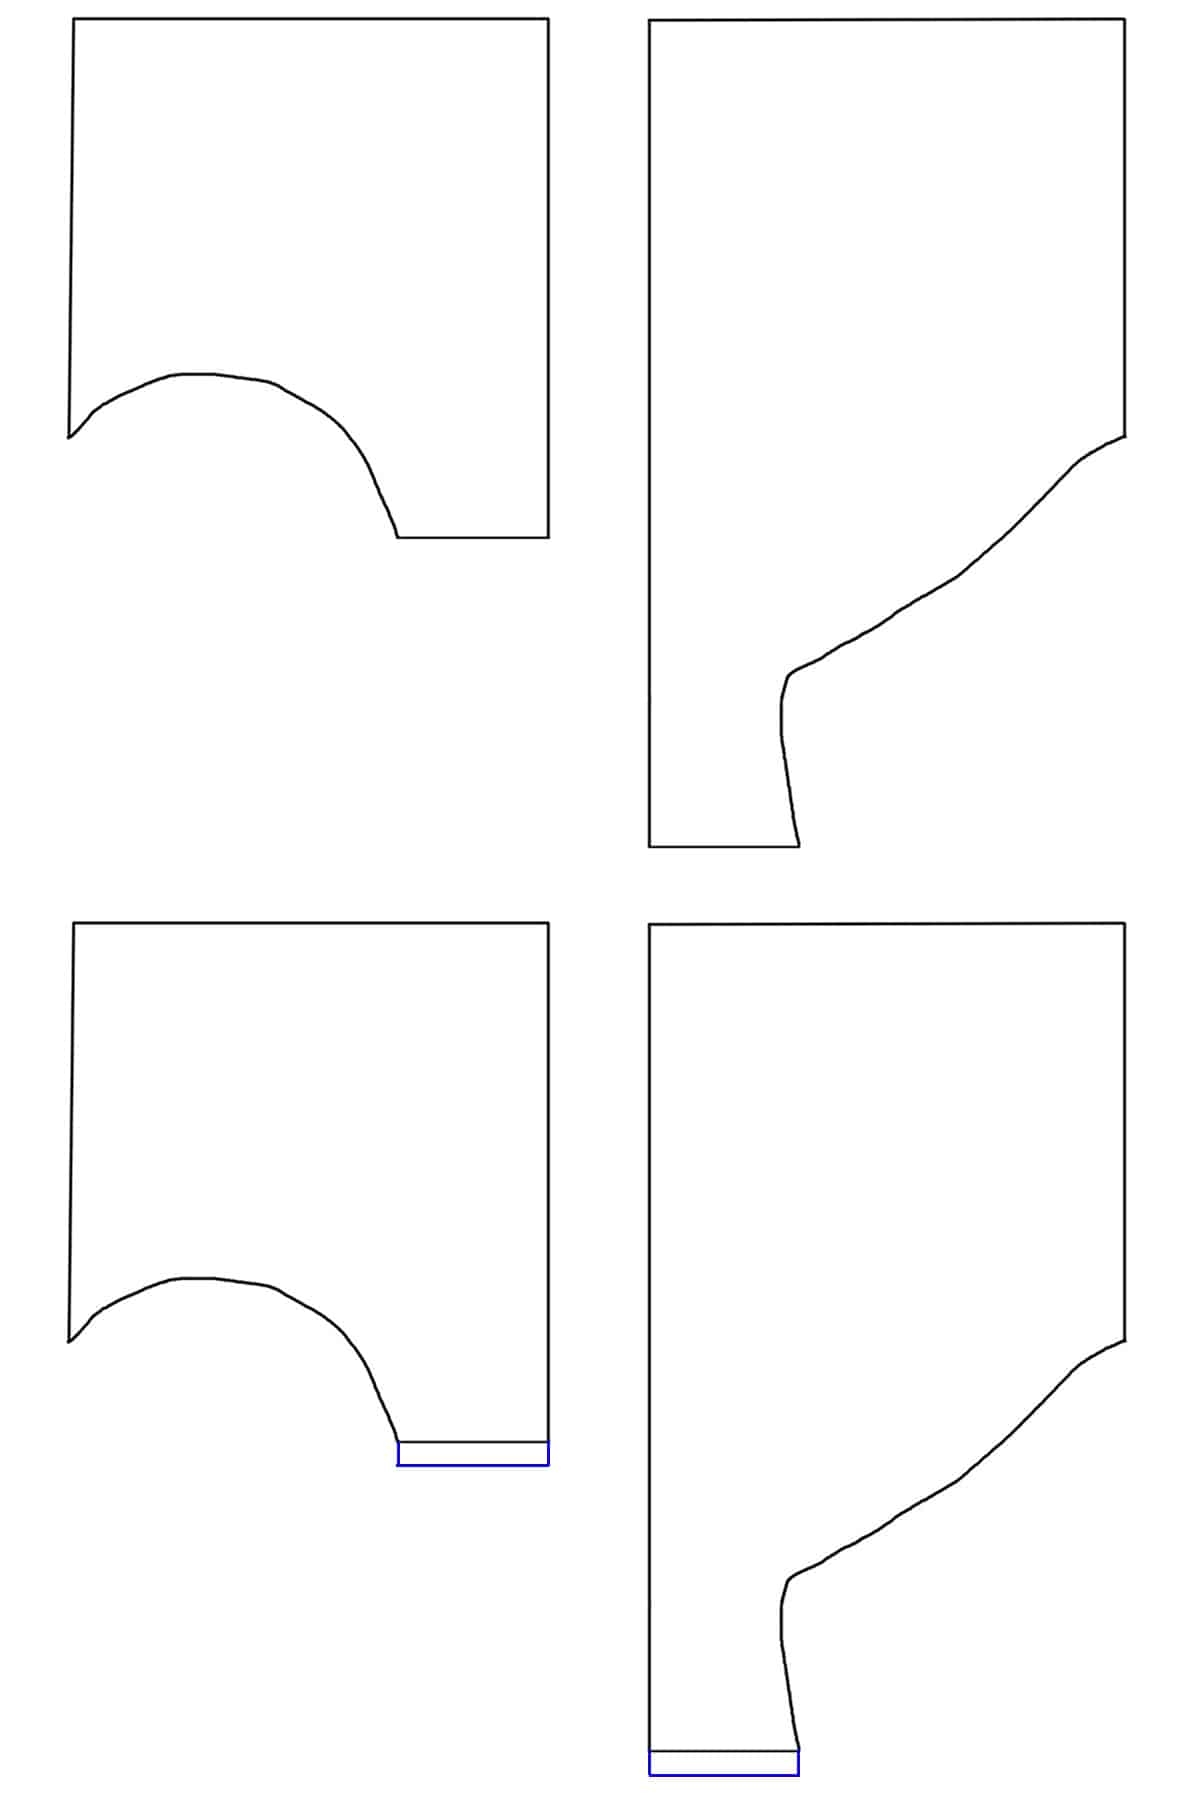
Use your pattern to cut out your briefs fabric, and you're good to go!
How to Make a Body Shirt using a Ready-Made Shirt
This section may seem a bit vague, but it’s one of those things that is going to vary wildly based on a combination of factors.
I’ll go over some things to keep in mind, and some general ways to proceed with it.
Ensure Appropriateness
First of all, make sure the shirt is one that’s suitable to skate in. If it’s not stretchy, it’s got to be billowy enough that the skater can move, lift arms, etc without ripping it or having their range of motion impeded.
The best thing to do is to skate in the shirt, securing the shirt at the waist.
Depending on the shirt/pants, this can be done just by tucking them into the pans. If that doesn’t work, try using a belt.
The big thing is that you need to know the shirt will work *while it’s held into place*. If it only works by coming untucked, you won’t have a great idea of how it’ll work as a bodyshirt.
If you’ve determined that the shirt will work, you need to work on length:
Decide on Length
Note: For the purposes of this tutorial, I’m going to assume that your pant waist is to sit right at the waist.
If it’s to be higher or lower than the actual waistline, you’ll need to adjust by an appropriate amount.
Generally speaking, you’re going to want the shirt to be whatever length you want showing, plus 1", plus your bottom seam allowance.
The first thing you need to do is determine where the bottom edge of the visible shirt will be - ie, in this example, the waist.
I recommend putting the shirt on, belting it at the waist - tightly, to prevent movement - and having the skater lift his arms, move around, etc.
Pull more of the shirt out, as needed, until you have the look and movement you want.
While the skater is wearing it, use safety pins or dressmaker chalk to mark the line that will be at the top edge of the pants.
Have the skater remove the shirt before proceeding 🙂
Trimming Excess Length
Lay the shirt out on a flat surface, smoothing out any bumps or wrinkles - depending on the fabric, you can iron it if you’d like.
Use dressmaker chalk or painter’s tape to mark your cut line - it’ll be about 1 ½" below the line you made while the skater was wearing it.
Note that there’s a good chance that the original line will not be straight. If there’s no obvious curve to it, you can either average it across the marks you’ve made, or just use the marks that will result in the longest shirt.
It’s ALWAYS easier to take length off of a too-long shirt, than it is to try and add length when you’ve cut off too much!
For that matter, if it’s your first or second time doing it, you may want to add 2 or 2.5" to it, just to be safe. Go with what you’re comfortable with!
Once you’re happy with your cut line, carefully cut it out.
I recommend not trying to cut through both the front and back of the shirt at one time - cut your way around the whole thing, 1 layer. Less chance of movement that way!
If the shirt is made from anything non-stretch, I like to serge (or zig-zag) along the bottom edge of the shirt at this time.
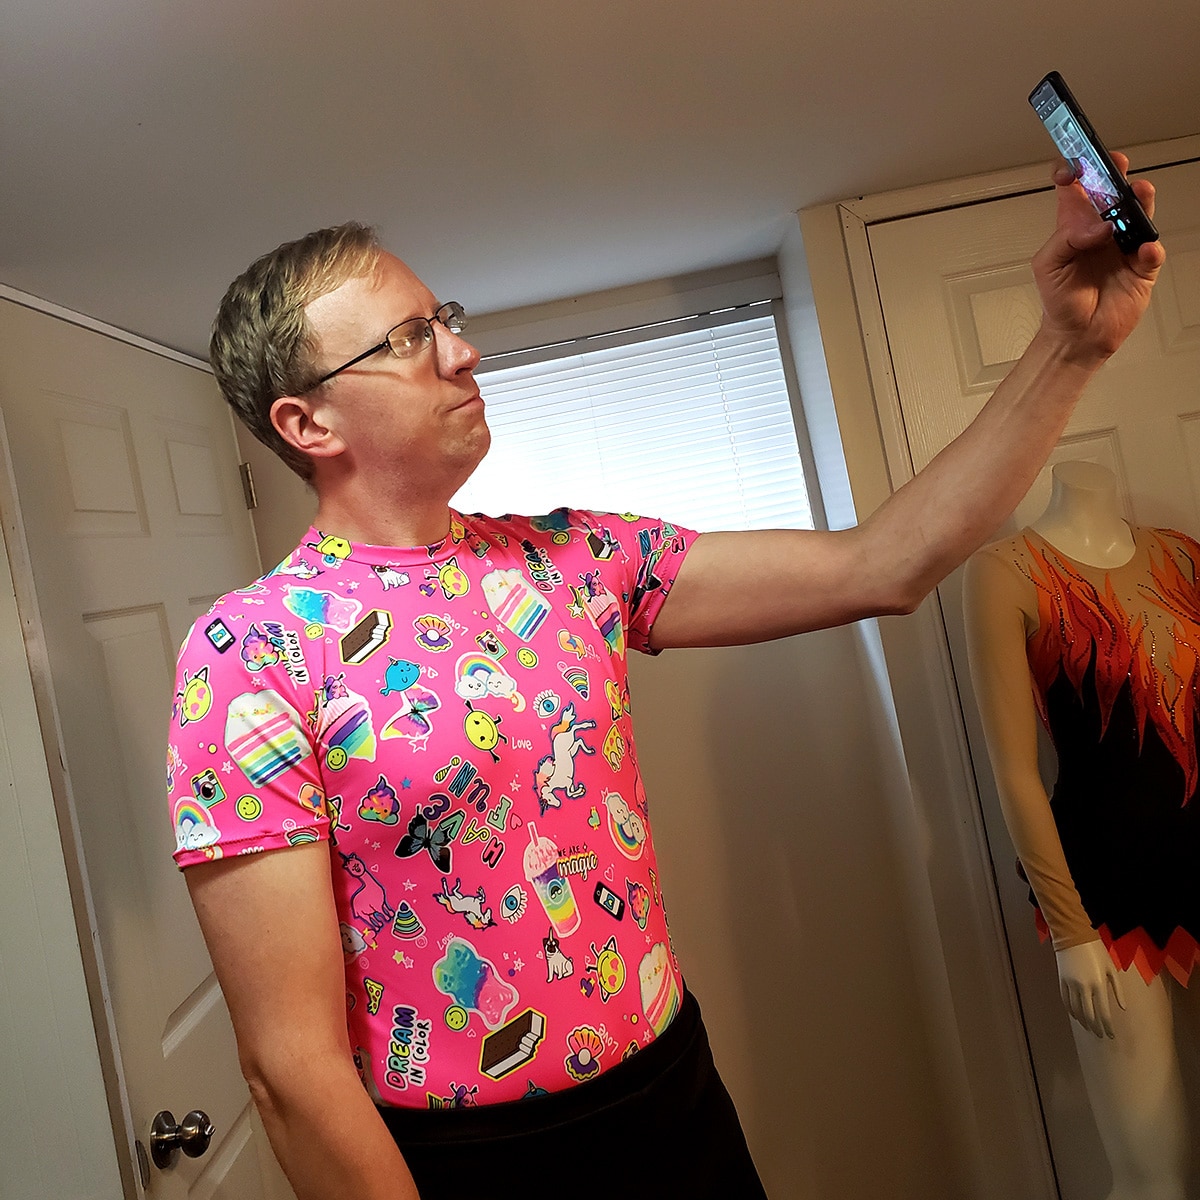
Just dropping a silly pic here to break up a giant wall of text!
Preparing the Shirt to Attach It
If you have a super basic t-shirt style, you can skip this section.
The next thing you’ll want to do is get the shirt ready to sew it to the briefs. What you’ll need to do with vary based on what kind of shirt you’re dealing with.
Buttons
If it’s a button-down - or button-down LOOK - remove the bottom button or two. Set these aside, so you can re-attach them later, if needed.
If it’s an actual button-down shirt - ie: with plackets that fully open up - see the “buttons” section under “Final Tips for Making Body Shirts” section, below.
Embellishment
If your shirt involves sequins - or any other embellishment that shouldn’t be sewn directly over - remove any of it from the bottom ½" or so of the shirt.
You may end up removing more later, but I don’t recommend removing too much right now - you don’t want the bare fabric showing over the top of the pants!
Gathering
If you have a shirt that has a significantly bigger waistline than the briefs, I recommend pre-gathering it.
I like to use a strip of clear swimwear elastic to do this. Cut it to the measurement of the briefs waistline (it can be approximate), and mark out the halfway point of the elastic. (Fold in half, mark with a pen or whatever!)
Starting at one side seam on the inside of the shirt, use a wide zig-zag to attach the elastic to the very bottom edge of the shirt.
Stretch the elastic to meet the other side seam, and sew along to that point. The elastic will evenly distribute the fullness of the shirt into a length that will be manageable for the briefs.
Once you reach the other side seam, stretch the remaining half of the elastic to meet up with the starting point, and sew along the edge of the shirt to that point.
Finish off, trim your threads.
Attaching the Briefs
Find the sides, center-back, and center front of your shirt, mark each with a pin.
Find the sides, center-back, and center front of the briefs, mark each with a pin,
Undo the snaps - if they’re done up - and position the right side of the briefs so that it’s face down on the right side of the shirt, with the top edge of the trunks lined up with the bottom edge of the shirt.
Manipulate the garment so that the brief is completely surrounding the bottom of the shirt, with the back of the trunks centered over the back of the shirt.
Line up the center front, center back, and side pins, pin the briefs to the shirt.
VERY IMPORTANT: Make sure that the front side of the brief (the shorter one) is facing the front of the shirt (the side with the lower neckline, in this case), and the back side of the brief (longer) is against the back of the shirt.
- Lining up the side seams - pin if you need - stitch the brief to the shirt around the entire raw edge (waist seam), stretching together as you go.
- Trim your threads at the end, flip the brief down so the right sides of both top and bottom are facing out. Double-check that your fronts are attached to each other and that you didn't sew the briefs on backward!
- If you haven’t already, install the snaps, as described earlier in this post.

A log driver skating costume. While I made the shirt from printed spandex, you COULD make one from an actual flannel shirt.
Final Tips for Making Bodyshirts
Buttons
Remember that functional buttons are not only unnecessary, they can also be a potential hazard. (If they pop off, they can cause serious injury if skated over.
If you’re doing a button-up style, it’s best to have the bulk of the buttons as decorative, rather than functional.
To this end, the plackets (the panels on a shirt where the buttons/buttonholes are sewn) are sewn together from the bottom, up to several inches below the collar.
Just a few buttons are left functional, to allow for a big enough opening to pull the shirt over the head.
Sewing the plackets together removes pretty much any possible force that could be applied to the buttons, and goes a long way to preventing buttons from popping off with movement.
While the Jalie pattern accounts for this, it’s an alteration you can make on your own patterns, or on ready-to-wear shirts.
To adjust a ready to wear button down shirt
Figure out how many buttons you’ll need to leave functional. Mark that line with a pin. Button up the shirt below that point, and pin the plackets together, as needed.
Beginning at the bottom edge, stitch up one side of the top placket - using an established seam, if possible - being careful to stitch through both layers of the shirt.
When you reach the marked point, drop your needle, turn the garment, and stitch across to the visible seam on the other side of the buttons.
When you reach the other side, drop your needle, turn the garment, and sew down to the bottom edge of the garment.
Remember to ensure that there are no buttons in what will become the seam allowance at the bottom. If there are any close to it, I recommend removing it/them, and re-adding after the briefs are sewn on.
Collars
Note that the most popular pattern used for bodyshirts - Jalie’s - has a fairly wide collar, and it can look a bit... dated.
Great if you’re going for a 70's disco or even a cowboy look, but for any modern styling, you’ll want to alter it.
I recommend making a practice run to check the look of your alterations, before making the final outfit. For something like a collar, it’s usually helpful to see the collar together with the rest of the shirt, for a full picture.
Sometimes, it can be hard to see whether a collar is an appropriate shape/size on its own, or just held up on the wearer.
Care of Bodyshirts
How you take care of your bodyshirt should be based on what the shirt part of it is made of.
If it's made from spandex / performance type knits, see my post: Proper Care of Spandex Costumes
If it's a ready-to-wear shirt, follow the care label on the shirt.
If it's a non-stretch shirt that was not ready to wear, google for the best way to care for the fabric type used.
Note: If your care label requires dry cleaning, note that that can adversely affect any crystals and other embellishments that were applied after purchasing it. Proceed with caution!

More Figure Skating Sewing Tutorials
Want some more skating related sewing content? Try these on for size:
How to Draft Skating Skirt Patterns
How I Made That: Flames Skating Dress
How I Made That: The Pink & Black Skating Dress
How to Make Scrunchies
Figure Skating Skirts
How to Pattern and Make Waterfall Skirts
How I Made That: The 80's Dress Figure Skating Dress
How I Made That: The Ursula Dress
How to Make Skate Covers
How to Make Soakers
Make a Basic Ice Skating Dress
Proper Care of Figure Skating Dresses
How I Made That: Art Deco Skating Dress
Share the Love!
Be sure to take some pics of your handiwork! If you post it to Bluesky, be sure to tag us - @SpandexSimplified.
Also, be sure to follow me on Pinterest, and subscribe to my Youtube Channel, so you never miss out on any of my nonsense.
Well, the published nonsense, anyway!




I'm new to spandex sewing as my boy just started with his first costumes for artistic skating. Boy costumes are so hard to find and I am really grateful for all your tips and tricks here! Love it!
Thank you!
Can you sew a shirt to underwear and put snaps in the crotch?
Thank you!
Not without enough alterations that it would just be easier to make the bottoms.