Spandex "String" is most commonly used for bikinis, but it can be used in many areas of spandex costuming. Here's how to make bikini string.
This tutorial is excerpted from The “Spandex Simplified” line of books by Marie Porter, as well as "Sewing for Skaters and Gymnasts and Dancers... Oh My. All photos, & accompanying tutorial are copyright @ 2000 - Marie Porter, all rights reserved.

“Strings” are actually skinny little tubes of matching / contrasting Lycra, commonly used for bikini ties.
For skating dresses, they can be used for everything from making "shoestring" bows for accent, to faux corset lace up accenting, to lacing up a wide open back.
Sergers are HIGHLY recommended for making strings, but you can get by with a small & short zig zag stitch, as long as you make sure to stretch the fabric hard as you sew it!
Be sure to read my post on how to sew spandex with or without a serger for the technique!

Longer lengths of bikini string can be used to make lace up backs on skating dresses and other garments.
How to Make Bikini String
Equipment Needed
To make bikini string, you’ll need either a serger or a sewing machine, and something to flip the string.

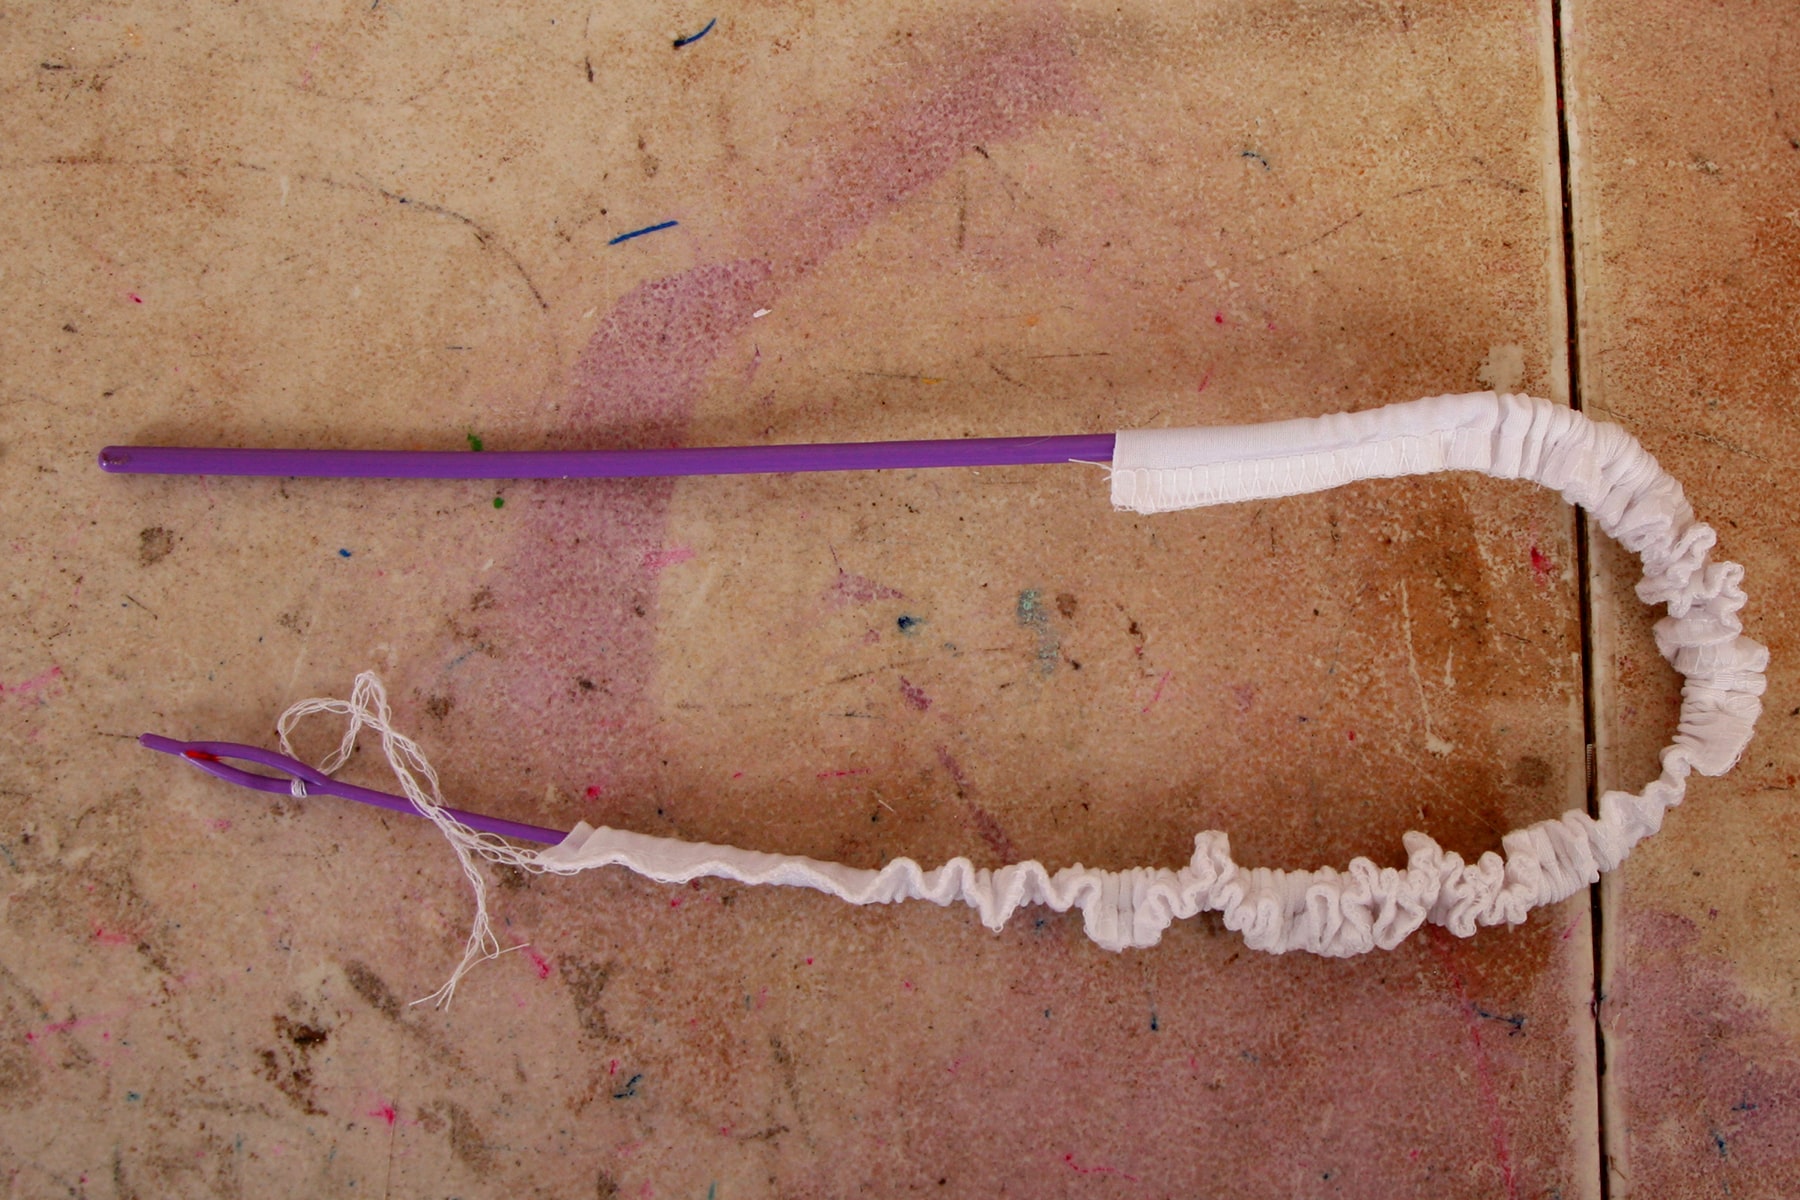
I keep a couple Cord Threaders on hand (as I tend to lose them, when I need them!), mostly for making bikini strings and scrunchies.
In addition to the cord threader, I also like to have a few Safety Pins on hand. Same purpose, but for when dealing with items with a small diameter, where feeding the cord threader through would be difficult.
Also: This works better when you’re making the strings without a serger - you pin to the fabric itself, as the 2 threads left by a normal sewing machine aren’t as strong as the 4 chained by a serger.
That said, I’ve used a few different items to turn my strings inside out, usually dependant on how organized my workspace is. Sometimes, I can’t find my cord threader (hence why I have more than one, now!), and I’ve used the aforementioned safety pins... when I can find them.
If you really need to MacGuyver it, I’ve used a crochet hook, paperclip, and a pen at different times. Desperate times can call for desperate measures, and tying the string to a random office utensil can actually work pretty well.
But seriously... get a cord threader or two!

How to Make Bikini String with a Serger
- Cut a length of Lycra that is about 1 ¼ inches wide, by however long you need. Have the greatest degree of stretch going from long side to long side.
- Fold the fabric in half - right sides together - along the long edges, and stitch up the length of it, making sure to stretch the fabric well as you do so.

- Again, be sure to read my post on sewing spandex - or watch the video at the end of this post - to get a feel for the technique!
- As you finish, leave a long chain - about 6" - trailing off the end.

- Tie the end of the trailing chain to the loop of a drawstring threader. If you don’t have a drawstring threader, tie it around the head of a crochet hook, or through a large safety pin.
- Run the tied off end through the length of the tube, starting at the end to which the chain / cord is attached.

Pull the needle through the opposite end. As you go, gently ease the bunching tube off the back end of the needle, and onto itself.

Be very careful not to break the thread / cording!
Once the whole tube is turned right side - out, clip off the end of the tube with the yarn / cord.
Cut the tube to the necessary lengths, if the original length was long enough for several pieces. I usually cut 60" lengths, and divide them into 4, or more/less, depending on what I need.
Any ends that are not to be sewn down to anything should be knotted off. This will prevent any raveling or fraying of the
tube seams.

How to Make Bikini String with a Sewing Machine
Making bikini string with a basic sewing machine works about the same was as with a serger, with a couple changes:
1. When sewing the fabric, use a straight stitch (short length) for the first pass, being sure to stretch as you go. 2. Use a wide zig zag as a second pass, binding the edge. You’ll want that to be a medium-ish stitch length, to avoid excessive curling in the finished seam. (How to sew spandex without a serger)
3. Instead of leaving a long chain of thread at the end of the seam, trim your ends and do one of the following:
- Cut a small hole in one end of the tube, and tie a 6" length of yarn or thin cording to it. Thread the other
end of the yarn / cord through a your cord threader, proceed as you would with the serger version to flip it.
2. Affix a safety pin through 1 layer of fabric (not the folded tube) at one end of the string.
Turn the safety pin down into the hole it’s attached to, and feed it all the way through the tube. It will basically be acting as a cord threader, so proceed as if you’re using a corn threader to flip it.

Video Demonstration
More Spandex Sewing Technique Tutorials
Interested in learning the basics of sewing with spandex? Here are a few more posts
How to Cut Spandex
Sew Spandex with or without a Serger
Hemming Spandex Skirts
How to Install Snaps in Spandex Garments
How to Apply Elastic
Appliquing Spandex
Padded Applique
How to Make Covered Elastic Straps
... and always, be sure to check out our Table of Contents for a full, categorized listing of all of our posts and tutorials!
Share the Love!
Be sure to take some pics of your handiwork! If you post it to Bluesky, be sure to tag us - @SpandexSimplified.
Also, be sure to follow me on Pinterest, and subscribe to my Youtube Channel, so you never miss out on any of my nonsense. Well, the published nonsense, anyway!
Finally: If you loved this tutorial - or have any questions about it - please leave a comment below! I'll do my best to answer any questions you may have!

How to Make Bikini String with a Serger
Equipment
- Sewing Machine
- Serger (Optional)
- Cord threader
Materials
- Spandex
Instructions
- Cut a length of Lycra that is about 1 ¼ inches wide, by however long you need. Have the greatest degree of stretch going from long side to long side.
- Fold the fabric in half - right sides together - along the long edges, and stitch up the length of it, making sure to stretch the fabric well as you do so.
- As you finish, leave a long chain - about 6" - trailing off the end.
- Tie the end of the trailing chain to the loop of a drawstring threader. If you don’t have a drawstring threader, tie it around the head of a crochet hook, or through a large safety pin.
- Run the tied off end through the length of the tube, starting at the end to which the chain / cord is attached.
- Pull the needle through the opposite end. As you go, gently ease the bunching tube off the back end of the needle, and onto itself. Be very careful not to break the thread / cording!
- Once the whole tube is turned right side - out, clip off the end of the tube with the yarn / cord.
- Cut the tube to the necessary lengths, if the original length was long enough for several pieces. I usually cut 60" lengths, and divide them into 4, or more/less, depending on what I need.
- Any ends that are not to be sewn down to anything should be knotted off. This will prevent any raveling or fraying of the
- tube seams.


Hey, nice site you have here! Keep up the excellent work!