To really customize a figure skating dress pattern, you should know how to draft custom skirts. Here's how to draft skating skirt patterns.
This tutorial is excerpted from The “Spandex Simplified” line of books by Marie Porter, as well as "Sewing for Skaters and Gymnasts and Dancers... Oh My. All photos, & accompanying tutorial are copyright @ 2000 - Marie Porter, all rights reserved.
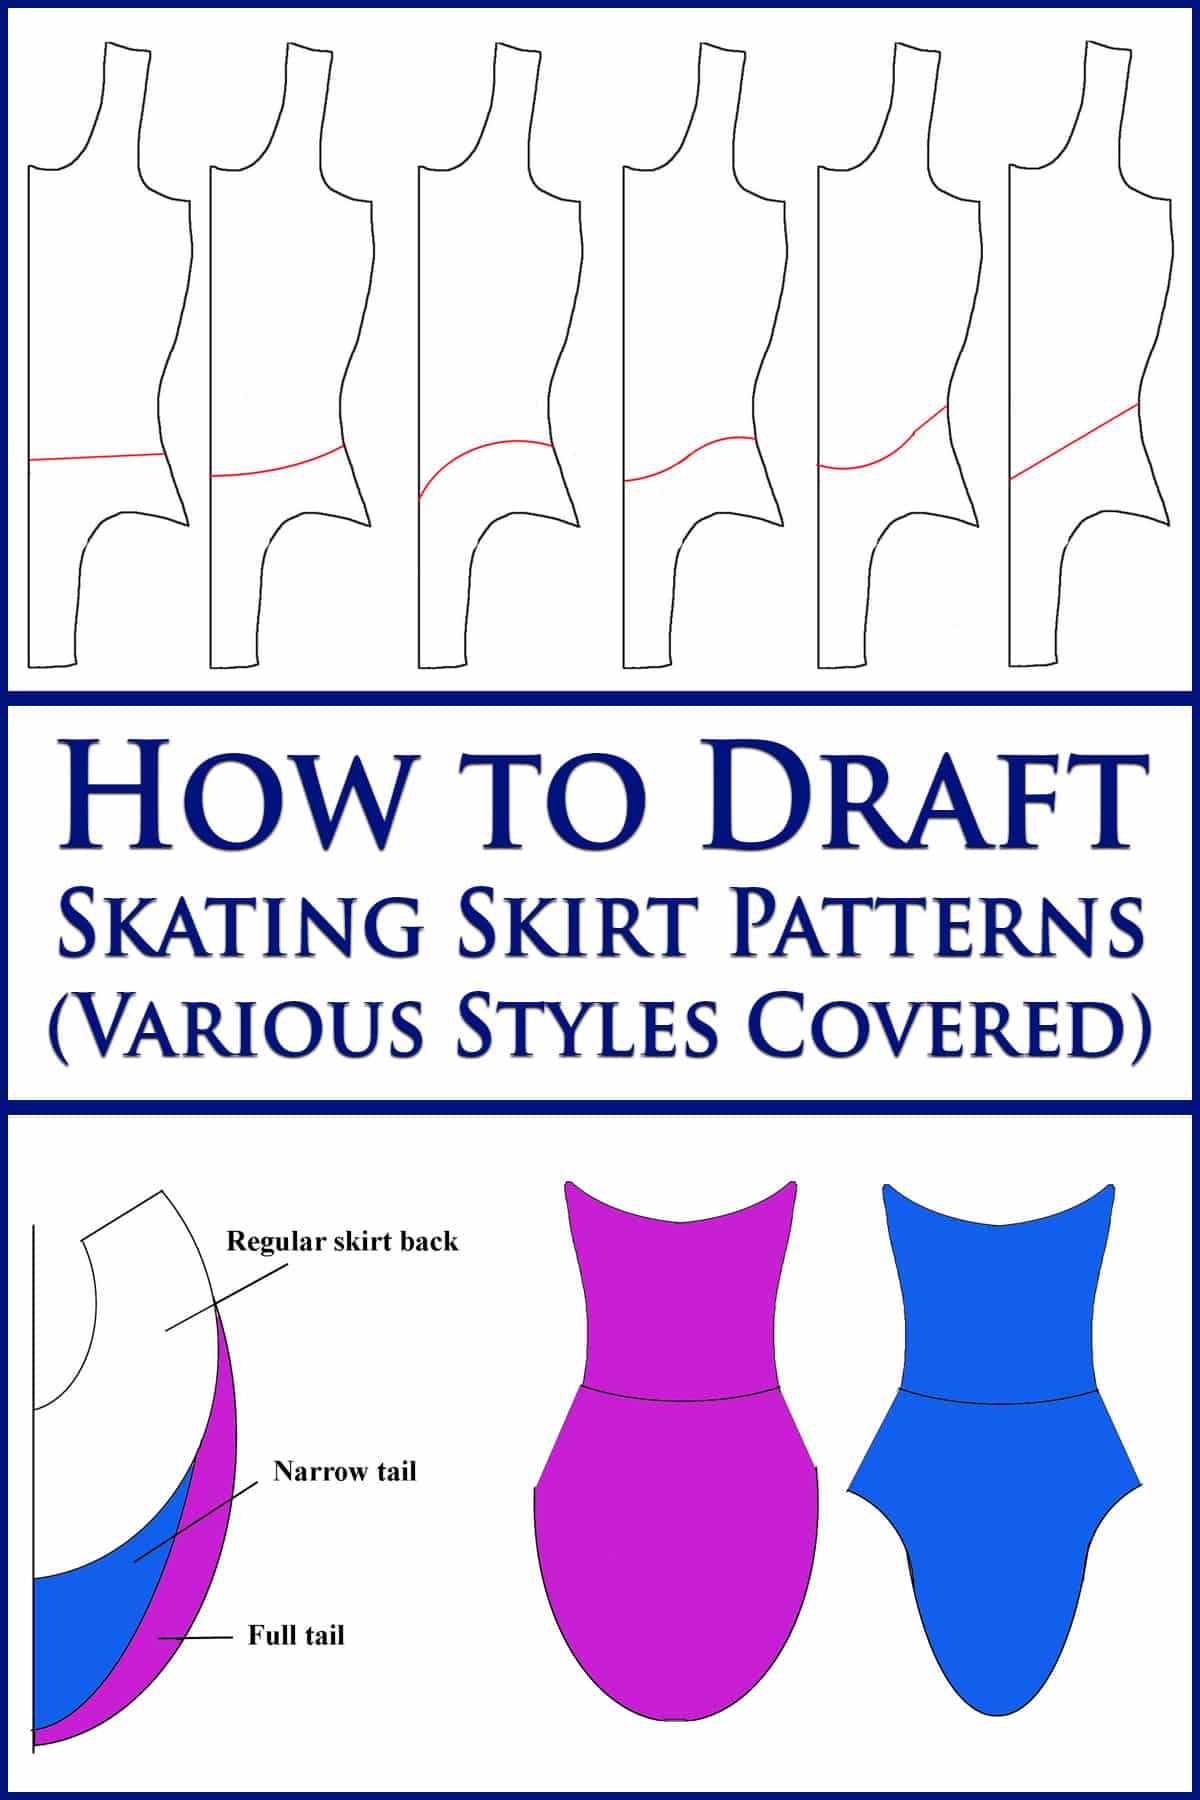
I've already posted about How to Draft a Circle Skirt, so I figure it's time to get into some information on how to design and make various other types of skirts.
The basic ideas I'm getting into here are usually seen in skating dresses - whether practice or competition garments.
That said, they can be applied to other forms of costuming, especially for dance.
Additionally, these techniques can be used as a jumping off point for many different variations.
Have some fun with it!
How to Draft Flat Skirt Patterns for Figure Skating
In making your pattern for a flat skirt, you will be presented with several options, all of which will affect the final appearance of the skirt - amount of flare, length, how the flare is distributed, etc.
Working with The Base Pattern
The first thing you will need to do is to make sure that the body suit portion of your pattern is suitable.
After making any necessary alterations for size, adjust your waistline so that it is either straight across, or only slightly scooped downward.
Deep “V” and basque type waistlines, for instance, are not suitable for the flat skirt style. Any sharp points or angles will not work.
Here are a few examples of waist lines that are suitable / not suitable for use with flat skirts:

Establishing Measurements & Style Goal
Now, there are a few measurements you will need to know:
1.) The measurement of the wearer’s torso, at the skirt placement line.
2.) The intended centre front length
3.) The intended centre back length
4.) The intended side length
Note: Flat skirts tend to look best when placed below the natural waist, sometimes as low as grazing the top of the hip bone.

Know where you are placing the skirt before determining length. The centre back measurement is usually slightly longer than the centre front.
Decide on the style of the skirt.
How much flare?
Will the flare be evenly distributed around the whole skirt line, or basically flat across the front and back of the garment, with the flare on the sides?
Starting Your Flat Skirt
Take a large sheet of medical examination paper*, newspaper, or whatever else you have lying around, and lay it out on a flat surface.
You can buy rolls of exam table paper on Amazon and at medical supply stores, for between $2-5 per roll. Super cheap - which is good, because you’ll go through it like crazy once you get going!
Draw a line which is perpendicular to one edge of the paper, and equal to ¼ of measurement number 1.
For example, if the measurement at the skirt placement line is 30", the measurement you’ll use here is 7.5"
Make another line at the end of the first, perpendicular to, and extending upwards from it. For the sake of example, we will use 1". This will be the side point of your skirt waist.
The longer this line, the more flare the skirt will have.

Below the original line along edge of the paper (which will be the centre front fold), make another point. For example, we will use 1" again.
This will be the centre point of the waist line.
The lengths you use in the previous two steps will be a determining factor when it comes to flare.
The closer they are to the original line, the flatter the skirt. The further away from the centre line, the more flare. 1" is a good starter measurement.
With flat skirts, it’s a good idea to make a practice skirt... or even a few of them.. to experiment with different measurements until you get the exact look you want.
When you have the perfect pattern, make a copy of it on a heavy craft paper, like Bristol board, for a more durable, reusable pattern.
Establishing the Skirt Waist
How you connect the points will affect the distribution of the flare.
A smooth, even curve will result in even distribution of the flare.
However, if the curve from the centre point upward is a long, shallow curve, and from the side point down is a short and deep curve, the result will be a skirt that is reasonably flat across the front and back, flared on the sides.
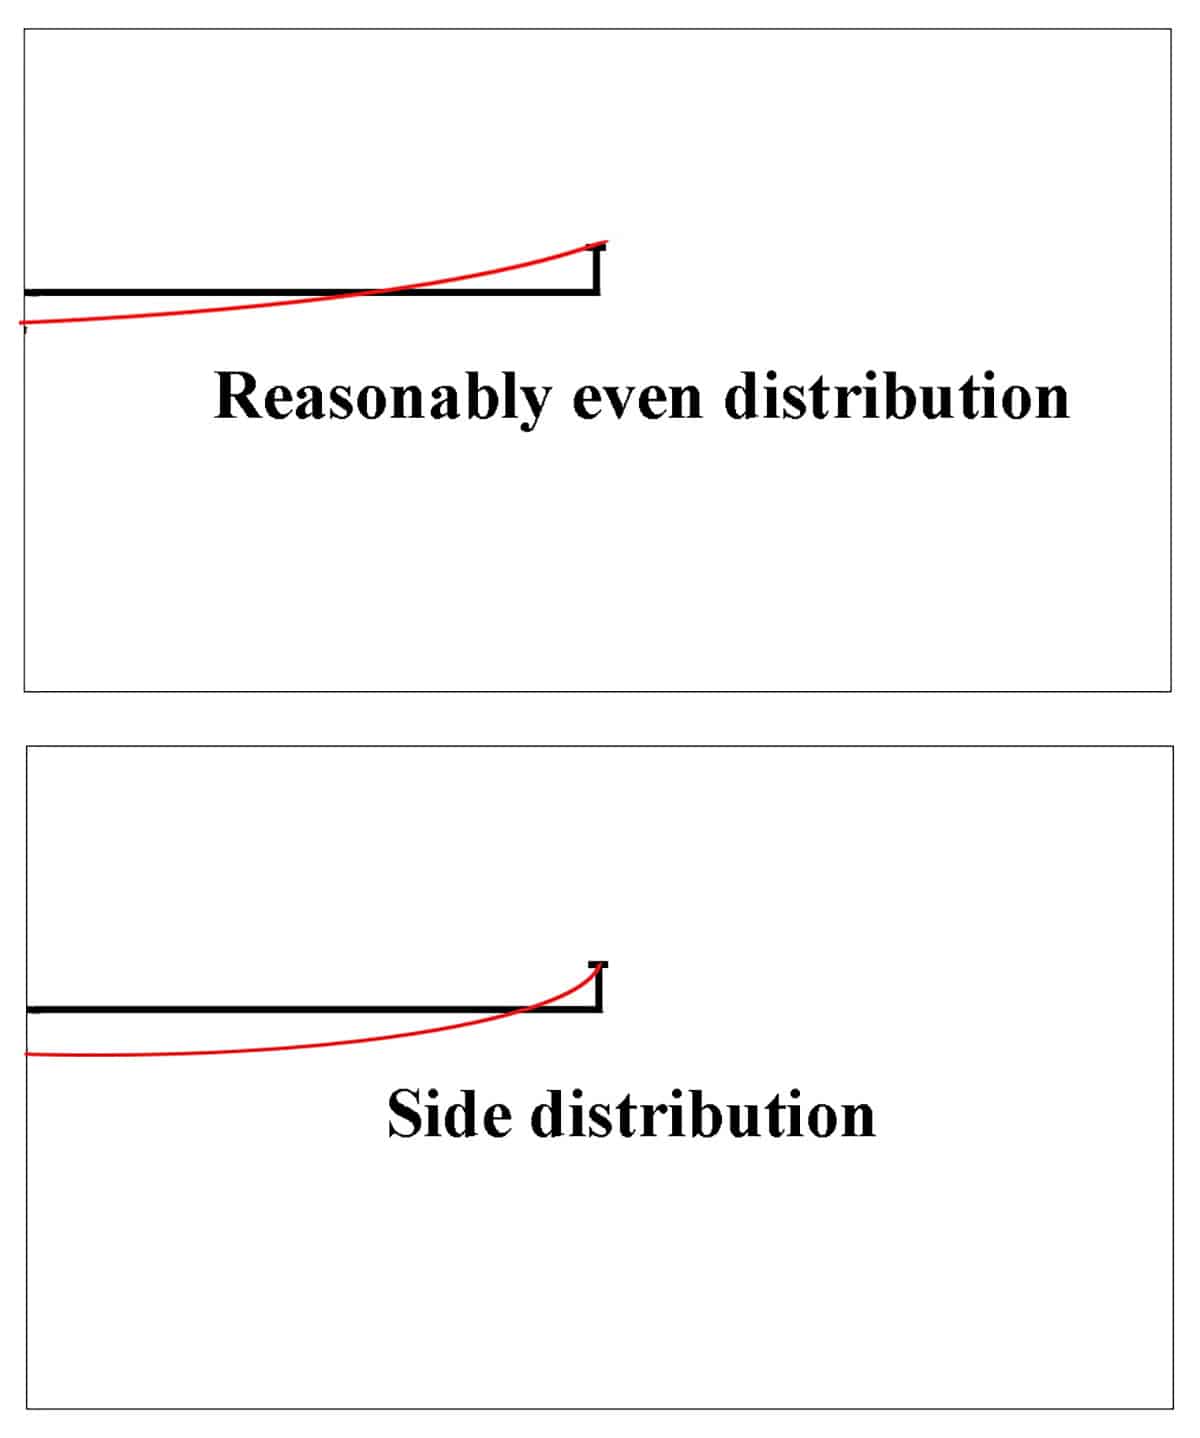
To look at this another way, where your waistline intersects the original line will give an indication of the flare distribution.
A waistline which intersects the original line somewhat close to the middle will result in an even flare, the closer the intersection is to the side point, the more of the flare will be distributed on the side.
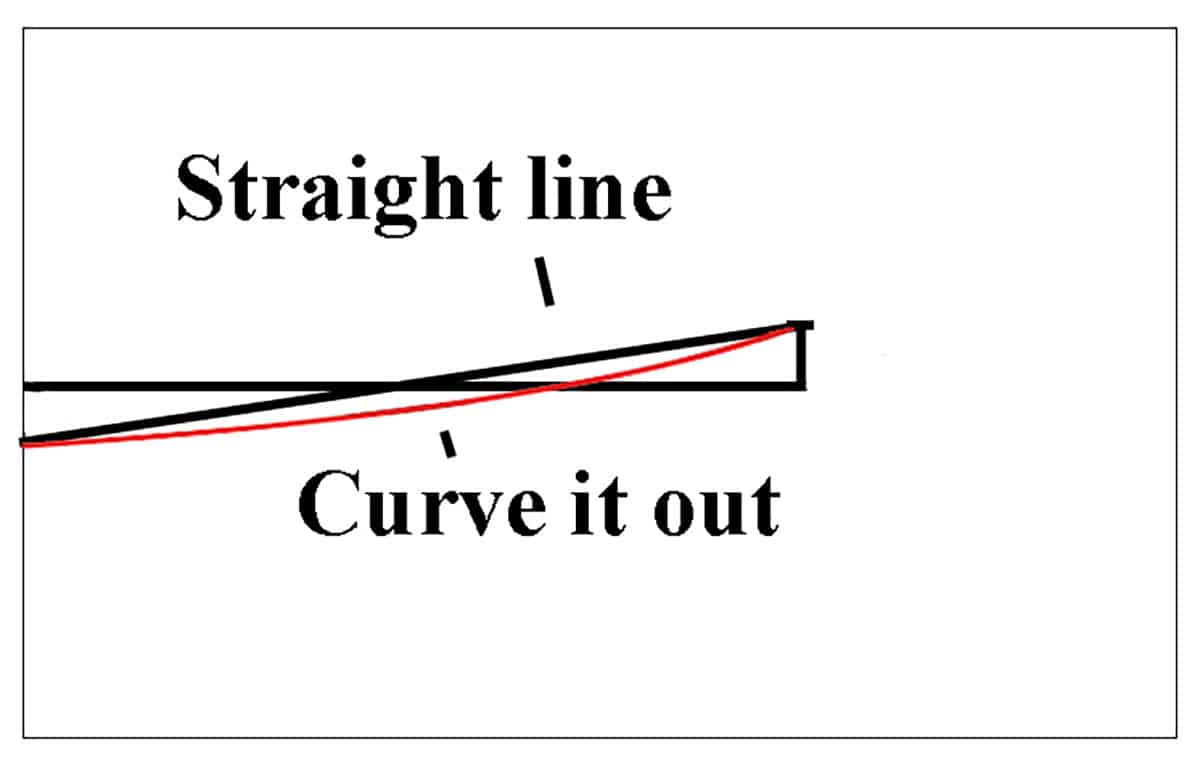
In the case of an evenly distributed curve, it can be easier to draw a straight line between the points, and curve it out in the middle.
Drafting the Actual Skirt
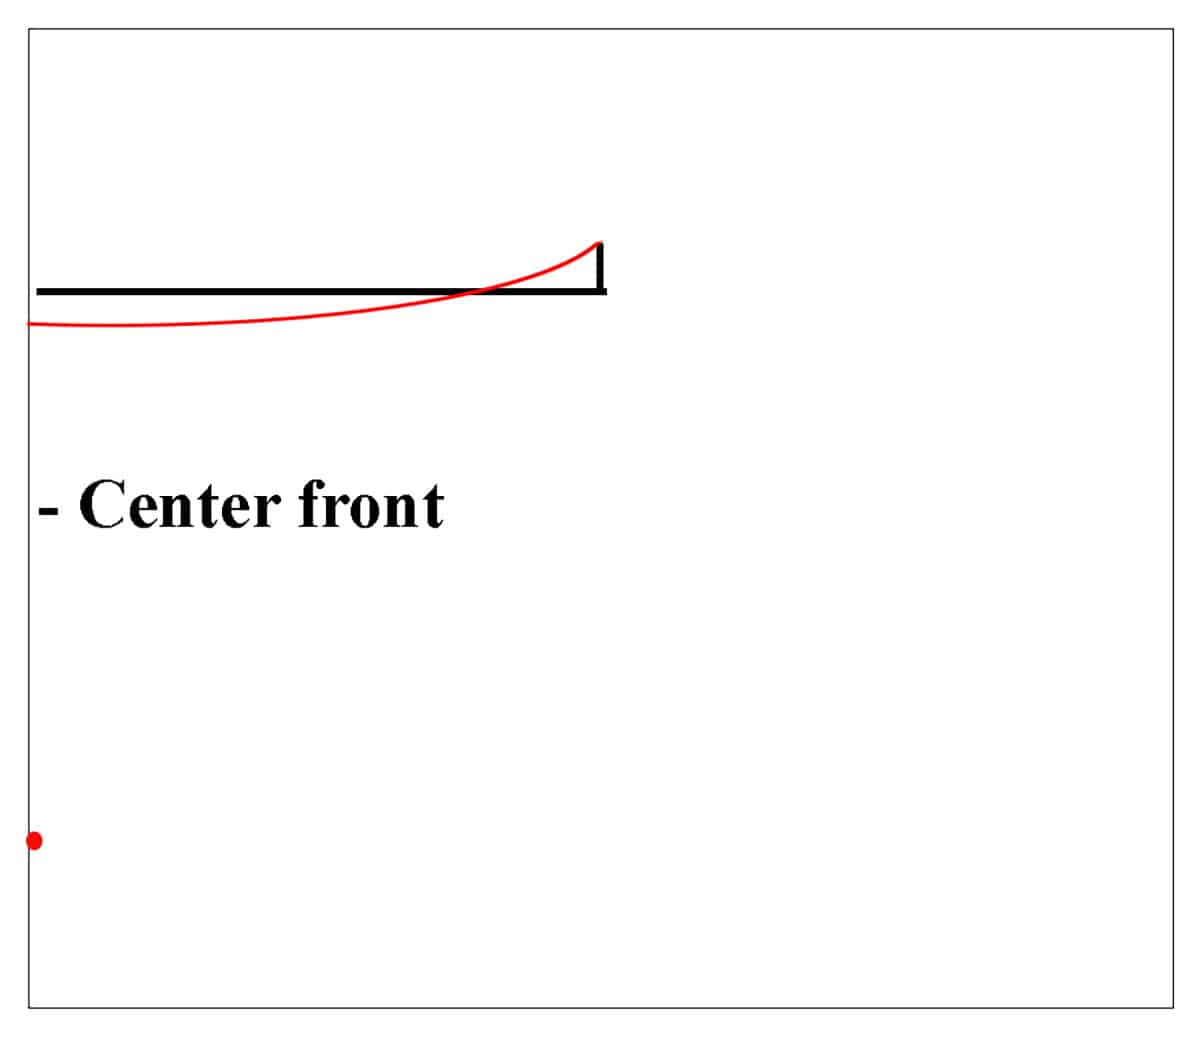
Once you have settled on your waistline, mark a point below the new centre waist point (NOT the original centre line point), that is the length of your intended centre front.
When drawing the side seam, you must keep in mind that the seam must be no less than 90 degrees from the side curve of the waistline.
Any smaller of an angle, and the skirt will not sit right on the side, as you will have more waistline than skirt which drapes from it. This results in a weird pucker.
90 degrees is good for a flatter skirt, if you would like more of a flare, use a larger angle.
The length of the line which you angle out from the waist will be the length of your intended side seam (Measurement #4).
This angle must be at least 90 degrees
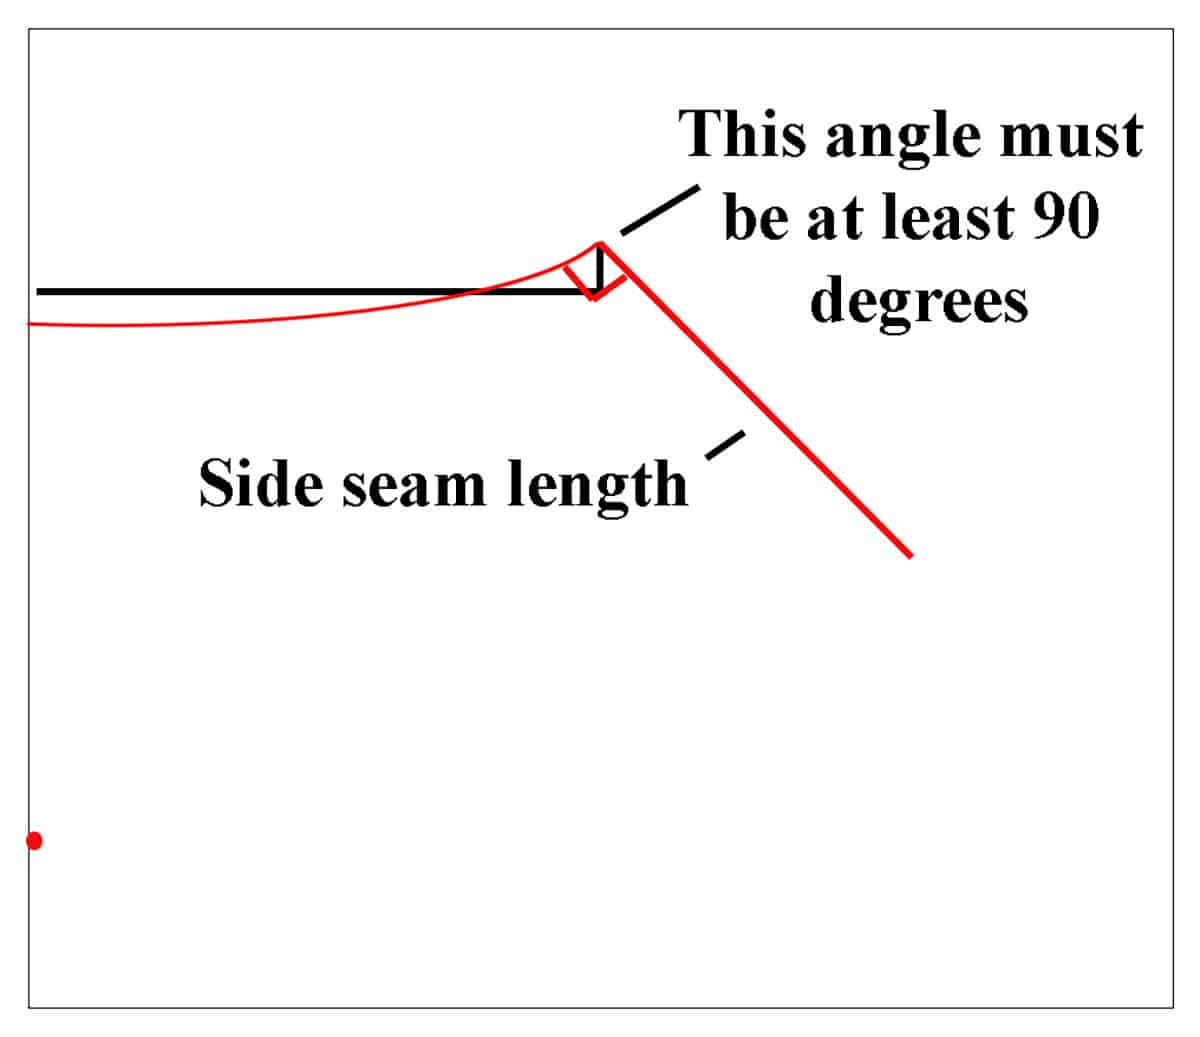
You will now need to connect the bottom end of your side seam to the bottom centre point (hem).
An even bottom curve will be great with an even waist curve, however if you opted for a side distribution waist, you may want to telegraph that waist curve into a roughly equivalent bottom curve.
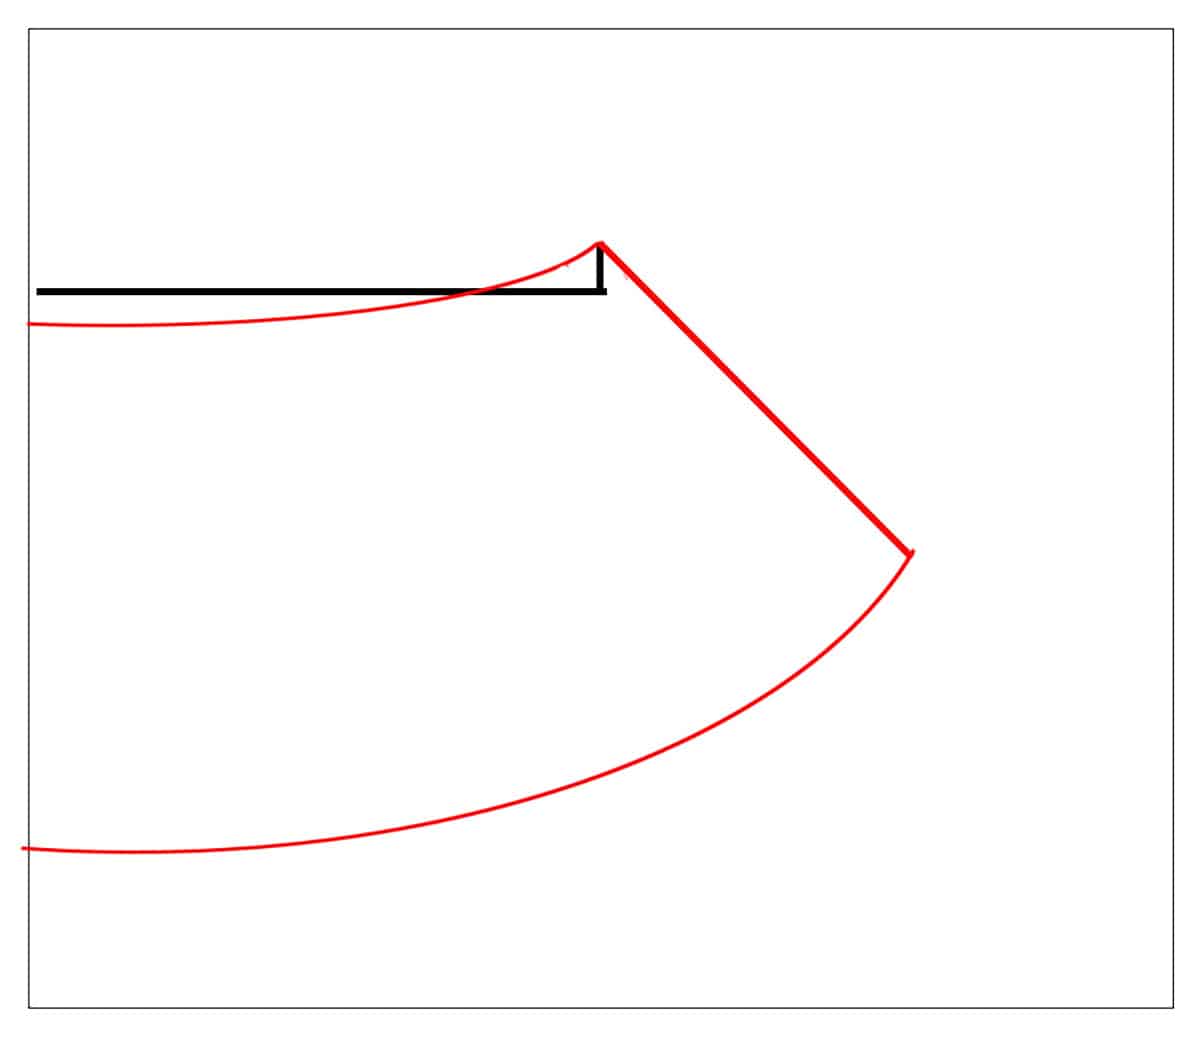
NB: If your centre front is longer than your side seam, then the skirt should get progressively, and evenly, shorter, going from the centre to the side.
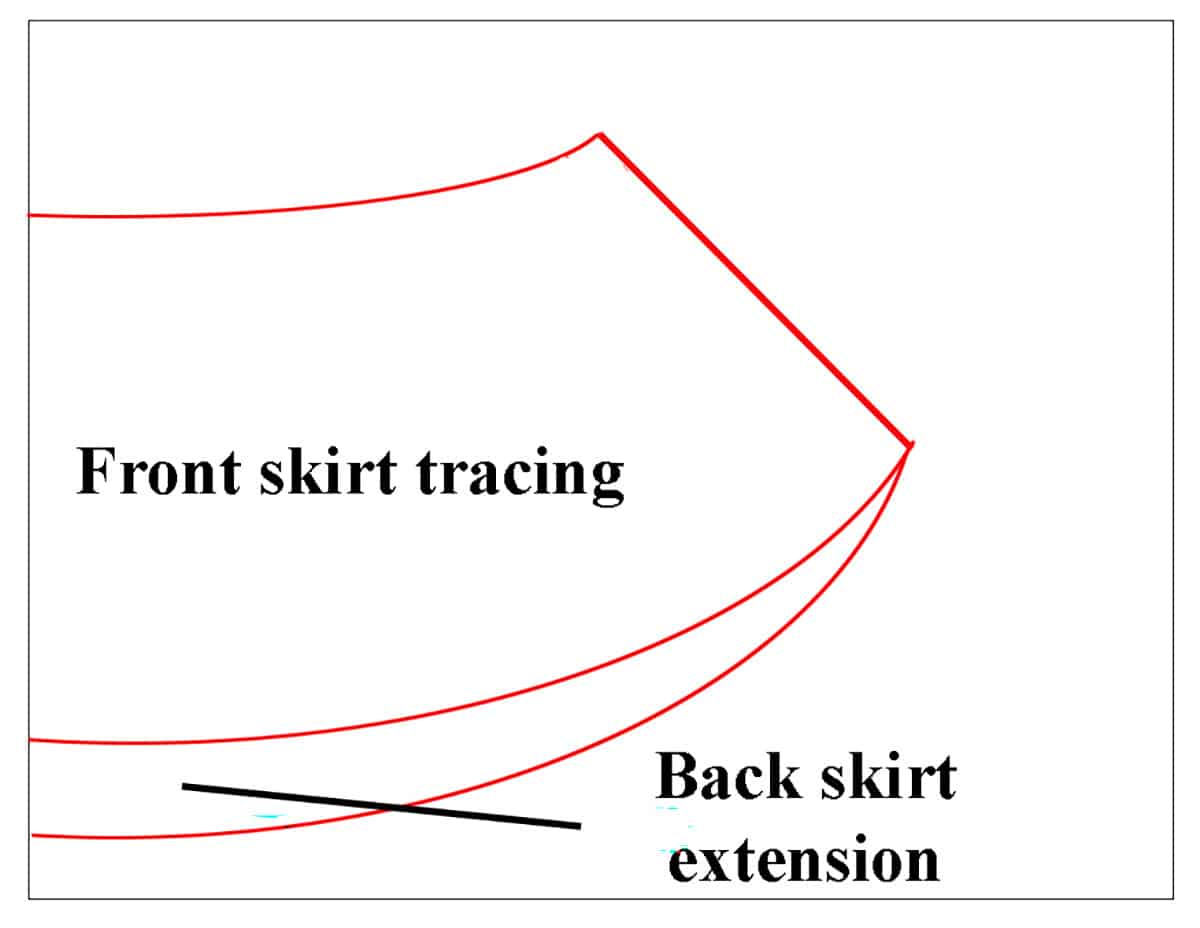
To make the back skirt, either repeat the above steps, substituting the centre back measurement in, or cut out your front skirt pattern. Trace it on to a new piece of paper.
Along the centre edge, extend the line below the front hem, as long as you would like for the centre back .
Re-draw the hem curve on the new piece of paper. It should look something like this:
Add Seam Allowances
Finally, add seam allowances to the waistline, side seam, and - if appliable - the hem.
I’ll usually add ⅜" to the waistline and side seam.
The skirt depends entirely on what kind of hem you’re using - if any. For just a cut edge, don’t add any seam allowance to the bottom edge.
Once you’ve bulked out the pattern with seam allowances, cut both pieces from desired skirt fabric, placing the center front on a fold.
Sew side seams, hem, and assemble as usual.
How to Make a Multiple Layered Skirt
This can be done with or without cutaways and/or different length layers.
Multiple layered skirts tend to work better with a more full skirt, rather than a flat skirt style.
Make any necessary alterations to your pattern to suit the bottommost layer.
Cut your bottom layer, front and back, out of the desired fabric. (If all of your layers are to be the same length, cut all skirt pieces with this pattern.)
If you are having layers which gradually get smaller, you can do one of two things:
1- Either cut the desired amount off the pattern (say an inch) then cut the fabric, repeating for each subsequent shorter layer
or
2. Cut all pieces out, then trim the required amount off the layers which are to be shorter.
Sew each skirt back to the corresponding skirt front, and finish the edges as desired. (Flat or lettuce edge hem, serging, etc.)
Lay your bottom skirt out flat, with the good side facing up.
Stack all other layers on top of this, good sides facing up, ending with the top layer.
Be sure that the front pieces, side seams, and back pieces all line up with the corresponding pieces below.
Zig zag around the waist edge of the skirts, securing them all together and stretching as you sew. Attach to garment as per usual.
Cutaway Skirts
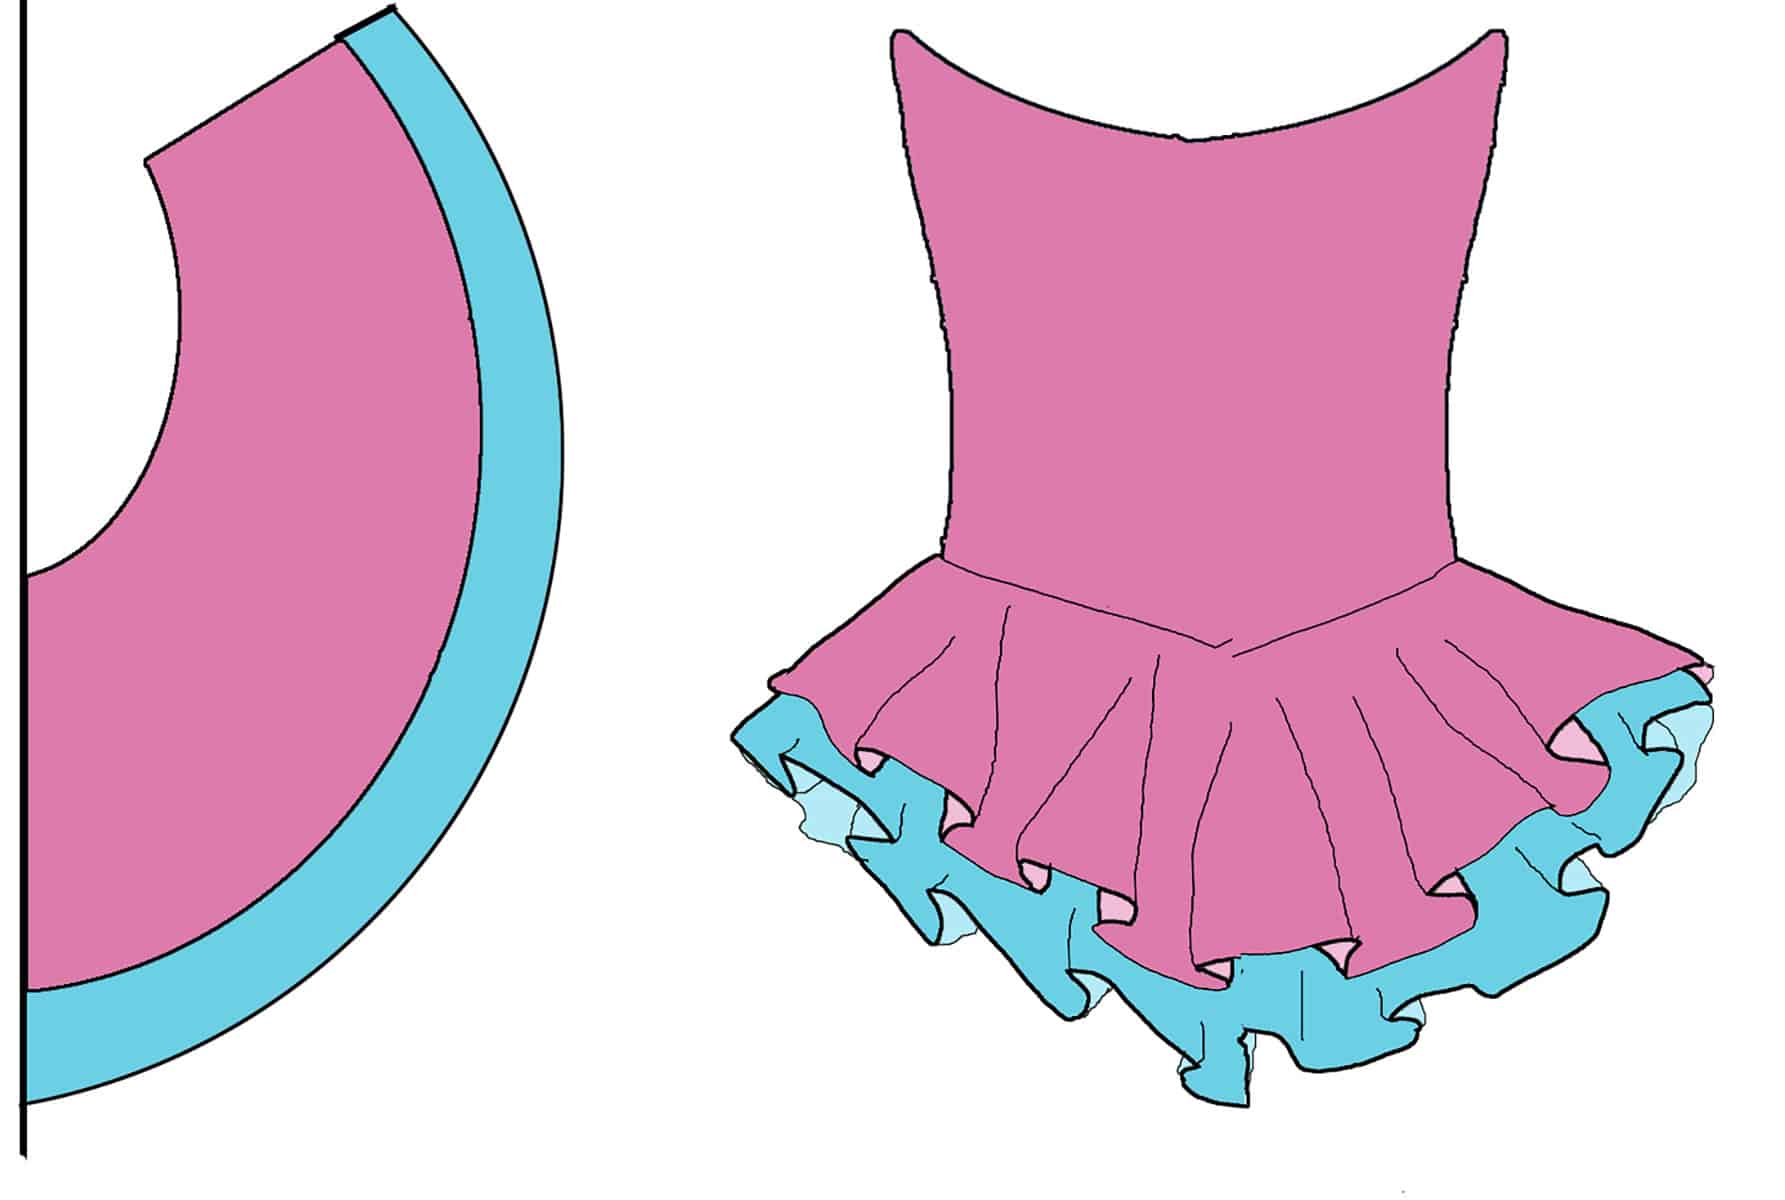
Cutaways are another way to add interest to your skirt. These are done on multiple layered skirts, and work best if the under skirt is a different colour.
To make cut aways:
Decide on a shape and location for your cutaway. This could be a half circle cut out of the back of the skirt, for instance.
Another example would be to have an upper layer that tapers up on one side, revealing more of the underskirt on that side, than on the other.
For a shaped cut out, simply cut away as desired, and hem as per usual.
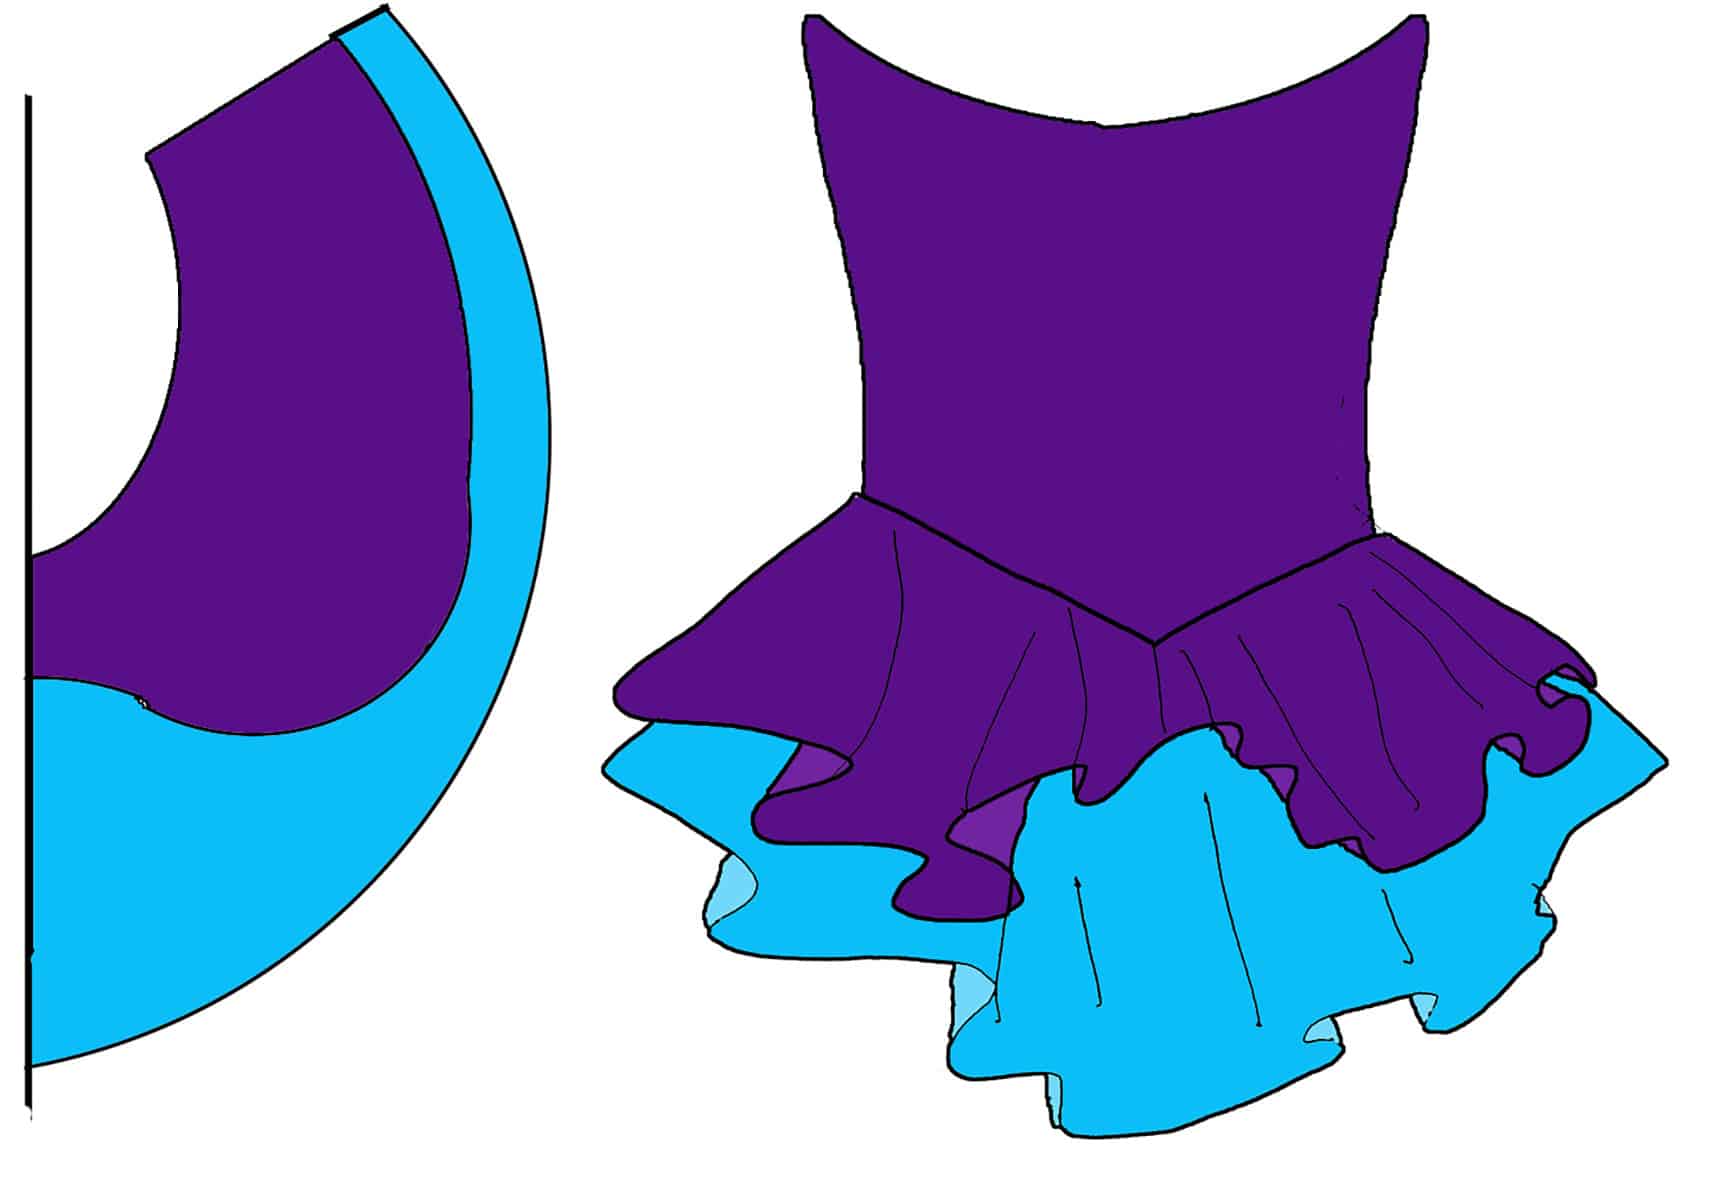
Slits
For a slit reveal on the side(s) of the skirt, hem both sides of both the front and back pieces of the top skirt layer - do NOT sew the side seams of this layer!
Hem the bottom edges of both front and back top layers, and assemble as described earlier, stacking layers and stitching together.

Alternatively:
On the pattern for your upper skirt piece, round the corner that joins the side seam to the lower edge of the skirt.
Hem from the waist to the waist, on both pieces (front and back), and attach them separately to the lower skirt, without using a side seam for that upper layer.

How to Draft a “Tail” Skirt
This style of skirt is popular with ice dancers, but can also be used for free skating if you don’t go overboard with the length.
Because of the elongated, tapering shape, this skirt is very flattering, especially for people who are concerned about their butt. (I was!)
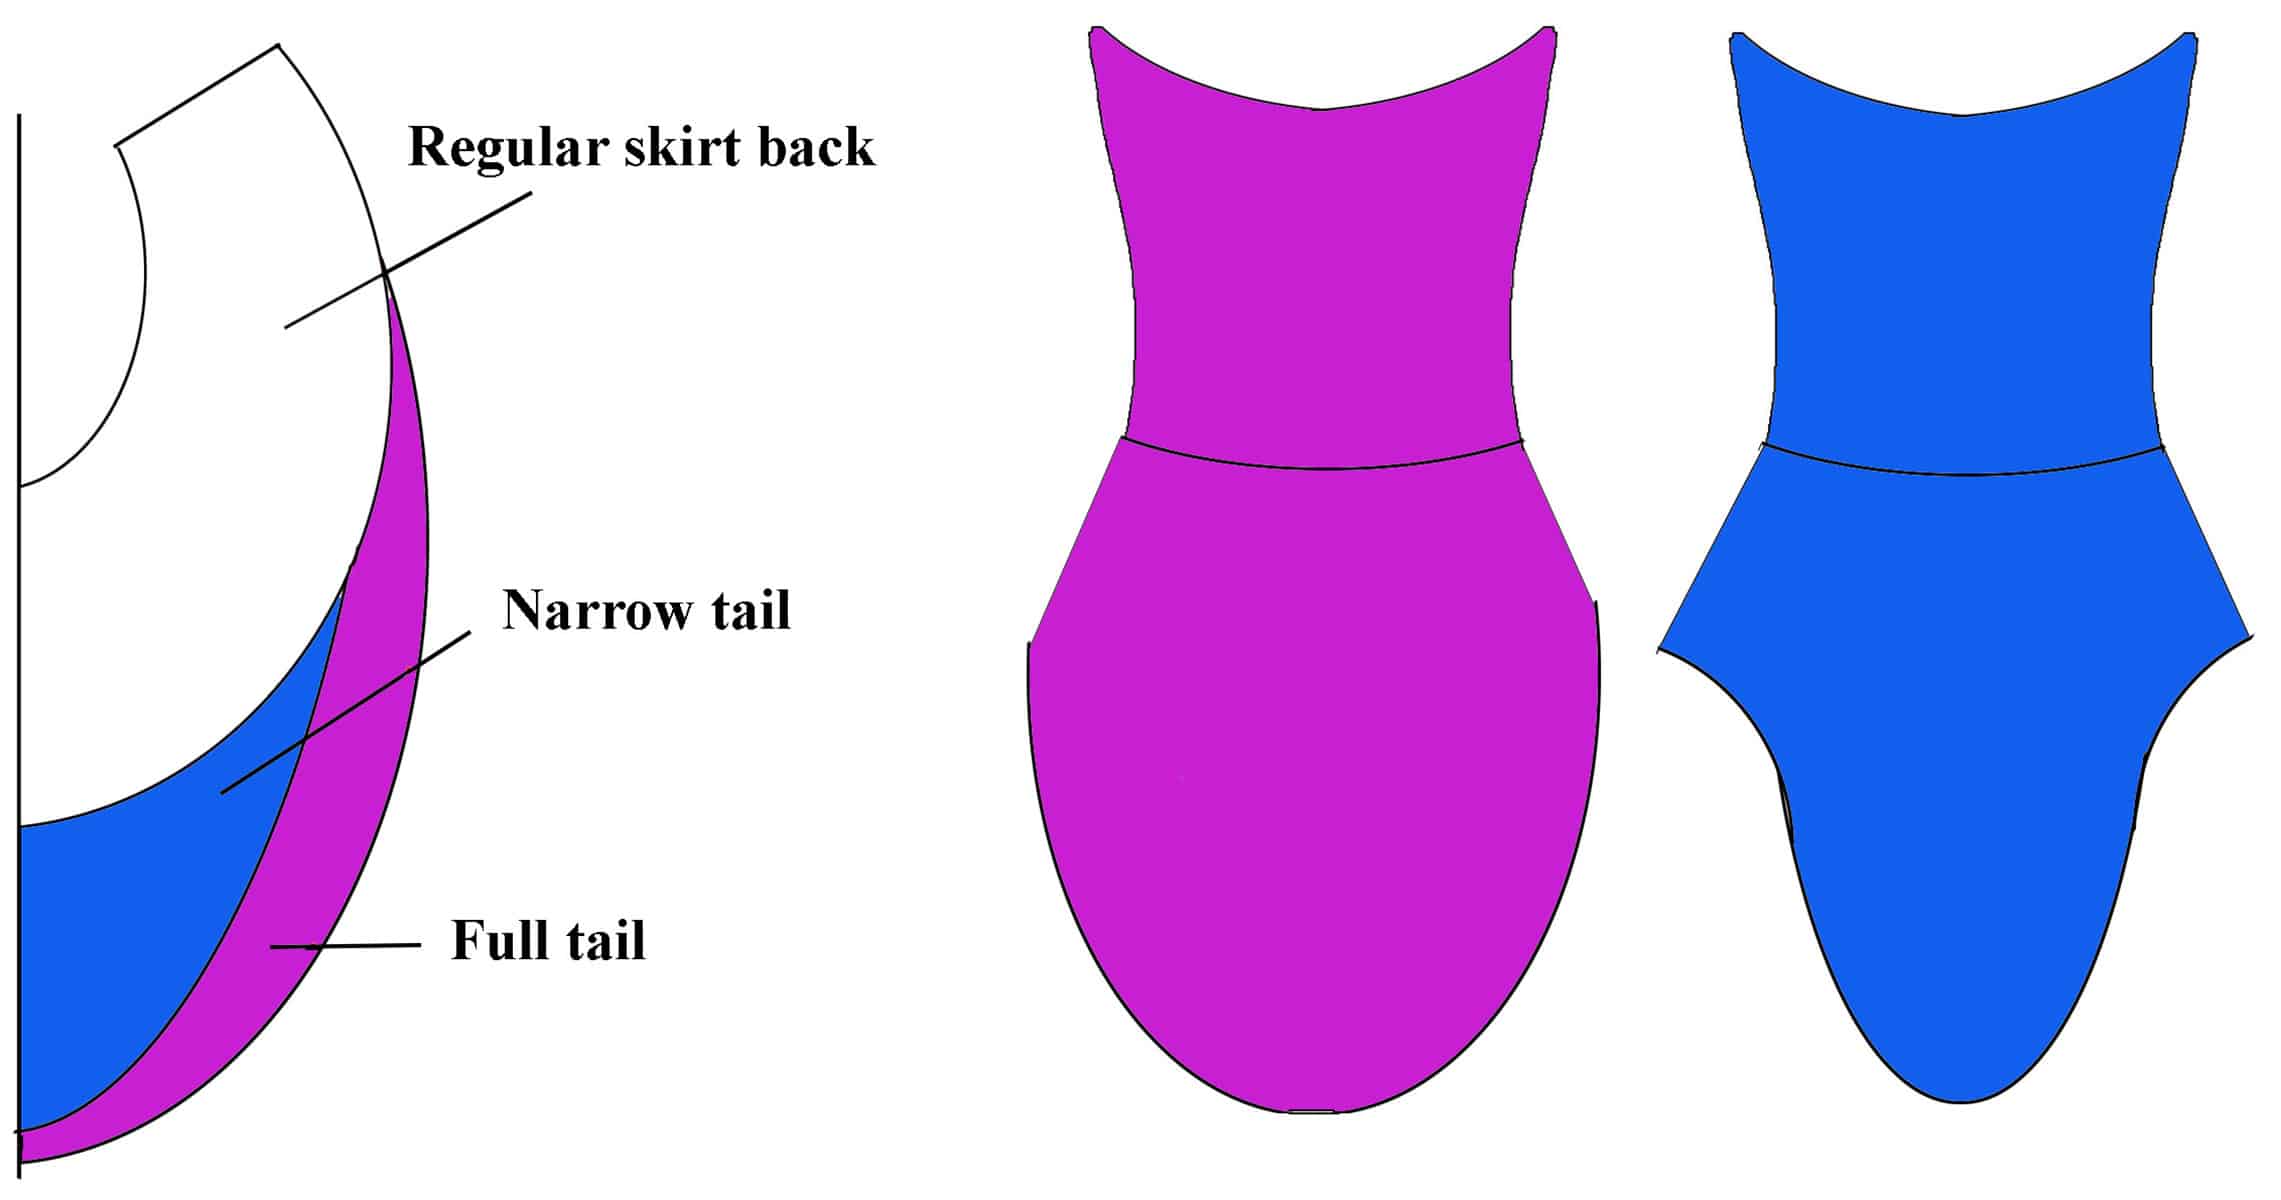
Lay your skirt back pattern on a larger piece of paper, with the centre back lined up against the edge of the paper. (Fold skirt pattern in half if necessary)
Determine how much longer than the actual pattern you would like the tail to be.
Ice dancers can get away with almost any length, typically down to the backs of the knees.
Free skaters should experiment, but not go much beyond 5 inches longer than the original pattern.
Along the edge of the paper, continuing along the centre edge of the skirt pattern, mark a spot which is the desired length away from the bottom pattern edge.
Re-draw the bottom edge of the pattern onto the paper.
For a fuller skirt, curve the new line out a bit, starting close to the side seam.
For a more elongated effect, be a bit more direct in drawing your new edge, and start extending the skirt out at approximately the midway point on your existing hem.
See sketches:
With the good sides together, sew and serge/zig zag the side seams. Hem and attach as per usual.
How to Make a Handkerchief Skirt
This type of skirt works best with very lightweight fabrics such as illusion or stretch chiffon.*
Note: As you do NOT want to be stuck hemming a ton of little squares, be sure that whatever fabric you choose isn’t prone to fraying!
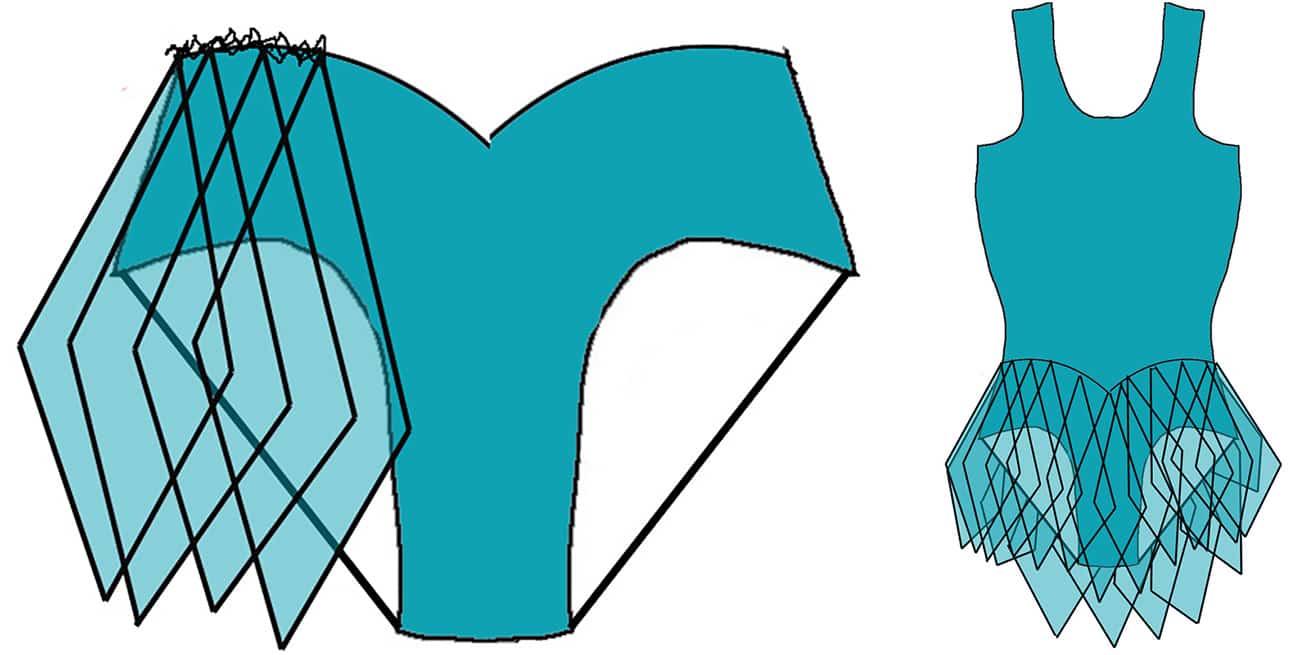
It is made by attaching the corners of many squares of fabric directly to the panty portion of the garment, then continuing as a normal skirt.
Determine how big your squares are going to have to be. The diagonal length of the square should be ½ an inch longer than the intended length of your skirt.
If you are wanting for the back portions to be longer, cut two different sizes.
Cut a WHOLE BUNCH of squares out of the desired fabric.
Don’t worry if some squares are not absolutely perfect.
With the good side of the finished panty portion facing out, start at one side seam and start sewing the squares to the waist.
Take one corner of a square and sew in on, and repeat as you zig zag along the waist.
Add as many layers to this as you need, and stretch it as you go.
You may want only a layer or two, especially if you are using a heavier fabric, or you may want many, many layers for a tu-tu like effect.
Once you have achieved the desired fullness, sew the bodice to this lower portion as usual.
Be very careful that the squares stay put as you are sewing them, and that the un sewn edges do not get caught up in the waist seam.
How to Make Petal Skirts
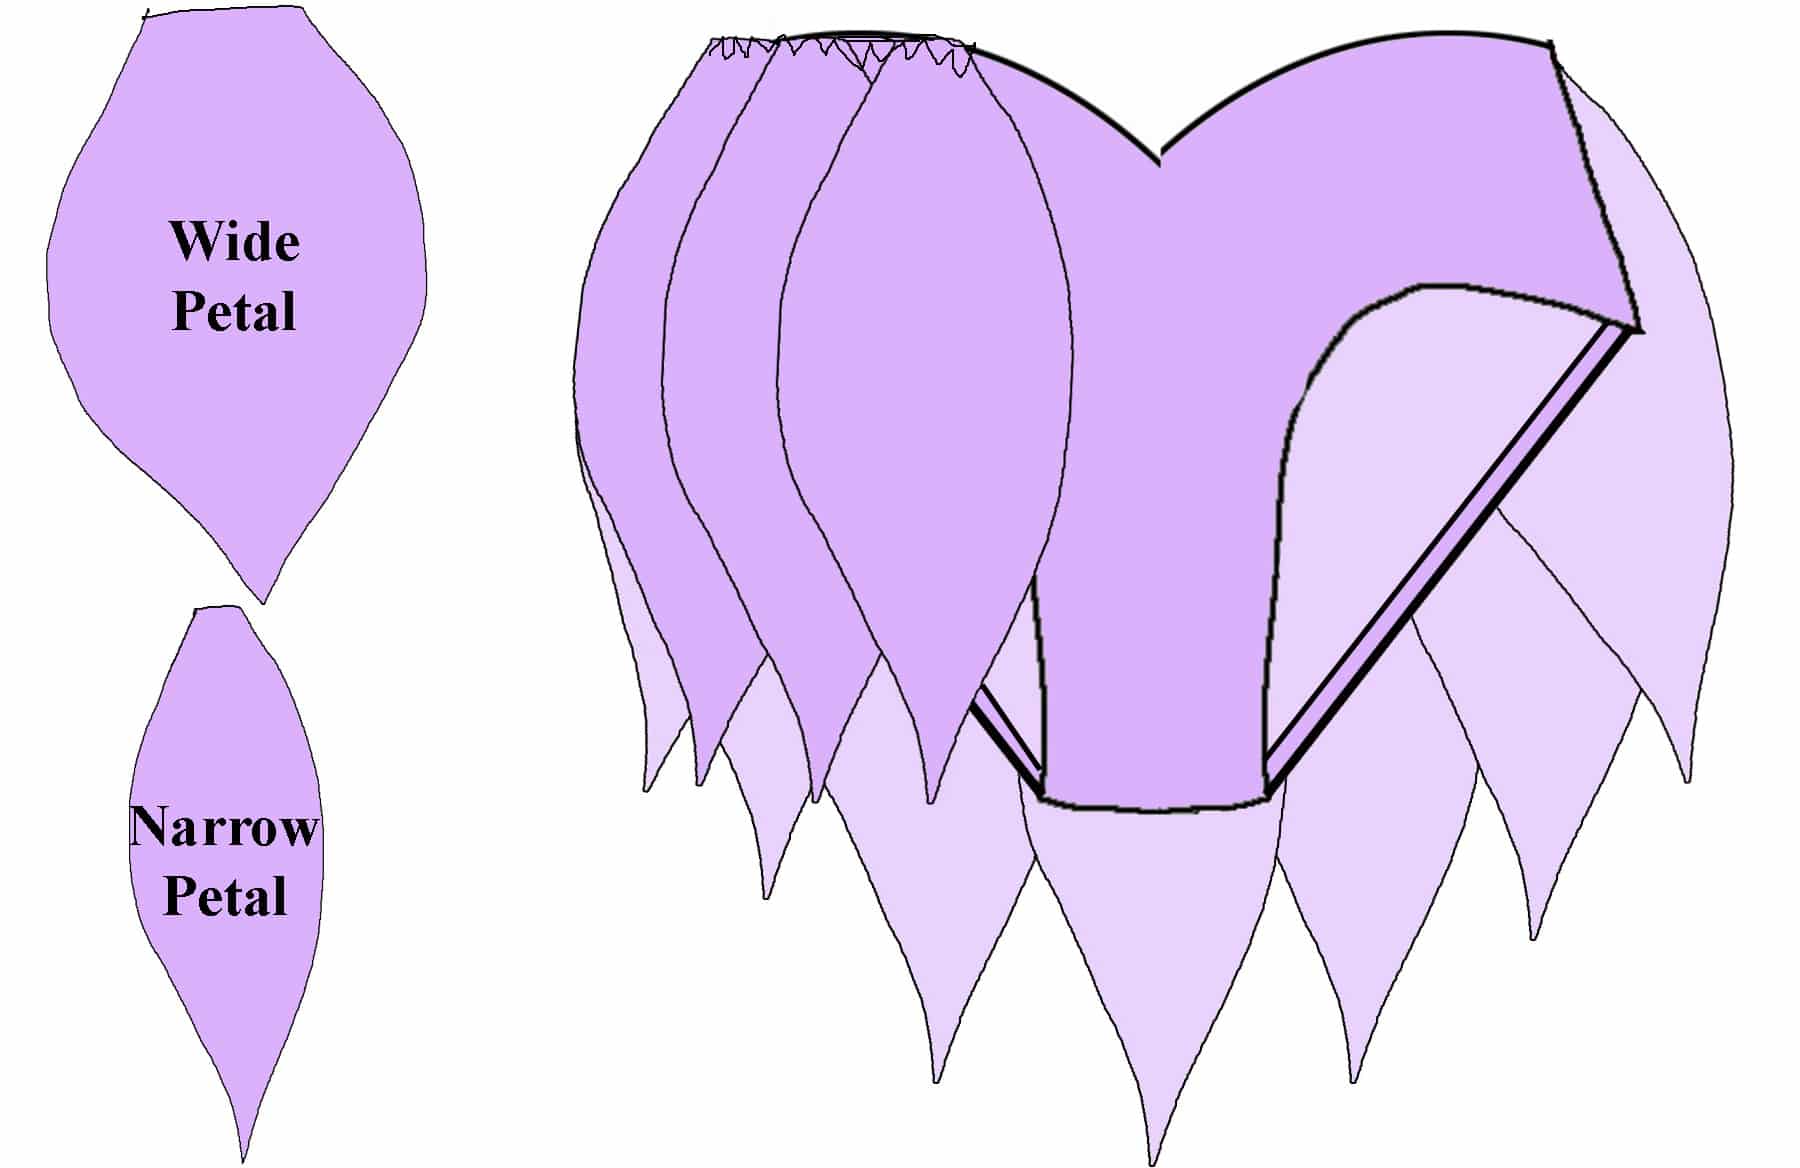
Another type of skirt which is not used too frequently is the petal skirt. This skirt is especially cute when used for very young skaters:

Want to learn how to make those long, metallic accents? See How to Make Sequins & Spangles
Cut “petals” out of your desired skirt fabric. I usually used spandex for this, but you could use a sheer fabric if you like.
These are usually peaked at one or both ends, curving out in the centre.
After assembling the panty, attach these petals to the waistline, right sides up.
You may or may not want to overlap these slightly. There’s no need for you to overlap and gather to the extent of the handkerchief skirt, in fact, that much layering would ruin the effect.
Assemble skating dress as usual
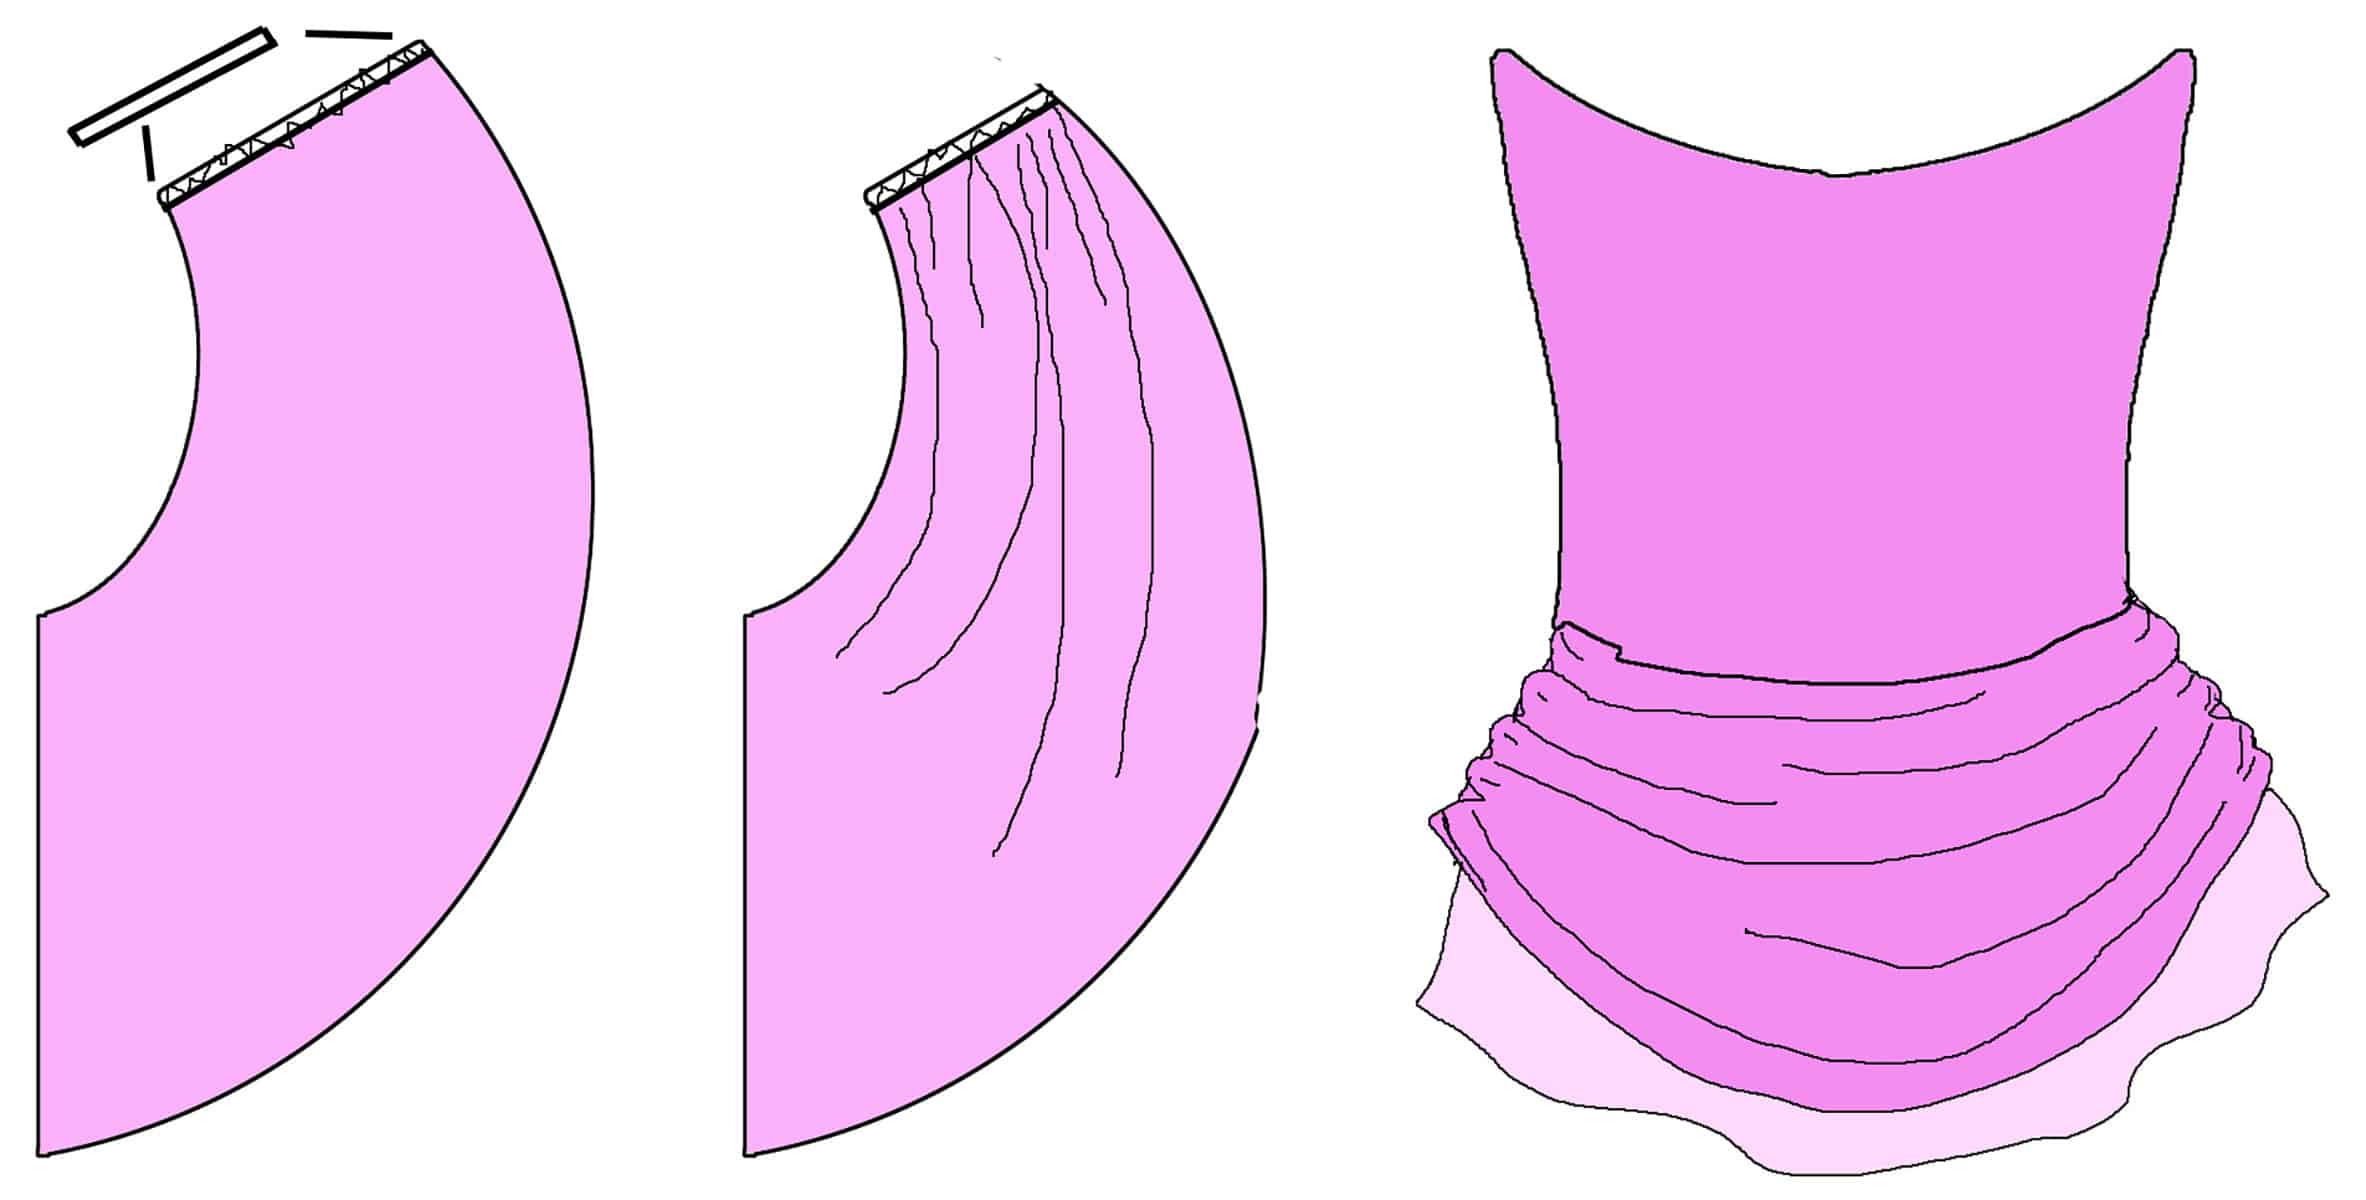
How to Make Draped Skirts
This technique is not one that is used frequently, but it is a nice effect.
This works best with multiple layered skirts made of lightweight fabrics (like stretch chiffon or illusion).
First, draft your bottom skirt layer.
Your top layer can be the same length as the bottom layer, or a bit longer - especially in the sides. It just depends on how much of a “swag” you want!
After assembling individual layers (Side seams and hems, if applicable) for the skirt:
Use a piece of clear swimsuit elastic that is shorter than the side seam of the uppermost layer, and stretch it to fit, sewing it right into the seam. This will gather the seam.
Repeat on the other side, if applicable. (You can do this with only one side gathered, for a more aymmetrical effect.)
Assemble the layers as usual.
One Final Note on Skating Skirts
A tip for sewing the bottom to the top: If your waist has a “V” shape, rather than a rounded curve: Sew up to the point of the peak, stopping one cm away (½ an inch).
Pivot the bodice piece slightly so that the un sewn half now lines up with the un sewn portion of panty part on the other side of the V.
Be sure to keep the needle in the fabric as you do it, and that the bodice part lays flat, no puckers.
Continue along the rest of the skirt waist.
More Figure Skating Sewing Tutorials
Want some more skating related sewing content? Try these on for size:
How to Hem Spandex
Bodyshirts for Male Figure Skaters
Figure Skating Skirts
80's Figure Skating Dress
Flames Figure Skating Dress
Pink & Black Skating Dress
How to Pattern and Make Waterfall Skirts
How to Make Scrunchies
How to Make Skate Covers
How to Make Soakers
Make a Basic Ice Skating Dress
Proper Care of Figure Skating Dresses
How I Made That: Art Deco Skating Dress
How I Made That: The Ursula Dress
Share the Love!
Be sure to take some pics of your handiwork! If you post it to Bluesky, be sure to tag us - @SpandexSimplified.
Also, be sure to follow me on Pinterest, and subscribe to my Youtube Channel, so you never miss out on any of my nonsense.
Well, the published nonsense, anyway!




I’ve done this many times but it’s always been hit or miss. Thanks for the method behind the madness.