

It might not be a skill you'll need often, but knowing how to make sequins and spangles can come in handy for custom spandex costuming!

A while back, I was planning for making example skating dresses for my booths at upcoming competitions.
Generally speaking, I do my samples as “sample size” - generally an Adult XS.
Not the most diverse, but hey - old fashion industry habits die hard!
This time around, I was planning to add some larger adult dresses, as well as a couple teeny, tiny child dresses.
I thought back to the smallest dress I’d ever made - a white velvet one with tiny Leg-Of-Mutton sleeves, a petal skirt, heart-shaped mesh cutaways, and more.

The remade dress, 30 years after the fact.
I figured it would be fun to remake it as a sample dress... 30 years after I made it. It was a cute dress, so why not?
I ordered the materials, made the pattern, and was good to go - ALMOST.
... I ran into a big problem with finding the kind of sequins I had used, the first time around!
I’m not a person who uses sequins often - it’s probably been 20 years since I have? - so I was admittedly out of the loop...
... but something had changed in the couple of decades since I last shopped for sequins.
What Are Sequins?
First off a bit of info for those not “in the know”.
Sequins are little bits of metallic-finish plastic that are sewn (or glued) onto clothing or accessories to give it a bit of shine.
Before crystals became the default form of bling for skating and dance costumes, sequins were ALL OVER the place. They were usually hand-sewn, accompanied by seed beads.
It used to be that you could find walls of them at any craft store, and - usually - at specialty skating or dance supply stores.
The most popular form were small, round, faceted sequins with a hole in the center, which came in a few different sizes, and a wide variety of colours.
Sequins also came in a wide variety of shapes, usually with the holes punched near the edge, rather than the middle.
You’d see long, unfaceted rounds... Teardrop shapes, leaves, these long, skinny “comma” looking ones, and more.
These days, I mainly only see sequins in sequined fabric... usually the colour-change kind.
You know, where you brush you hand over part of it, the sequins flip, and you have a streak of a contrasting colour now revealed?
A meme that I made a few years ago. Seems like a good time to dust it off and re-share!
A Note on Nomenclature
Remember the whole “Crystal with a crystal crystal crystal” thing on my “Everything You Need to Know about Rhinestones” post?
The same sort of thing kind of applies here, too!
While I have always purchased what I’m looking for as “sequins” - the sections and labels they were sold in and under - there are actually various naming conventions that apply.
To some purists, “sequins” applies only to the faceted round style, and/or only the ones that have the hole in the center.
“Paillettes” would specifically refer to the larger, non-faceted variety of these decorations.
“Spangles” would refer to any such item where the hole was located near the edge, rather than the center.
However, I have never seen “sequins”, “paillettes”, and “spangles” separated out in any store, or even labeled differently.
So, for the purposes of this post, we’re going with the general, relatively generic term I’ve always known - sequins.
ANYWAY.
The Great Sequin Search of 2019
While I knew that crystals had replaced sequins as the bling of choice for skaters and dance, I guess I hadn’t followed that thought through.
I was shocked to find that - beyond a few colours of the small, faceted rounds - sequins were incredibly hard to find!
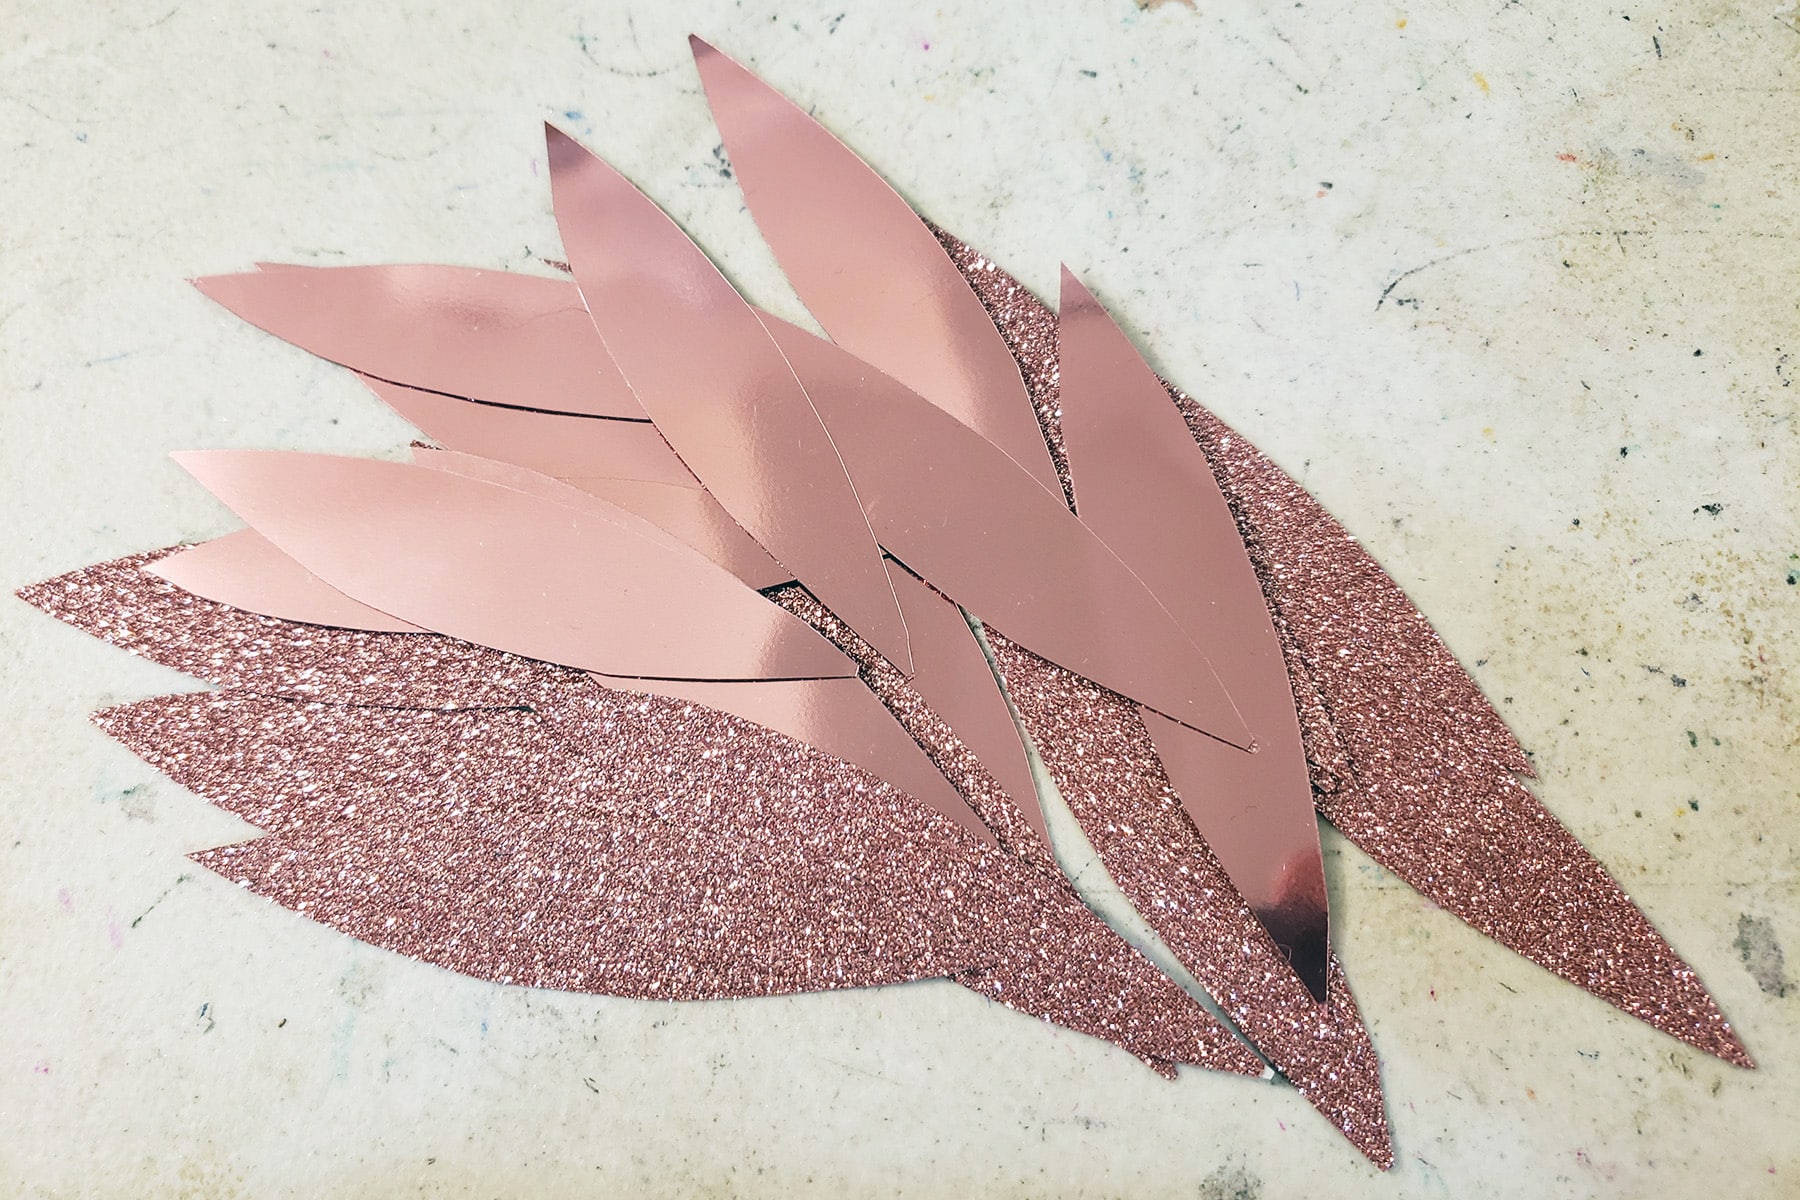
... this was pretty inconvenient, as I had a very specific cut of sequin in mind. (An elongated, pointed shape with symmetry on both axes)

I went to the local craft chains, my favourite spandex supply shop, and more.
There’s even a dance supply shop in the local fashion district ... didn’t even have luck there.
This was disappointing, as they actually had a huge display of sequins - in every colour you could think of - but basically just the rounds.
After a search online, I was left frustrated - it seemed that the style of sequin I wanted just.. Wasn’t a thing anymore!
... Never get in the way of an autistic with an idea, though!

How to Make Sequins
I decided that if I couldn’t buy them, obviously I was just going to have to make them. I wandered the aisles of the closes craft supply shop, looking for materials I could use.
After some experimentation, I came up with the materials and techniques that made the most sense for the shape and style I was planning to use - your mileage may vary, of course!
Materials Needed
Metallic / Foil Heat Transfer Vinyl
This comes in a wide variety of colours, and is what makes the mirrored, shiny side of the spangles.
I bought mine at the local Michael’s, but I see there’s a HUGE selection on Amazon, here: Metallic Heat Transfer Vinyl.

Glitter Heat Transfer Vinyl
Much like with the metallic HTV, this comes in a wide variety of colours - it was easy to find a good match for the metallic HTV I’d purchased.
I’d originally purchased a roll of this as a “Maybe glitter spangles would be fun?” sort of option, but after playing around with it, I found it to be a requirement.
I’m not someone who’s ever used HTV before, so maybe there’s a known reason or workaround for it, but I found that the metallic HTV didn’t “stick” very well to itself.
Bonding the metallic HTV to the glitter HTV not only gave a much better bond, but I also preferred the stability of it.
Your mileage may vary, so I definitely recommend testing whatever metallic HTV you have to see if it will bond to itself!
As with the metallic, I bought my glitter HTV at Michaels, but see that Amazon also has a huge selection, here: Glitter Heat Transfer Vinyl

Equipment Needed
An Iron
You’ll want an iron that has a non-steam setting, as well as an ironing board or other flat, heat-safe surface.
I use just a super basic Black and Decker Iron that I bought at Walmart a few years ago.
It was whatever was cheapest - I don’t iron often! - so you really don’t need anything fancy!
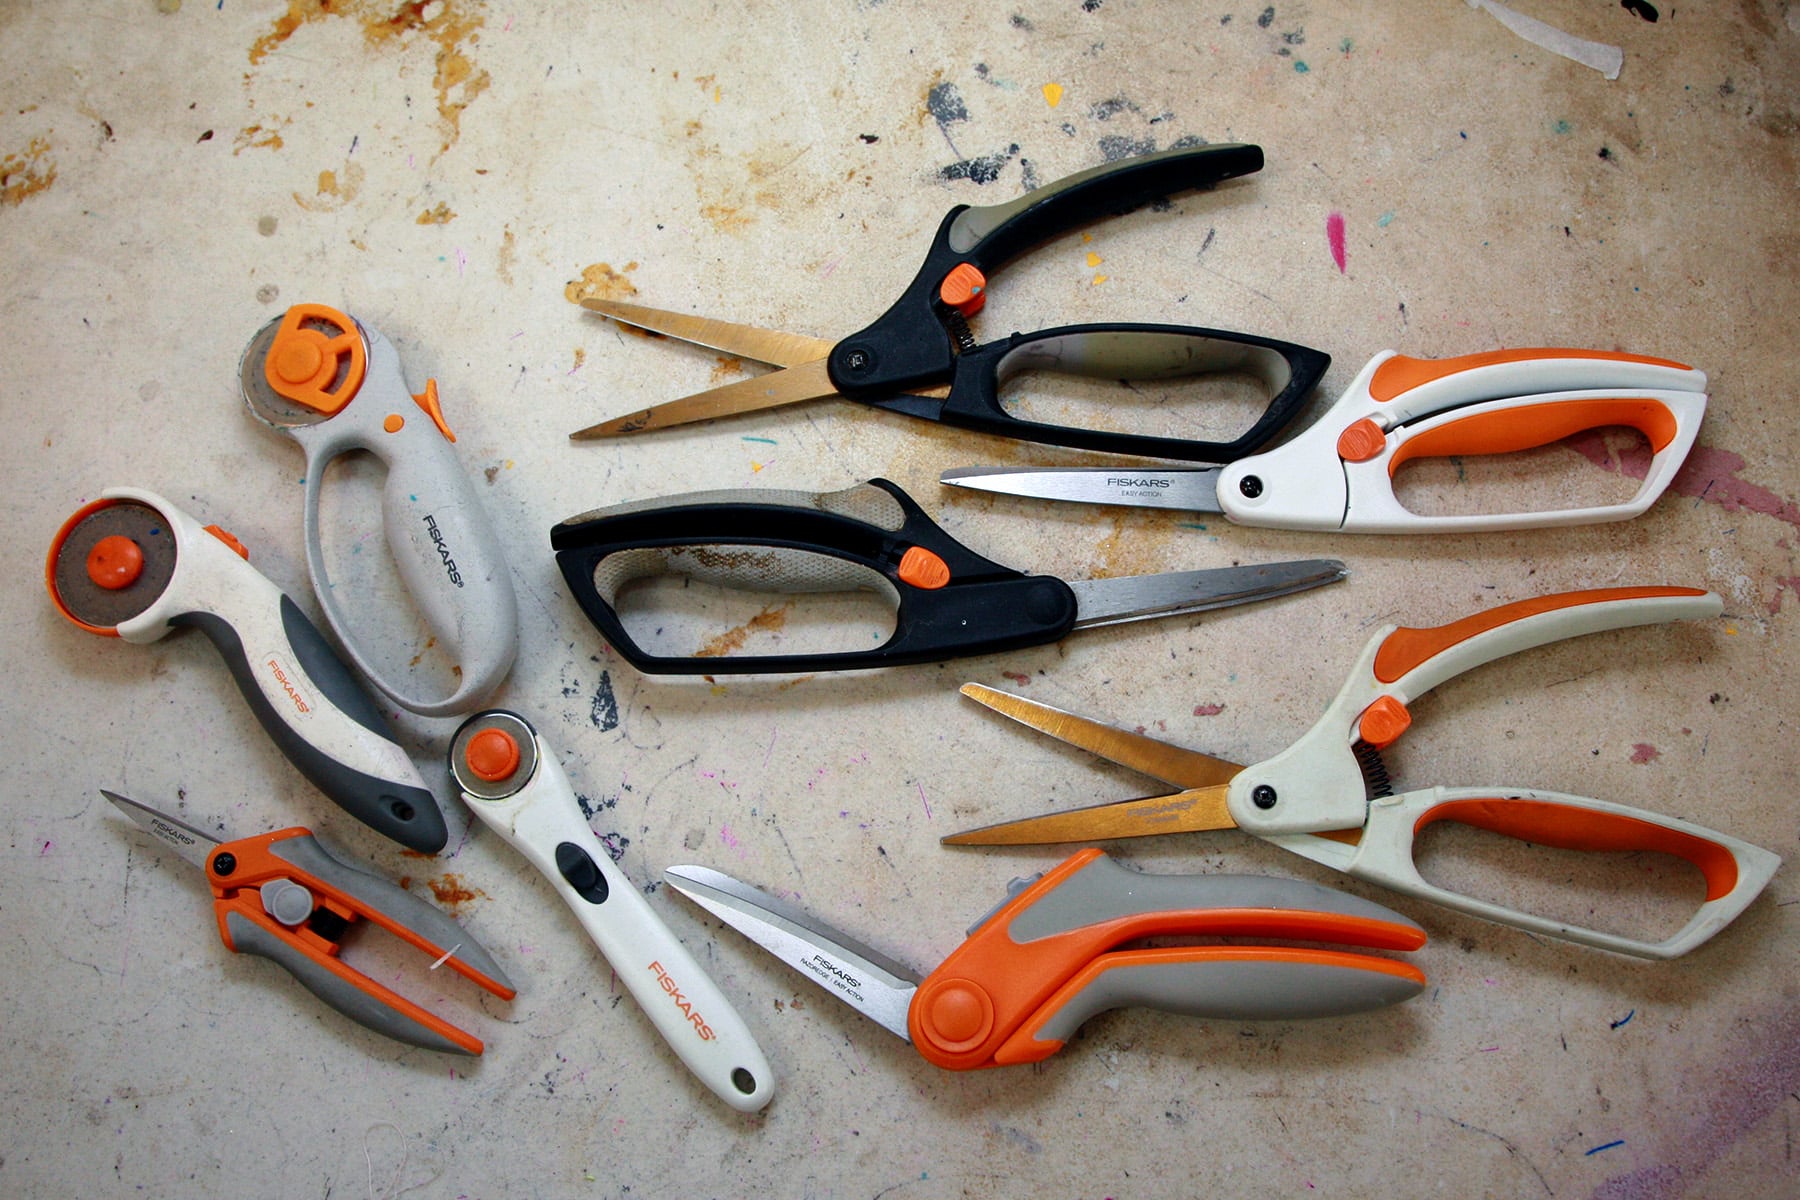
Scissors
You’ll be cutting through multiple layers of vinyl, so probably best to not use your sewing scissors.
Personally, I love my Fiskars 8" “Easy Action” Scissors, and - As I mentioned on my "Tools and Supplies for Spandex Costuming" post... I have a pile of them.
The spring-loaded feature is easy on my hands, and if I do grab the wrong pair to use on a project like this, they’re easily sharpened.
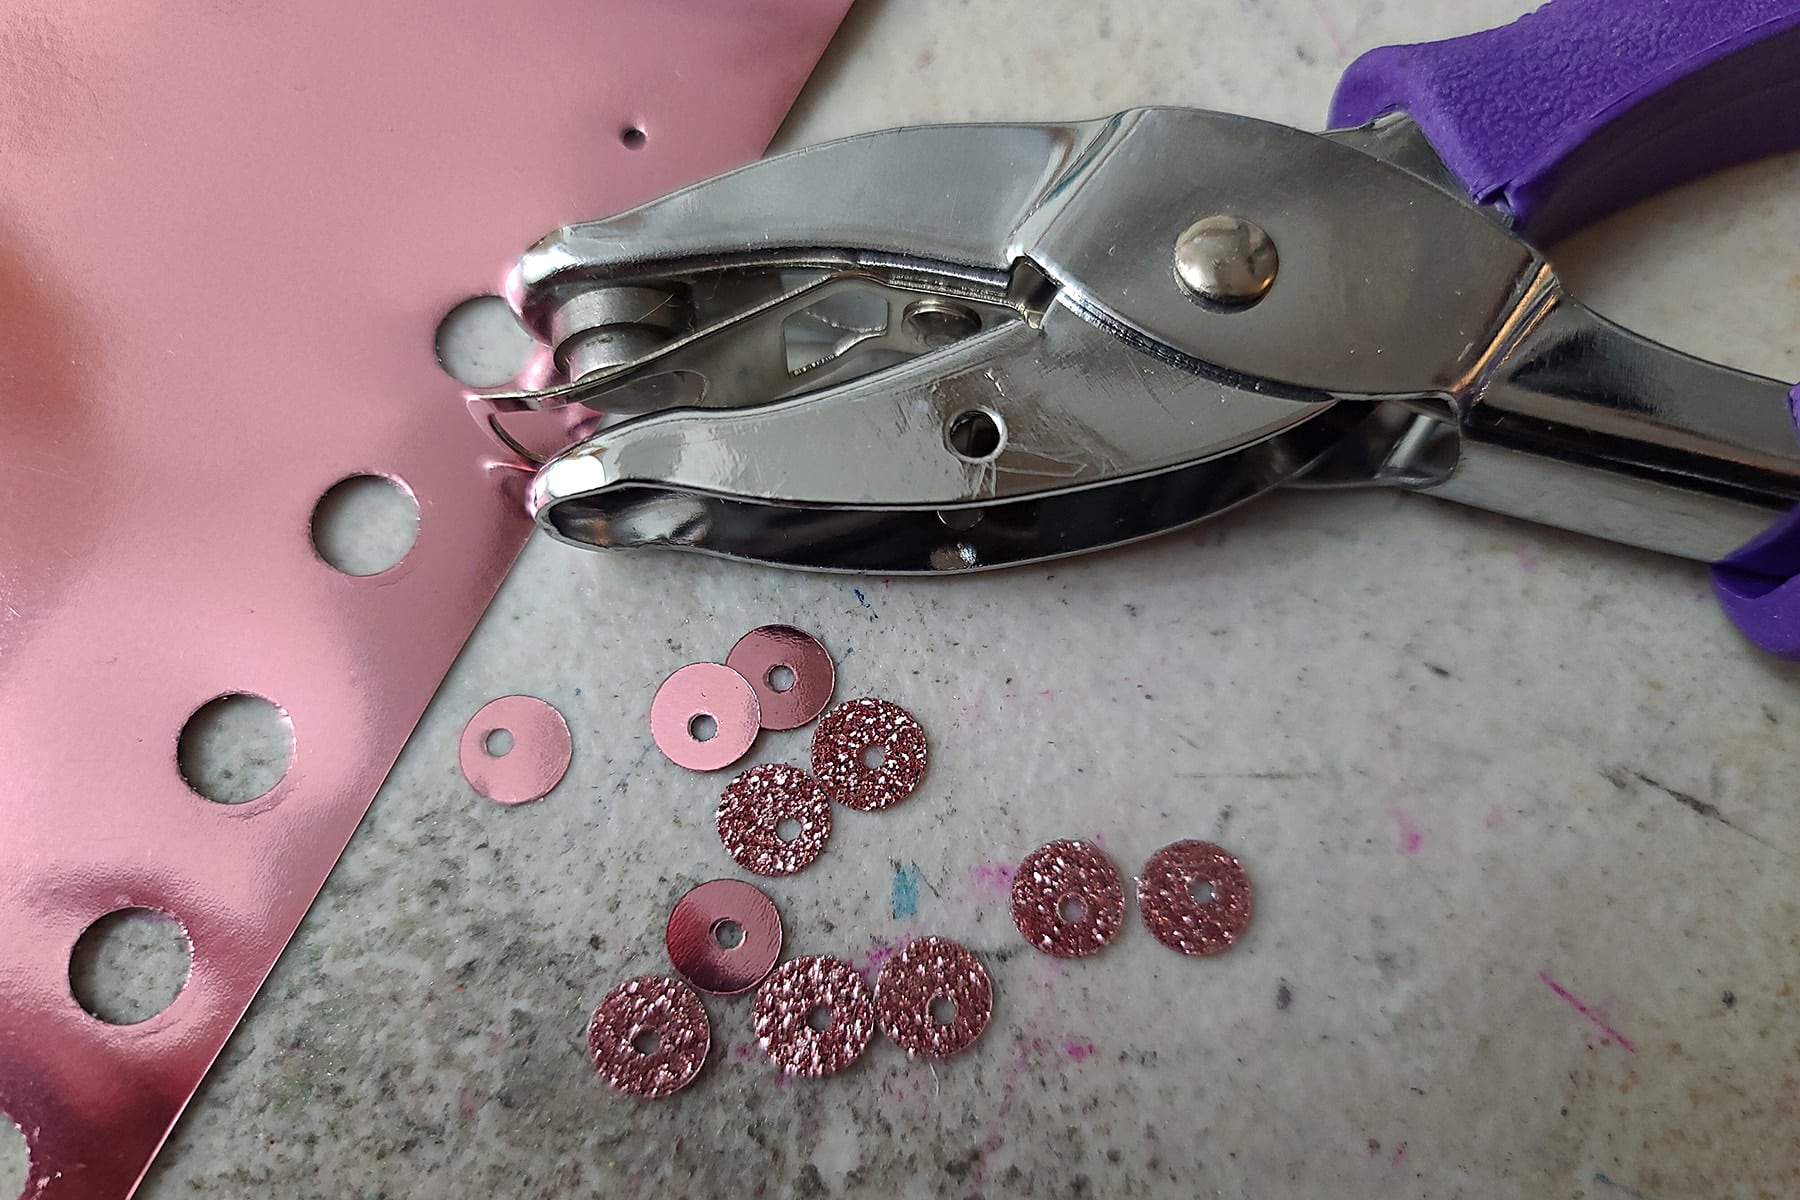
Hole Punches
At the very least, you’ll want a very small-hole hole punch, for making the holes in the sequins. The one I use is a 1/16" Hole punch.
If you’d like to make basic round sequins, you’ll want a larger hole punch for that (larger than normal hole punches!). The one I use is a 5/16" hole punch.
These were both parts of a 3 pack of Darice hole punches that I bought a few years ago, it looks like that particular set is no longer available.
Depending on what you’re looking to do, you can get round punches in a variety of sizes, including as a ½" hole punch, a 1" round hole punch, and even as Shaped Hole Punches,

Optional
While I just cut my shapes out with scissors, the shape you’re looking to make will influence whether or not you can do the same.
A CriCut Machine or Silhouette Machine would be a great option for cutting complicated shapes, or just not having to fuss with hand cutting even simple shapes, like mine was.
When making the actual dress, I worked up a quick pattern in Photoshop, to ensure symmetry on both axes. For the purposes of this tutorial, I just cut the shapes freehand.
DIY Sequins Technique
1. Decide how big of a sheet you’d like. A little goes a long way, and it’s easy enough to make more later, if you underestimate it!
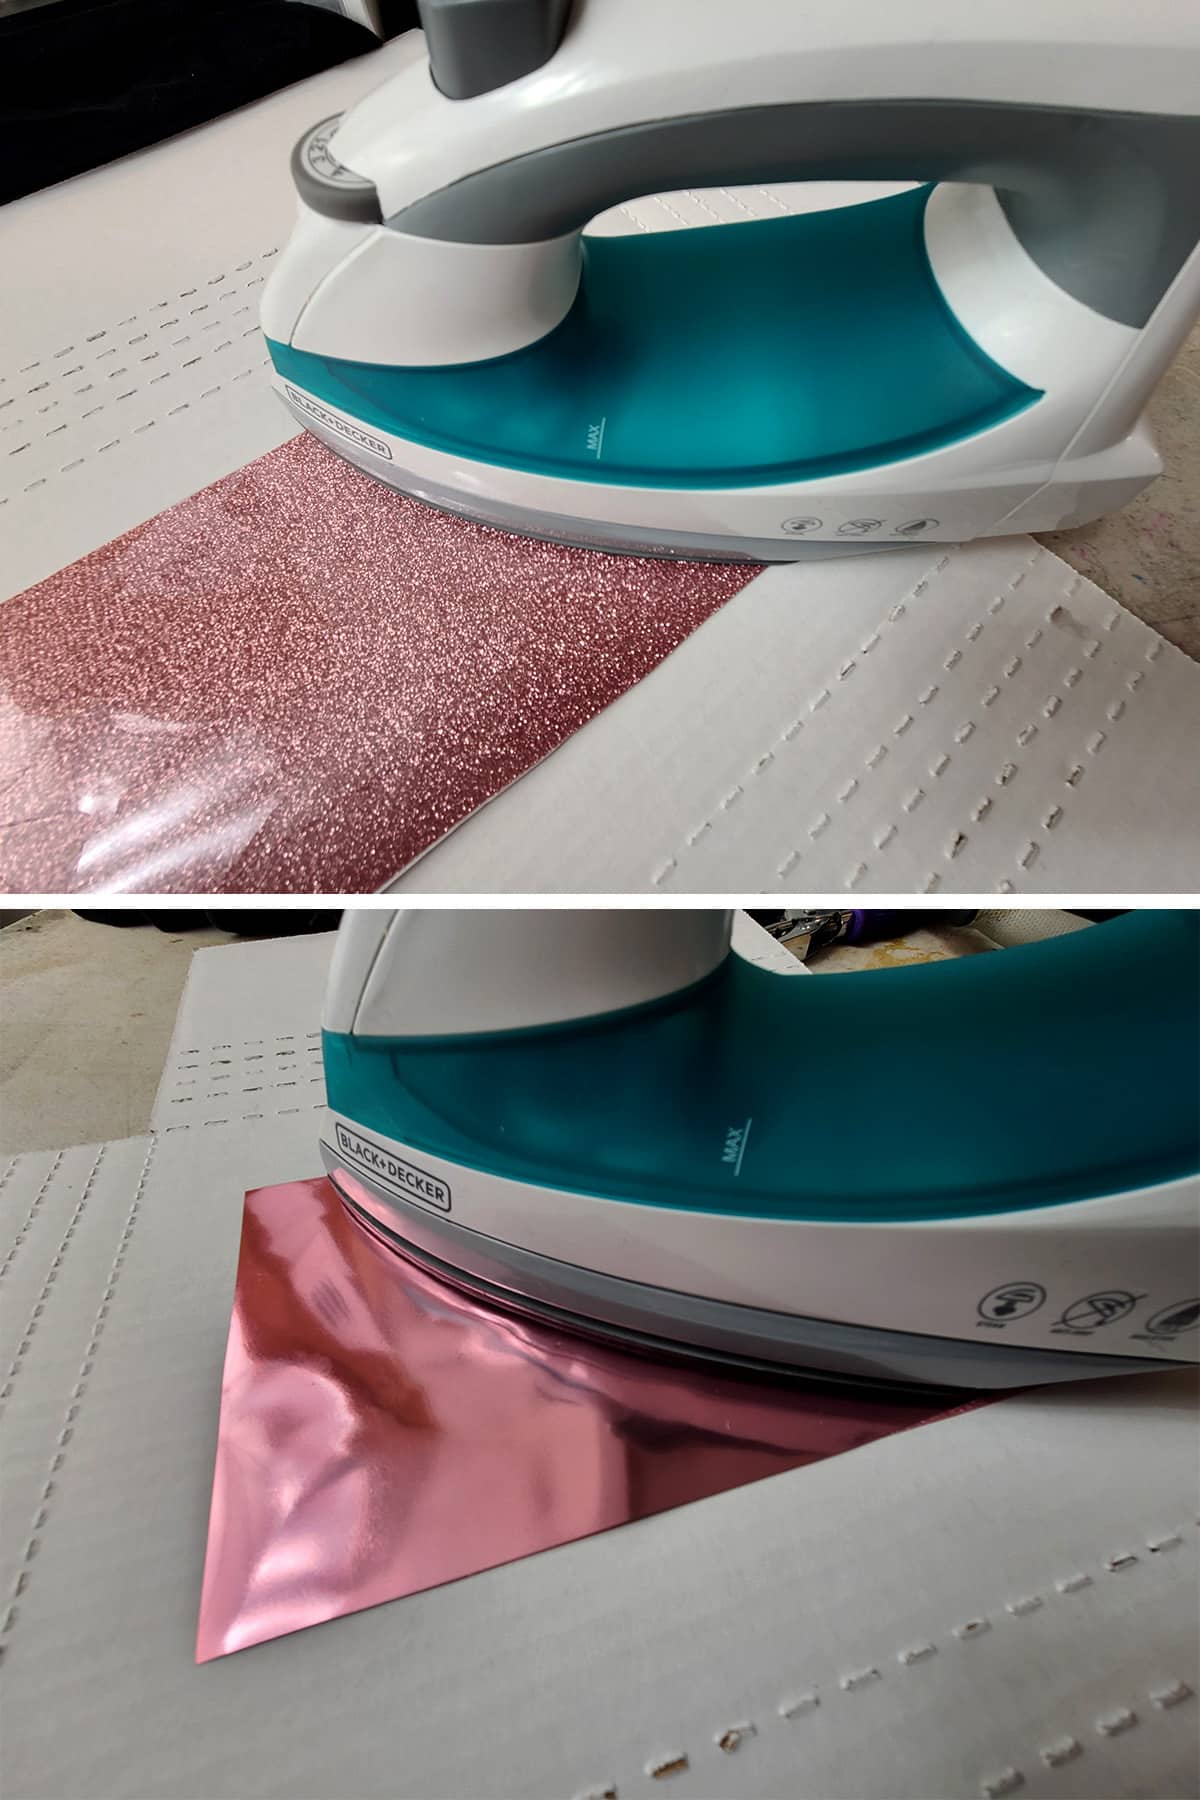
2. Cut a piece that size out of both the metallic and the glitter Heat Transfer Vinyl.

3. Position the pieces of heat transfer vinyl together, shiny / glitter sides facing out.
4. Following the directions on your HTV, iron the pieces together.
For this brand, that meant having the iron on the “Cotton” setting - no steam - and pressing down for 10 seconds, but the brand you use may vary from this.
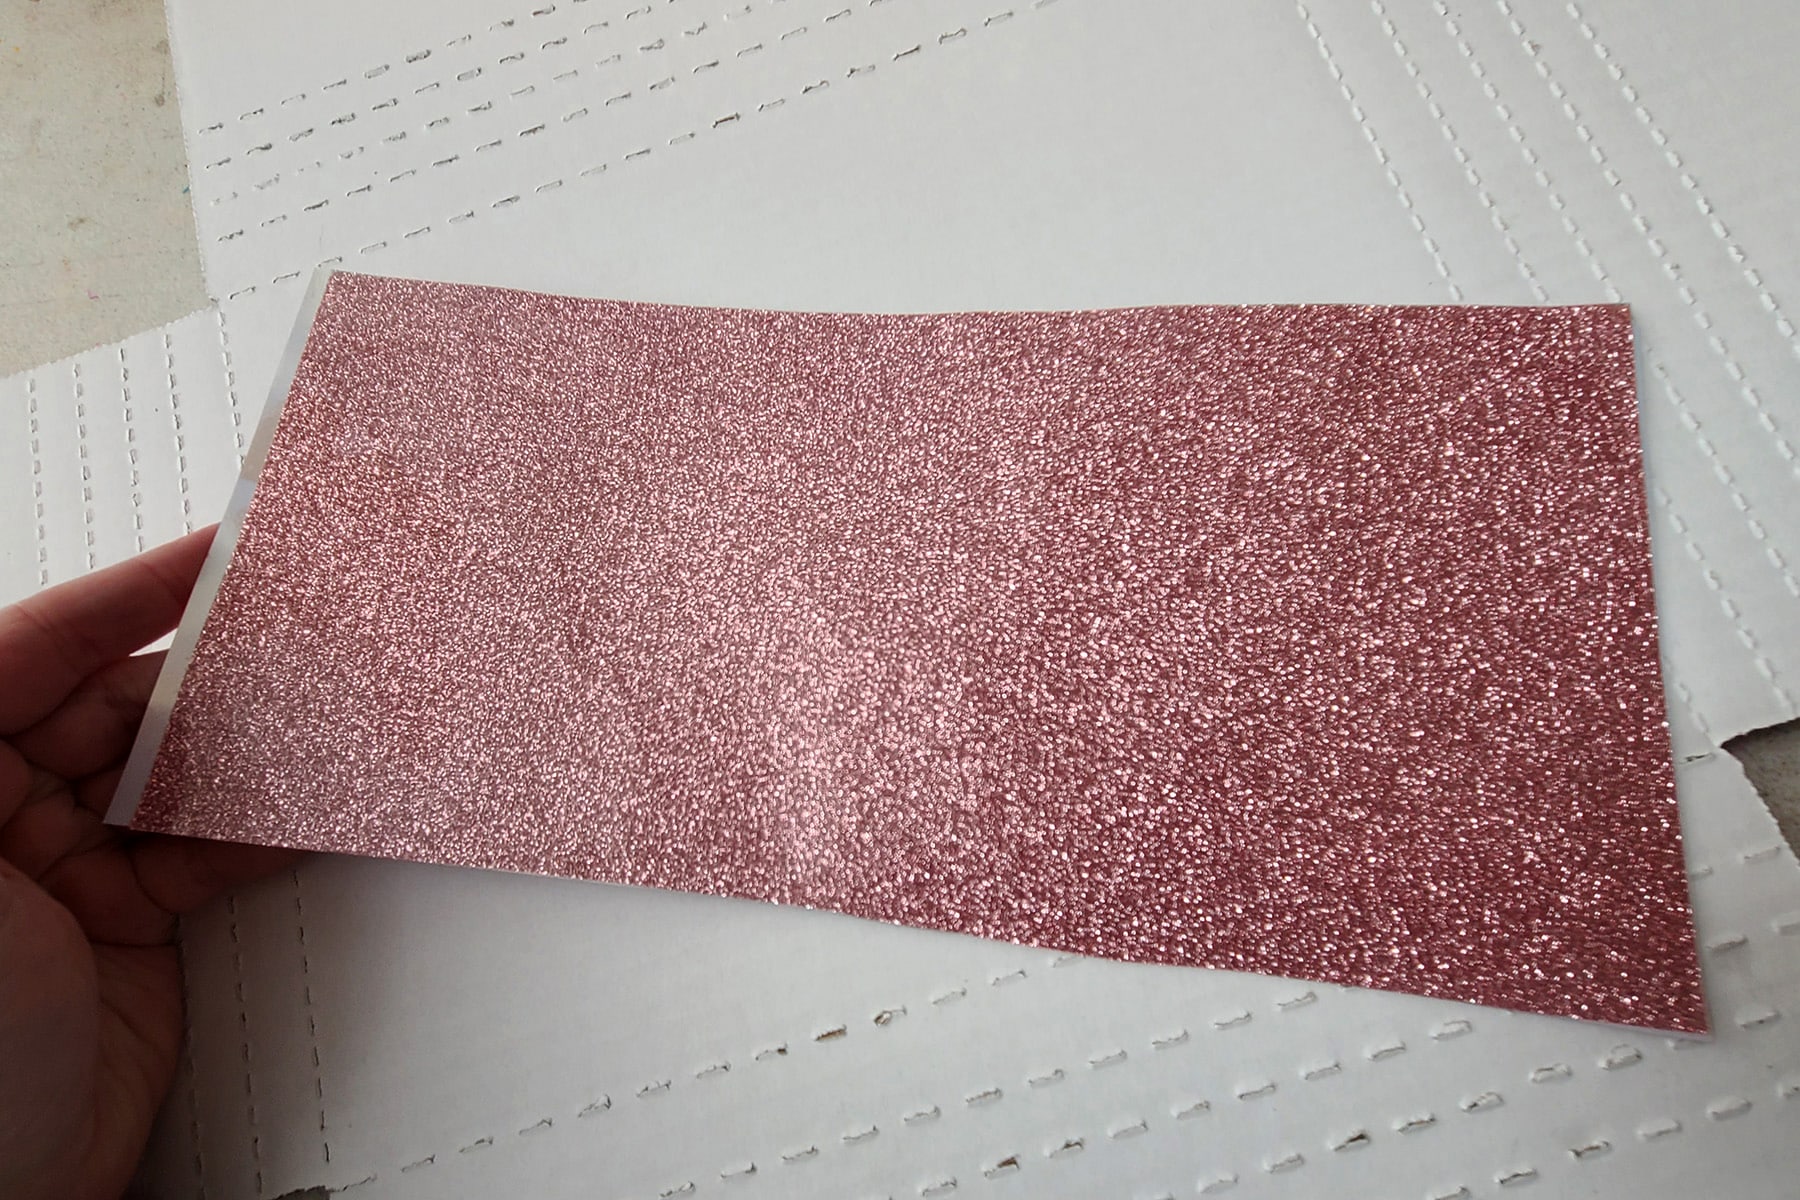
5. Allow your sheet to cool fully, on a flat surface.
If there’s a curl to it at all, set something flat and heavy on top of it, while it’s still hot.
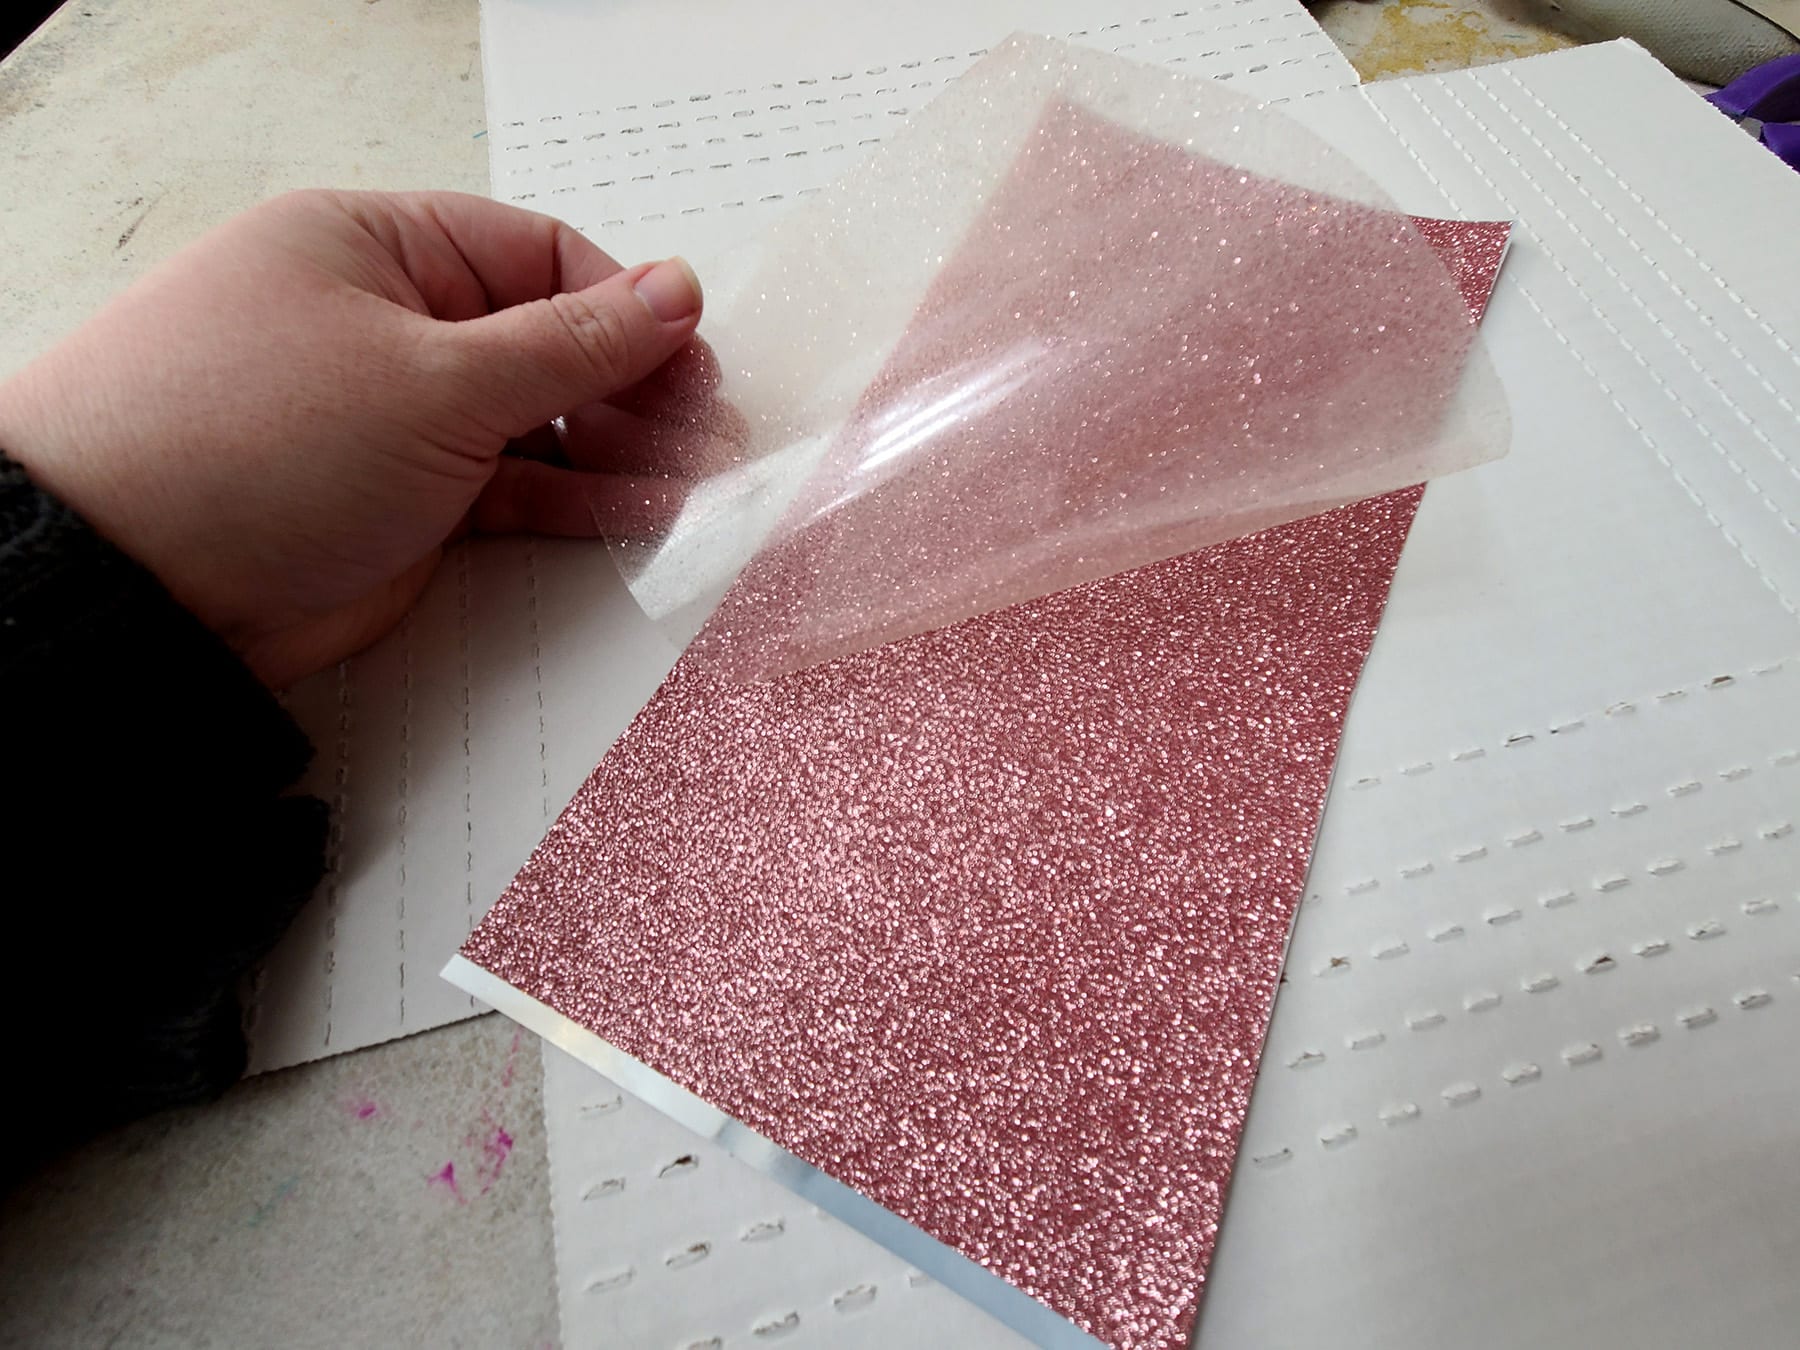
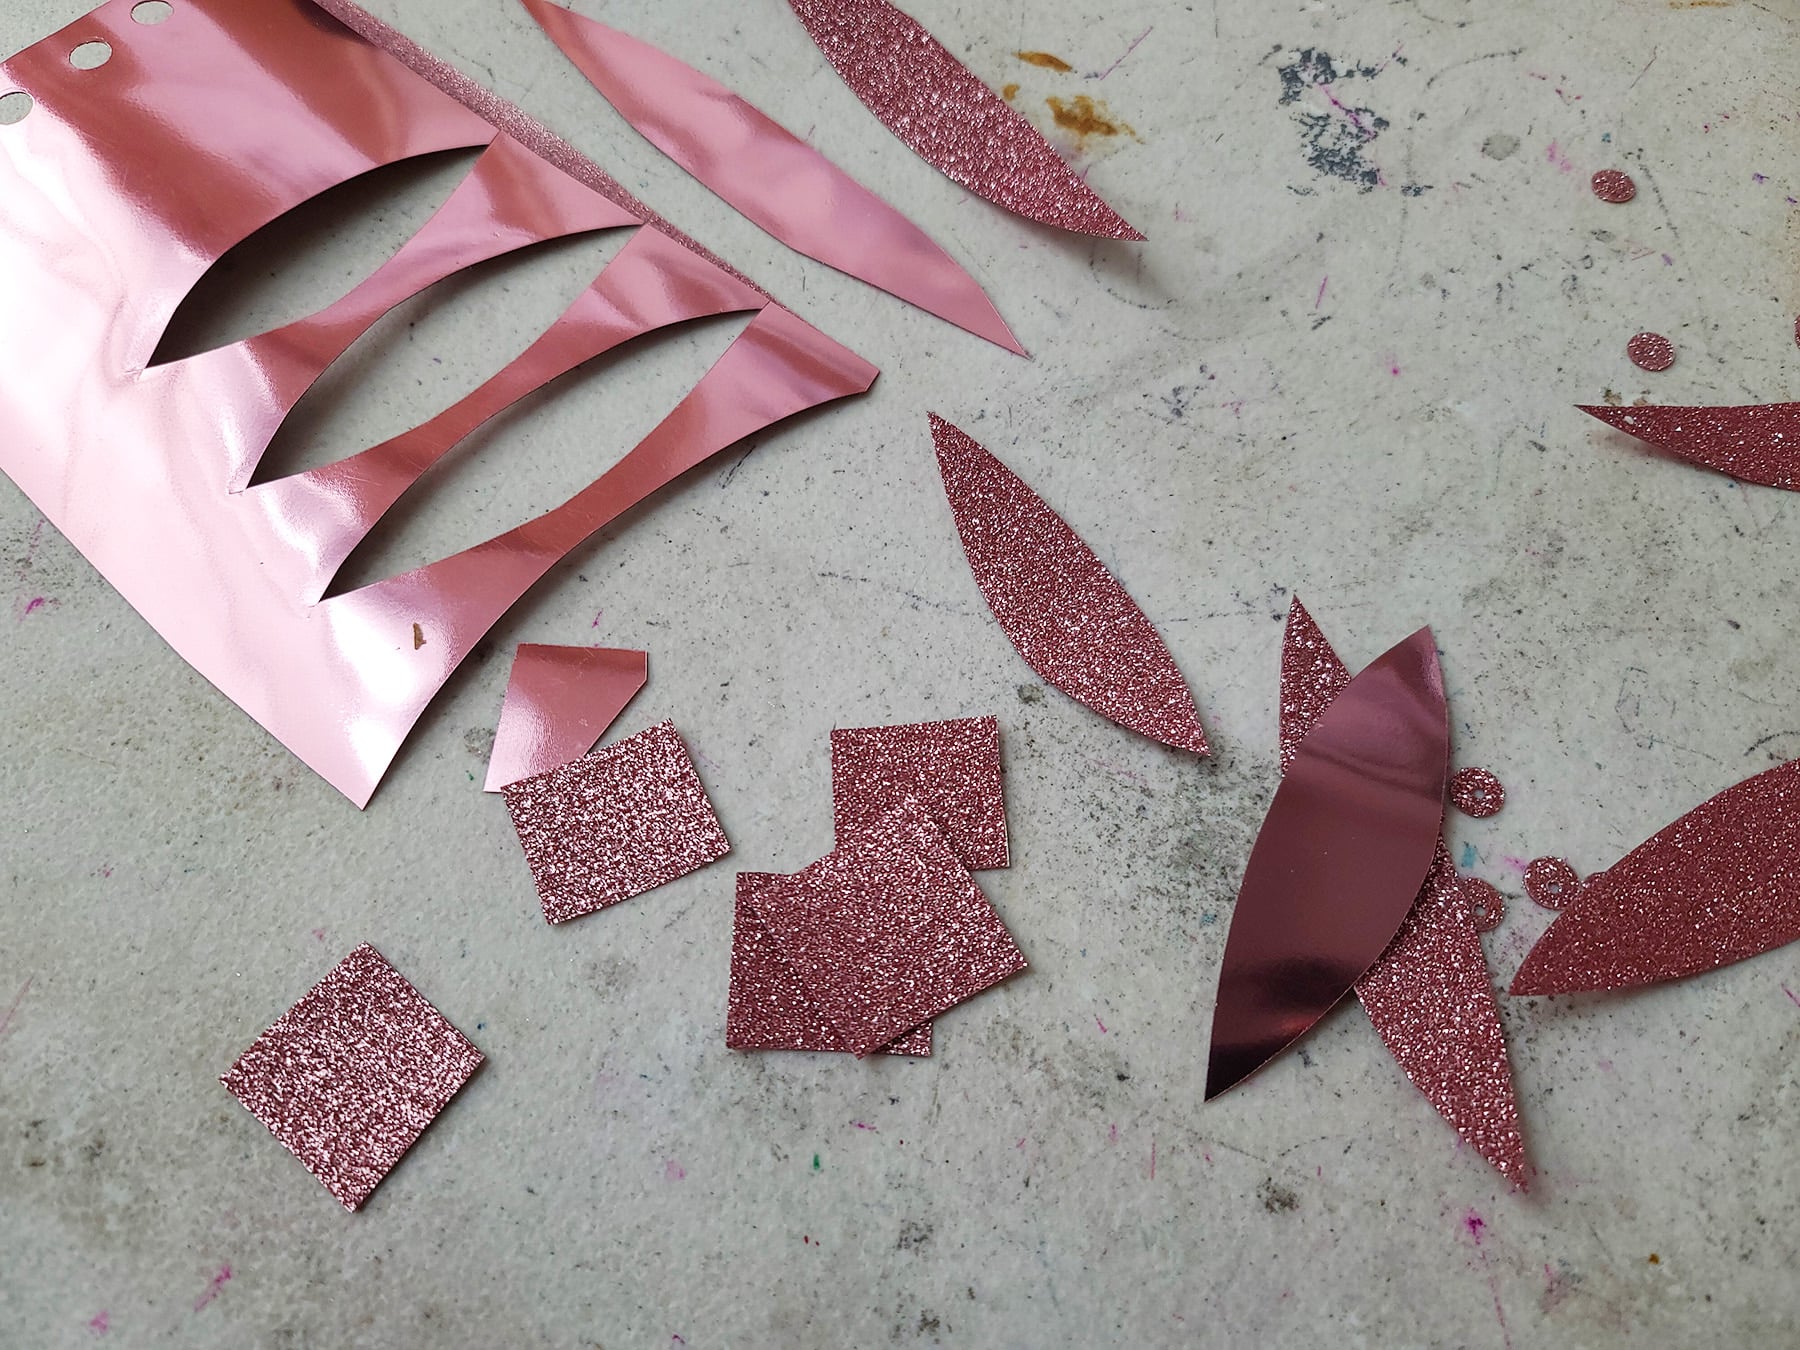
6. Peel the plastic sheet off the glitter side, if you’d like.
Leaving it on gives more stability, and can protect the underlying garment from snagging on the glitter (if it’s something fragile like chiffon).
Peeling it off gives it a more flexible structure and more sparkle.
For Larger Sequins
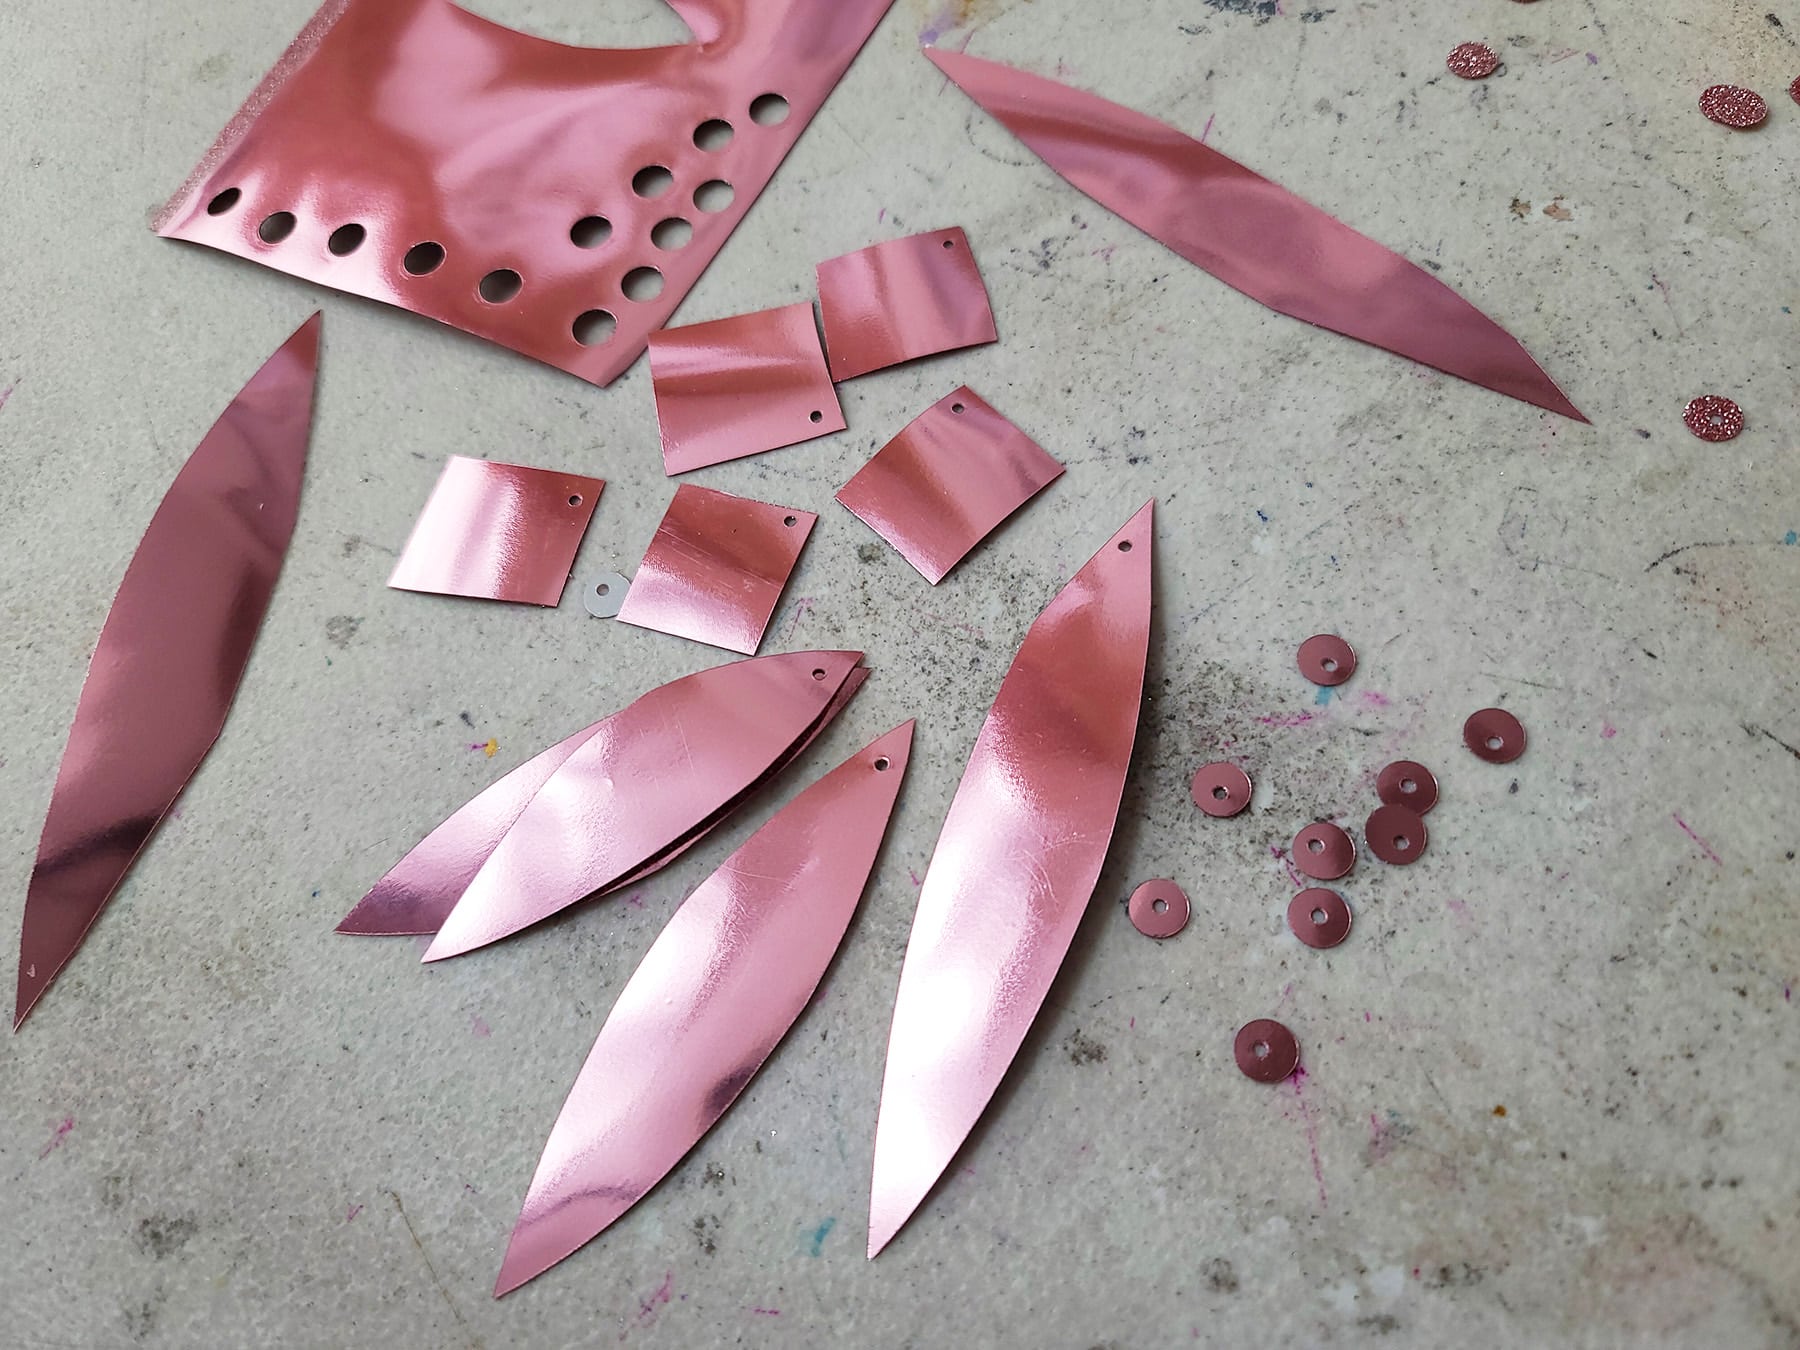
1. Once sequin sheet is fully cooled, use scissors, a large punch, or a cricut machine to cut your sequin/spangle shapes from it.
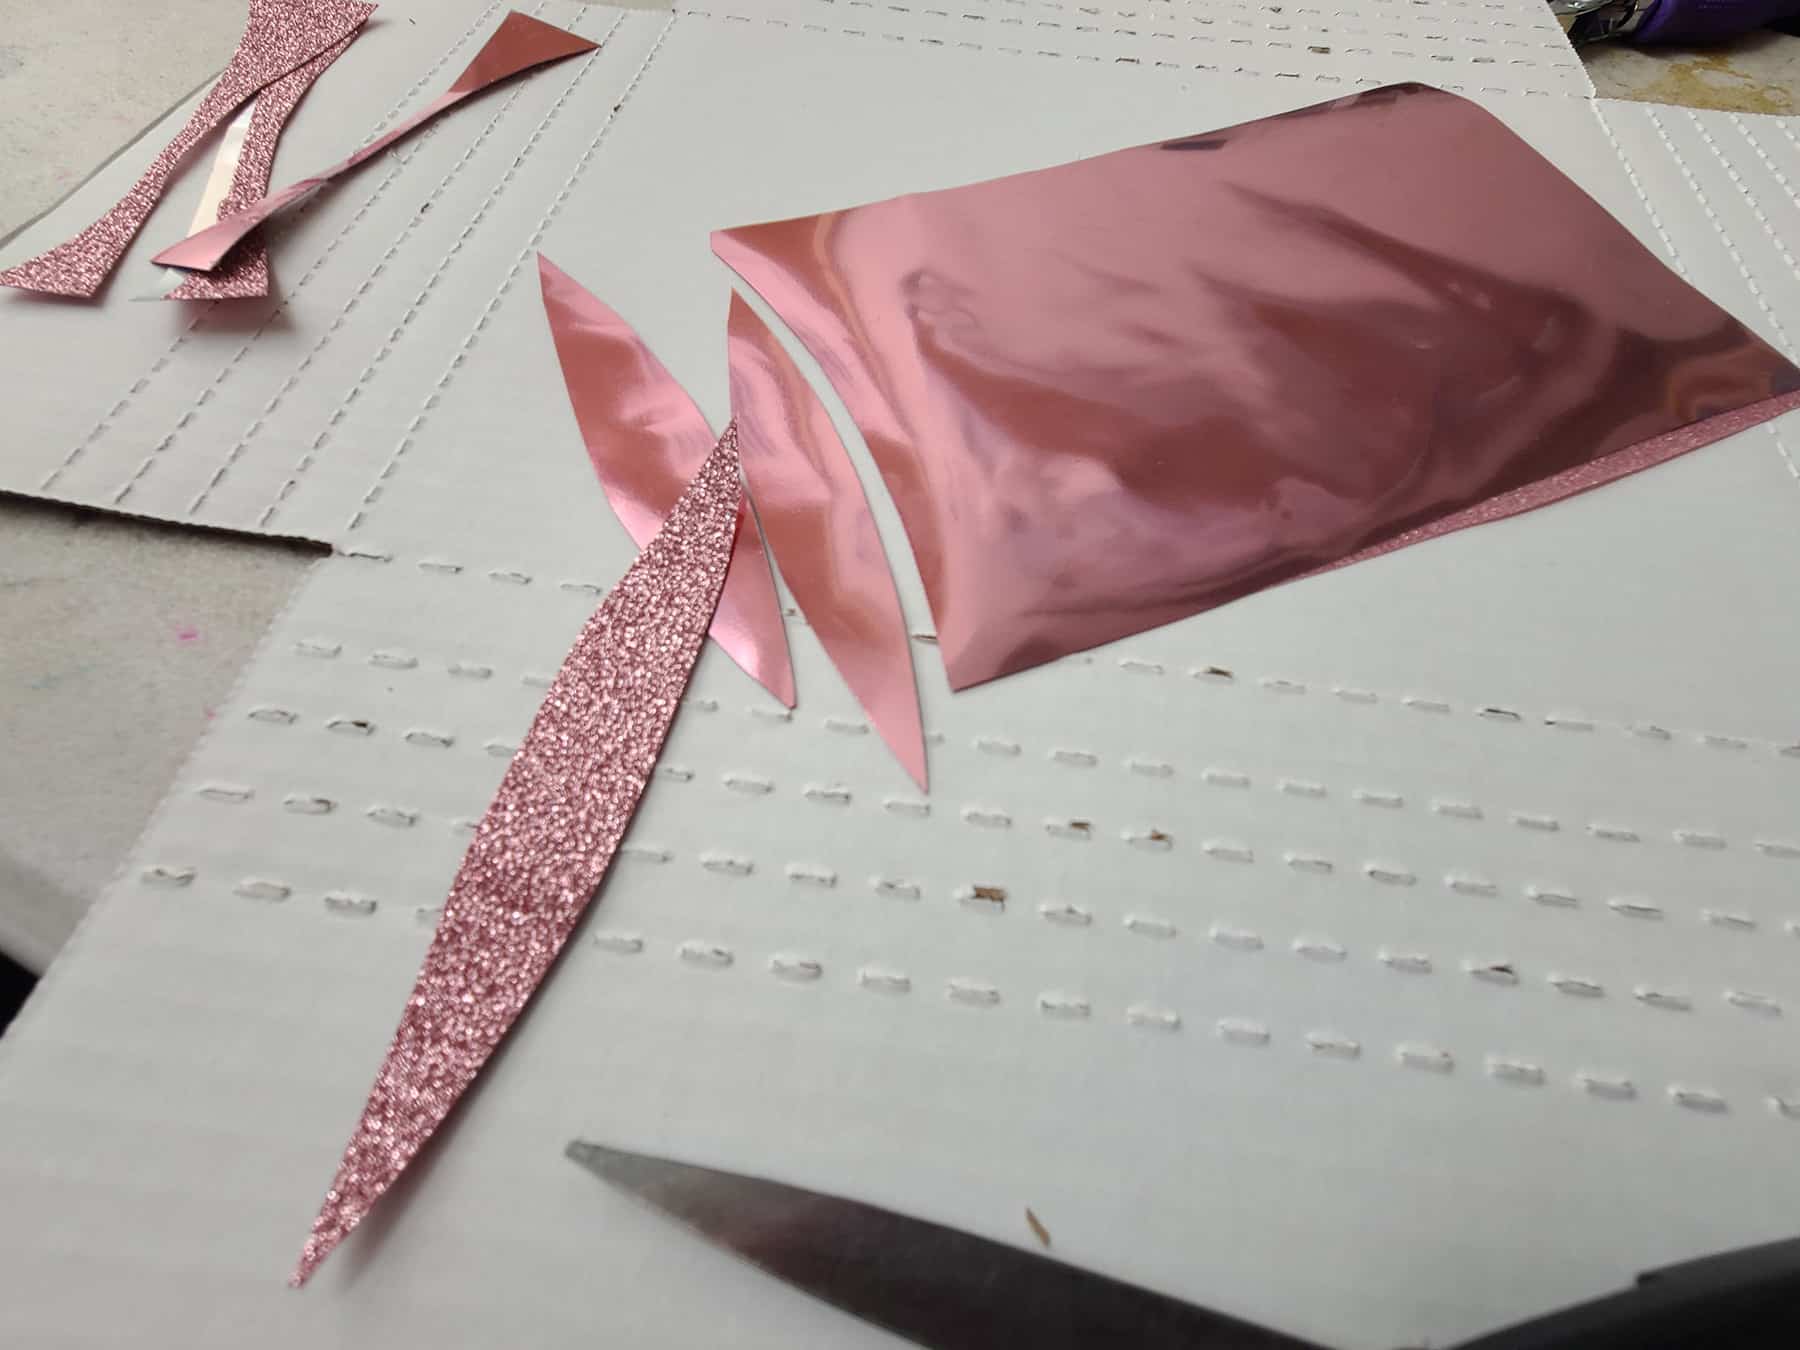
2. Use the 1/16" hole punch to carefully punch holes in your sequins in the desired location.

3. And you’re done!
For Smaller Sequins
1. Once the sequin sheet is fully cooled, use your 1/16" hole punch to punch the center holes in the sheet.
Be sure to leave room to accommodate 2x the radius of the sequin in between each punch.

2. Position your larger / shaped punch over the small holes you’ve punched, aiming such that the small hole will be in the desired spot of the finished sequin.

3. Punch your shapes out.
One Final Note
Once I had gone through all of this and was super satisfied with my results, someone told me that the Darice company had a product called “Dream Sequins”.
It’s a double-sided, shiny metallic paper that you can use to cut your own sequins, much in the same way I use my bonded HTV.
... However, it looks like the product was discontinued a few years ago.
I see it’s still possible to get the odd package, out in the wild (Etsy or Ebay), so that may be an option for some. The selection is - understandably! - limited, though.

Share the Love!
Be sure to take some pics of your handiwork! If you post it to Bluesky, be sure to tag us - @SpandexSimplified.
Also, be sure to follow me on Pinterest, and subscribe to my Youtube Channel, so you never miss out on any of my nonsense.
Well, the published nonsense, anyway!

How to Make Sequins & Spangles
Equipment
- Iron
- Scissors
- 1 16" Hole Punch
Materials
- Metallic / Foil Heat Transfer Vinyl
- Glitter Heat Transfer Vinyl
Instructions
- Decide how big of a sheet you’d like. A little goes a long way, and it’s easy enough to make more later, if you underestimate it!
- Cut a piece that size out of both the metallic and the glitter Heat Transfer Vinyl.
- Position the pieces of heat transfer vinyl together, shiny / glitter sides facing out.
- Following the directions on your HTV, iron the pieces together.
- For this brand, that meant having the iron on the “Cotton” setting - no steam - and pressing down for 10 seconds, but the brand you use may vary from this.
- Allow your sheet to cool fully, on a flat surface.
- If there’s a curl to it at all, set something flat and heavy on top of it, while it’s still hot.
- Peel the plastic sheet off the glitter side, if you’d like.
- Leaving it on gives more stability, and can protect the underlying garment from snagging on the glitter (if it’s something fragile like chiffon).
- Peeling it off gives it a more flexible structure, and more sparkle.
For Larger Sequins
- Once sequin sheet is fully cooled, use scissors, a large punch, or a cricut machine to cut your sequin / spangle shapes from it.
- Use the 1/16" hole punch to carefully punch holes in your sequins in the desired location.
- And you’re done!
For Smaller Sequins
- Once the sequin sheet is fully cooled, use your 1/16" hole punch to punch the center holes in the sheet.
- Be sure to leave room to accommodate 2x the radius of the sequin in between each punch.
- Position your larger / shaped punch over the small holes you’ve punched, aiming such that the small hole will be in the desired spot of the finished sequin.
- Punch your shapes out.


I just tried it with scraps of glitter and hologram HTV and it is AMAZING!!!
I used my Brother Scan N Cut to cut out the shape - knife 5,5, speed 1, Pressure 1 - and it cuts the shape perfectly 🙂
Thank you for this, my baton twirlers will be happy to try new decorations!!
This is the exact tutorial I needed for a sequin dress I'm trying to make next year, thank you so much!
You can actually buy sequin film by the roll in various places online, such as some millinery shops, aliexpress and if you need a shit load alibaba, colour choices may be a little more limited than htv availability..... But the white sequin film can be sublimation printed if you are really dedicated and if you need it to be sparkly but a certain colour or print you can use the siser foil adhesive or heat and bond and and iron or press or sheets of double stick tape and a clear holo foil from aliexpress that comes in a roll (it is best to laminate with clear adhesive laminate if you need great durability of the foil) , or use glitter htv and sublimate..... But my pro tip for making sequins with htv it to get some cheap laser transparency and iron the htv to that then cut, makes the faux sequins less floppy more sequiny...... You can also use just the laser transparency on its own and sublimate it with a print if you like clear sequins, you can foil it (technically don't need adhesive for this if you use the clear holo stuff from aliexpress but it scratches so bad if you don't protect it with laminate, you can also use toner reactive foil if you run it through the laser printer and hot laminate so you could put your colour on then add like silver foil stars) or paint with clear glitter paint/top coat /some sort of sealant with mica, sparkle pigments, glitter etc
All those ways can be cut on a cricut too, some plastics can be cut with a laser
e
There's also doing very very thin 3d prints with diffraction grating stuck to the print plate (gives one sided holo) or doing a thin print then ironing both sides with diffraction grating, you can add sublimation first for colour...... Thin 3d prints can be a bit snappy unless you use tpu flex not sure how well tpu takes sublimation as I've only used tpu once and it's a bit fussy, but tpu can be used to print 3d elements for stretch clothing too
I'm audhd as heck and have a thing for textiles, I'm an art therapist so I experiment a lot for materials and media
Merci pour ce tuto !
Imaginons que je crée un tissu pailleté élaboré pour un vêtement qui doit être lavé régulièrement, pas de risque de dégradation des paillettes au lavage ?
(Car j'ai une blouse avec une poche à grands sequins et qui se décolorent au lavage....)
Yes, you're definitely going to want to hand wash anything with sequins - and ideally just spot wash it.
https://spandexsimplified.com/proper-care-of-spandex-costumes/