

Whether sewing for figure skaters, dancers, or rhythmic gymnasts, you'll want to know how to hem spandex. This post covers most options!
This tutorial is excerpted from The “Spandex Simplified” line of books by Marie Porter, as well as "Sewing for Skaters and Gymnasts and Dancers... Oh My. All photos, & accompanying tutorial are copyright @ 2000 - Marie Porter, all rights reserved.

Now that I've covered How to Draft Skating Skirt Patterns, and How to Draft Circle Skirt Patterns, I guess it's time to address how to hem those skirts!
There are many different options for hemming spandex.
You can do all of them on a basic sewing machine - even if you only have straight stitch and zig zag options! - but you can also do some of them on a serger, if you like.
How you hold the spandex when feeding it into the sewing machine or serger is very important. If you haven’t already read my post on How to Sew Spandex (with or without a serger), I recommend doing so before attempting any of the sewn hems.
When to Hem a Skating or Dance Dress
Hems are usually easier to do before attaching the skirt to the body, with some exceptions:
- If it is your first time using a certain pattern or designing for a particular skater,
- If it’s a long (especially circular) skirt,
- If it’s a medium-long skirt from heavy fabric, or certain woven fabrics...
... you will probably want to do the hem after the suit is constructed, in case you need to alter the length of it.
In some cases, you’ll want to see how it sits on the skater before hemming it, in case it needs to be shortened.
Note: When in doubt, always aim for too long when patterning. It’s a lot easier to trim length, than to add it!
In other cases, it’ll be a matter of the fabric.
Some fabrics - especially heavy ones - need to be sewn into the garment and hung up for a few days, to allow the weight of it to settle.
Hemming these fabrics after a rest prevent the hem line from stretching out / warping after it’s hemmed.
Note: How your hem turns out will depend on how you handle the spandex, with regards to stretch. If you haven't already, be sure to read my "How to Sew Spandex" post for more details on how stitching and stretch work together!
How to Hem Spandex
You have many different options for hemming spandex. Here are some of the most common techniques:
Cut Hem
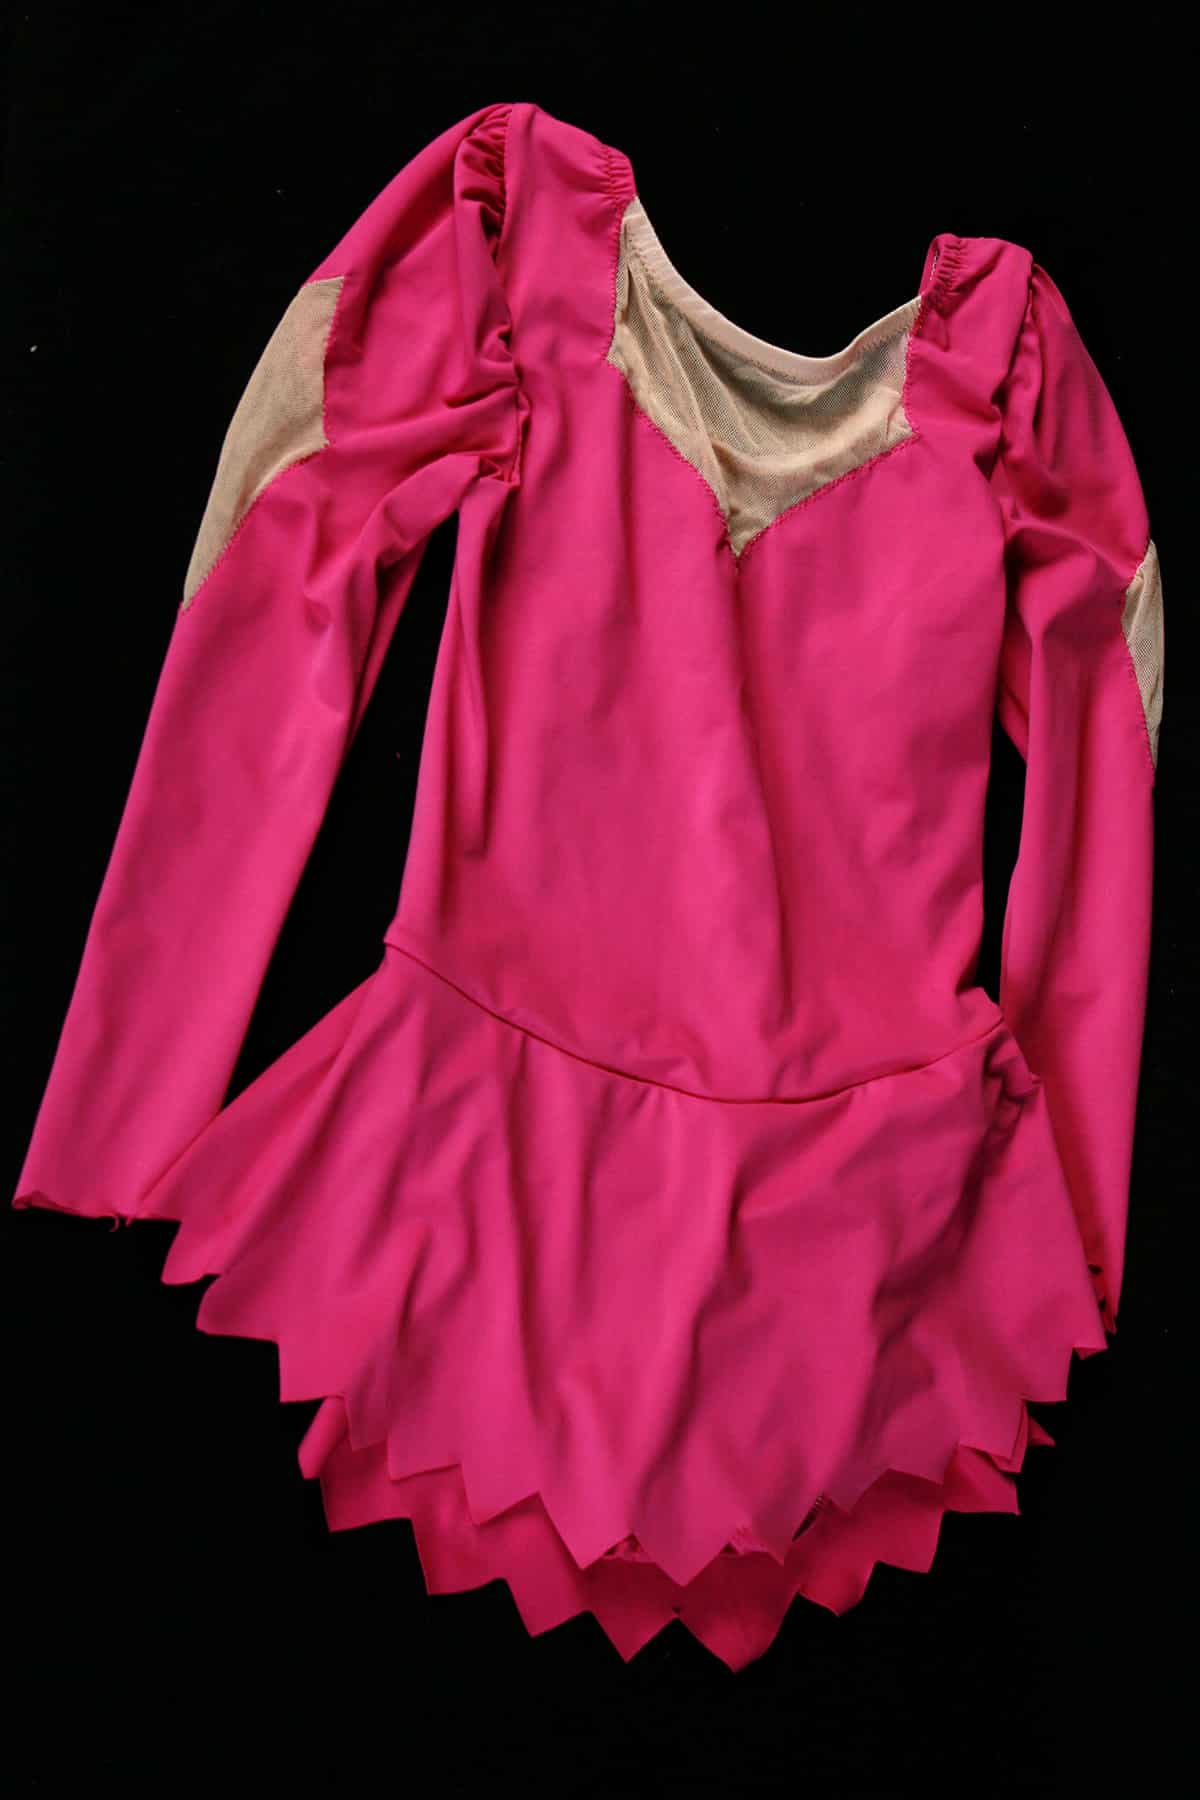
Most spandex can be left unhemmed without worry of fraying, etc.
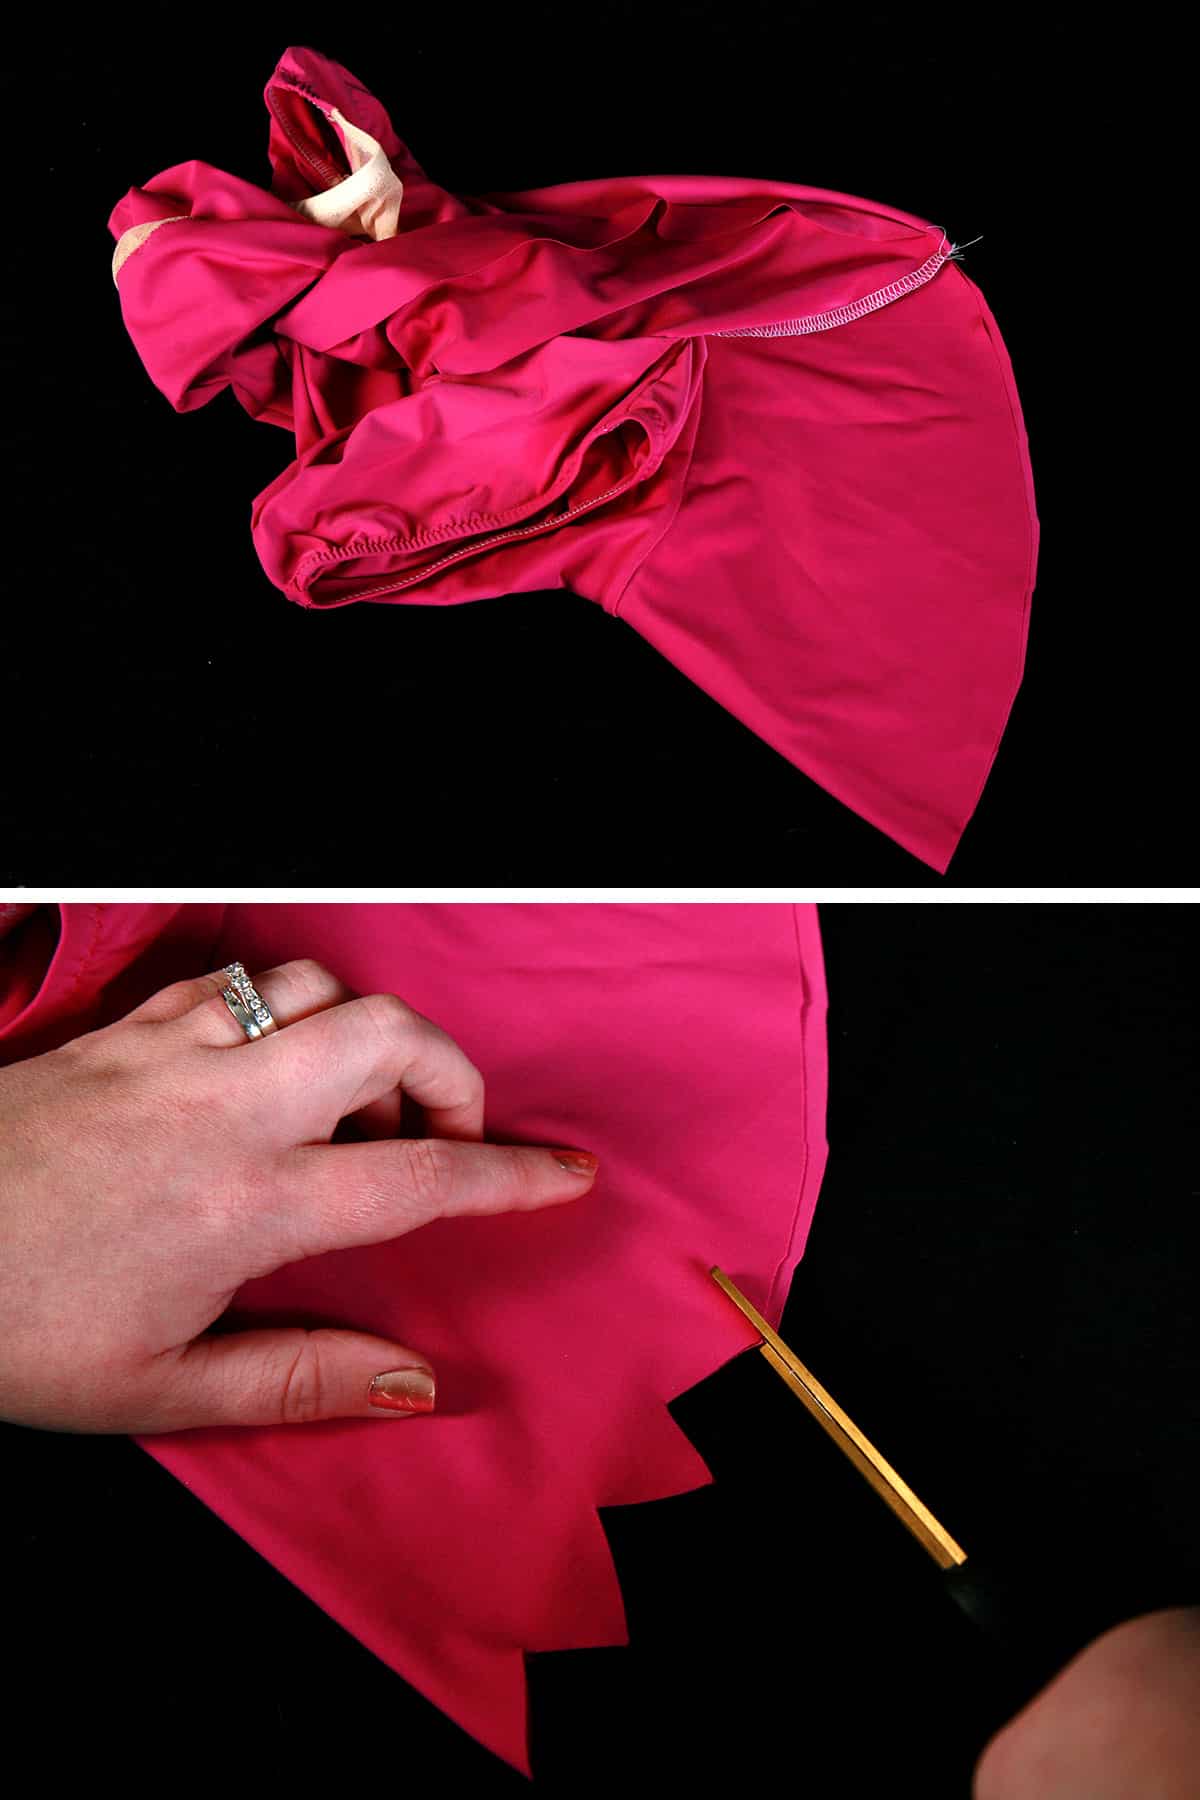
This technique is one that you will use for petal skirts, or any skirt with a jagged, uneven hem.
Make sure to use sharp scissors, and cut the hem in whatever shape you’d like - scalloped edge, triangle cuts, or random jagged.
If you’re doing a fairly consistent cut pattern - or want it symmetrical - it can help to fold the skirt in half and cut through two layers at once.
Check out my "How I Made That: Flames Dress" post for a fun example of layering a cut hem!
Cutting a More Precise Hem
Not a fan of freehanding it?
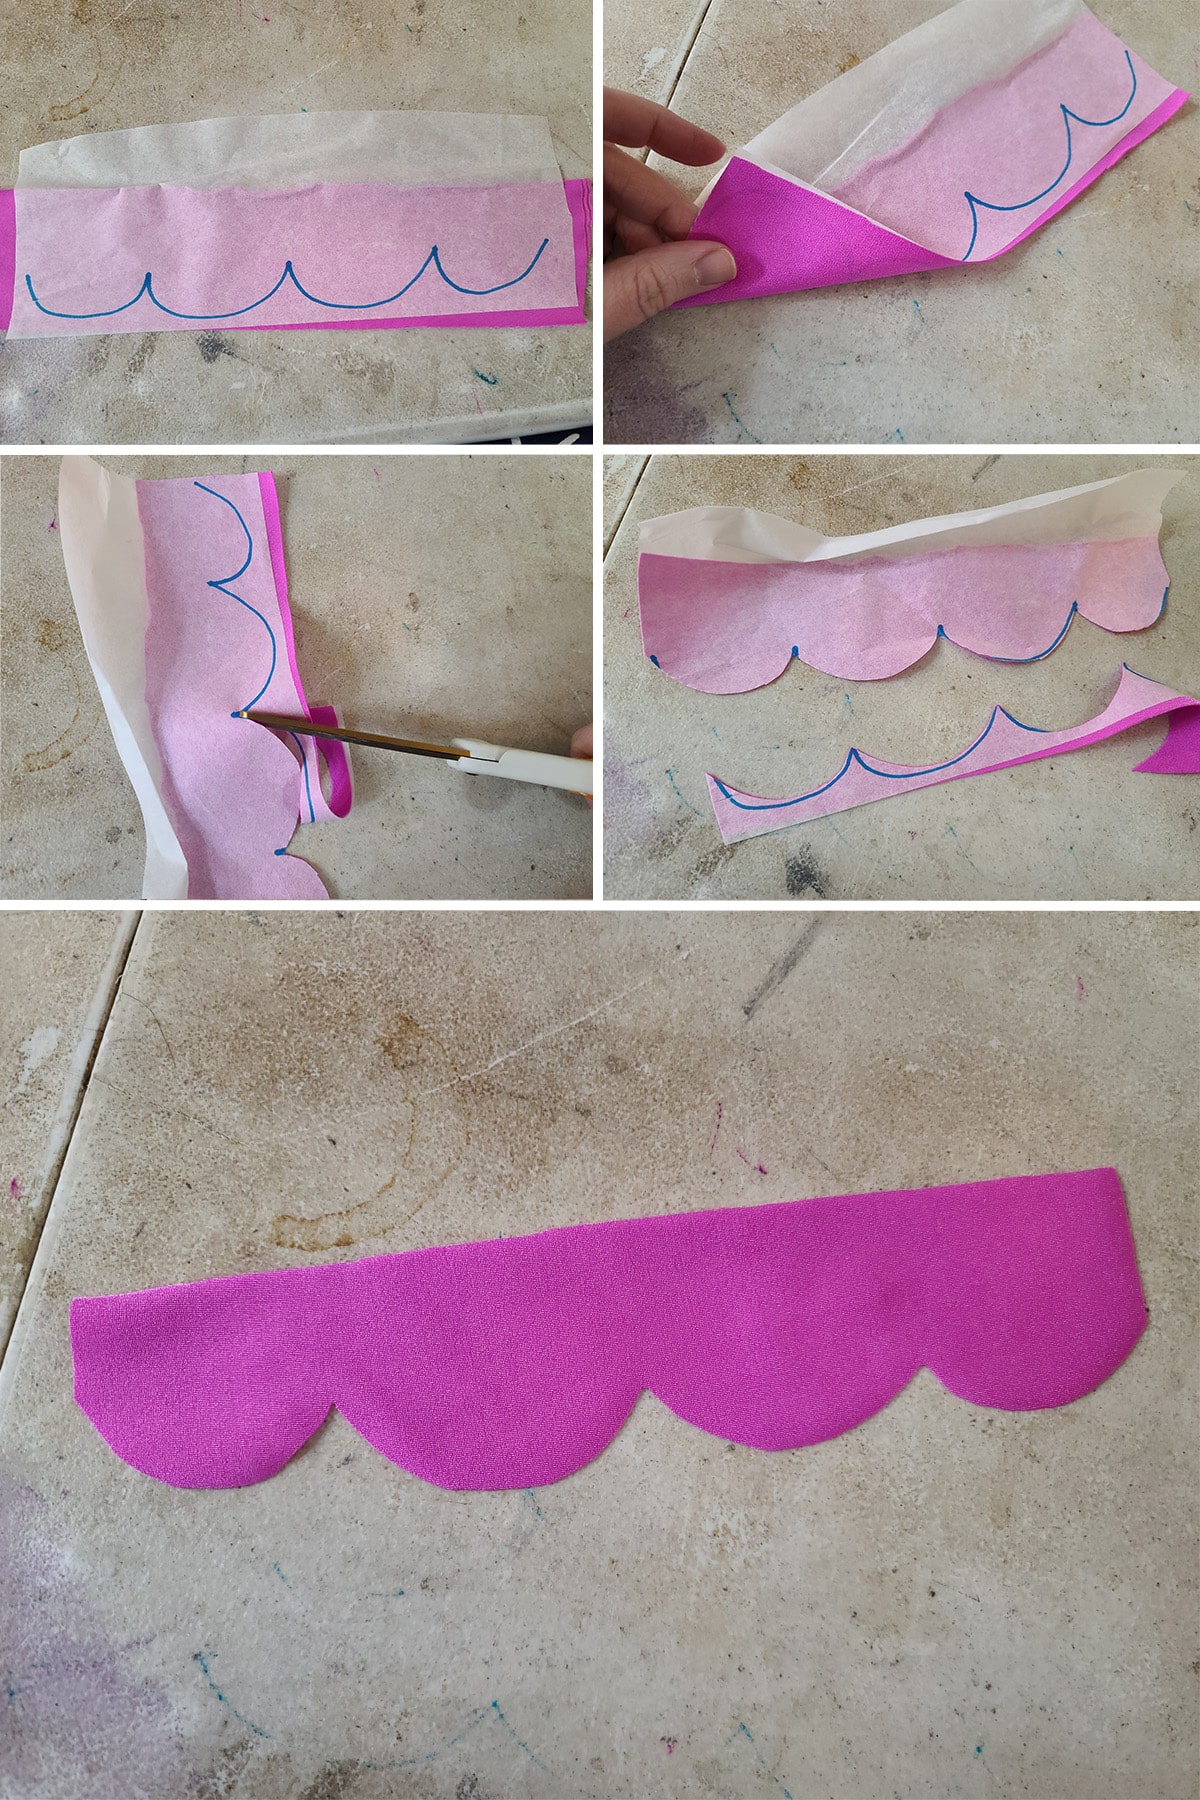
You can use a piece of exam table paper and some Odif's 505 Temporary Fabric Adhesive.
First, transfer your skirt pattern - the whole pattern, adding the mirror image of any “cut on fold” patterns - to a sheet of exam table paper.
If it’s too big for the exam table paper, you can tape sections of the exam table paper together.
Draw your desired pattern onto the hem of the new pattern piece, using any rulers, French Curves, etc as necessary. (See my post Spandex Costuming Tools & Supplies for more information on helpful tools!).
Lightly spray the wrong* side of your pattern with Odif's 505 Temporary Fabric Adhesive.. Allow to dry for a few minutes.
Place the sticky side of the pattern face down on the WRONG side of the skirt fabric, press lightly to smooth everything out.
Using sharp scissors, cut through both the pattern and the fabric.
When you’re done, carefully peel the remaining pattern off the skirt piece.
* You want to spray the wrong side to ensure there's no transfer of pen or marker to the fabric, as well as to be able to see your marked pattern clearly.
If your design has a definite right side / wrong side to the pattern cut, you'll want to draw your pattern in reverse/as a mirror image to what you actually want.
That is to say, the side of the pattern with the actual marks being made on it should be how you want the WRONG side of the fabric to be cut.
Cut Hem Video Tutorial
Flat Hems
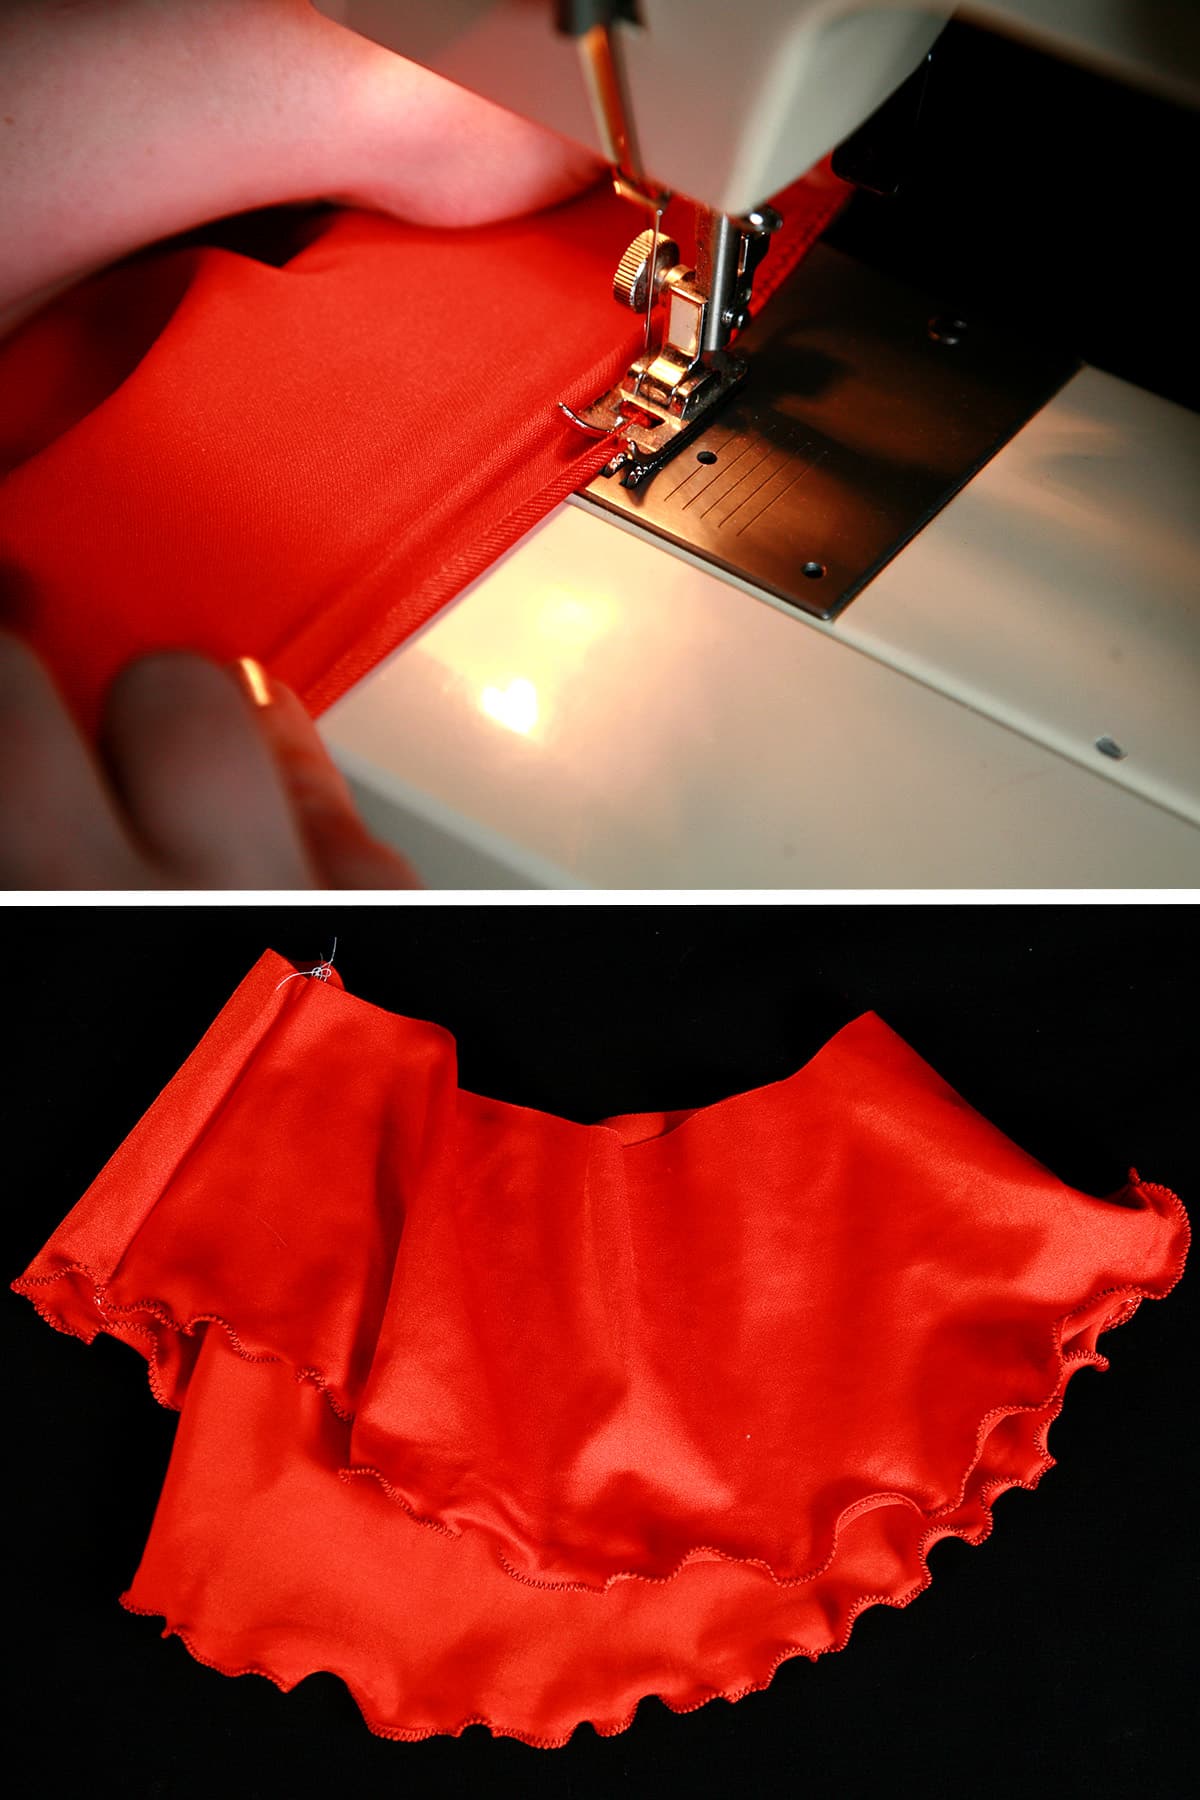
Flat Zig Zag Hem
Fold about ¼-1/2" of the bottom edge of the skirt under to the wrong side.
Using a medium stitch width, and a length of 8-12 stitches per inch, sew along the hem, being careful NOT to stretch the fabric as you go.
A decorative stitch can be substituted for a zig zag stitch, but - generally speaking - no one will see it.
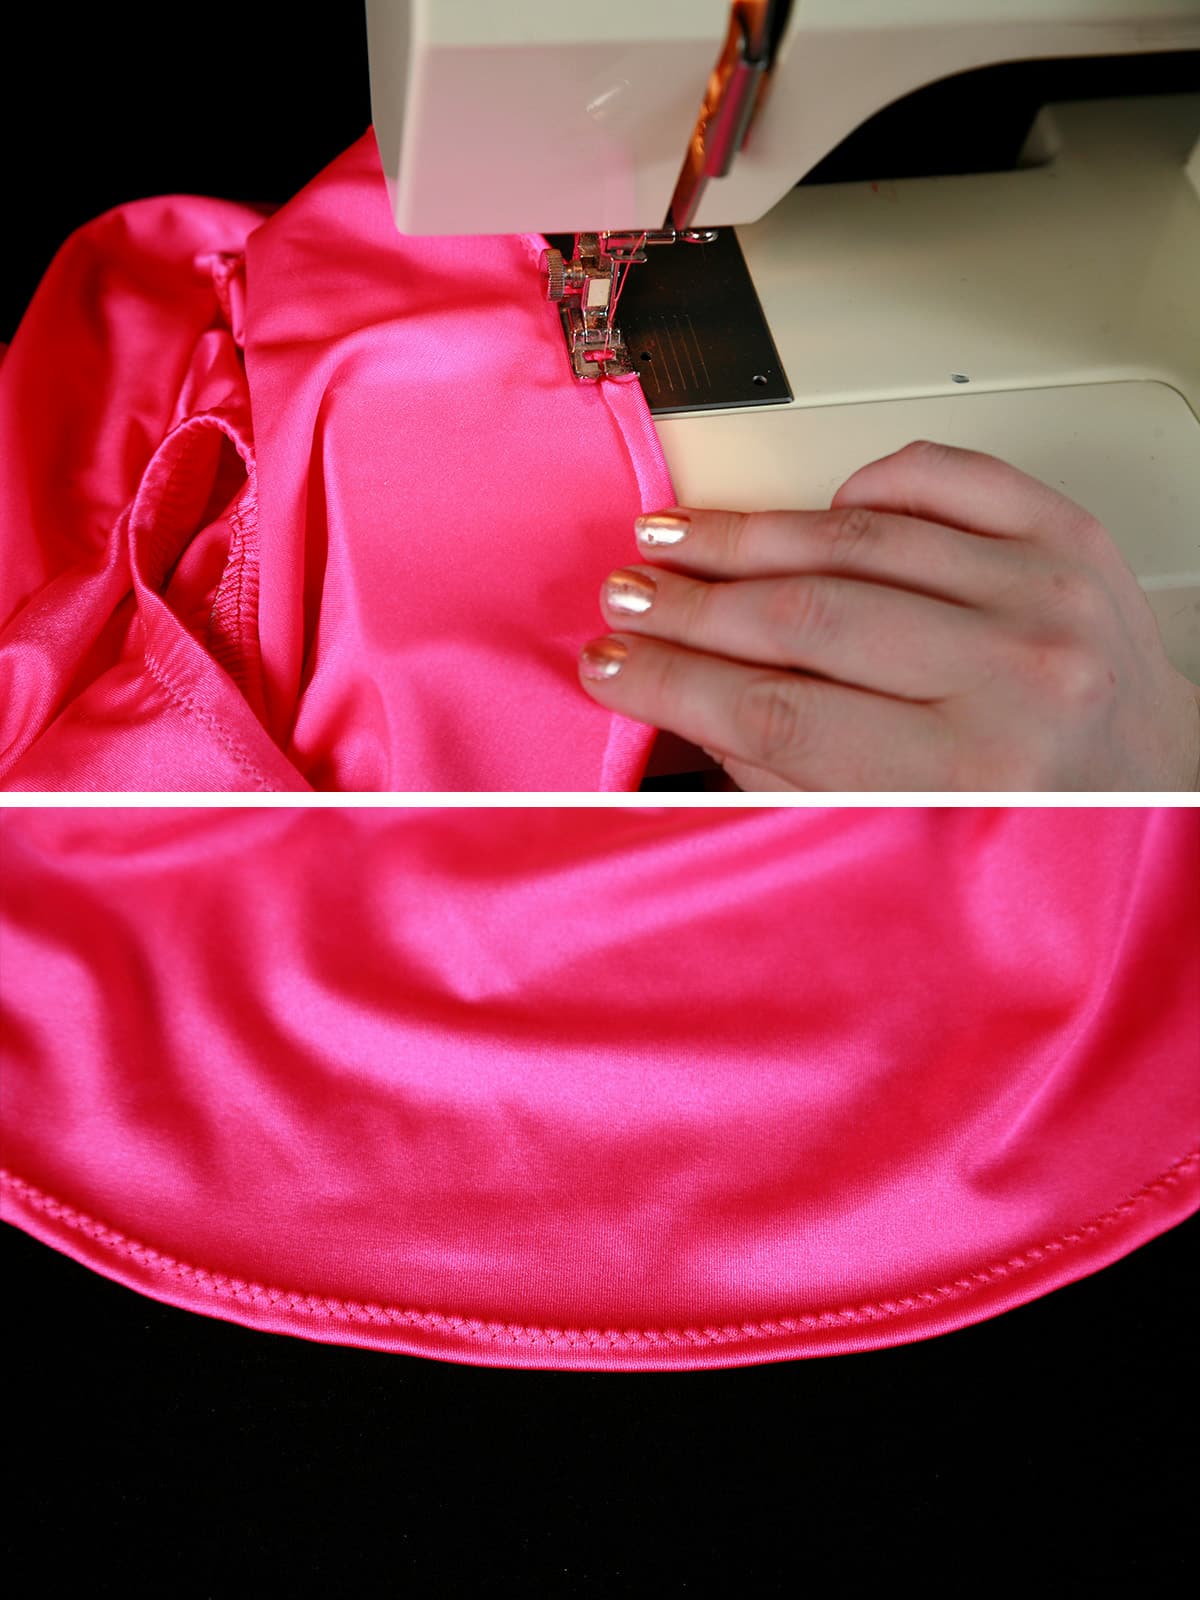
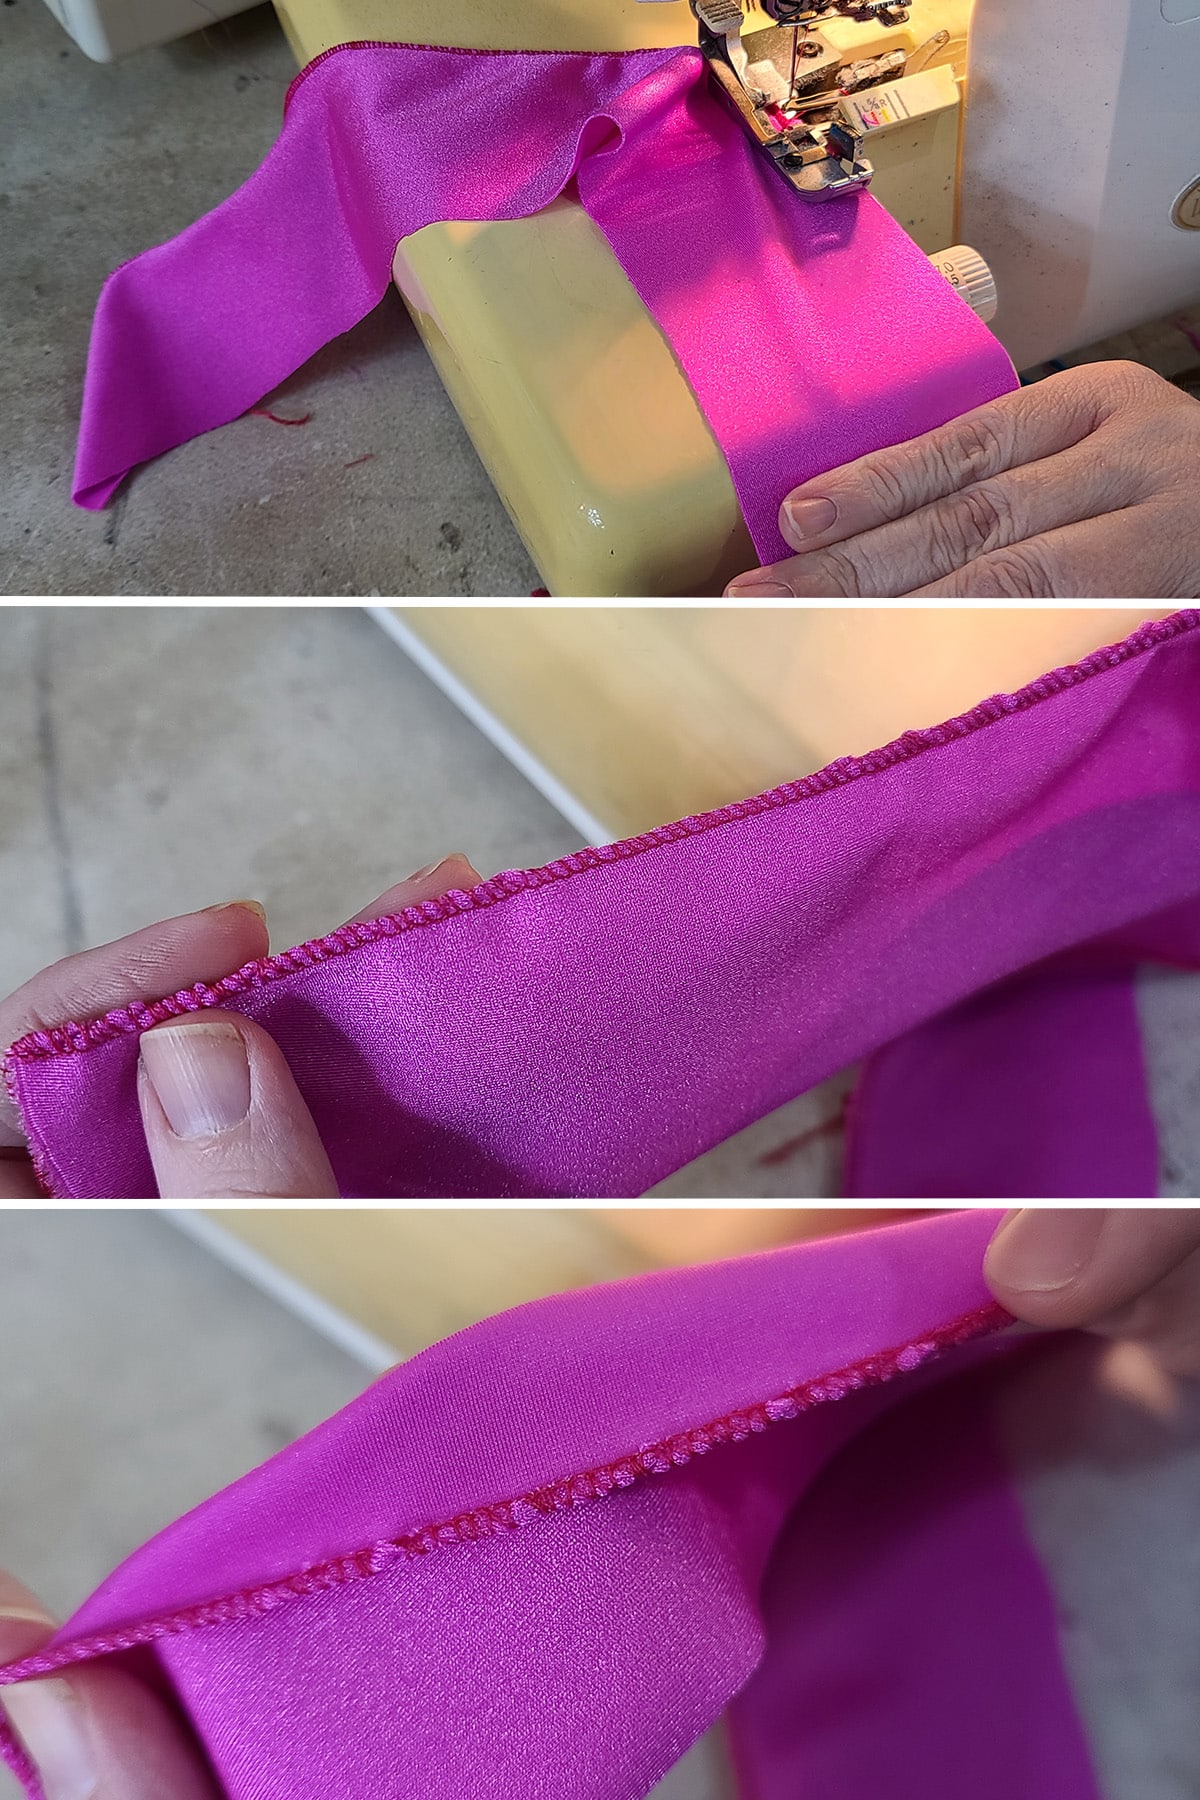
Flat Serger Hem
Using a 3 or 4 thread setup, Set your cutting width to narrow, and use a slightly shorter stitch length than normal. You can use a rolled edge hem setting if you like - pictured.
Hold your fabric from both ends - going into the serger, and coming out of it - and stretch JUST enough to flatten it out.

Holding fabric taught, serge around the edge, being careful to NOT stretch the fabric from the front as you go. Any stretch / resistance from the front will make it wavy / curly!

This is how your hem should look, if you hold it taut as you sew.
Note: You definitely want to hold it taut / pull gently from behind the machine- this won’t cause waviness, but it will prevent bunching:
This is what can happen when you're not holding the spandex taut as you sew.
Lettuce Edge Hem
You can do a lettuce edge hem with either a serger or a zig zag.
Either way, I tend to do mine wrong side up, folding the very edge of the skirt up and over as I go. This is 100% a matter of personal preference, so try out a few ways and see what you prefer!
Zig Zag Lettuce Edge Hems
Use a wide stitch width and a short stitch length for this hem.
Stretch the fabric firmly as you zig zag over the edge, maintaining the stretch as you sew. Do NOT let go until the machine stops!
The more you stretch the fabric - and hold it stretched - the more ruffly your lettuce edge will turn out.

Some people will do this right over the raw edge, I find it works better - and turns out nicer - when I let a slight edge of the fabric curl over when sewing across it.
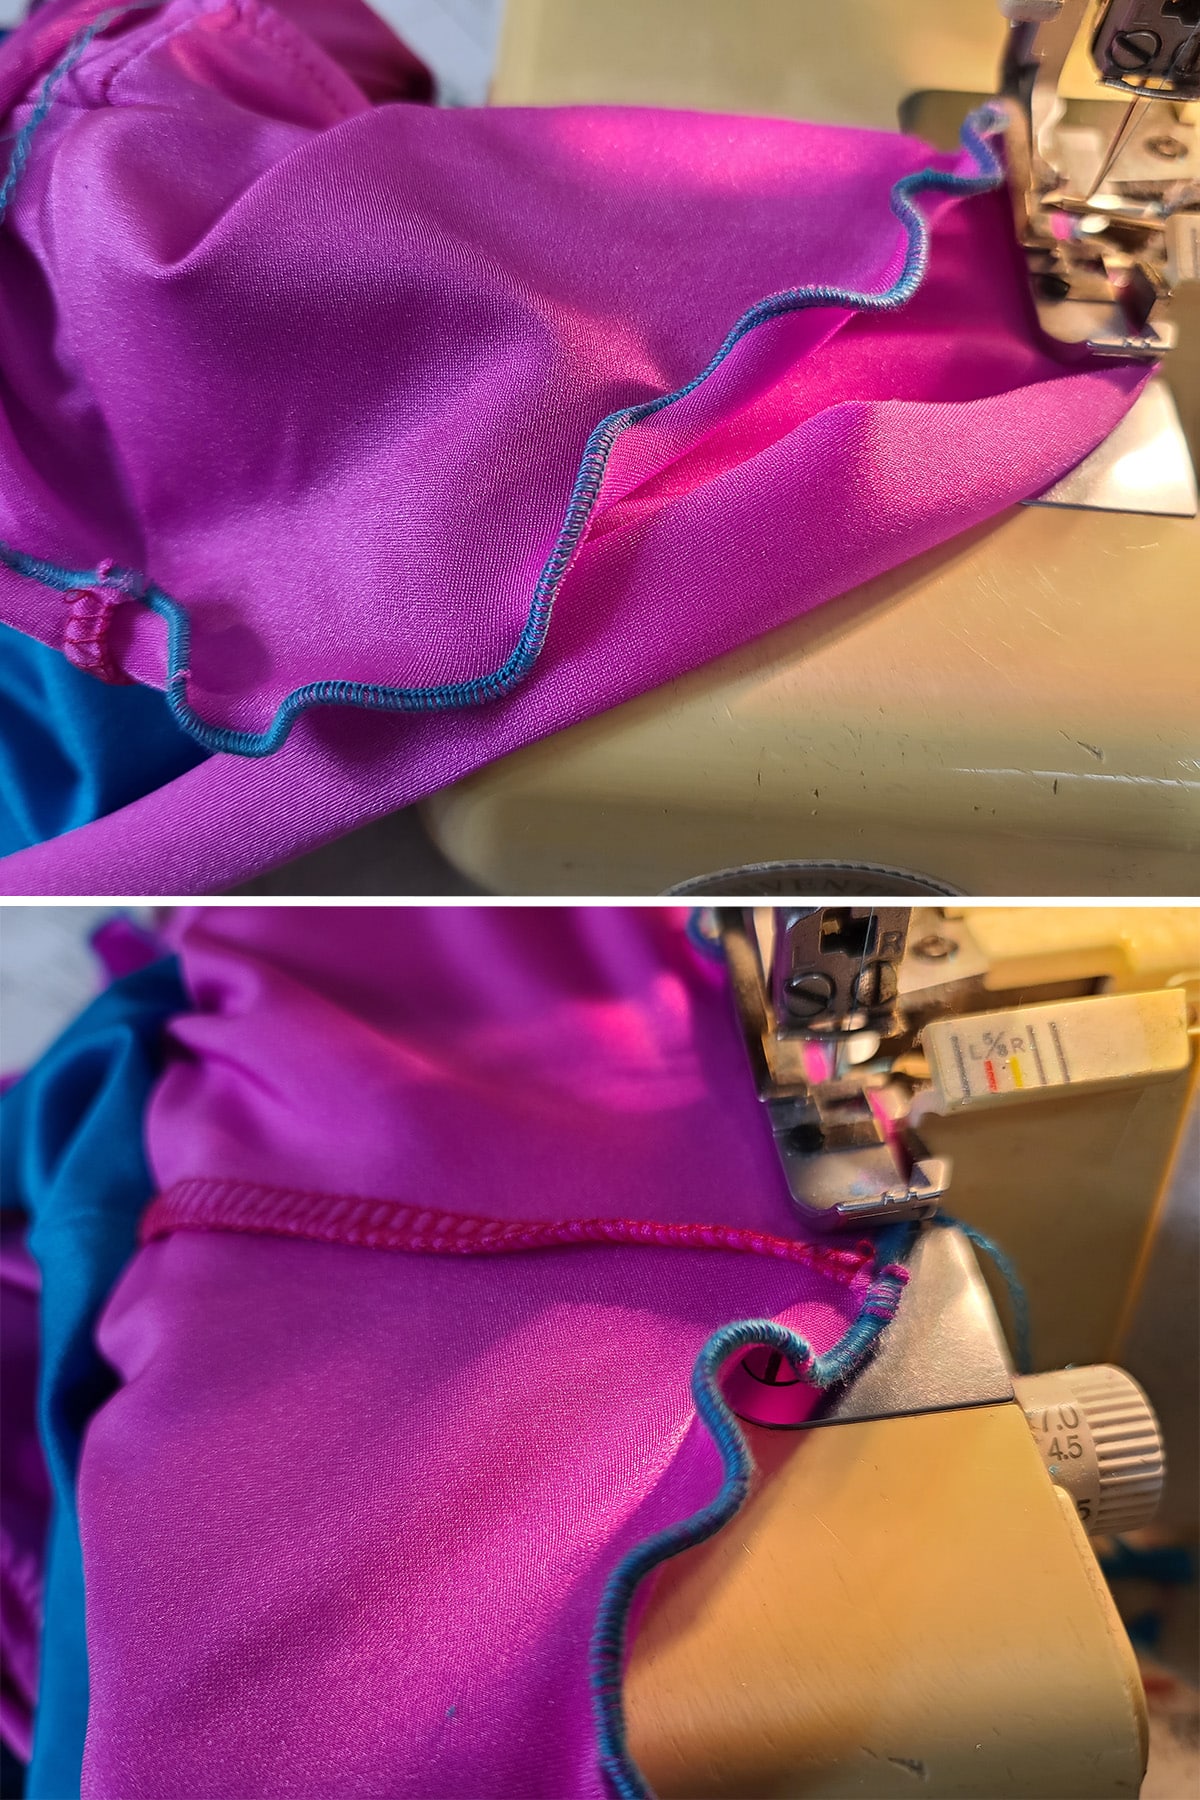
Lettuce Edge Serged Hem
Set the cutting width to narrow, following your machine’s instruction manual for exact stitch settings. (Narrow hem, narrow edging, rolled edge hem, or etc)
The stitch length should be very short.

Sew the hem as you would with the normal lettuce hem, stretching as you go.

As with the zig zag, the more you stretch the fabric - and hold it stretched - the more ruffly your lettuce edge will turn out.
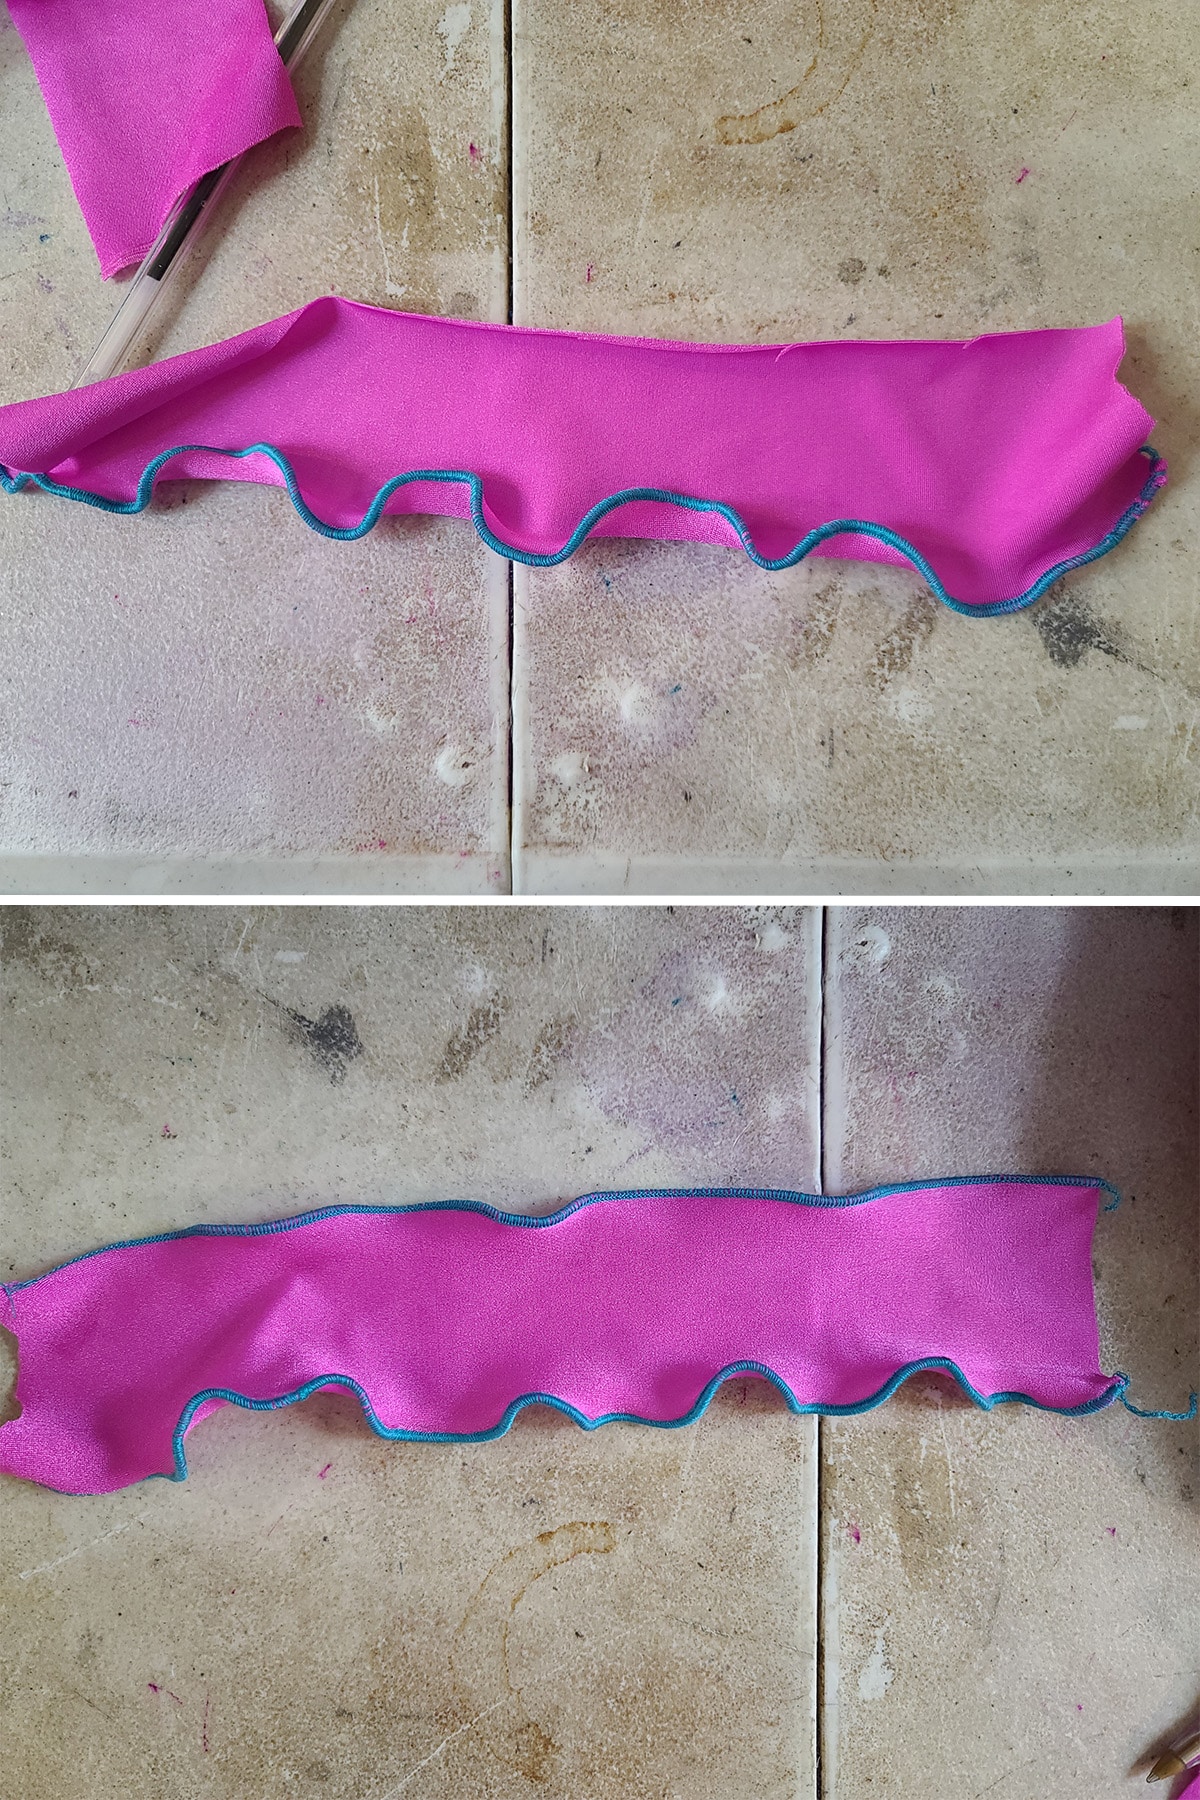
This shows the same fabric with 2 different degrees of lettuce edge hem. The bottom edge was stretched much further than the top edge was.
Notes on Degree of Ruffling
If your fabric doesn’t have a lot of stretch, if you don’t stretch it well, and/or if your stitches aren’t set to a narrow enough length, you won’t get that much ruffle to your hem.
Keep this in mind if you’d like a less curly, more wavy effect

This is an example of sewing a lettuce edge without full stretch / super tight stitches, resulting in a wavy edge.
Additionally:
When sewing a lettuce edging on stretch chiffon or a 2 way stretch lycra, keep in mind that only portions of your completed skirt will end up being ruffled.
If you are doing multiple layers of 2 way stretch, (for instance, stretch chiffon) cut half of the layers with the stretch parallel to the grain line, and the other half with the stretch across the grain.
Doing this will make sure that you do not have obvious flat sections to the hems of your skirt.

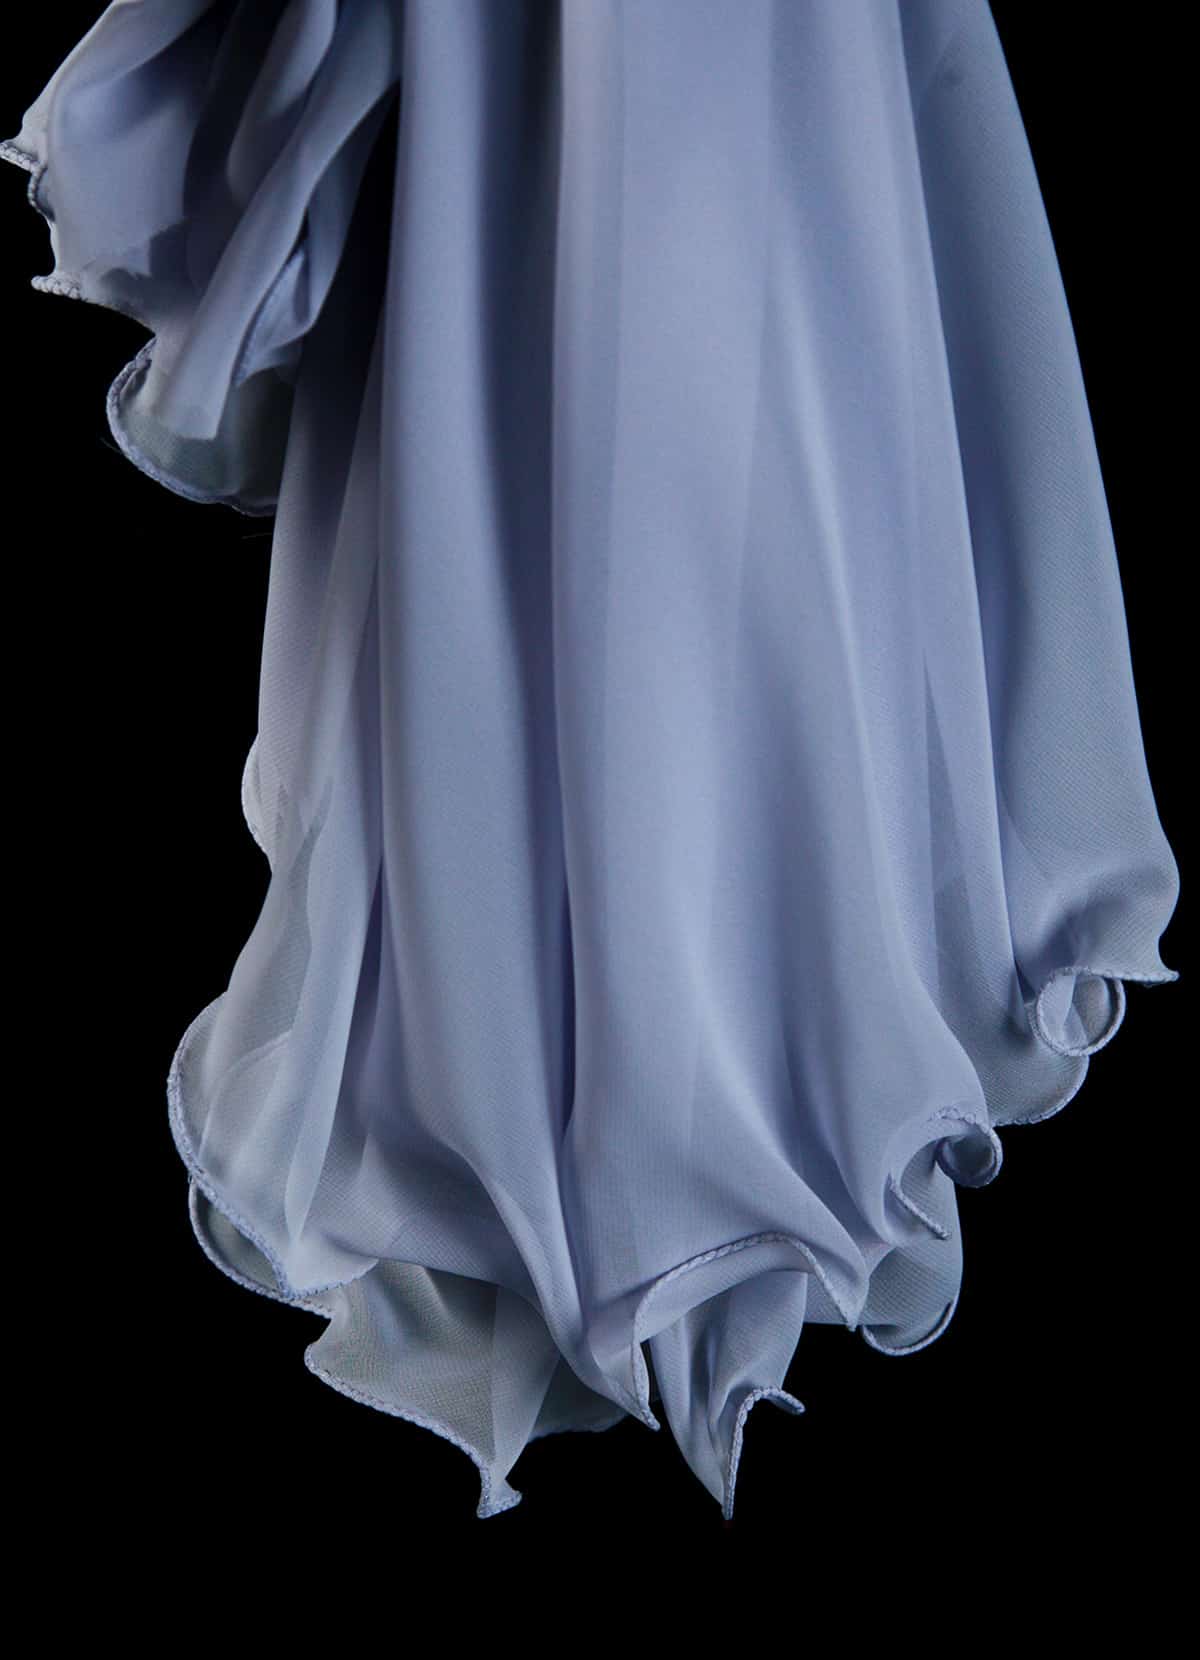
Fishing Line Hem
Fishing line hem follows the same basic premise of lettuce edge hemming, but with a twist.
Like lettuce edge hem, the whole idea is to force the edge of the skirt stretched - with the very edge of the fabric stretched, and the fabric leading up to it NOT, the excess bulk at the edge will curl.
Rather than forcing the fabric to stretch with a lot of extra stitches, THIS hem stretches fine, sheer fabric over a length of fishing line.
The clear fishing line supports the stretched fabric, and it curls over itself.
This is the sort of hem you'll see on a lot of ice dance dresses, as well as on things like children's pouffy pageant dresses.
You can use a variety of sheer fabrics - chiffon, crepon, georgette, illusion, organdy, organza, voile ... but chiffon will be the most common you'll see.

What Fishing Line to Use for a Hem
As far as the fishing line goes, you'll have a bit of selection.
Fishing line comes rated for strength - the higher the number, the more weight it can support.
For the purposes of hemming, I recommend using a heavier line - 80-100 lb test, if possible.
This is especially important if you use a heavier fabric. The flimsier the fabric, the less this is necessary.
As an example, I'm demonstrating this technique with chiffon, and 10 lb test line. As you can see, it works just fine - though a heavier weight line would provide even more structure.
As with many things on this blog, play with it and see what your preference is!
What Sewing Machine to Use for a Fishing Line Hem
While you can do this with a serger, I prefer to use a regular sewing machine with a wide zig zag stitch - I just find it gives me more control, which is important for this kind of hem.
Your mileage may vary, of course!
How to Sew a Fishing Line Hem
Set your machine to a wide stitch width, and relatively short stitch length.
Use a rolled edge hemmer foot if you'd like - I don't bother. Just a regular sewing foot and zig zag works just fine!
Generally speaking, you’ll want to match your thread to your fabric as closely as possible - we did NOT, so that you can see the stitches better!
At the start of your hem, position your skirt with the wrong side of the skirt facing up.
Hold the fishing line parallel to the edge of the skirt, and fold a very small amount of fabric over it.
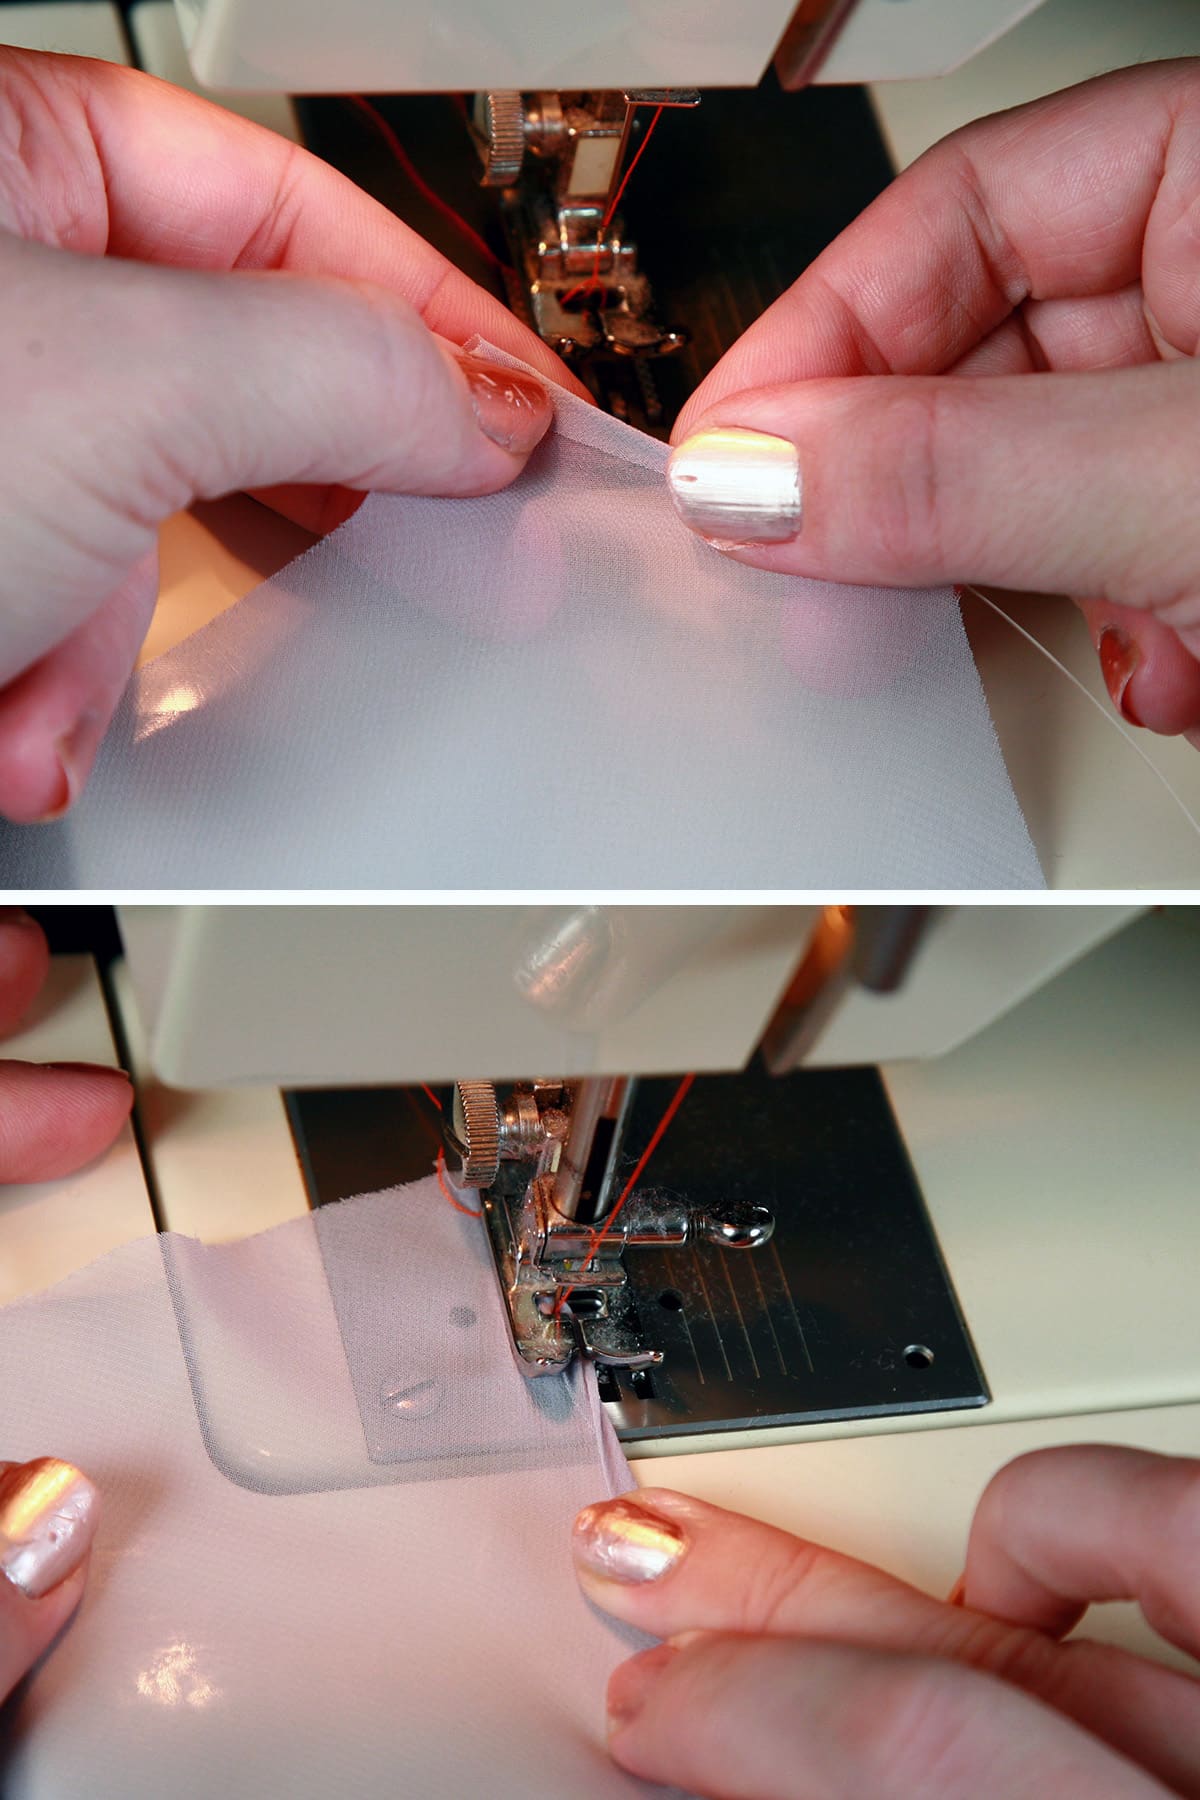
Fold fabric edge over once more, being careful to completely encase both the edge of the fabric and the fishing line.
Make a few stitches, taking care to secure the edge of the fishing line in place.

Working a few inches at a time, continue to tightly encase the fishing line and raw edge of the fabric as you feed it into the machine.
Be careful not to actually stitch through the fishing line, as it will kink. As you sew, easing the fabric, you'll also want to stretch the fabric as much as possible.

Heat Setting Fishing Line for Hems
Now, as a note - I will use the line straight off the spool that it comes on, and like the wavy effect it produces.
If you would like a TIGHTER effect, there's a fairly easy way to achieve that.
First, measure out the fishing line - you'll want a fair amount more than you think you need.
Once you've cut the desired length, tape one end to a new "spool".
It can be a small spool of thread, a thick dowel (say 1" in diameter), or any number of other things - improvise!
Tightly wrap your length of fishing line around this new spool, securing the end with another small piece of tape.
Bring a pot of water to a boil, remove from heat. Submerge your new spool of fishing line in the hot water, allow to sit for about 5 minutes.
Remove from water, set it on a towel, and allow it to cool completely - I like to leave it at least 2 hours.
When you unroll the length of fishing line, you'll find that you've reset the curl to it, and it's now got a much smaller radius to it.
In my opinion, this is a bit of a waste of effort - the fabric will straighten this out, and curls with too small of a radius just get lost.
For skating, the big, wavy curls look much better on the ice!
Horsehair Braid Hem
Like the fishing line hem, horsehair braid is an option that has a very specific look to it: structured waves of spandex.
While the fishing line hem stretches the fabric along a length of fine fishing line, horsehair adds a bit more structure and bulk to a seam, allowing the billowy waves to hold their shape a lot better than the fishingline does.
You’ll see it on some ice dance dresses, but moreso in dance costumes, pageant wear, and dancesport dresses.
The way you design and cut your skirt piece(s) will influence the degree of ruffle, as will how you sew it:
- The fuller your skirt - ie: the more hem you have with - the more “wave” you’ll end up with.
- If you stretch the fabric slightly as you sew the horsehair to it, you’ll get more wave.
You definitely want to get as much hem length as you can from the actual cut of the spandex, though: Stretching the fabric a LOT won’t give you a smooth effect.
Because the horsehair is fairly wide, that stretch will drop off quickly at the seam point, leaving an obvious ridge.
Anyway, this hem technique can be done on spandex itself, as well as the lighter weight fabrics. It’s even used in formalwear, to support the seam structure of heavier weight fabrics like satin.

Anyway, here’s a quick overview of how to do it:
Sewing a Horsehair Hem
Place your skirt in your sewing machine with the RIGHT side facing up.
At a seam - or wherever you want to start your hem, if there are no seams - place your horsehair on top of the right side of the fabric.
If your horsehair braid has a thread sewn into it, place that edge of the braid facing away from the edge of the skirt.
Using a straight stitch (or a wide zig zag) with a medium stitch length, sew your horsehair to the hem edge of the skirt, using about ¼" seam allowance.

Note: I used a serger because my normal machine was annoying me that day. A serger is not only wholly unnecessary for this hem, it’s actually less than ideal.
I find it far more prone to snagging / bending the fibers of the braid. So... consider this another case of “do as I say, not as I do? LOL
As you reach your starting point (if applicable), overlap the horsehair edges by about 1", cut it off and trim your threads.
Flip your horsehair braid around to the wrong side of the skirt.

Pulling the fabric smooth around the horsehair - and taking care to not stretch or warp the horsehair as you go - stitch the horsehair braid down to the wrong side of the skirt, keeping your seam pretty close to the “Free” edge of the horsehair, as pictured.

Appliqued Hem
Note: See my "How to Applique Spandex" post for everything you need to know about appliqueing - it'll help when you do this hem style!
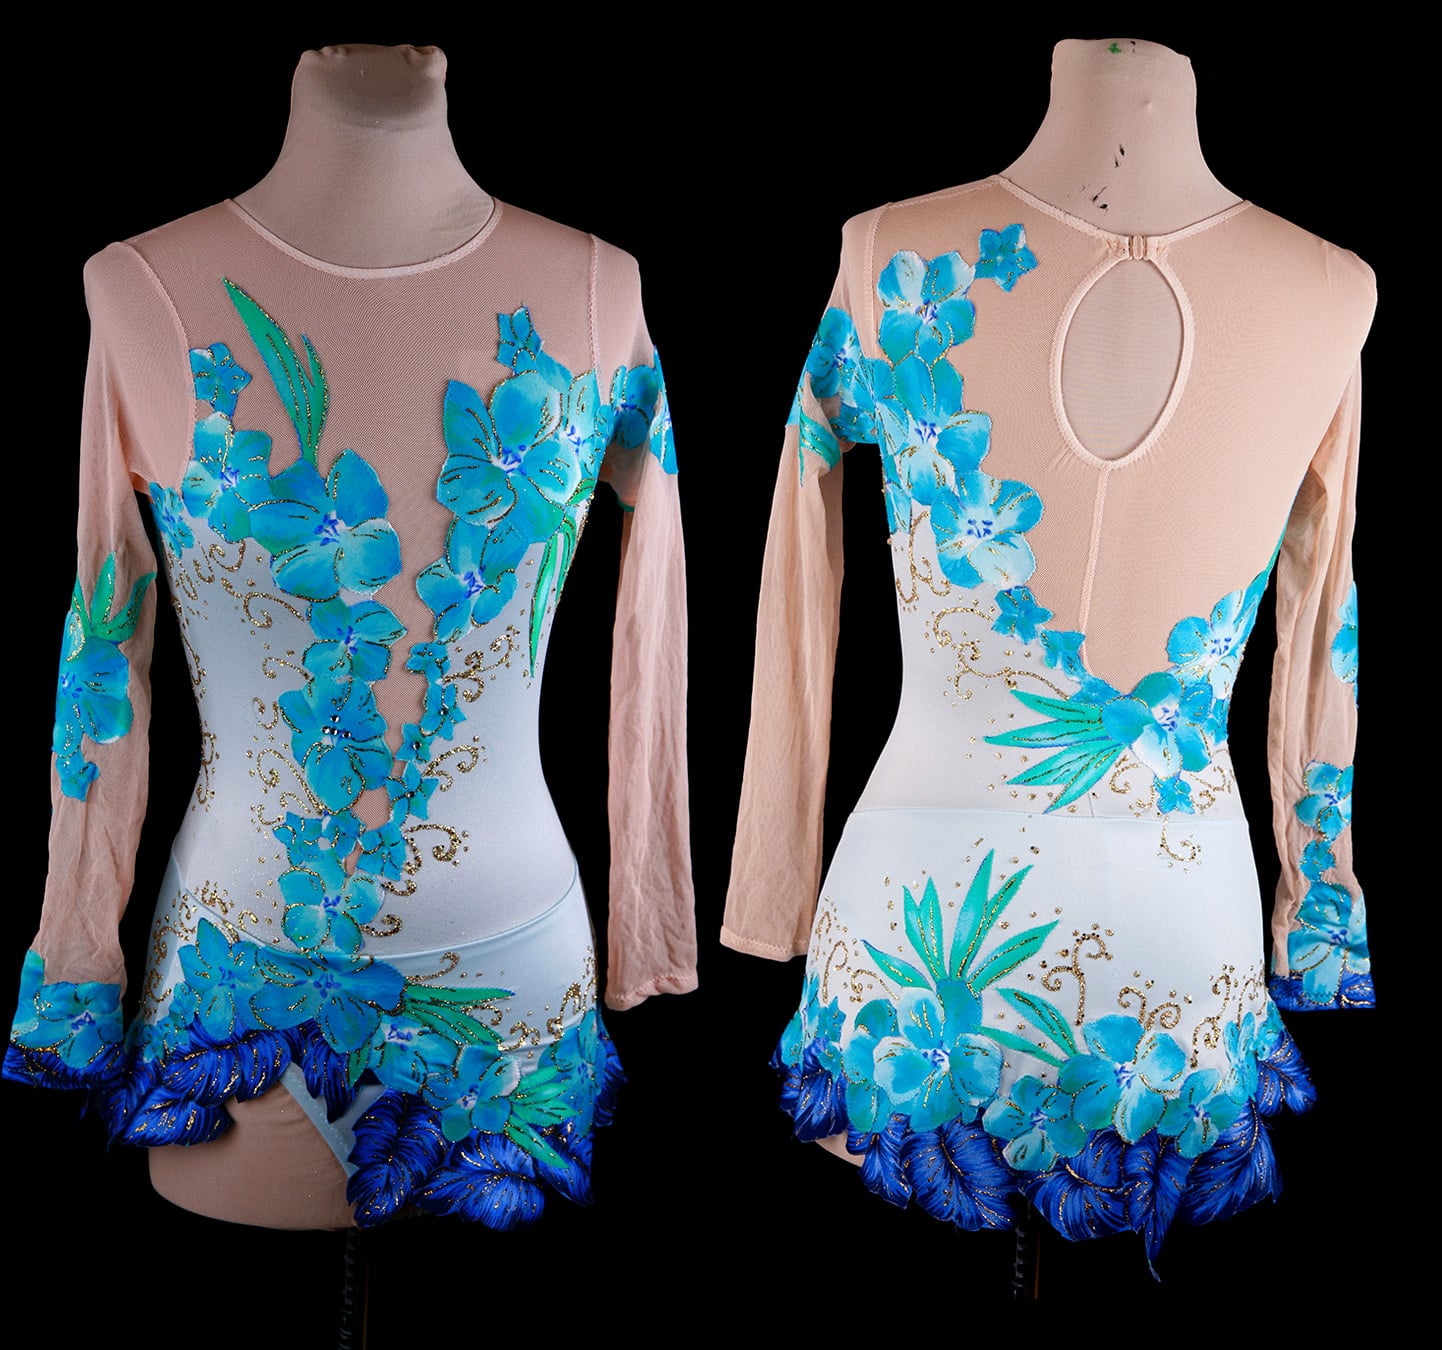
Applique is a great way to add some interest to a figure skating or rhythmic leotard skirt.
Once you have learned the basic techniques for applique work, you’ll find that using it on a hem isn’t really different from doing it on any other part of a leotard.
First, lay out all of your applique pieces on the front and back pieces of the skirt, being sure to plan for any overlap pieces.
Once everything is laid out, spray and affix your pieces, aside from those closest to the side seams - I like to leave 1-2" bare at every seam, to start.
Once everything is affixed, sew the appliques on as usual.
After you’ve sewn all of the applique work on both the front and back pieces, place them with the right sides together and sew the side seams.
Flip the skirt right side out, opening to flatten one of the sides. Affix the overlap applique, stitch down. Repeat on the other side.

Once all of the design pieces are appliqued into place, flip skirt inside out. Using a sharp pair of scissors, very carefully trim, away the excess base skirt fabric, if so desired.
Notes on Trimming
If you plan to trim the excess fabric, I highly recommend testing your spray before affixing your appliques.
Some sprays will remain tacky after removing the fabric it has been stuck to. The other types will dry, and no longer feel sticky.
For this example, I trimmed away the base fabric that extended beyond the bottom edge of stitching only.
For a lighter weight skirt, you can also trim away excess base layer fabric behind each piece of applique - in this example, that would be the pale blue fabric behind each flower and leaf.
More Spandex Sewing Technique Tutorials
Interested in learning the basics of sewing with spandex? Here are a few more posts
How to Cut Spandex
Sew Spandex with or without a Serger
How to Apply Elastic
Appliquing Spandex
How to Install Snaps in Spandex Garments
Padded Applique
How to Make Covered Elastic Straps
How to Make Bikini String
... and always, be sure to check out our Table of Contents for a full, categorized listing of all of our posts and tutorials!
Share the Love!
Be sure to take some pics of your handiwork! If you post it to Bluesky, be sure to tag us - @SpandexSimplified.
Also, be sure to follow me on Pinterest, and subscribe to my Youtube Channel, so you never miss out on any of my nonsense. Well, the published nonsense, anyway!
Finally: If you loved this tutorial - or have any questions about it - please leave a comment below! I'll do my best to answer any questions you may have!


Leave a Reply