Before getting started on spandex costuming, it's a good idea to know how to do basic pattern alterations for size, fit, and comfort.
This tutorial is excerpted from The “Spandex Simplified” line of books by Marie Porter. All photos, & accompanying tutorial are copyright @ 2012- Marie Porter, all rights reserved.

Before you get started with spandex costuming, you’re going to want to know how to use a pattern, and how to alter a pattern for size.
There’s a fair amount of info to address, so let’s just get to it!
How to Use a Sewing Pattern
Patterns can come in 2 main ways:
Printed Patterns
These are the patterns that have been around forever. They’re printed off on large sheets of paper - either a tissue paper, or something more sturdy - folded, and packed inside envelopes.
Digital PDF Downloads.
These are patterns that you order online, download to your computer, and print off yourself. Depending on the sizes of the pattern pieces, you will usually have to cut and tape pieces together, to form the actual pattern.
Most patterns - printed or digital - come with multiple sizes.
Generally speaking, cutting out any one size will render all other sizes unusable.
I like to think of any pattern as a “master” pattern, and trace from that master pattern when making anything from it. I never make any alterations or cuts to the original pattern, whether purchased already printed, or printed at home.
Really, who wants to go to all the effort of cutting, piecing, and taping, just to have to do it all again for the next one? No thanks!
Transferring Patterns to a Working Copy
I like to use rolls of medical exam table paper for patterns.
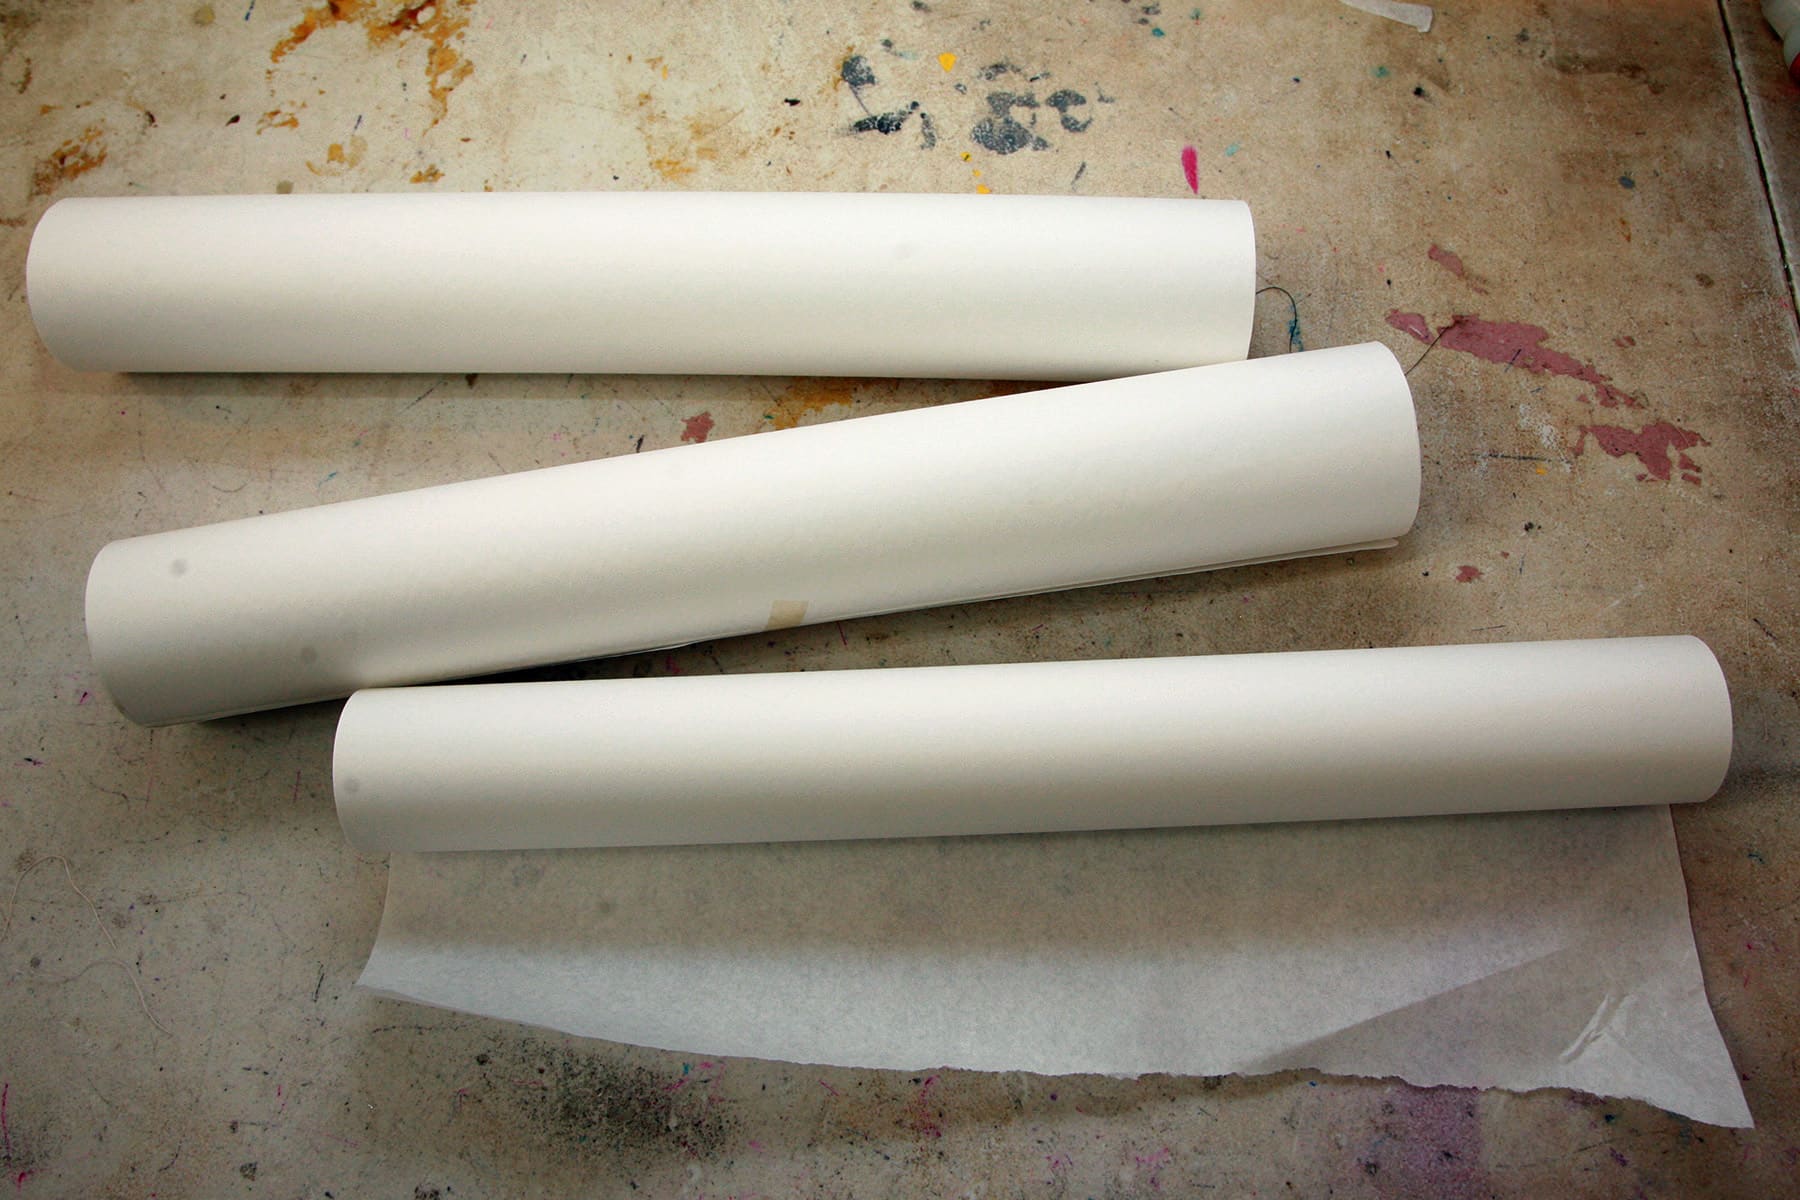
You can buy rolls of exam table paper on Amazon and at medical supply stores, for between $2-5 per roll. Super cheap - which is good, because you’ll go through it like crazy once you get going!
Sometimes, you’ll be given a choice of 2 papers. One is cheaper and uncoated, and the other is slightly more expensive, and is coated. Go for the cheaper roll, as wide as you can. 21" is great, 18" will usually do. If you do this as a business, you’d be best off to buy it by the case - usually 12 or 24 rolls.
Basically, open up your “master” pattern - the store bought pattern. Don’t ever do anything to that pattern - you can use it for many, many projects, if you trace it each time you need to make a new size/shape costume!
Just line up one long end of exam table paper with the “fold” line of the pattern (the black line below), if applicable.
The store bought pattern will be clearly visible through the exam table paper - trace your desired size on to the exam table paper, and there you go!
A Note on The Examples Shown
You may notice that I don’t have skirt or design lines on the following diagrams. I strongly believe that you should have a well fitting torso / body suit pattern, before deciding on where to cut for the skirt line or neckline variations - when applicable.
Also: generally speaking, the skirt lines that come with commercially available patterns are not flattering at all, so I recommend ignoring them entirely.
Additional Note: I’m using a basic bodysuit type pattern to demonstrate a lot of the pattern alteration techniques, but they apply to all types of pattern. How you add or remove length to a sleeve or leg is the same as you’d do it to a torso.
Choosing a Pattern
There are several different pattern brands out there. Which you choose - what which you ultimately prefer using - are going to be largely a matter of what you’re making, and personal preference.
I always liked the Kwik Sew brand, as they were not only easy to use (Printed on actual paper, not tissue!), but they were very true-to-size, and tend to use a centre back seam.
(Note: A pattern with a curved centre back seam will lay flatter and fit nicer than one that has a straight centre back seam, or one that has the back cut as one piece.)
Again... the skirt lines on their patterns aren’t the best, and should be ignored - look for a swimsuit or bodysuit pattern, if desired!
Anyway, enough on my now-defunct favourite pattern brand.
Your best bet is to look for a pattern that looks like what you want to make. Then, do a quick Google to see if there are any specific recommendations for that pattern brand.
Some run smaller than you’d think, some have a looser fit. It’s always good to know these things before altering your patterns!
Making a Muslin
If you can’t find any reviews - or don’t want to bother - I recommend making a muslin before making your actual garment.
A muslin is a garment made from the pattern, but in a fabric you don’t really care about.
You can buy cheaper fabric, not worry about things like colour blocking, etc... just the basic shape, to get the fit right.
Once you’ve made the muslin and tried it on, you’ll have a good idea of things that you can alter for a better fit.
One caveat: While you can use cheaper fabric, you’ll want to use a fabric with the same basic weight and degree of stretch, as the fabric you intend to use for the final product.
Additionally, if lining is to be incorporated into the final outfit, be sure to use it on the muslin as well.
A list of pattern companies and other references is on our Resources Page.
How to Size a Pattern
When choosing which size of pattern to make, compare your measurements to the chart provided on the pattern.
If your measurements fit various sizes (for instance, the chest is a “large”, waist “small”, and hips “medium”), use the pattern guide for the largest size represented, in this case, a large.
When transferring your pattern, you will be making a few minor alterations to the (in this case) hip and waist sizes.
While you may be able to use one of the provided sizes without alteration, there’s a good chance that you’ll want to adjust the sizing.
Using the example above - Overall a “Large”, but “Small” waist and “Medium” hips - this is how you would trace out your new pattern:
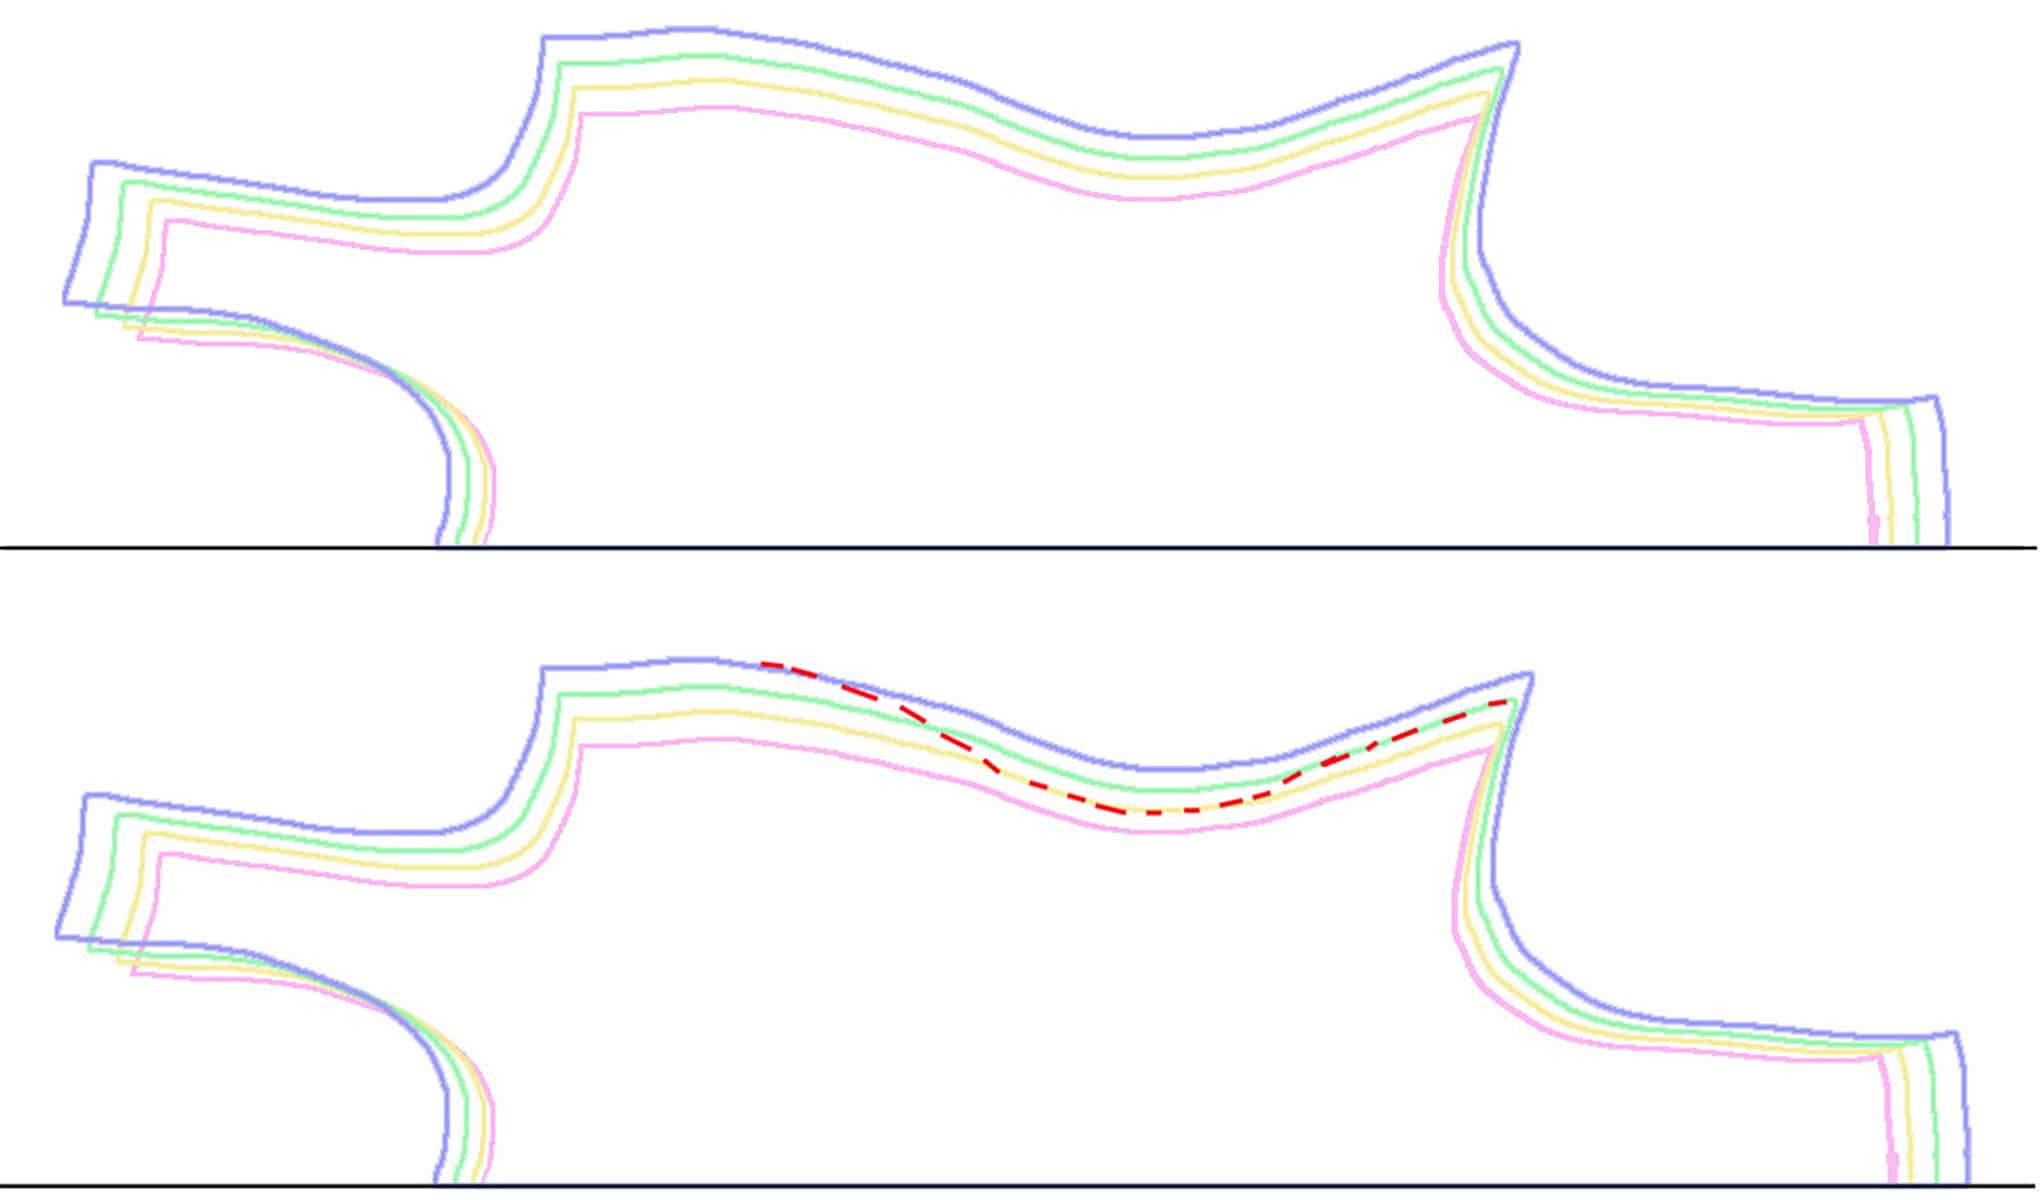
In this example, Pink = XS, Yellow = Small, Green = Medium, Blue = Large
For the top and bottom of the costume, trace along the blue outline.
From the chest down, you’ll want to gradually transition from the blue line to the yellow line, right about where the waist is.
As you continue downward, transition out to the green line for the hips. Just freehand it, and don’t worry - Spandex is very forgiving!
Before Getting Started with Pattern Alterations
Before we get into the specifics of altering a pattern for length or shape, there are a couple basic bits of information that are good to know:
(Cup) Size Matters
The majority of teen/adult sized patterns for women are designed to fit up to a C-cup chest.
If you’re making the garment for someone who is larger-busted, altering the bust line will result in a more comfortable garment. Adding extra length and width through the front will help it fit over the longer bust curves, as shown below.
For every size above a C cup, add about ½ cm, or .25 inch in length.
This should be done at the widest part of the chest (on the pattern), using the technique below for adding length.
Location Matters
The alterations you make to add or remove length will need to be done at the same points on both the front and back of the pattern - and commercially available patterns will have lines marked for this purpose.
Where you make the alteration will depend on the wearer’s body.
If the length (or lack thereof) is in the upper torso (if the superhero is long or short waisted), then make your adjustment above the waist line.
Conversely, if the wearer is long or short in the lower torso, adjust below the waistline.
If the wearer’s body is proportionate, you can adjust both above and below the waist.
That is, if a major adjustment needs to be made, make 2 adjustment sites on either side of the garment. One above, and one below the waist, of equal amount.
Generally speaking, though, you will likely only find yourself needing to add an inch or so in length - which is usually fine to do above the waist, as a default.
How to Add Length to a Pattern
1. Mark a straight line across your traced pattern, where you want to make the alteration.
2. Cut the pattern at this line. Have a piece of paper handy.
3. Tape one half of the pattern to this piece of paper, with the majority of the paper extending past the cut edge, towards where the other piece of the pattern would be.
4. Find out how much you will be adding (say 1 inch, for demonstrative purposes).
On either side of the cut edge of the pattern (centre and side), mark a spot 1 inch away from the pattern edge, and connect the two marks with another straight line.
5. Take the other pattern piece, and line it up against this new line, so that it also lines up with the first pattern piece.
Tape it down. See the diagram below.
6. Draw a new edge to the pattern on the paper, where it would have been if not for the alteration. You may need to curve it slightly to fit a more natural path than just a straight line.
7. Repeat for the other side of the pattern. Ie: this diagram shows a front pattern piece - the same extension would need to be applied to that pattern piece for the back of the costume.
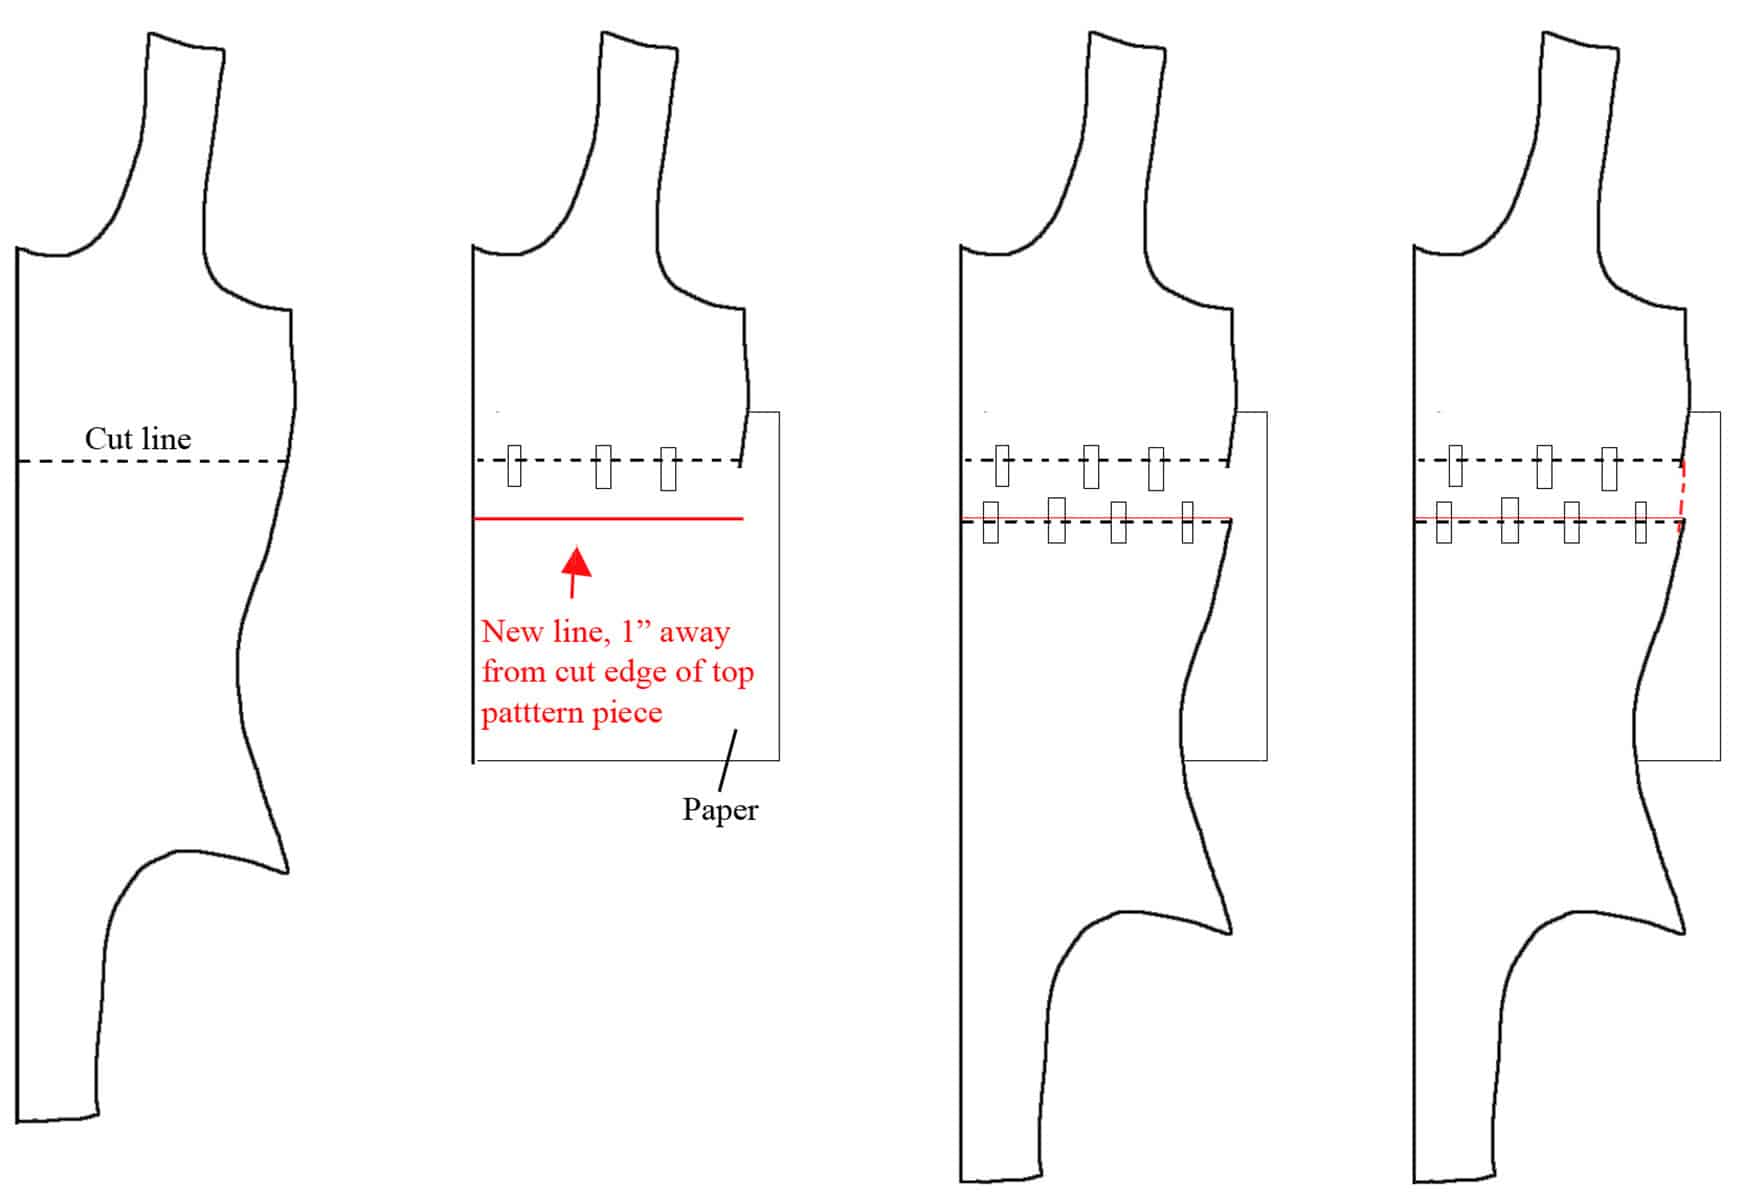
Adding Length to a Pattern
How to Remove Length from a Pattern
1. Mark a line straight across the pattern in the place you would like to make the alteration.
2. Mark lines on either side of the original line, that are ½ of the amount you would like to remove. (In the case of a 1 inch alteration, you would mark .5 inch above, and .5 inch below the original line.)
3. Fold the pattern in half along the MIDDLE line.
4. Fold the pattern again, along one of the other two lines.
You should now have the two outside lines touching each other, with a .5 inch fold (Assuming a 1" alteration, as example).
5. Tape the fold down, keeping the two outer lines touching each other.
6. Draw new edges in. It may be necessary to trim corners, in order to give it a natural curve.
7. Repeat for the other side of the pattern. Ie: this diagram shows a front pattern piece - the same extension would need to be applied to that pattern piece for the back of the costume.

Removing Length from a Pattern
The Pattern Alteration Hack
Now, these were the methods that I started with, back when I first started costuming.
There is a quicker and easier way, in my opinion... and this is how I’ve done it for years!:
1. Lay the master pattern out, with piece of tracing paper on top.
Line edge of paper up with fold line, if applicable. Trace out the top part of the pattern, as well as the cut line.
2. Move the tracing paper to separate the traced cut line from the original cut line, by the distance needed to move (eg: 1" separation).
Be sure that you are moving the paper directly to one side, so everything still lines up well (even if you’ll have to draw in new lines.).
To lengthen, move the traced portion away from the portion yet to trace, to shorten, move the traced portion towards the portion left to trace.
3. Continue tracing the remaining portion of the pattern, drawing/smoothing a new connecting edge if necessary.
4. Repeat with the other side of the pattern. (Ie if you altered the front, do the same for the back)
Adjusting Curve of the Back
You may find, once you’ve made your first costume, that there seems to be extra fabric in the small of the wearer’s back, that the costume is not laying flat against their skin.
If this is the case, she - this tends to apply to women’s costuming almost exclusively - probably has a deeper curve to her back than the pattern you are using was intended for.
Don’t worry though, many women do - especially when it comes to dancers, figure skaters, and rhythmic gymnasts!
To correct this, simply draw a deeper curve to the pattern. Your curve will start at the shoulder blades (widest part of the chest on the pattern), curve in to the smallest part of the waist, and back out to meet up with the widest part of the bum.
Start with taking about an inch off the original pattern (at the waist), and experiment until it fits right.
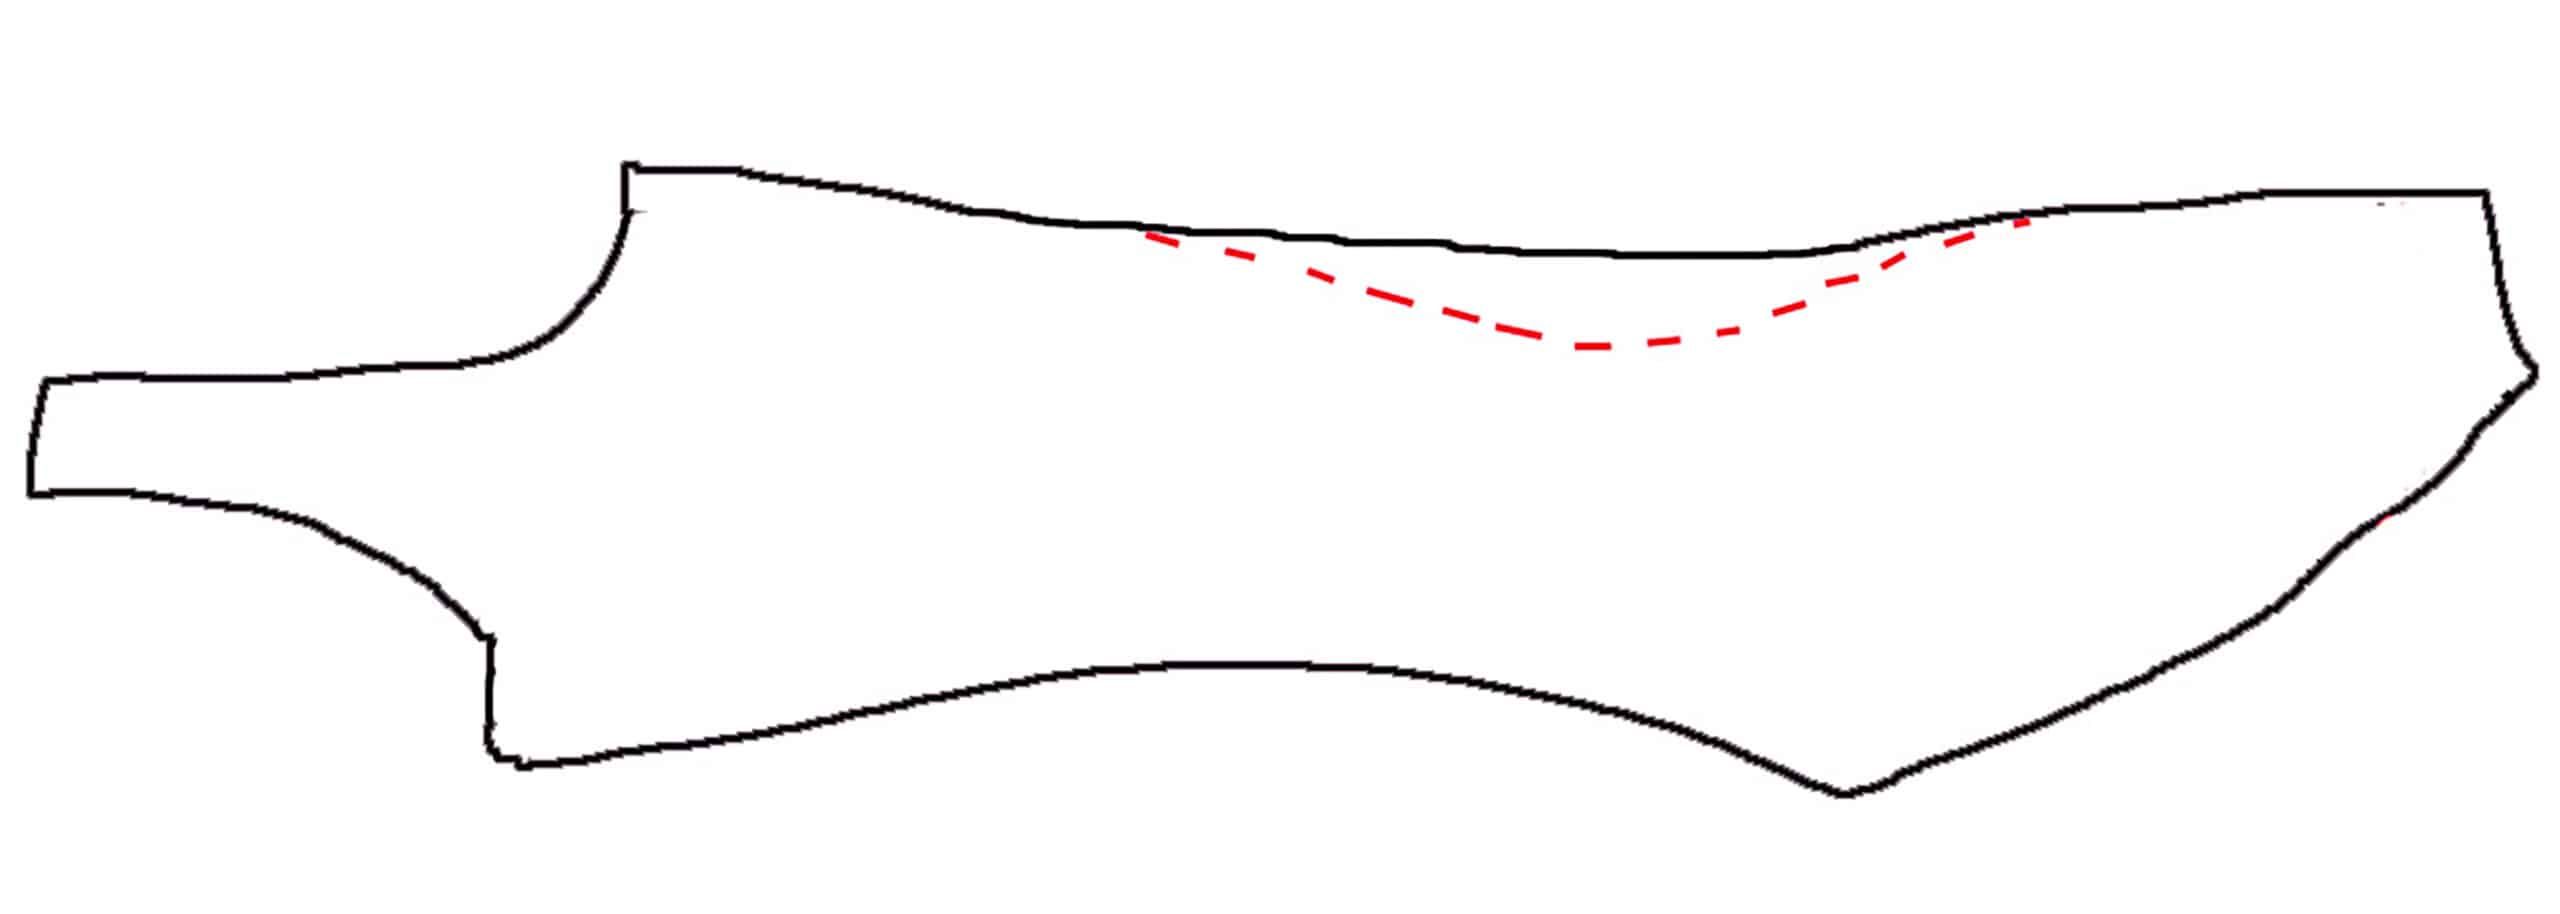
Adjusting for a Deeper Curve in the Back
Adjusting the Butt Length
You may find, once you’ve made your first costume, that there seems to be extra fabric - vertically - in the butt of the bodysuit.
When this is the case, it can look bunched up towards the bottom of the butt, while fitting fine, side-to-side.
While I love Kwik Sew patterns, this was an issue I had to correct almost as a default correction, when it came to “Misses” sizes (ie: XS, S, M, L, XL).
To correct this, figure out how much fabric you have as excess in the back of the . Just pinch it - vertically along the centre back seam - until it fits snugly.
However much you pinched off is the amount you’ll need to remove from the pattern.
It’s probably easier to show first, THEN explain:
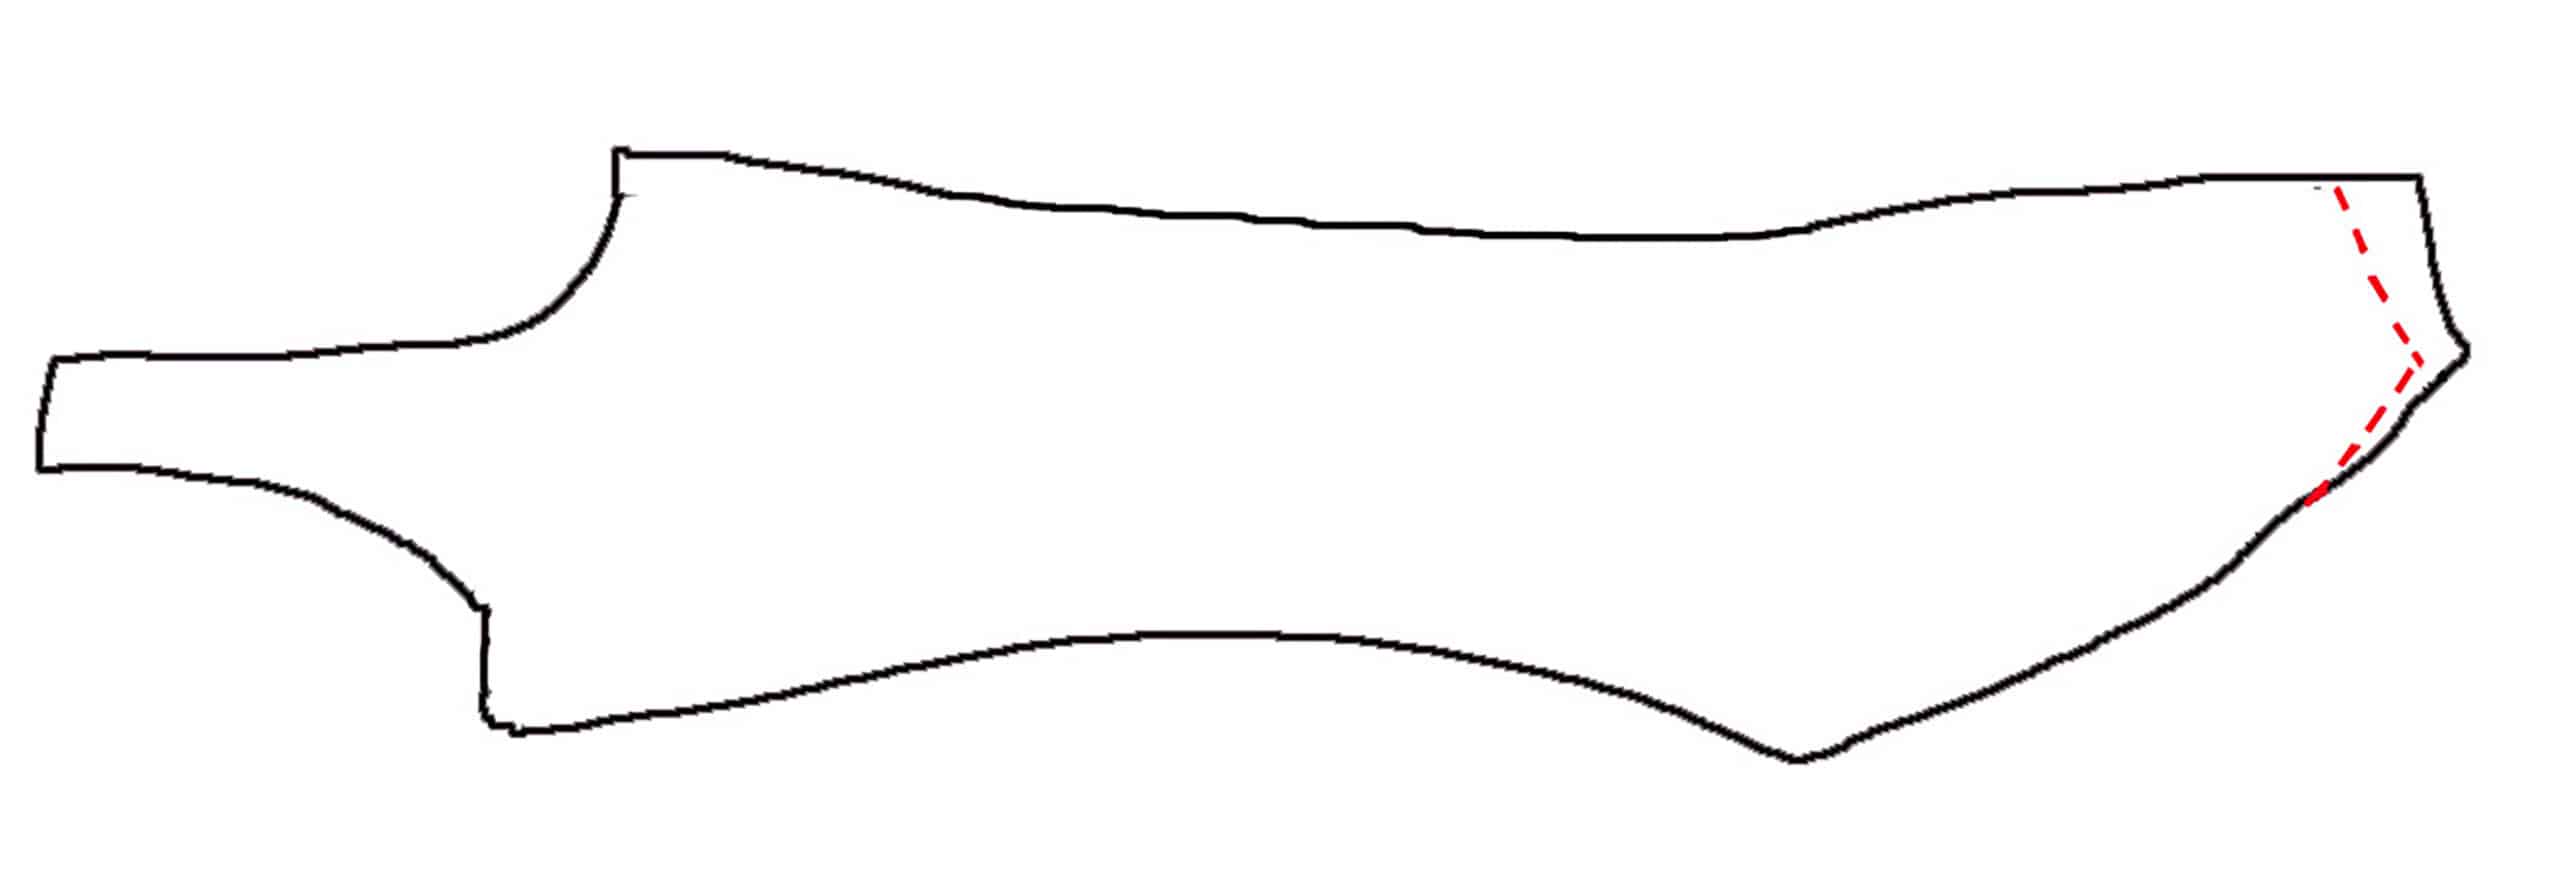
Adjusting for Butt Length
I would make a mark about 2" up the centre back seam, measured from the bottom/crotch seam. I would also measure about 1" up the bottom of the leg seam, and draw a curved new cut line between the 2" and 1" marks.
From there, I would measure the length of the bottom seam, and transfer that to the new cut seam - measuring out from the centre back seam. Mark that spot, then taper the existing leg curve in to meet the mark on the new cut line.
This simple alteration will make suits made by a Kwik Sew pattern fit a LOT better.
While the measurements given are the default I’d suggest on that particular brand of pattern, the technique can be used to fix a “saggy bum” in any brand of pattern.
Altering Leg Openings
While the leg openings on a commercial pattern may be just fine as it is, it is an area where you can provide some customization to fit and flatter, or just for comfort.
Deciding where you want the new leg cut line will be partially a matter of preference (or accuracy to an established costume!), and partially a matter of trial and error.
After making all of the adjustments that you want for size and length, make a practice costume / muslin - including elastic in all of the openings that need them- leg/arm/neck.
Use the practice costume as a guide to where you want to adjust the leg hole, if at all. While the wearer is wearing the test costume, mark the desired leg height with a safety pin.
Have the wearer change out of the costume, and examine it.
Measure up the side seam, from the edge to the safety pin. This is how much length you will need to remove from the side seam on the pattern, both front and back.
Let’ s look at some basic leg alterations.
Higher Leg Cut
To redesign the leg opening, simply mark off the point on the hip that it will need to be cut up to, and:

Redrawing a higher leg opening
Front: Draw a curved line from the mark on the side seam, tapering in to where the leg opening straightens out towards the bottom/crotch seam. (Note: diagram shows a VERY high cut leg.)
Back: Draw a line that curves inward slightly from the mark on the side seam, and then goes fairly straight towards the leg seam, gradually curving into it.
You don’t want to remove a lot of the fullness in the butt part of the suit, but you don’t want to create bulging, either!
Lower Leg Cut / Boy Cut
On both front and back pieces, extend the side seam, following the path it’s on from the waist downward.

Mark off how long you want the additional side seam to extend, on both the front and back pieces.
Redraw the leg openings on both sides of the pattern, using the diagram on the previous page as a guide to how it should look.
“Wedgie Proofing”
I hated when my skating dresses would ride up, so I figured out this simple way of preventing the unpleasant situation.
This is a simple alteration that you make to the back of the panty portion, before cutting your fabric.
It works by “cupping” the butt with a little additional fabric.
1. Approximately halfway in between the end of the side seam and the corner of the crotch seam, mark a spot that is a few inches away from the pattern.
Depending on the size of the wearer, this should be between 1 inch and 2+ inches. The larger the butt, the further away.
Re draw the leg opening, starting about 1 inch inside the side seam, ending about 1 inch away from the crotch seam. This is the new cut line for your pattern.
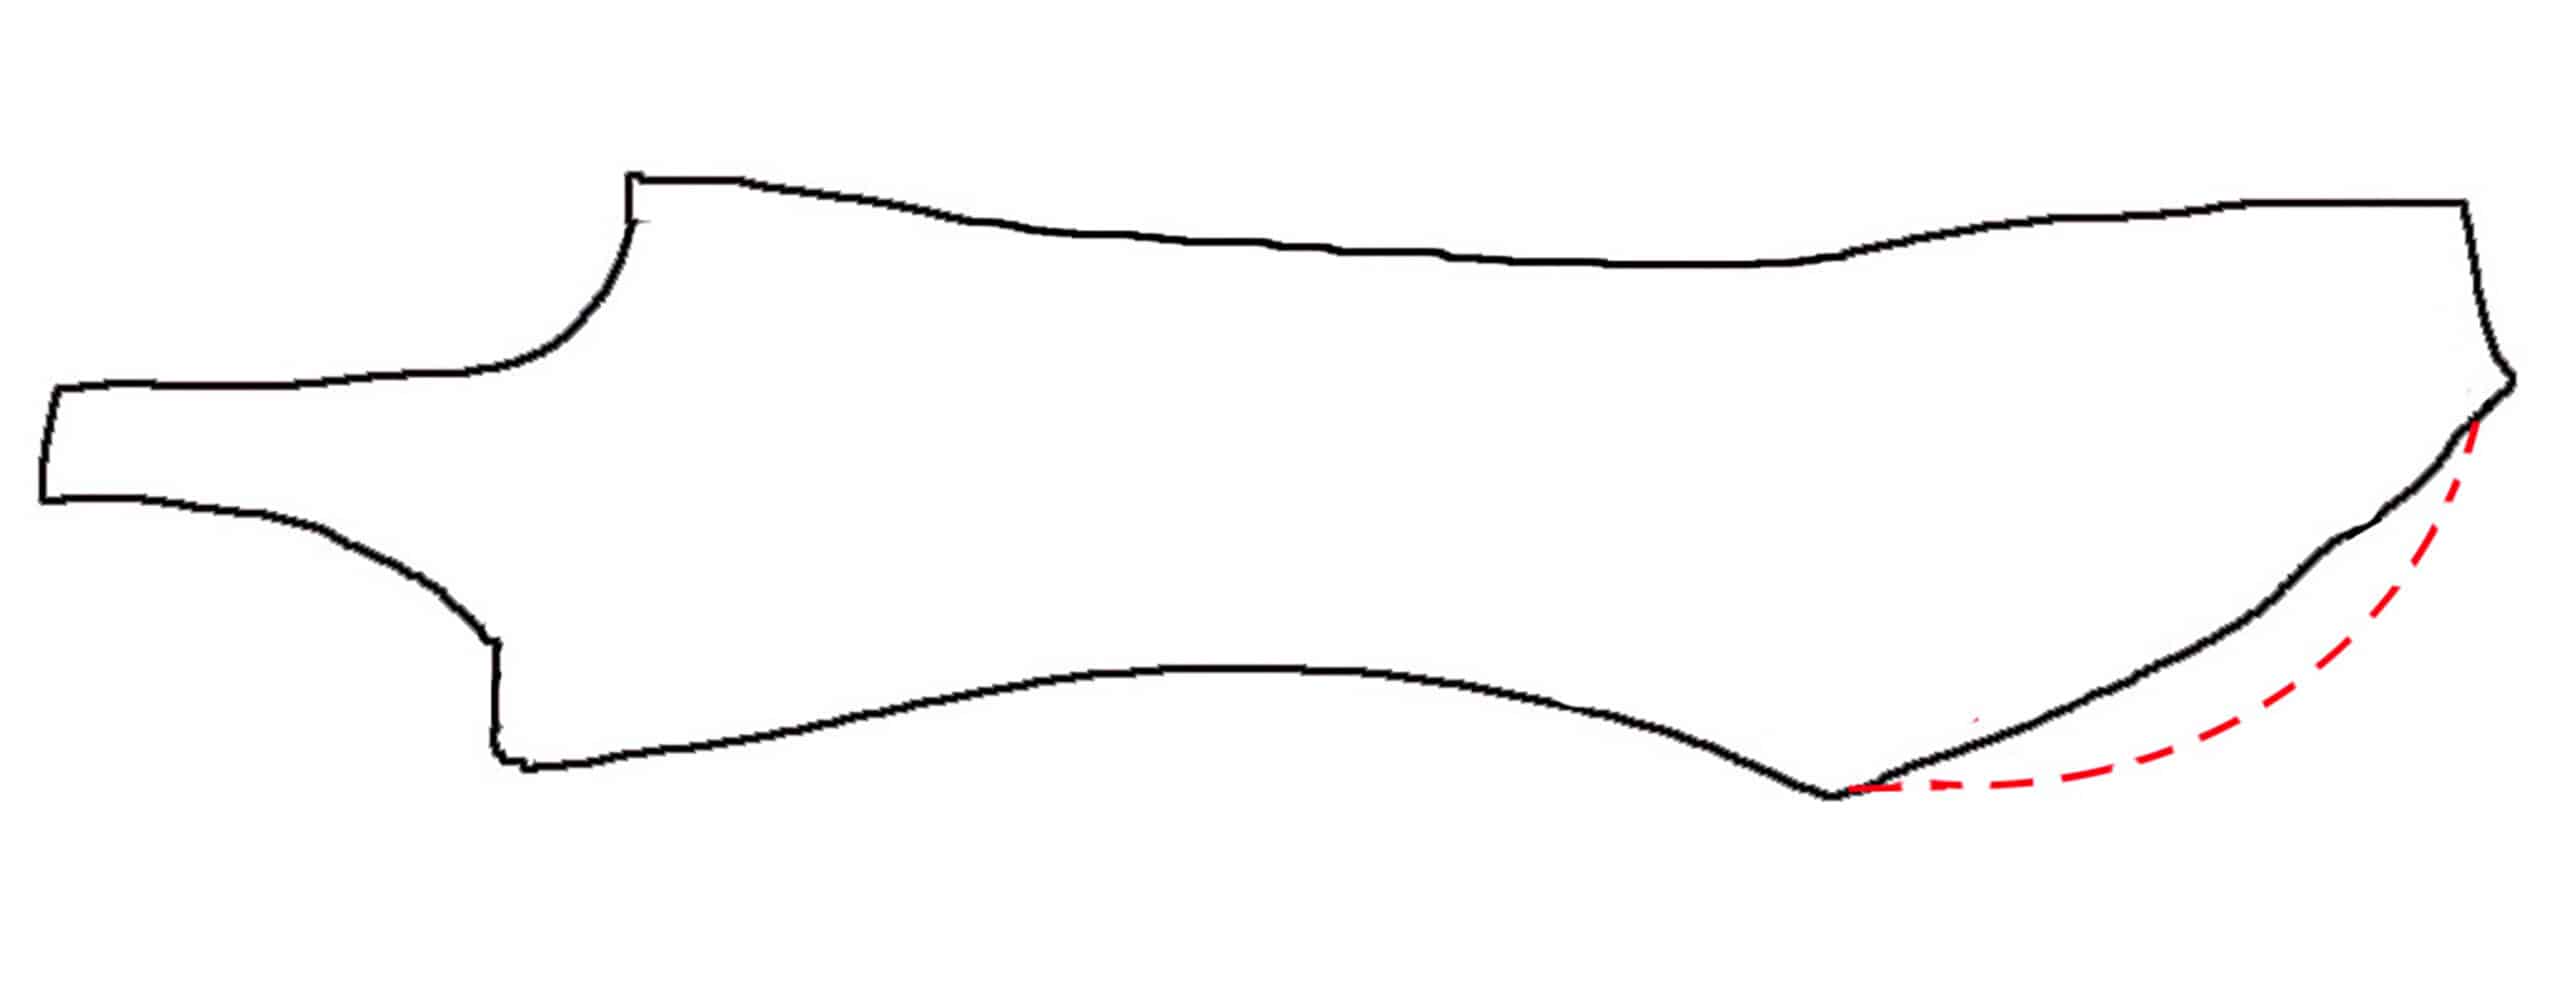
Adjusting the Skirt Line
Skirt placement lines are generally marked on all patterns, but usually are not very appropriate or flattering.
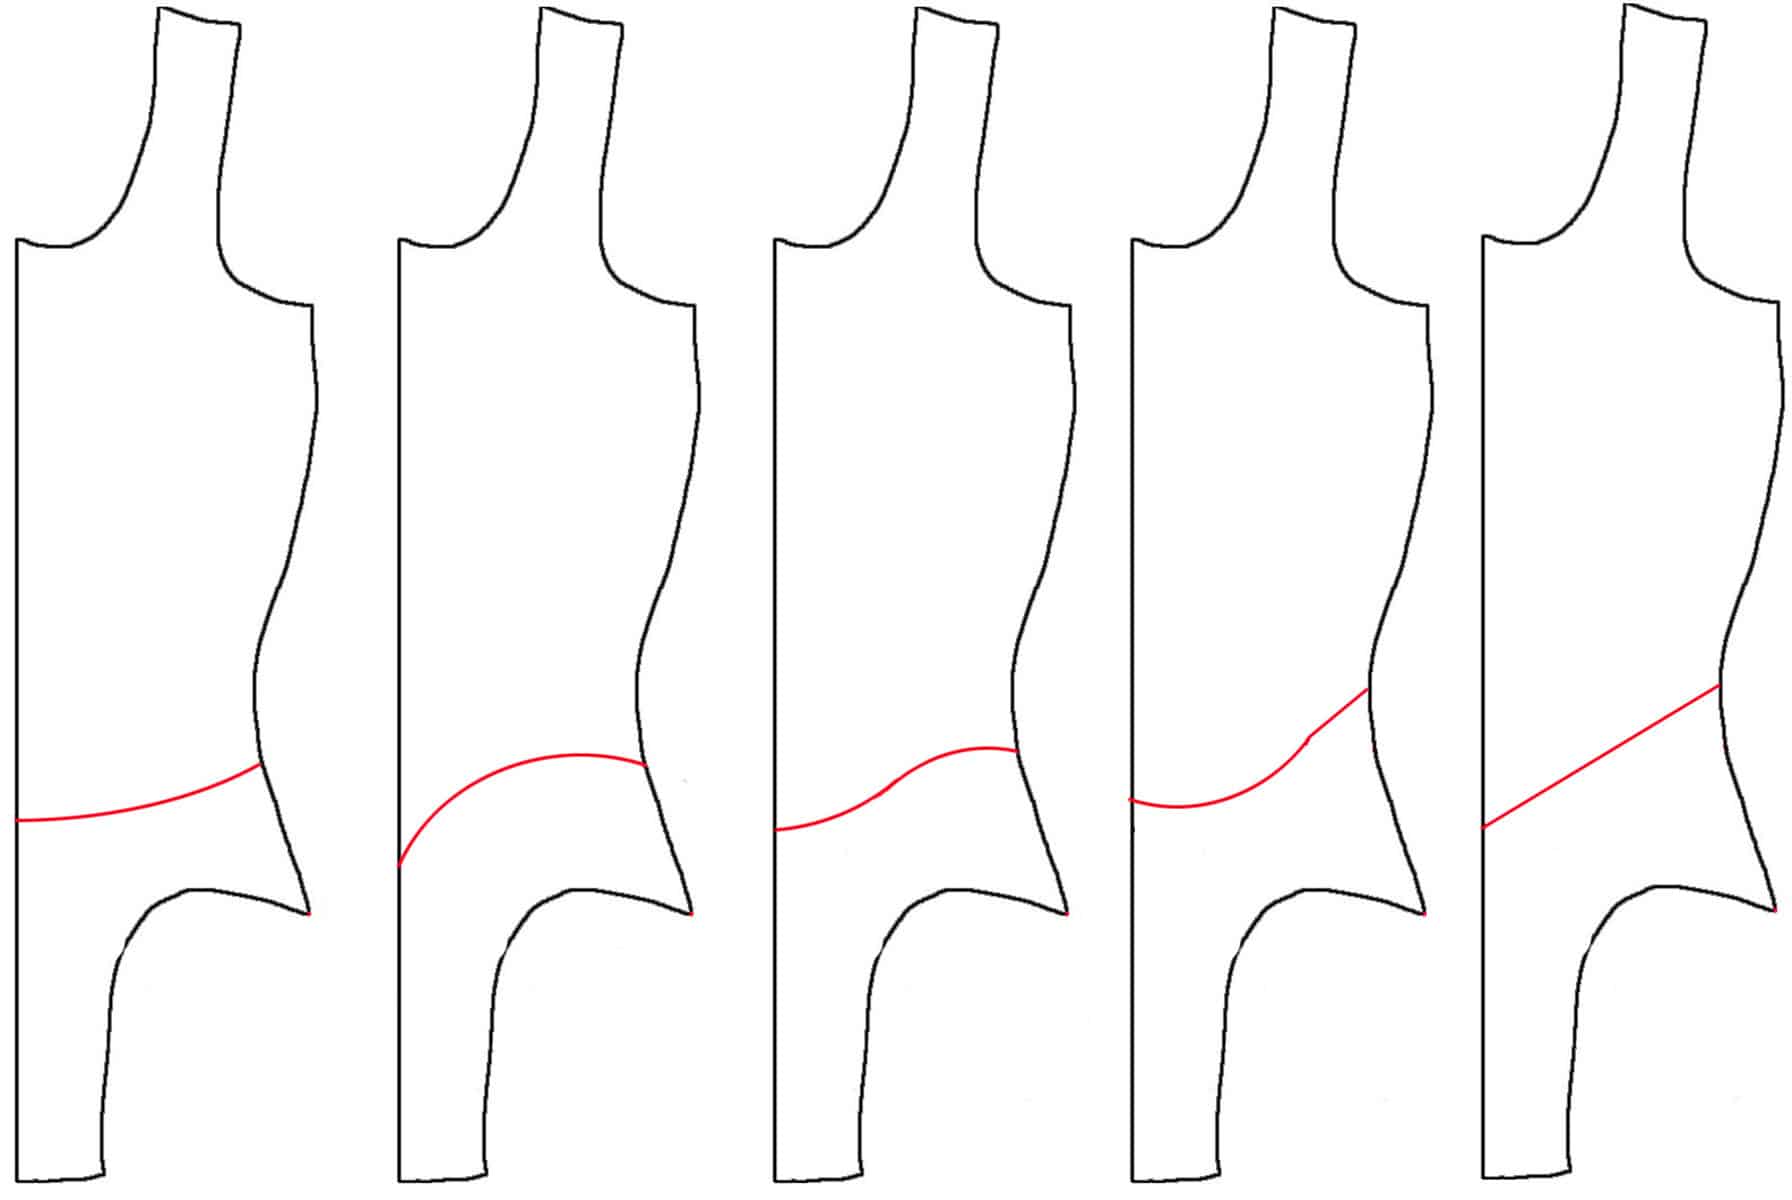
Some fairly typical skirt placement lines, on skating dress patterns.
For this reason, it’s usually a good idea to get a pattern which has the bodice and panty all in one, so that you can tinker with the skirt placement.
Something to keep in mind: a pattern intended for a figure skating dress - which can be tempting to use for things like skirted superhero costumes - will have a very different skirt AND skirt placement than what you’ll want for a anything other than skating dresses.
While skating skirts are placed fairly low and usually dip down in the front and back, skirts on other types of costumes tend to be placed much higher - usually 4 to 4.5" above the top of the hip bone - and are fairly straight across. They tend to mimic regular clothing lines.
While I was always a fan of “just winging it” - I could look at a client and their costume design, and know where to draw the skirt line on the pattern - those new to sewing spandex costumes will find it easiest to use a practice leotard/skirted bottom to figure out skirt placement.
While your wearer is wearing the properly fitting body suit / shorts / etc, mark off where you would like the skirt line to be, on both the front and the back.
(Hint: you really only need to make the skirt line on one half of the front, and one half of the back - no need to aim for a perfectly symmetrical skirt line across the entire front, or anything like that!).
Once you’re satisfied with your marking, have the wearer change out of the body suit, and transfer those markings to your well fitting body suit pattern.
Along that line, make a note to yourself that you will need to add a little length for seam allowance to each side of the skirt line, when you cut it all out. I usually go with ¼" on each side of the cut line.
Important Note: ALWAYS adjust the skirt line before designing/drafting the skirt pattern!
I find that skirts tend to be the most flattering when they are lined up with the top part of the hip bone on the side, scooping down slightly in the front, however, some people may prefer to place the skirt all the way up at the natural waist (Though, I find this to look fairly dated).
It’s just a matter of personal preference.
The front can, and usually is, placed lower than the sides, but should never be placed lower than the point where the stomach starts to curve in towards the crotch.
The type of skirt you plan to use can have an impact on the skirt placement line you will need.
Flat skirts require a straight skirt line, or very slightly scooped. Making a dress with a flared skirt, you will have a lot more flexibility in terms of what you can do with the skirt line.
Base Pattern Alteration Final Notes
Once you’ve got a basic pattern that fits - with folds, cuts, pen marks, new leg and butt seams, and all - trace the whole thing onto a fresh piece of paper.
Behold! Your new master pattern!
Assuming you’ve made a practice suit from this new master pattern and are happy with everything, I recommend making a heavier copy - perhaps from brown craft/kraft paper - and setting it aside.
Being able to trace that master pattern out onto a new sheet of tracing paper any time you need to make a new suit will save you a lot of hassle!
Getting Started with Spandex Costuming
Looking for more posts on the basics of spandex costuming?
Colour Theory for Spandex Costuming
How to Measure for Spandex Costuming
Spandex Costuming Tools & Supplies
Spandex Costuming Design Principles
Types of Stretch Fabric for Spandex Costuming
How to Cut Spandex
How to Sew Spandex With or Without a Serger
... and be sure to check out our Table of Contents for an organized listing of all of our posts.
Share the Love!
Be sure to take some pics of your handiwork! If you post it to Bluesky, be sure to tag us - @SpandexSimplified.
Also, be sure to follow me on Pinterest, and subscribe to my Youtube Channel, so you never miss out on any of my nonsense.
Well, the published nonsense, anyway!




Thankyou, I love your instructions! Can you tell me, when measuring a girl for a four way stretch spandex dance costume, do you make the pattern pieces the exact size of the girls measurements or deduct some to allow for the stretch of the fabric? Is there a formula? Is this called negative ease? I would love to see a tutorial on "correct transfer of measurements to pattern"
thankyou1
I just saw this - sorry about it being a few years late!
Start by using the measurement chart on the pattern you're using - they're all a bit different. Go by the actual measurements you took, to start.
Make a practice outfit, then go from there. Some patterns are more tightly fit than others, some people prefer a tighter or looser fit.
You may find that -for your tightness preference and the pattern you're using - you want to size down in the width only. I don't recommend sizing down in the length, unless your specific measurements indicate that to be a need.