Swimwear is easy - and fun! - to make. This tutorial shows you how to make a string bikini top, for either recreation, or as a posing suit.
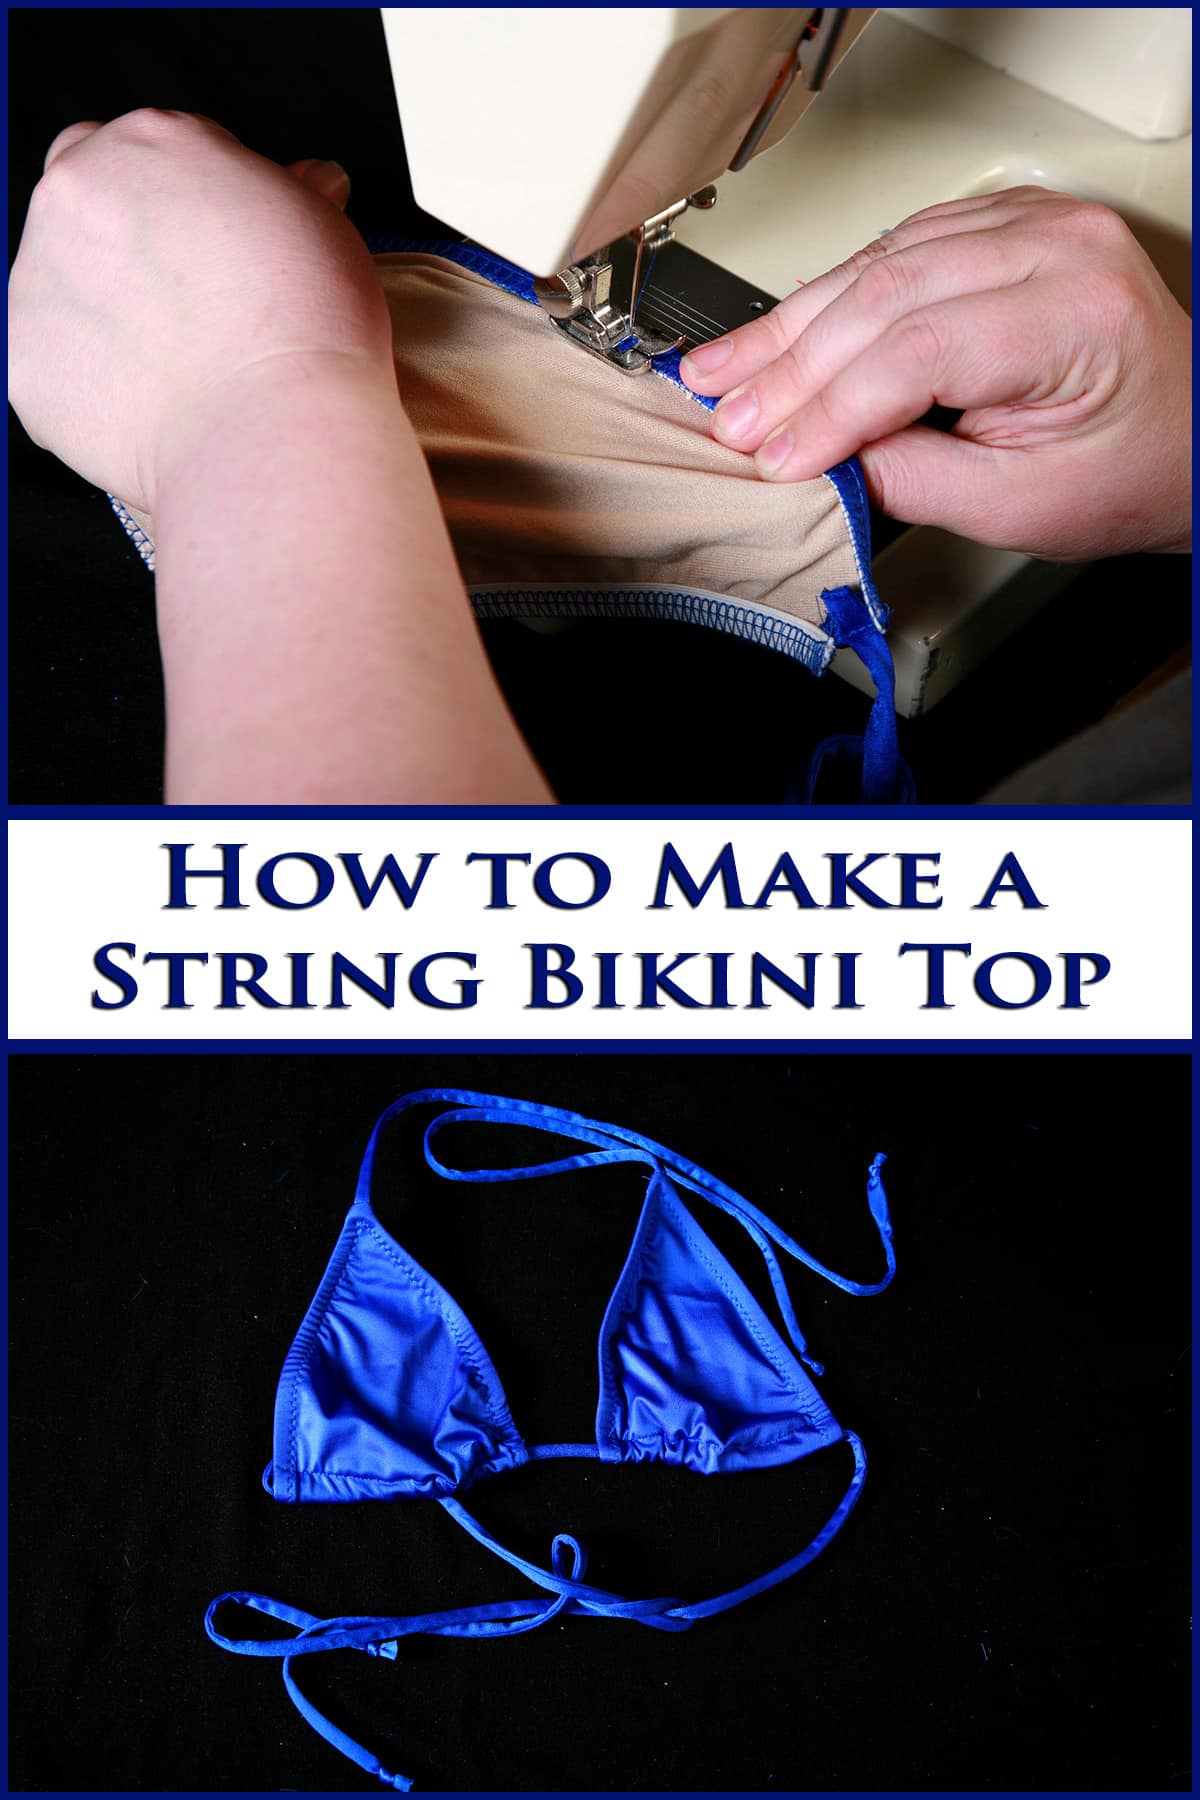
This tutorial is excerpted from “Spandex Simplified: Fitness & Bodybuilding” by Marie Porter. All photos and accompanying tutorial are copyright @2013 Marie Porter, all rights reserved.
Today's tutorial is for a bikini top I've been making for almost 20 years at this point.
I designed this pattern back in 2002-ish, specifically for my fitness and bodybuilding clients, as a posing suit top.
Sometimes they'd be done in just basic spandex, as an unadorned posing suit, sometimes I'd cover them with a TON of crystals. For certain routine costumes or cosplay, I've even appliqued them - More info on crystalling and applique at the end of this post!
Either way, this bikini makes a beautiful, flatting base for whatever you're doing with it.
The cups are symmetrical and teardrop-shaped in design, tapering up to the top ties in a way that eliminates some of the excess fabric seen in other styles of bikinis.
Let's get to it!

A past client wearing a posing suit I made from this pattern.
What You Need to Make a String Bikini Top
Pattern
The information on this post is based on my downloadable PDF Pattern #102 - Teardrop Bikini Pattern.
This is available for purchase on my Etsy shop or on my main blog’s Downloads Section
The techniques should work for most bikini patterns, but if you’re using a different pattern, you’ll want to consult their info for material requirements.
Materials Needed
Note: Amounts are given under the assumption that you are buying fabric specifically for this project, rather than using scraps, etc you have on hand.
The cups for this pattern require very little fabric - you will have leftovers if buying yardage.
⅓ yard 4 way stretch spandex
⅓ yard swimsuit lining
4 pieces of ⅜" Braided elastic:
- 7.5" long each for XS
- 8"long each for S
- 8.5” long each for M
- 9” long each for L
- 9.5” long each for XL
- 10” long each for XXL
Thread to match the spandex
Equipment Needed
Sewing machine with straight stitch and zig zag
Serger (optional)
Scissors
Cord threader*
* I like the Dritz Drawstring Threader or Schaller's EZ Threader for this.

How to Make A String Bikini Top
Get Everything Ready
Making sure that your print setting is set to "actual size"- not "fit”- print your pattern. (If your print setting defaults to “fit” and you don’t change it for this print, your pattern will print too small)
Using the pattern size you want, cut out the pieces needed:
a.) Two long strips of spandex: 1 ¼" x the width of your yardage (See “strings” section for more details)
b.) Two pieces from spandex of choice
c.) Two pieces from swimsuit lining.
Be sure to cut the pieces so that the greatest degree of stretch is in the direction indicated on the pattern.
Make Your Strings
Sergers are HIGHLY recommended for making strings, but you can get by with a small & short zig zag stitch, as long as you make sure to stretch the fabric hard as you sew it!
Cut 2 lengths of Lycra that are about 1 ¼ inches wide (about 3 cm wide), by the length of your fabric cut (usually 58-60").
See my post “How to Make Bikini String” for full details on making your bikini strings.
Once the tubes are turned right side - out, clip off the end of the tube with the hole and yarn / cord.
Leave one string uncut - this will be the torso string.
Cut the other string in half, these will be the neck strings - to be trimmed to size later.
Assemble Your String Bikini Top
Lay both of your lining pieces out flat on your work surface.
Determine which is the “right” side of your spandex pieces. Position one spandex piece on top of each lining piece, with the right side facing up. Line everything up well.
You may choose to zigzag/serge your pieces together along all edges, to keep the lining and outer spandex pieces held together, before proceeding. (I just zigzag or serge the top and bottom edges, as pictured).
After stitching, lay your piece sets out, so that the right sides are facing up, keeping lining lined up with the outer piece.
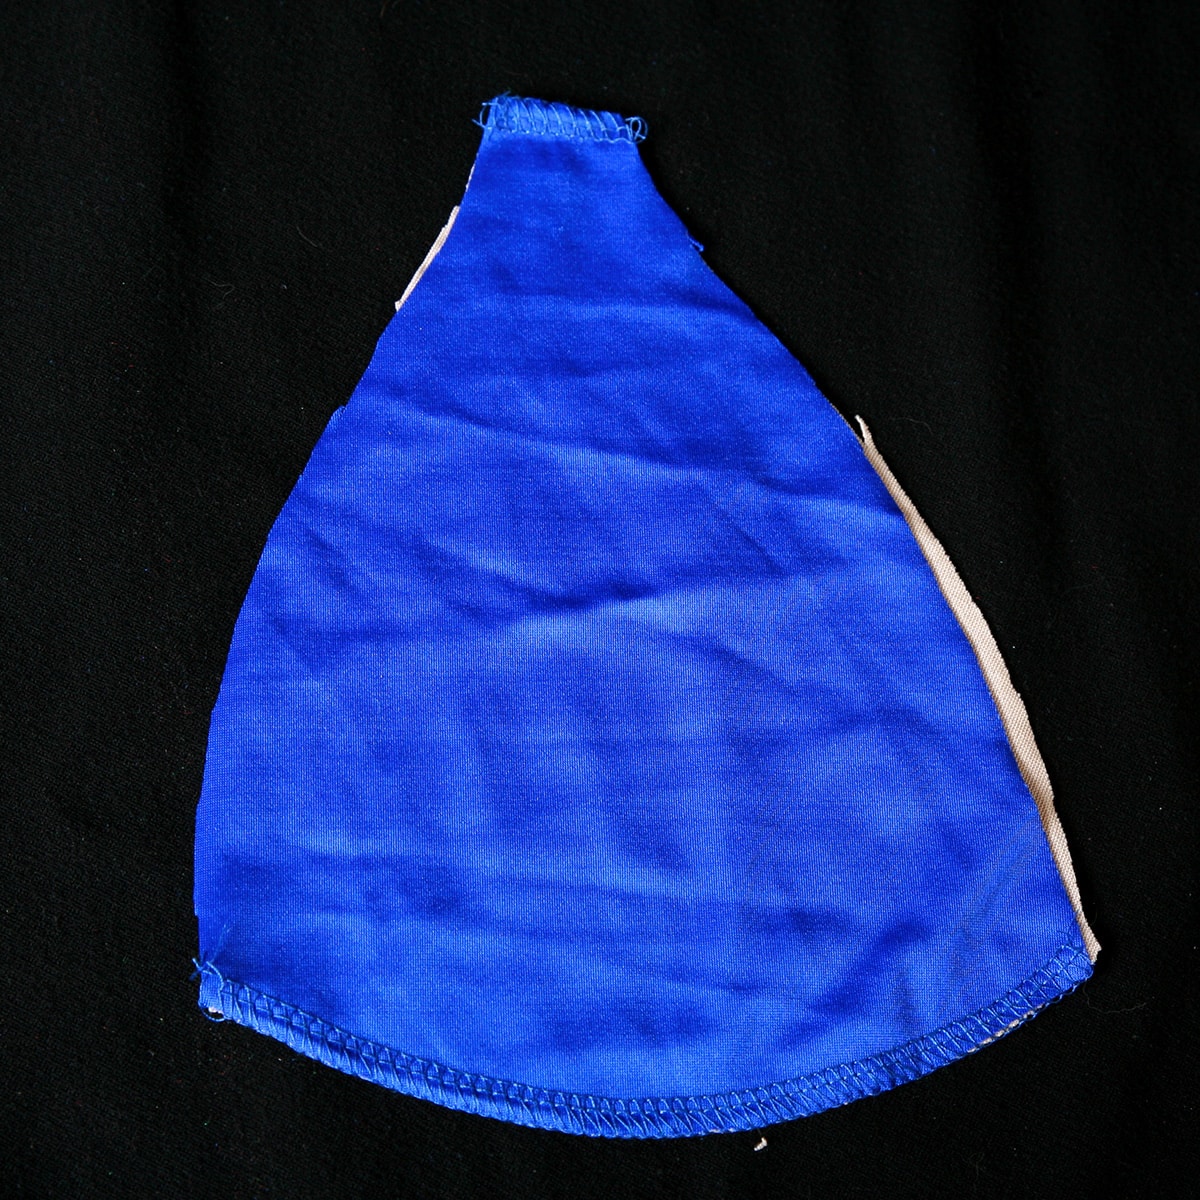
Stitch a string to the flat top edge of the bikini top, lining the raw edge of the string with the flat edge of the teardrop. Be careful to stitch through both the outer fabric and the lining. Repeat on the other top piece.
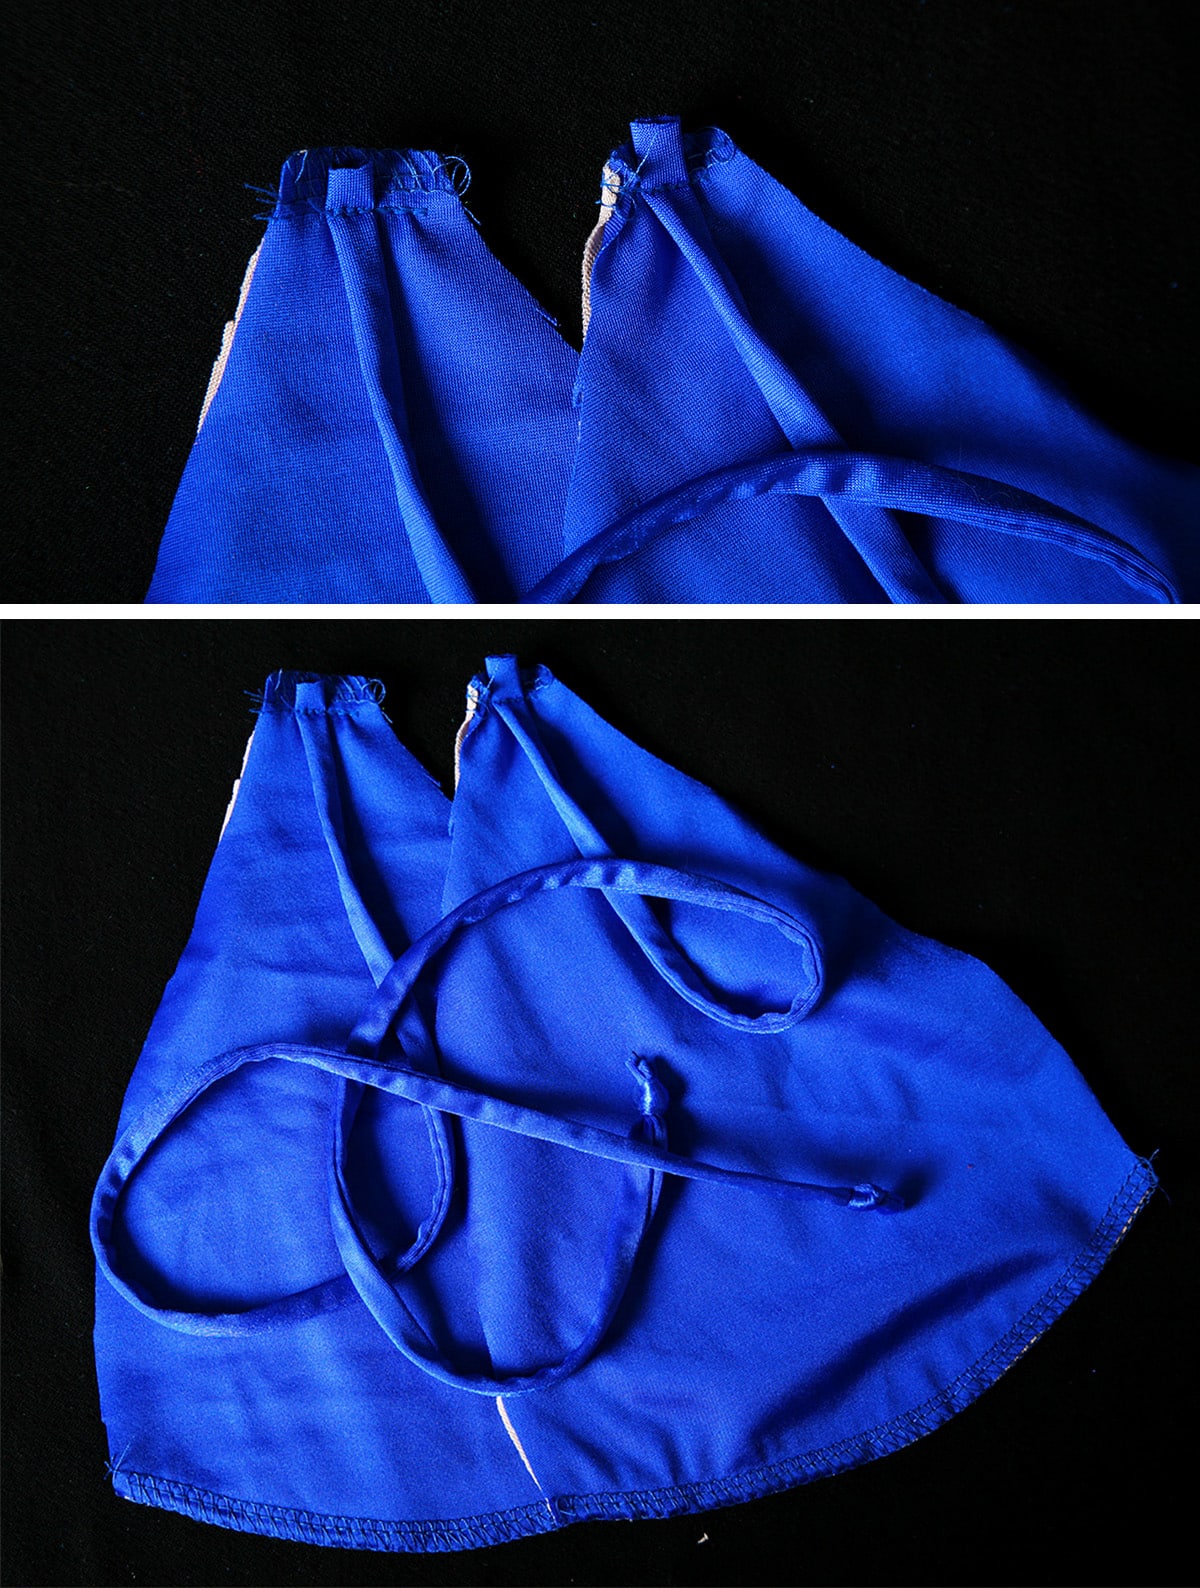
With the lining side of each piece facing up, pull the string so that the short, raw edge of the top is laying against the wrong side of fabric / lining, and the remainder of the string extends away from the teardrop.
Apply the Elastic
Sew a piece of elastic from the string end of one teardrop to the curved bottom edge of the same teardrop.
Once you have a couple of stitches in place, stretch the elastic so that the free end of elastic meets the bottom edge of the bikini top.
The starting edge of the elastic should be holding down the top seam you just created when sewing the string on.
Repeat elastic application on the other side of the teardrop.

Repeat elastic application steps with the other teardrop
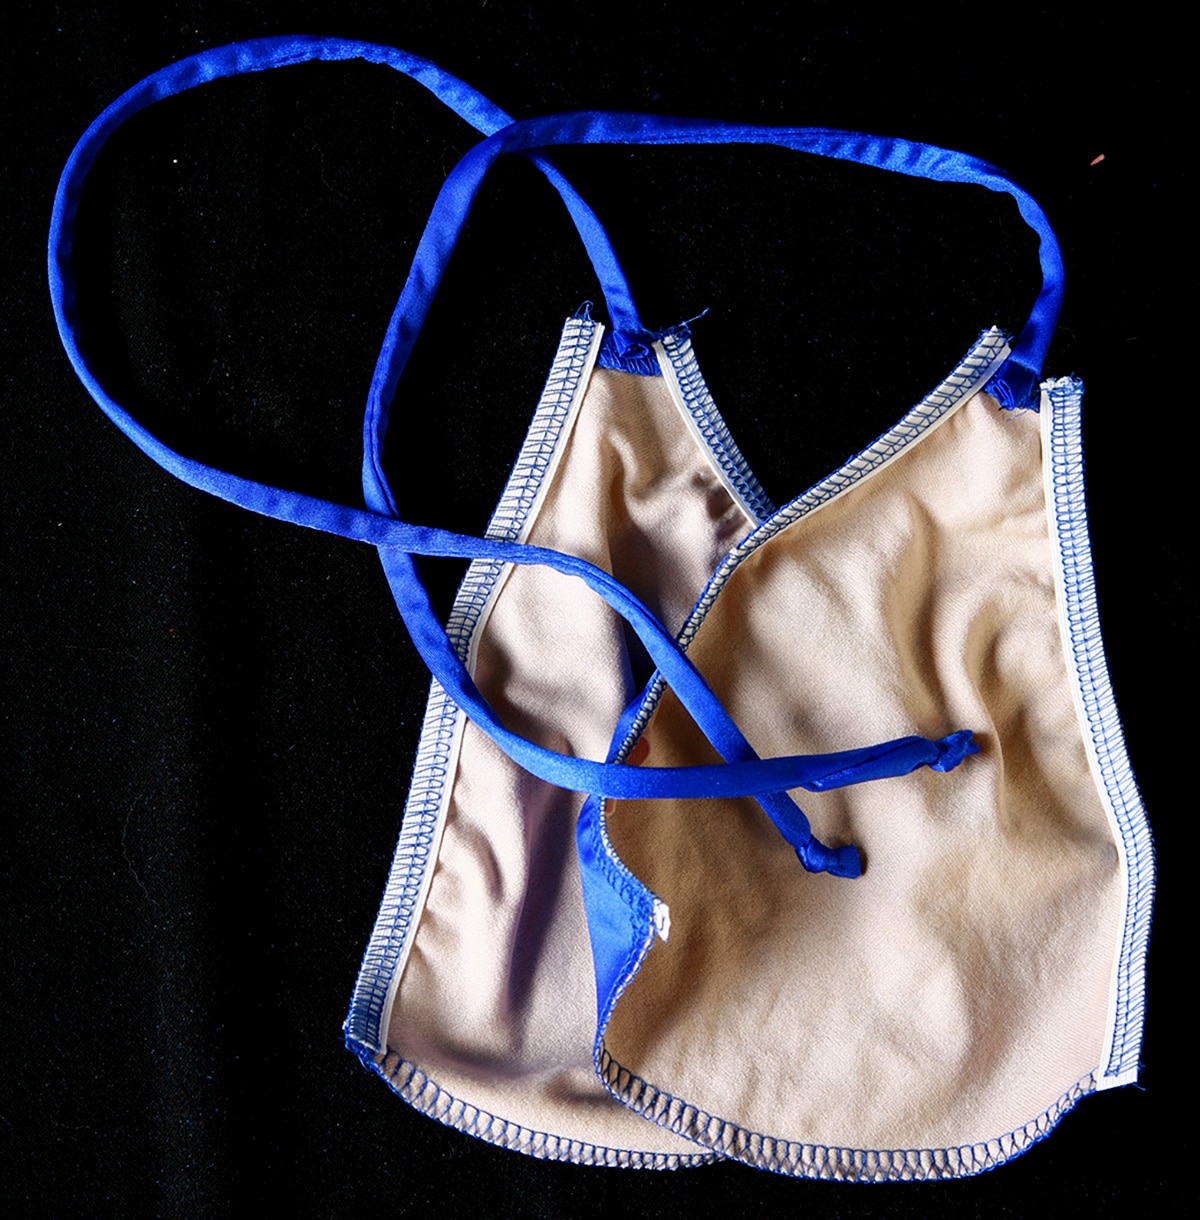
Flip one teardrop over so that the right side is facing up.
Hold it so that the curved bottom edge is away from you, and the string toward you.
Starting on the right side of the piece, flip the elastic under and stitch down with a zigzag. Remember to stretch as you go - see "How to Sew Spandex with or without a Serger".
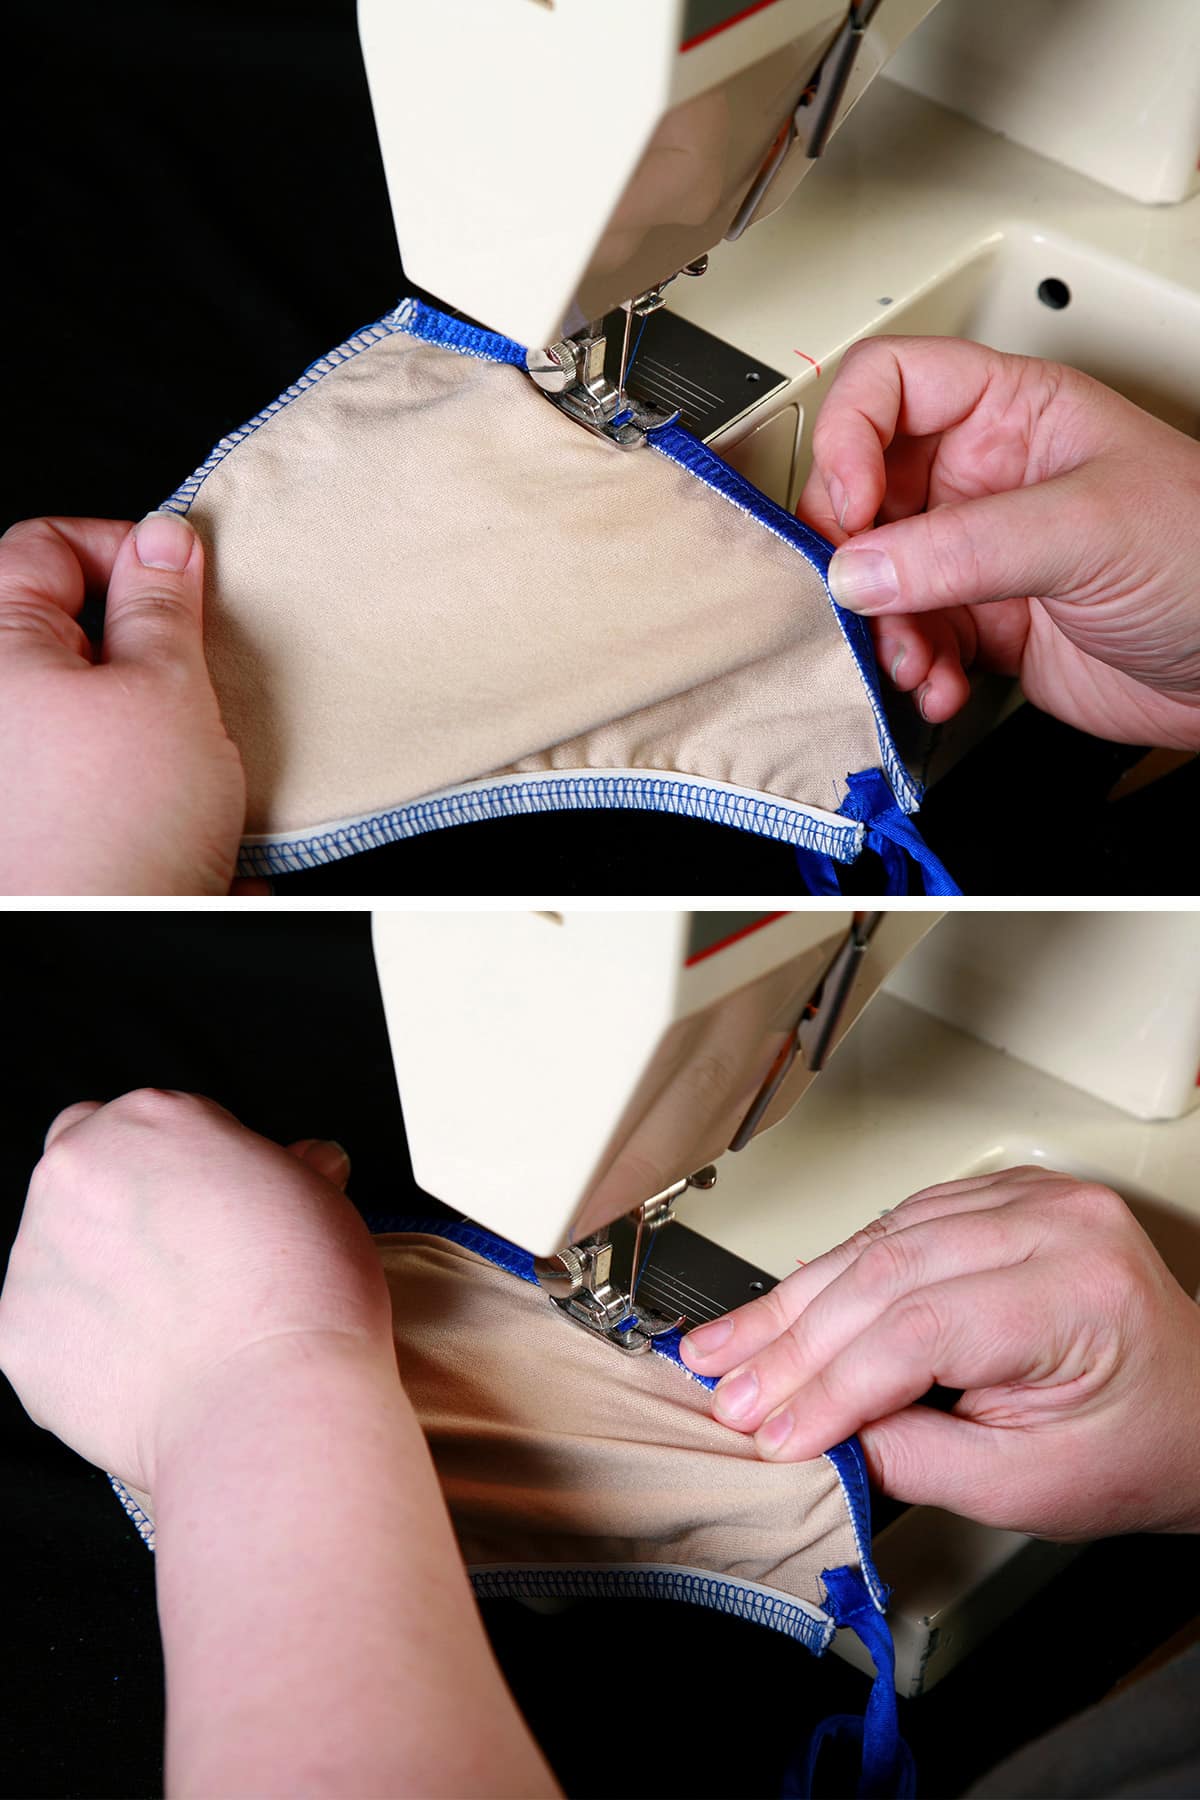
As you come to the string end of the teardrop, flip the second (left) piece of elastic under, holding it and the first piece under so that they lay nicely.
Stitch right to the string end while holding in place, lower your needle, and pivot the teardrop so that you can continue to sew down the second edge:

Alternatively, you can sew the elastic down with the wrong side facing up. Do everything the same as described on the previous page, only upside down!

Sew the Cord Channel
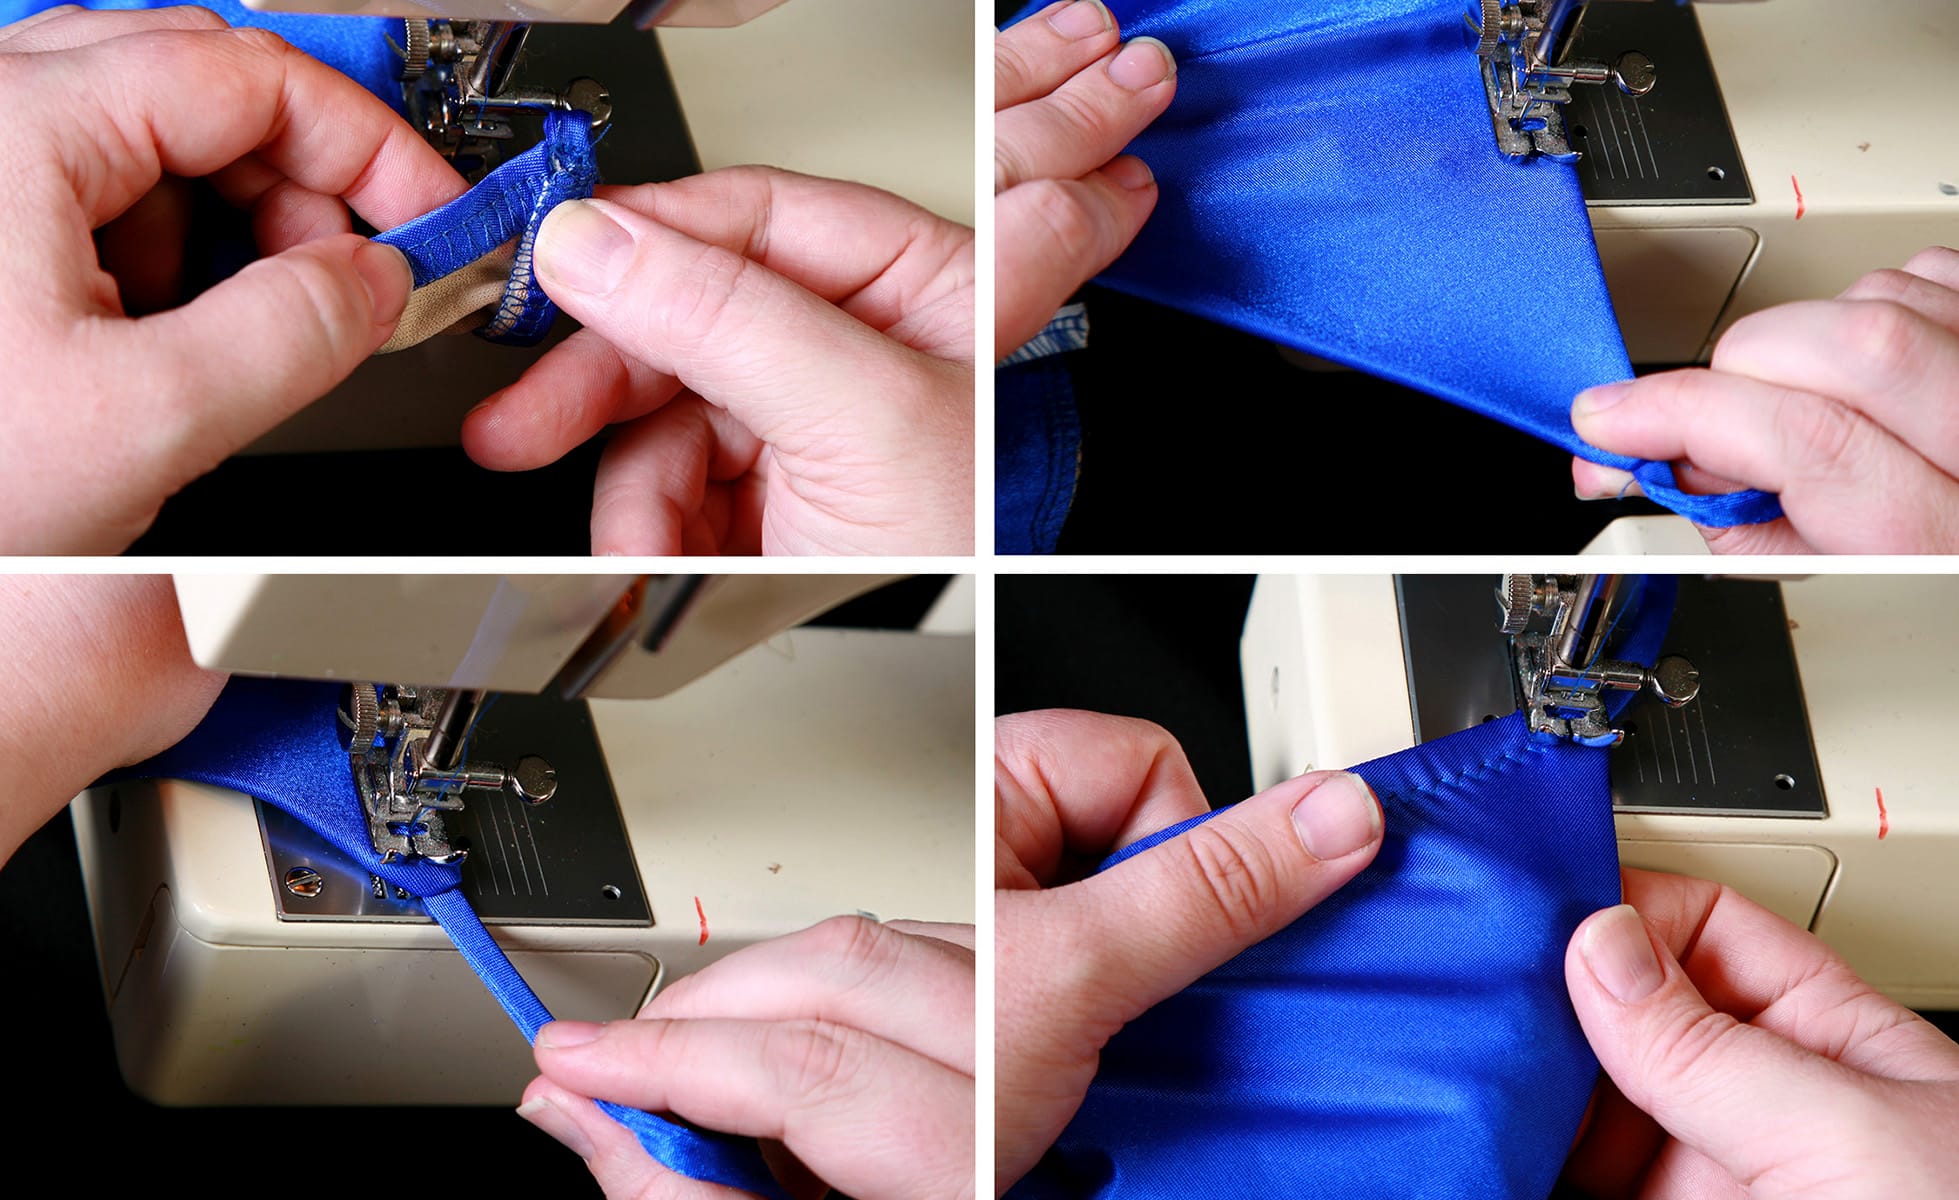
With the wrong side of a teardrop facing up, and the raw, curved edge to the right, flip the curved end up and over, meeting the raw corner of the curve with the side of the elastic, with about ½ to ¾" seam allowed.
Using a narrow zig-zag, and easing the seam allowance as you go (stretching the top so that there's no wrinkling on the sewn edge), stitch along the raw edge, so you’re making a tunnel.
Be sure to backstitch a few times at the start and end of the seam.

Repeat on the second teardrop.
You now have two complete teardrops for your top.
Finish Your String Bikini Top
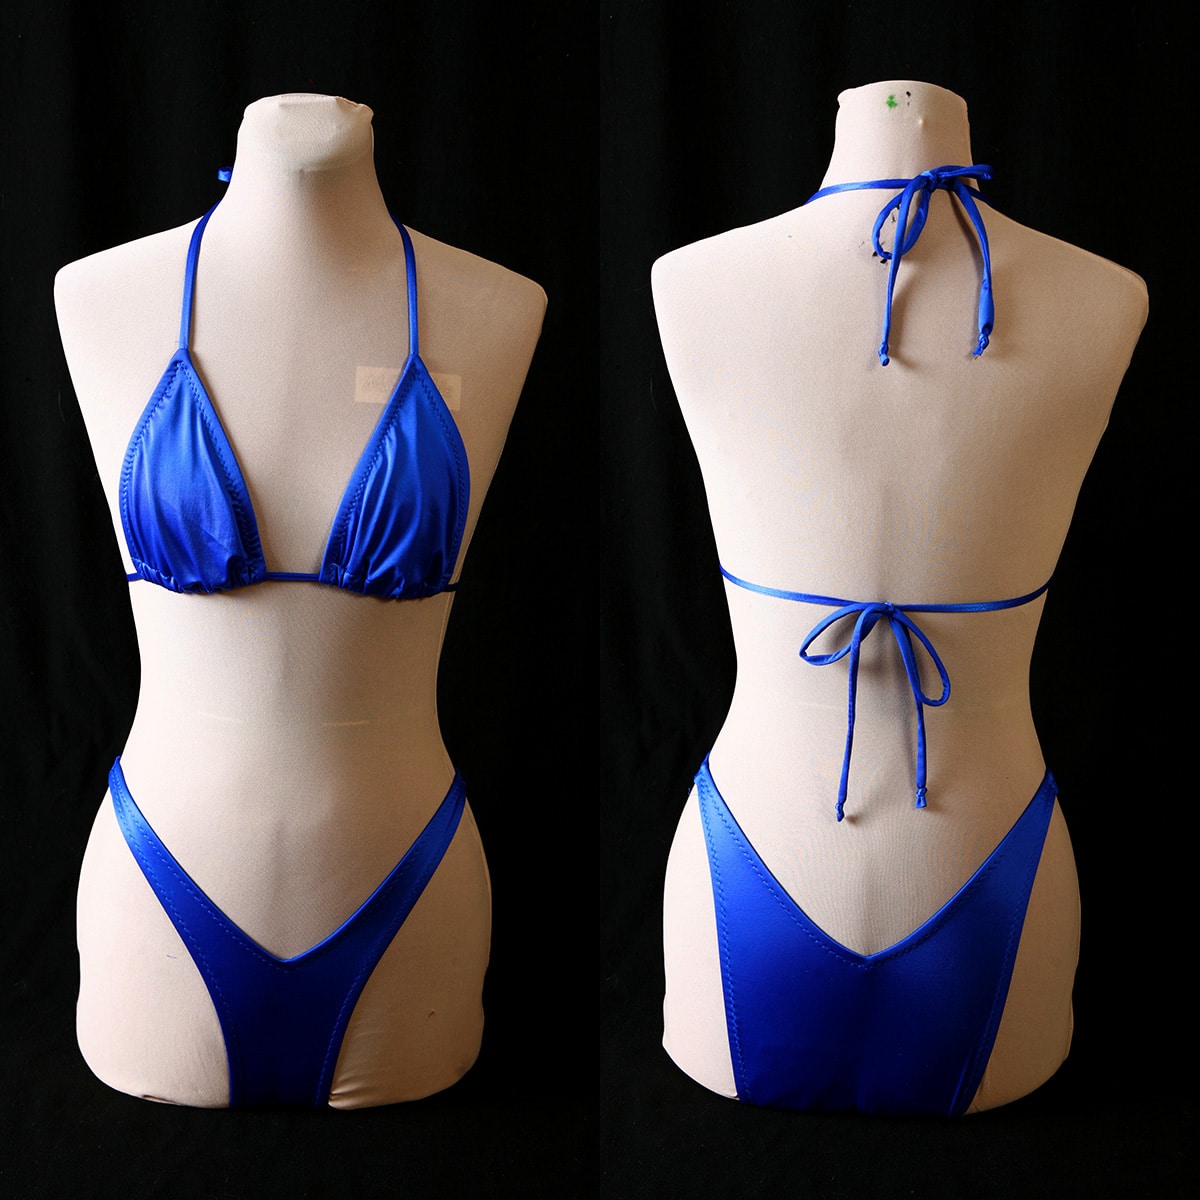
Now, thread one end of your long string into your cord threader, then thread that through both tunnels - making sure that both cups are facing the same direction, as you go.

Try bikini top on, trim neck and torso strings to the length you like.
Note: Save trimmed pieces to make loops on your bottoms, for posing suits!
Tie a small knot in both ends of the long string, as well as the raw end of each shorter string, to prevent raveling
Crystalling Your String Bikini Top
If you are crystalling your bikini top, you'll want to do it after you're completely finished sewing it.
See my post "Crystalling on Spandex" for more details on how to do it!

A past client wearing a crystalled version of this bikini.
Appliquing your String Bikini Top
If you're wanting to applique your bikini top, it's generally best to do that before sewing it together. Usually, I'll bond the lining to the main fabric, and applique through both layers, but that's personal preference.
See my post "How to Applique Spandex" for all the details on how to applique your bikini top.
Note: While it's not covered in that post, it's important to keep in mind that you'll be losing about ½" on each side to the elastic being flipped over, and about ¾-1" on the bottom edge (the channel).
So, when designing your applique, it's best to draw those measurements in as guides, keeping your design within them.

These are a couple of examples of appliqued bikini tops using this pattern. The Stargazer bikini was done using my basic applique technique, the monarch with reverse applique.
Share the Love!
Be sure to take some pics of your handiwork! If you post it to Bluesky, be sure to tag us - @SpandexSimplified.
Also, be sure to follow me on Pinterest, and subscribe to my Youtube Channel, so you never miss out on any of my nonsense.
Well, the published nonsense, anyway!
How to make a string bikini top
Equipment
- Sewing machine with straight stitch and zig zag
- Serger (Optional)
- Scissors
- Cord threader
Materials
- ⅓ yard 4 way stretch spandex
- ⅓ yard swimsuit lining
- 4 pieces ⅜" Braided elastic: See post for recommended lengths
- Thread to match the spandex
Instructions
Get Everything Ready
- Making sure that your print setting is set to "actual size"- not "fit”- print your pattern. (If your print setting defaults to “fit” and you don’t change it for this print, your pattern will print too small)
- Using the pattern size you want, cut out the pieces needed:a.) Two long strips of spandex: 1 ¼" x the width of your yardage (See “strings” section for more details)b.) Two pieces from spandex of choicec.) Two pieces from swimsuit lining.
- Be sure to cut the pieces so that the greatest degree of stretch is in the direction indicated on the pattern.
Make Your Strings
- Sergers are HIGHLY recommended for making strings, but you can get by with a small & short zig zag stitch, as long as you make sure to stretch the fabric hard as you sew it!
- Cut 2 lengths of Lycra that are about 1 ¼ inches wide (about 3 cm wide), by the length of your fabric cut (usually 58-60").
- See my post “How to Make Bikini String” for full details on making your bikini strings.
- Once the tubes are turned right side - out, clip off the end of the tube with the hole and yarn / cord.
- Leave one string uncut - this will be the torso string.
- Cut the other string in half, these will be the neck strings - to be trimmed to size later.
Assemble Your String Bikini Top
- Lay both of your lining pieces out flat on your work surface.
- Determine which is the “right” side of your spandex pieces. Position one spandex piece on top of each lining piece, with the right side facing up. Line everything up well.
- You may choose to zigzag / serge your pieces together along all edges, to keep the lining and outer spandex pieces held together, before proceeding. (I just zigzag or serge the top and bottom edges, as pictured).
- After stitching, lay your piece sets out, so that the right sides are facing up, keeping lining lined up with the outer piece.
- Stitch a string to the flat top edge of the bikini top, lining the raw edge of the string with the flat edge of the teardrop. Be careful to stitch through both the outer fabric and the lining. Repeat on the other top piece.
- With the lining side of each piece facing up, pull the string so that the short, raw edge of the top is laying against the wrong side of fabric / lining, and the remainder of the string extends away from the teardrop.
Apply the Elastic
- Sew a piece of elastic from the string end of one teardrop to the curved bottom edge of the same teardrop.
- Once you have a couple stitches in place, stretch the elastic so that the free end of elastic meets the bottom edge of the bikini top.
- The starting edge of the elastic should be holding down the top seam you just created when sewing the string on.
- Repeat elastic application on the other side of the teardrop, as well as both sides on the other teardrop
- Flip one teardrop over so that the right side is facing up.
- Hold it so that the curved bottom edge is away from you, and the string toward you.
- Starting on the right side of the piece, flip the elastic under and stitch down with a zigzag.
- As you come to the string end of the teardrop, flip the second (left) piece of elastic under, holding it and the first piece under so that they lay nicely.
- Stitch right to the string end while holding in place, lower your needle, and pivot the teardrop so that you can continue to sew down the second edge:
- Alternatively, you can sew the elastic down with the wrong side facing up. Do everything the same as described on the previous page, only upside down!
Sew the Cord Channel
- With the wrong side of a teardrop facing up, and the raw, curved edge to the right, flip the curved end up and over, meeting the raw corner of the curve with the side of the elastic, with about ½ to ¾" seam allowed.
- Using a narrow zig zag, and easing the seam allowance as you go, stitch along the raw edge, so you’re making a tunnel.
- Be sure to backstitch a few times at the start and end of the seam.
- Repeat on second teardrop.
- You now have two complete teardrops for your top.
Finish Your String Bikini Top
- Now, thread one end of your long string into a your cord threader, then thread that through both tunnels - making sure that both cups are facing the same direction, as you go.
- Try bikini top on, trim neck and torso strings to the length you like.
- Note: Save trimmed pieces to make loops on your bottoms, for posing suits!
- Tie a small knot in both ends of the long string, as well as the raw end of each shorter string, to prevent ravelling


[…] String bikini tops are very trendy these days, and almost everyone is trying this style out! However, due to this style being trendy – these types of tops are also quite expensive in the market right now. Why spend the much extra bucks when you could just make one in the comfort of your own house? The best part about this is that you can perfectly customize the size according to your bust, cup size, underbust, and shoulder length! Isn’t that amazing? spandexsimplified […]