Neck & Back Style Variations
This tutorial is excerpted from The “Spandex Simplified” line of books by Marie Porter, as well as "Sewing for Skaters and Gymnasts and Dancers... Oh My. All photos, & accompanying tutorial are copyright @ 2000 - Marie Porter, all rights reserved.
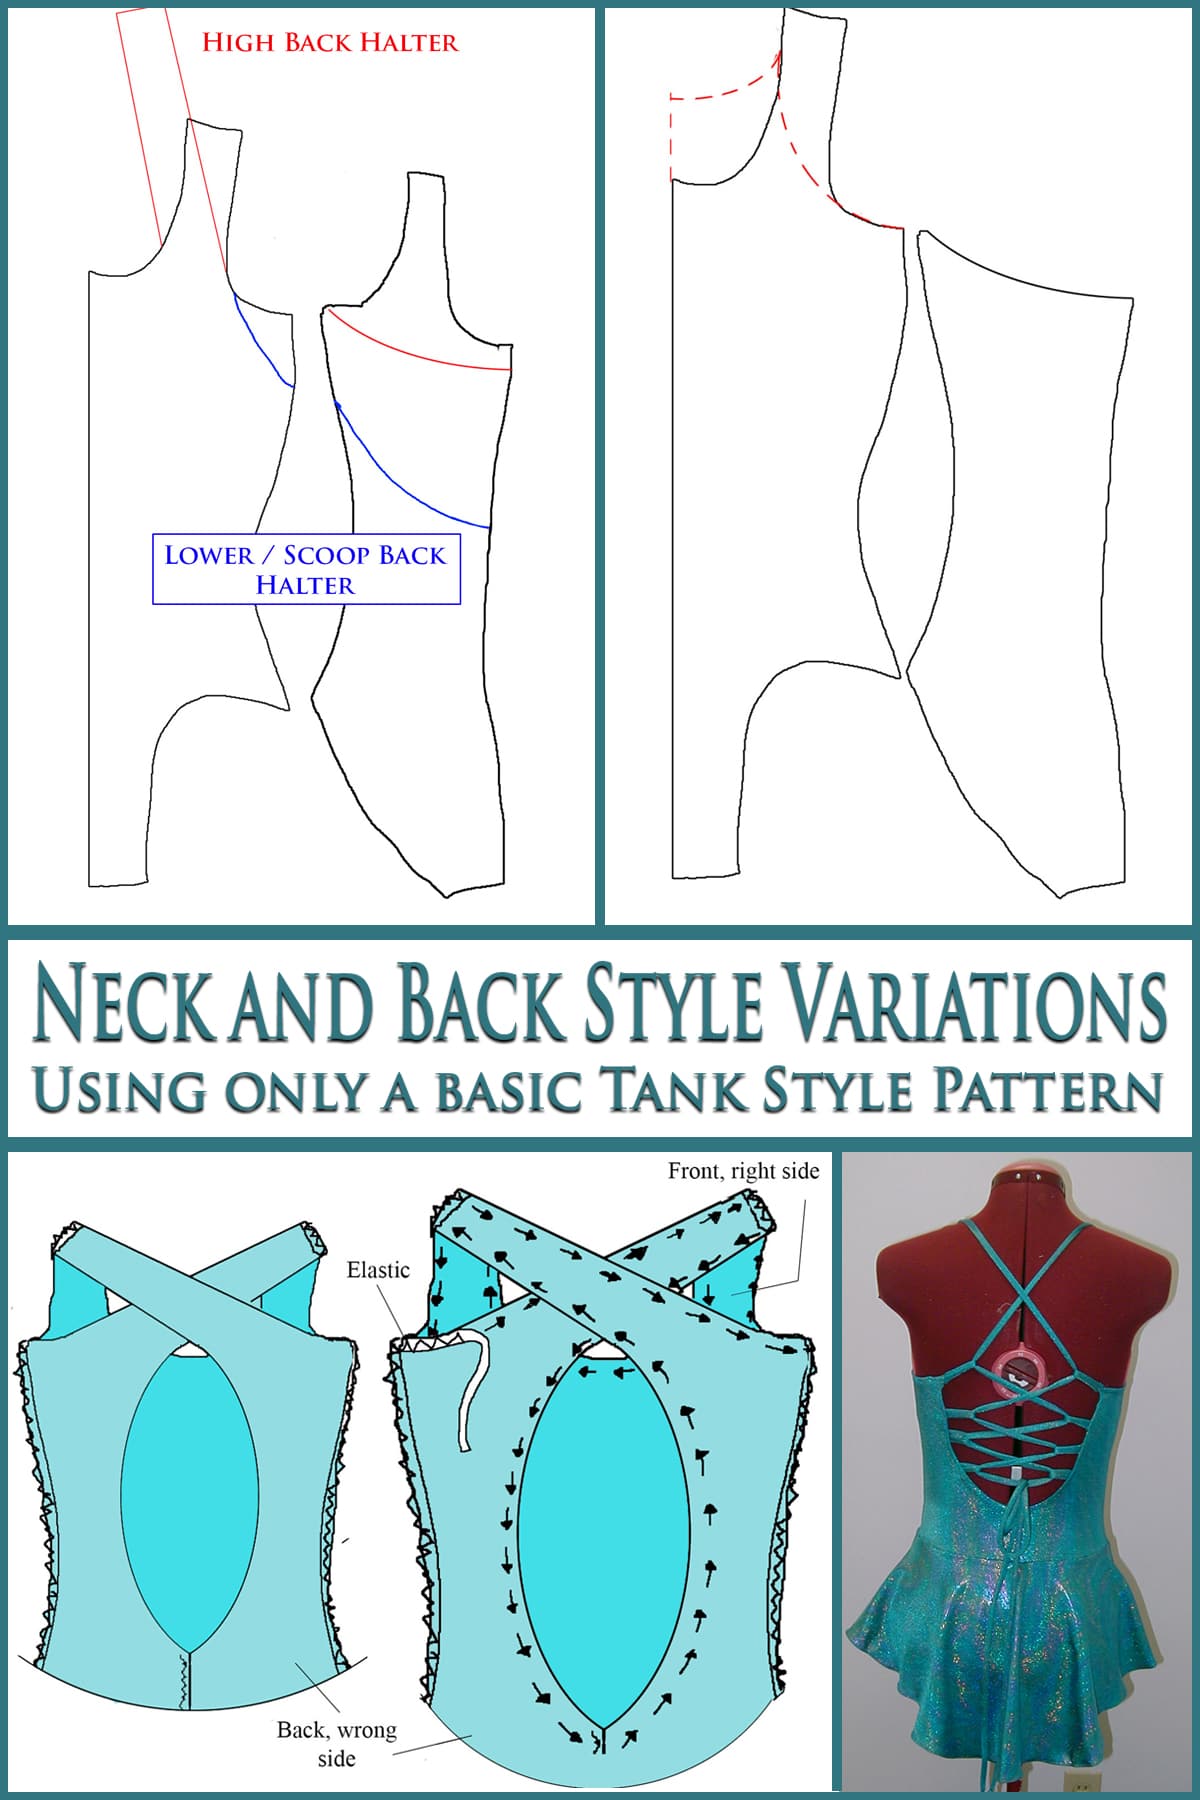
Who needs a bunch of patterns? With a basic tank style dress or leotard, there are many Neck & Back Style Variations you can do - here's how!
Once you’ve gotten comfortable with a basic tank suit pattern, you can have some fun with it!
This post has a ton of information on alterations you can do to a basic tank suit pattern, for different styles of neck / back.
Most of the diagrams here are done on a bodysuit / swimsuit base, but any of these alterations can be done on any spandex garment with a basic tank style - swimsuits, skating dresses, unitards, body suits, and even some sports bras!
A lot of the techniques in this post rely on freehand drawing, guesstimation, and instinct - so draw out your pattern as best you can, and be sure to make a practice suit in case the first try needs tweaking!
What You’ll Need to Alter Patterns
Base Pattern
You’ll want a base pattern, whether that’s a commercially bought pattern, one that you’ve drafted from scratch, or something in between.
What pattern you use will be a matter of both what you’re looking to make - skating dress, synchro swimsuit, full unitard, etc - and what brand you like to use.
See my Spandex Costuming Resources page for links to some popular spandex pattern companies.
Note: Any alterations for size or length should be done before working on back and neck alterations. (See my post “Basic Pattern Alterations”)
Tracing Paper
I use exam table paper for all of my patterning, and it works really well as tracing paper.
This allows me to make a new pattern - with the altered neck/back - without affecting the original base pattern.
You can buy rolls of exam table paper on Amazon and at medical supply stores, for between $2-5 per roll. Super cheap - which is good, because you’ll go through it like crazy once you get going!
Sometimes, you’ll be given a choice of 2 papers. One is cheaper and uncoated, and the other is slightly more expensive, and is coated. Go for the cheaper roll, as wide as you can. 21" is great, 18" will usually do. If you do this as a business, you’d be best off to buy it by the case - usually 12 or 24 rolls.
Tape
Some of these alterations require tape. I recommend just basic masking tape, and always keep a roll close at hand in my sewing studio.
Pen & Marker
I like to do initial drafts of my back and neck style alterations with pen, then use a darker marker to highlight the final pattern redraw.
Optional Tools
If you’re not as confident with freehanding everything, there are some optional tools you can have on hand.
A set of french curves, and/or those flexible curve rulers - for creating your own shape guides are always nice to have around.
Also, you may find a protractor & compass to come in handy, depending on what you’re doing.
How to Make Scooped and Boat / Bateau Necklines
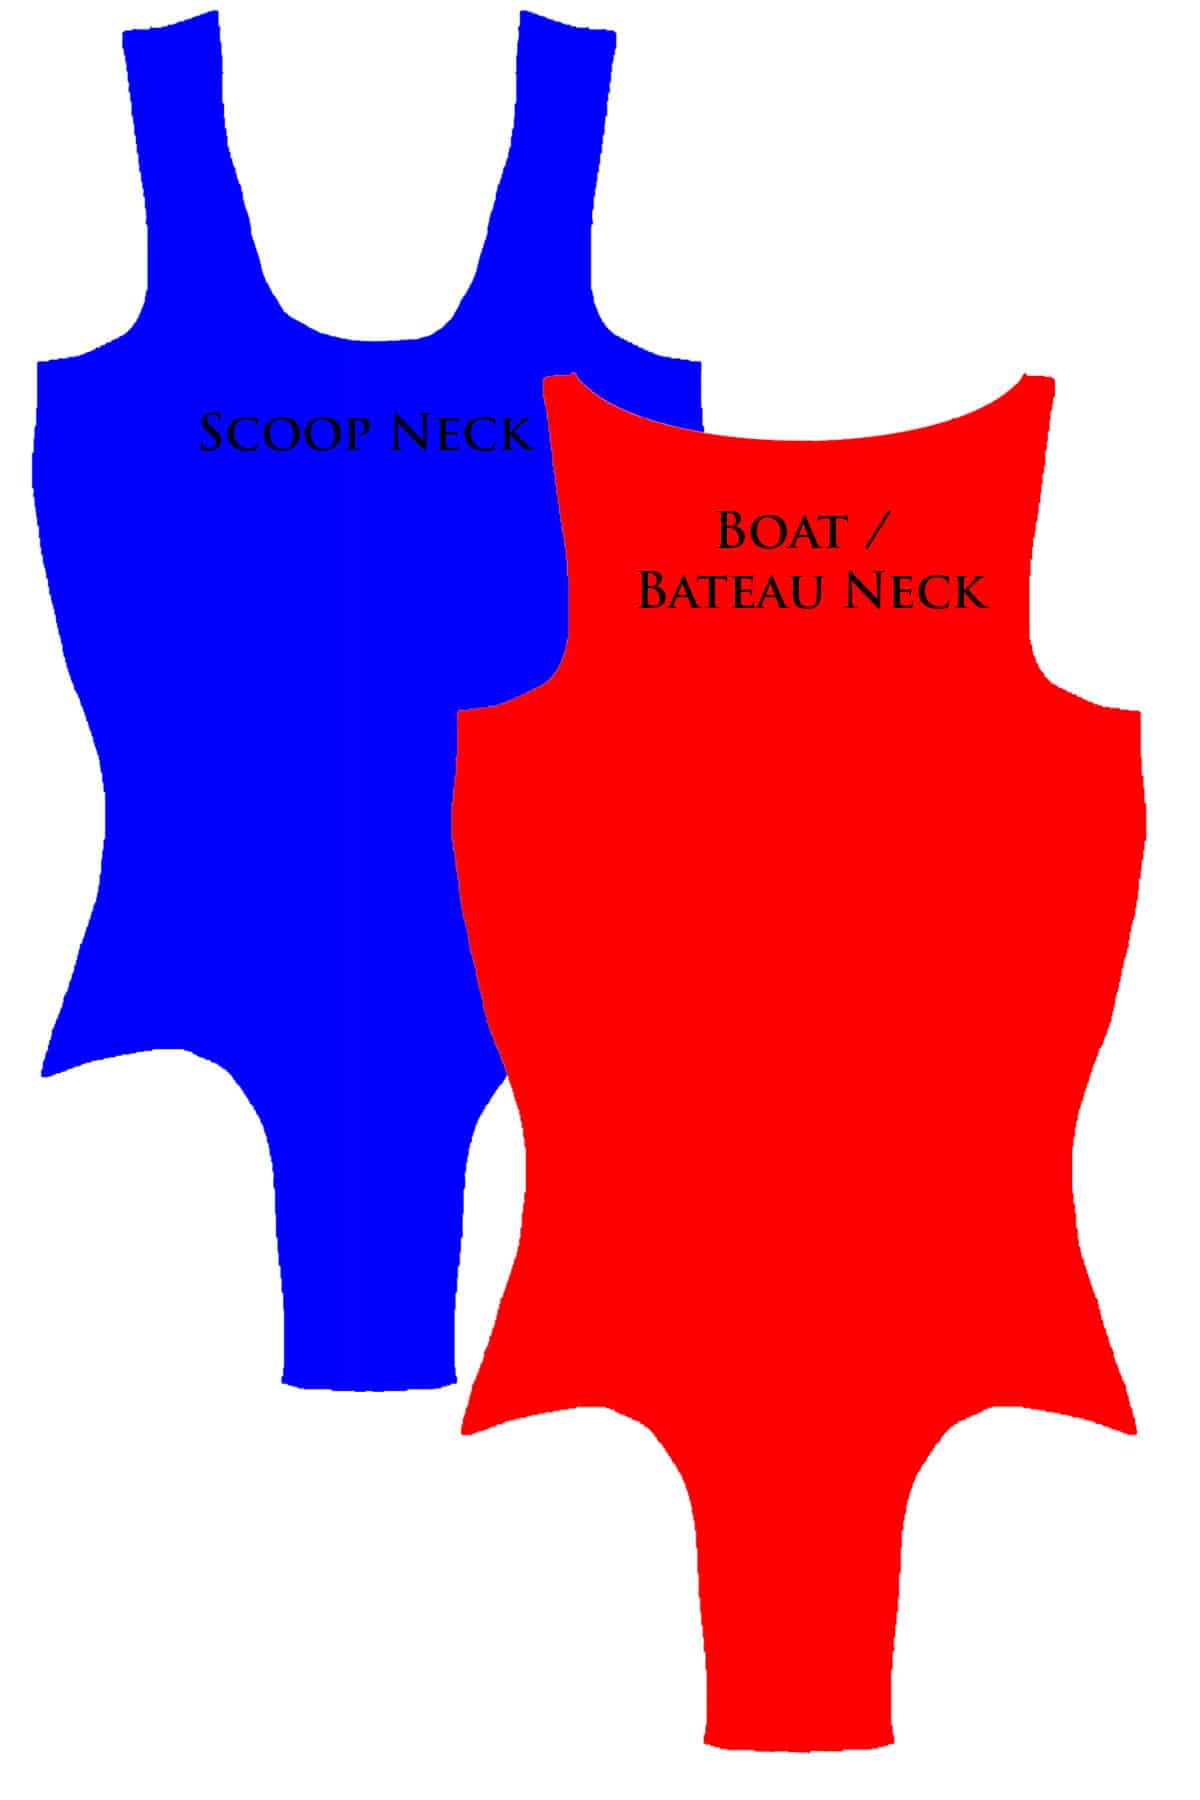
Scoop necklines are rounded - usually deeper than the standard neckline on a base pattern. You can do a scoop neckline in either the front, the back, or both.
Boat/bateau necklines are shallow, and elongated shoulder to shoulder - basically laying along the collarbone.
To be a bateau neckline, this style needs to be done across the front. It can also be done in the back, or you can do a wide, scooped neckline in the back - your choice.
Scooped and Boat necklines are the easiest alterations you can do to a pattern.
Basically, just draw the intended neckline on to the pattern. Cut out the fabric, and sew the garment, including any linings, colour blocking, etc. Apply elastic as usual.
For a Boat Neckline
On the pattern (folded in half if necessary), mark a spot at the center edge (fold) of the bodice, just slightly down from where the neck begins. Boat necklines have a very shallow scoop to them.
Re-draw where the neckline meets the shoulder. This should be pretty wide out, almost to the sleeve.
Cut out and sew the complete garment.
NB: As the boat neckline is so wide, a shelf bra lining is definitely recommended, to avoid bra straps from showing!
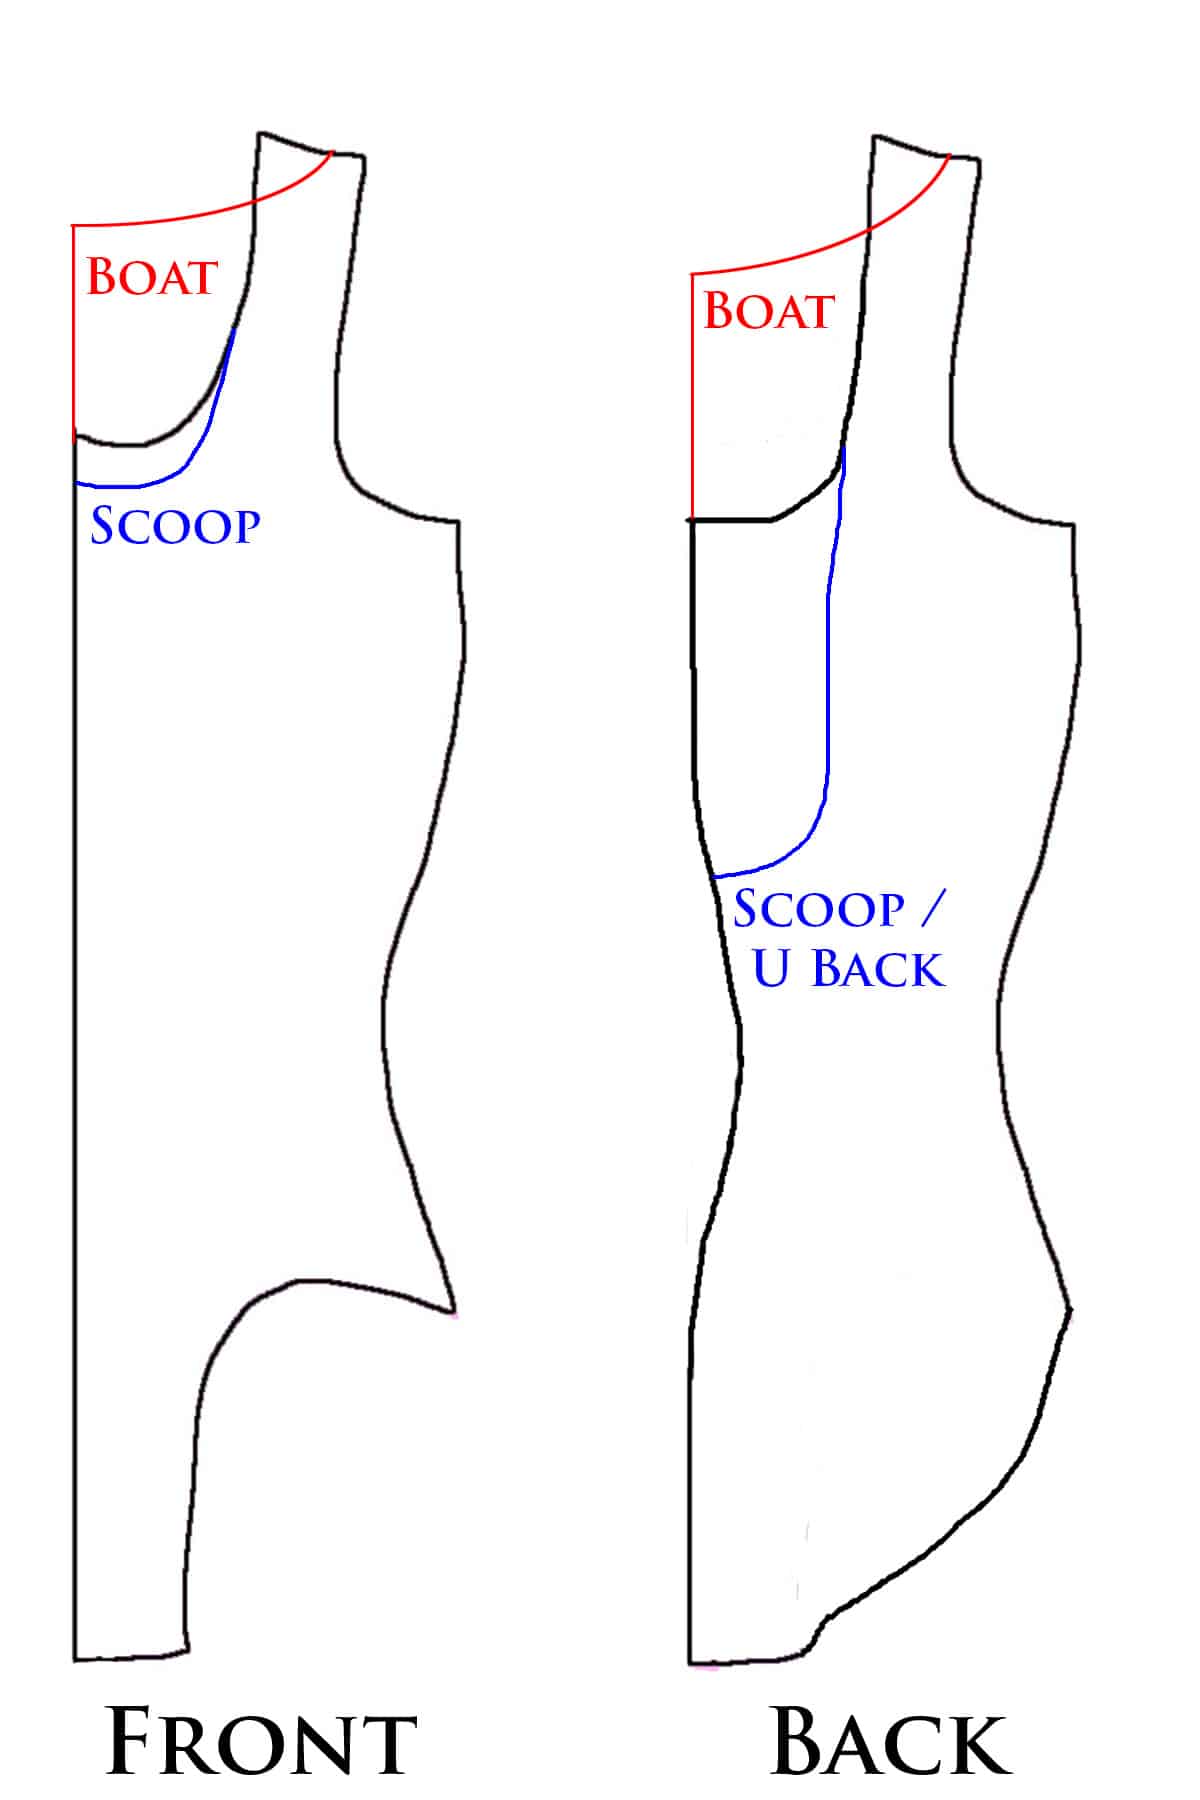
For a Scoop Neckline
On the center back / front, mark the lowest point of your scoop. Remember - you'll loose about ¾" of fabric to the elastic application, so don't go TOO fat with it!
You can always cut away more later - it's a lot more difficult to add fabric when you'd cut too much off!
Once you know where the low point of your scoop is, simply re-draw the curve to meet up with the original neckline, where it straightens out.
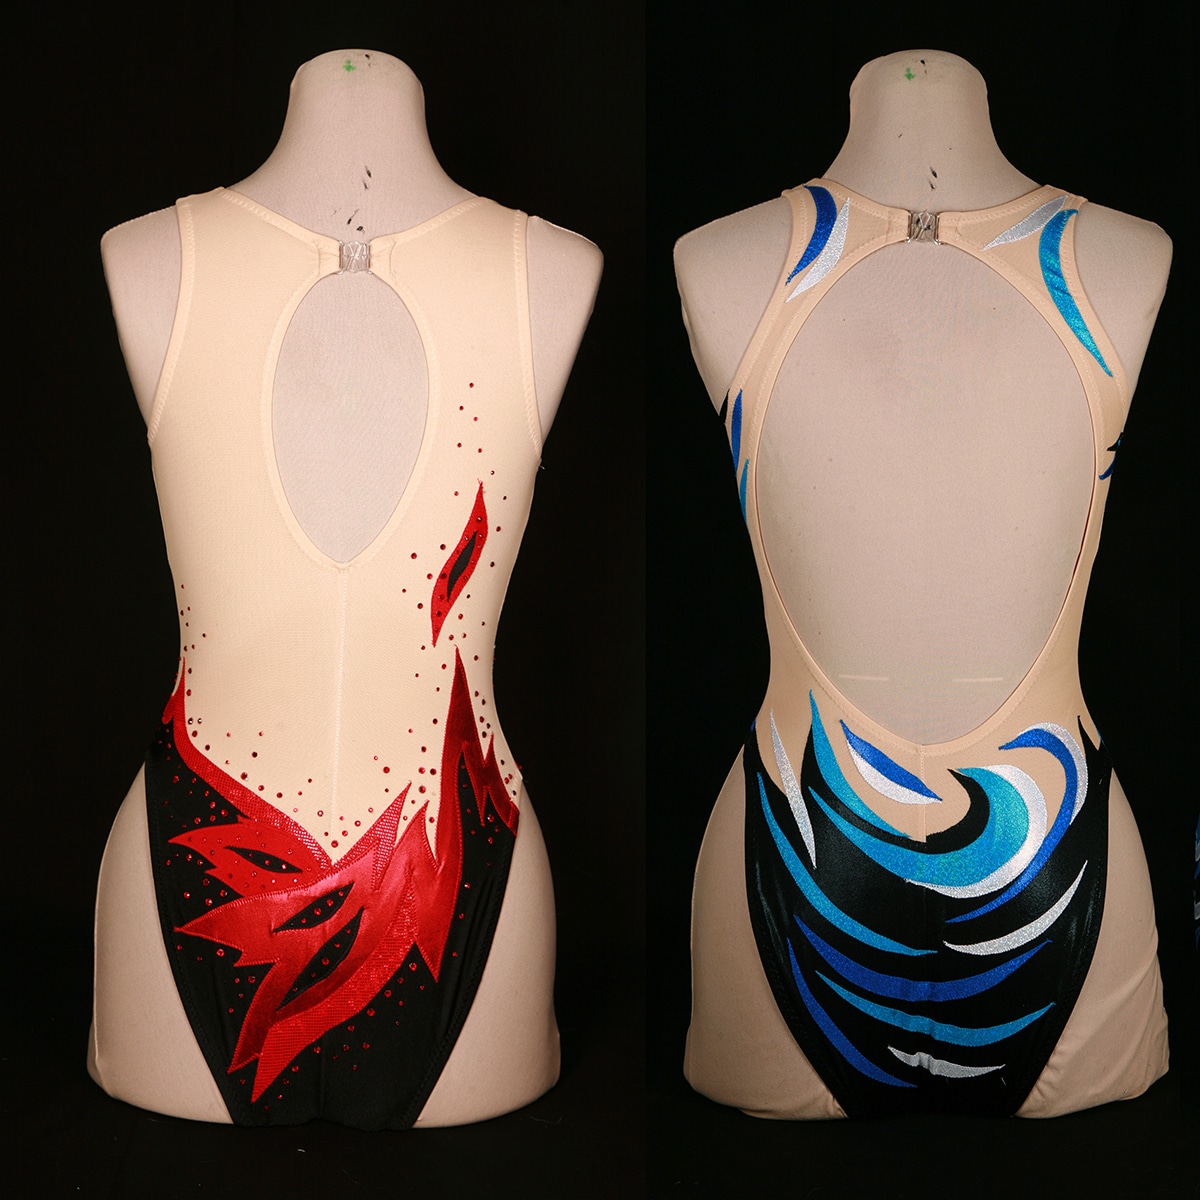
You can go as big or small as you want with a hole back - just make sure that hole+neck together is big enough for the wearer to get in!
How to Make a Hole Back
Hole backs can be done as small or as large as you want - a small keyhole, or almost backless!
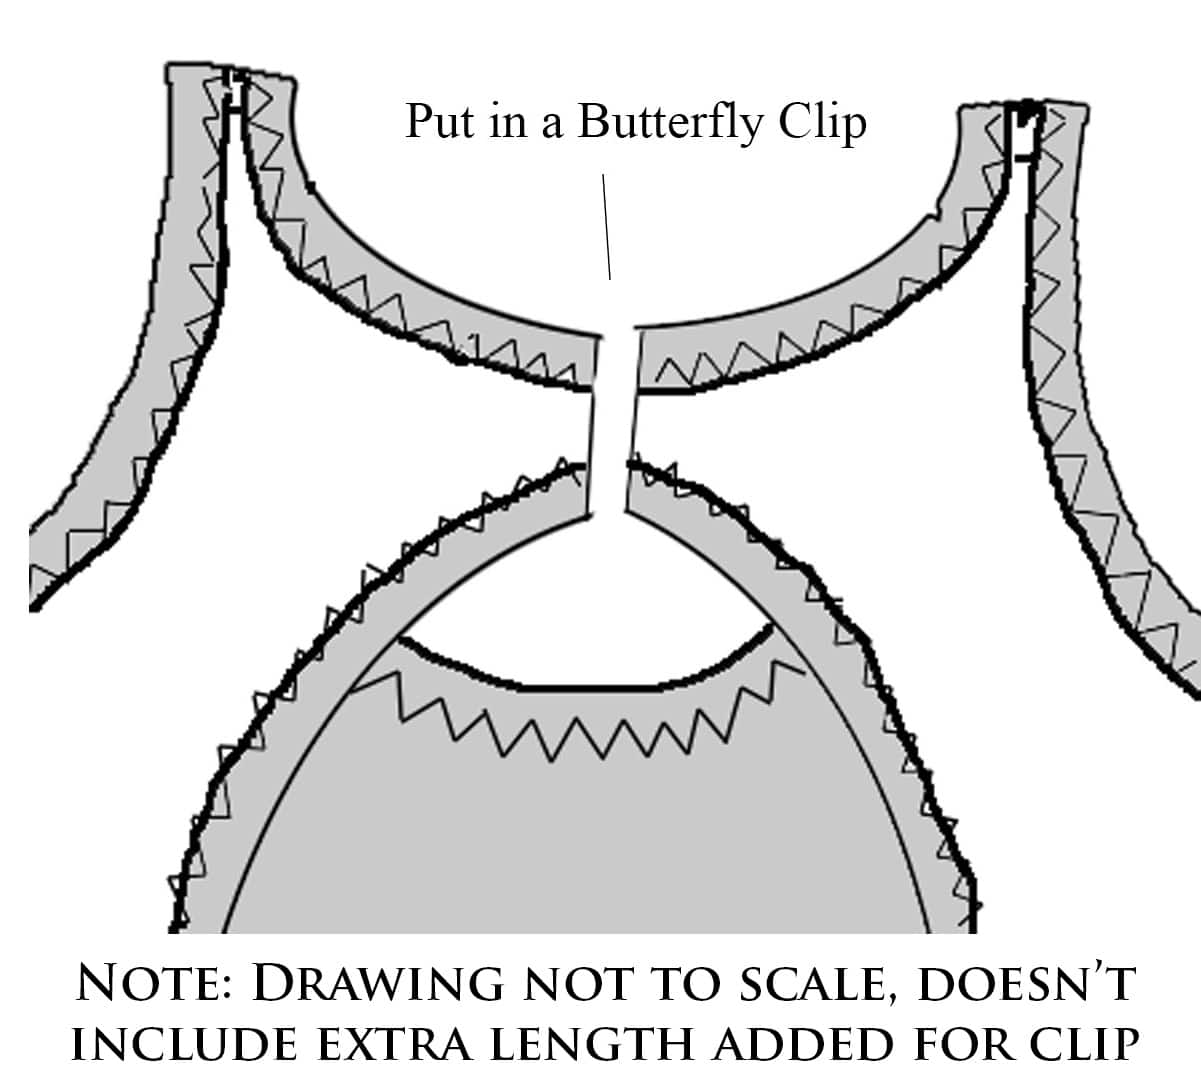
On the back pattern piece, draw your desired hole. Be sure to leave enough space (Usually over an inch and a half) between the neckline and the top of the hole to allow for elastic application.
Plan ahead - know what size of clip you’ll be using, and plan accordingly! (Height of the clip, plus 2x the width of elastic you’ll be using.)
Extend this opening about ½" - 1" past the original pattern piece, to allow for fussing with the snap later - you can always trim it back, if needed.

Apply elastic from one lower edge of the centre back neckline (closure area), around the hole, all the way to the other lower edge of the closure area.
Apply elastic to the neckline, and the arm holes.
Flip all elastic and finish off with zigzag.
Apply closure - ideally a butterfly snap - to both ends of the center back opening.
Hint: Use mesh and applique together with a hole back to create “fool the eye” looks, pictured below. This is an easy way to give some substance to designs using more delicate fabrics, etc.
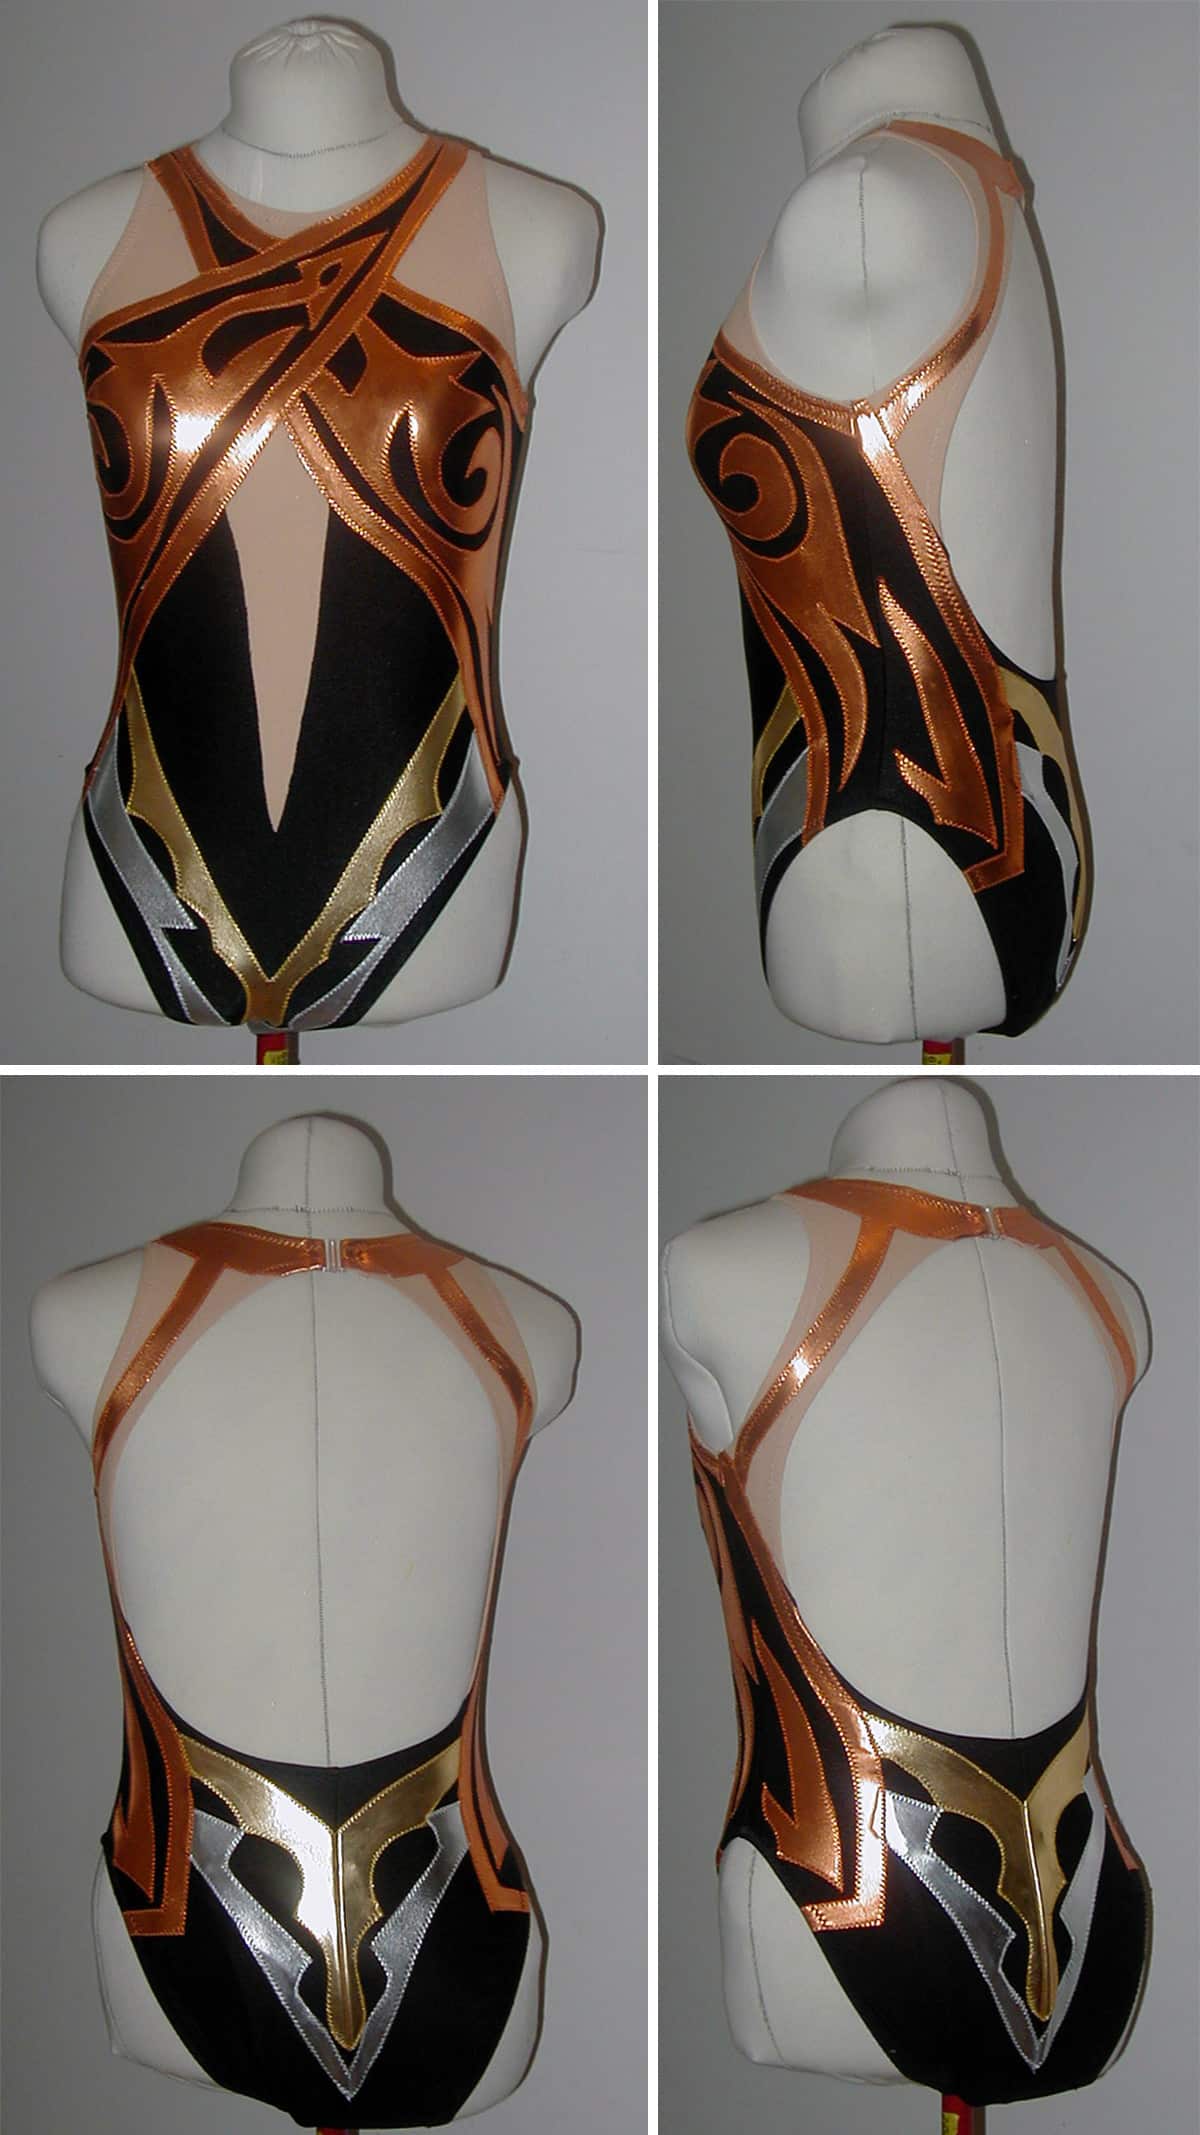
How to Make a Crossover Back
This was my favourite type of back when I was skating!
While it’s not really used for competition suits, it’s great for practice dresses / leotards.
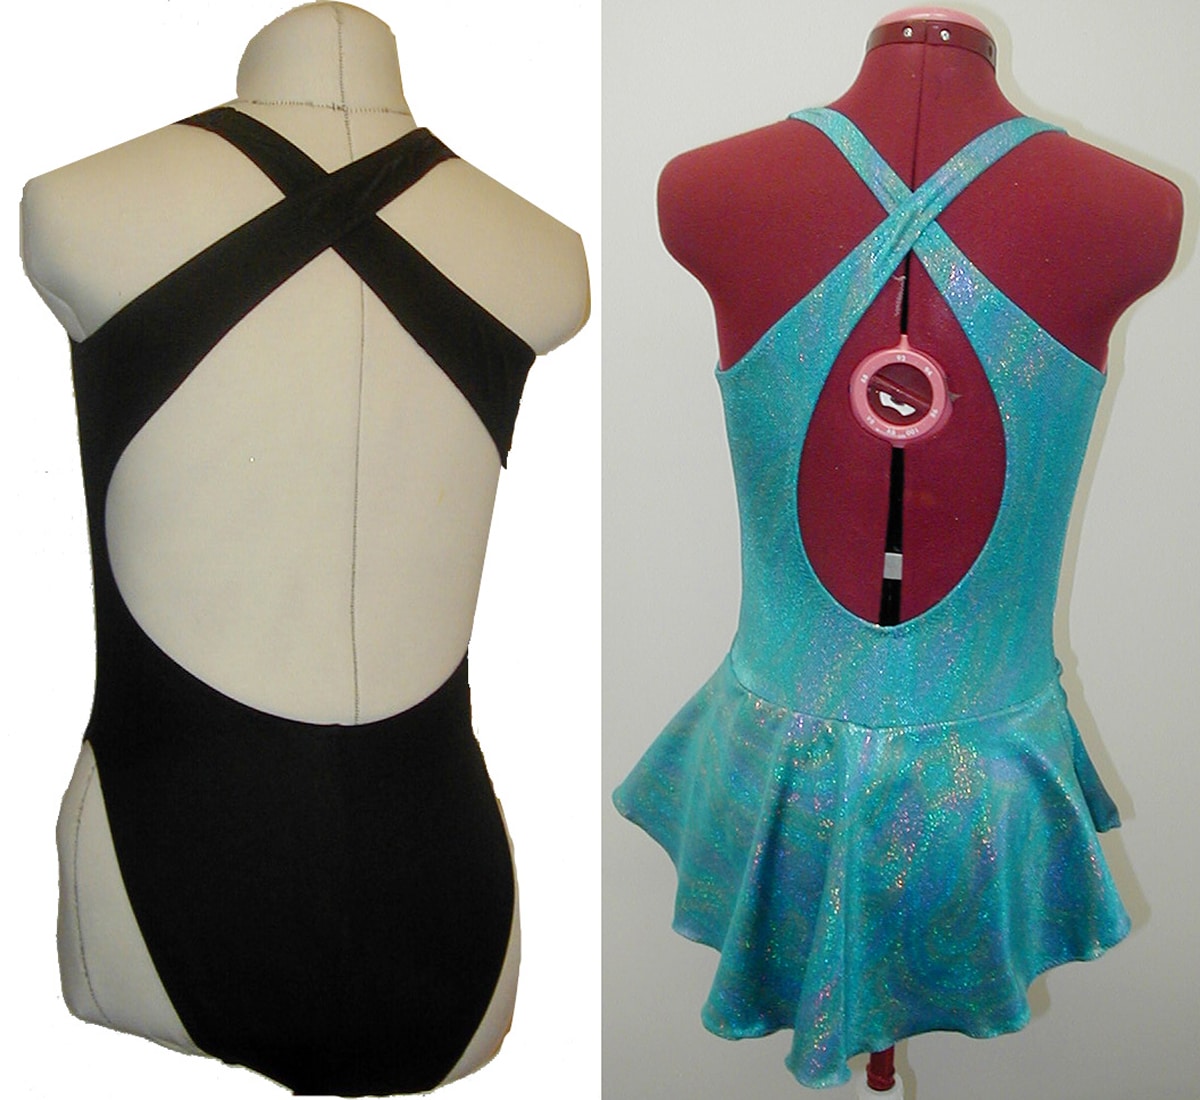
Crossover Back, 2 Styles.
Prepare Your Base Pattern
Trace the back portion of your pattern so that you have two copies. Tape them so that the necklines match up, side to side.
You may have to overlap a portion of the upper back. Don’t worry about being super accurate, the fabric will stretch.
Start Drawing!
Draw a straight line that goes from one armpit up to the inside of the opposite shoulder (ie: the corner closest to the neck).
From the point where your line meets up with the existing pattern piece, draw a short line that is perpendicular to the one you just made.
It should be the same length as the top shoulder seam for the front piece of the suit, usually about 2 - 3"
On the same pattern piece, mark a spot on the center of the lower back that is approximately where you would like the lower hole to end. Don’t cut it TOO low, you don’t want plumbers/skaters crack to happen!
Above that mark, mark a spot where you would like the lower edge of the crossovers to be.
Draw a half-teardrop shape curve up from the bottom mark. This style can be done really bare, really modest, or anywhere in between, depending on how you draw your teardrop!
Extend this teardrop shape up to the opposite shoulder, meeting up with the new shoulder seam you drew at the end of step 2.

Cut and Sew Your Suit
Cut this pattern out of both the fabric and lining (If applicable) - you will need two mirror-image pieces of each.
Hint: If using lining, it doesn’t need to go all the way up the strap. Cut it off at the point where it narrows out, to avoid some extra bulk!
Positioning the good sides together, sew the centre back seam from the teardrop down.
Lay the back part of the garment against the front, with the good sides facing.
The back straps should cross over each other to lay against the opposite front shoulder. Sew and finish the side and shoulder seams, keeping the back crossed.
Apply the Elastic
Finishing this neckline will take one long piece of elastic.
Starting from one armpit, attach the elastic all the way around.
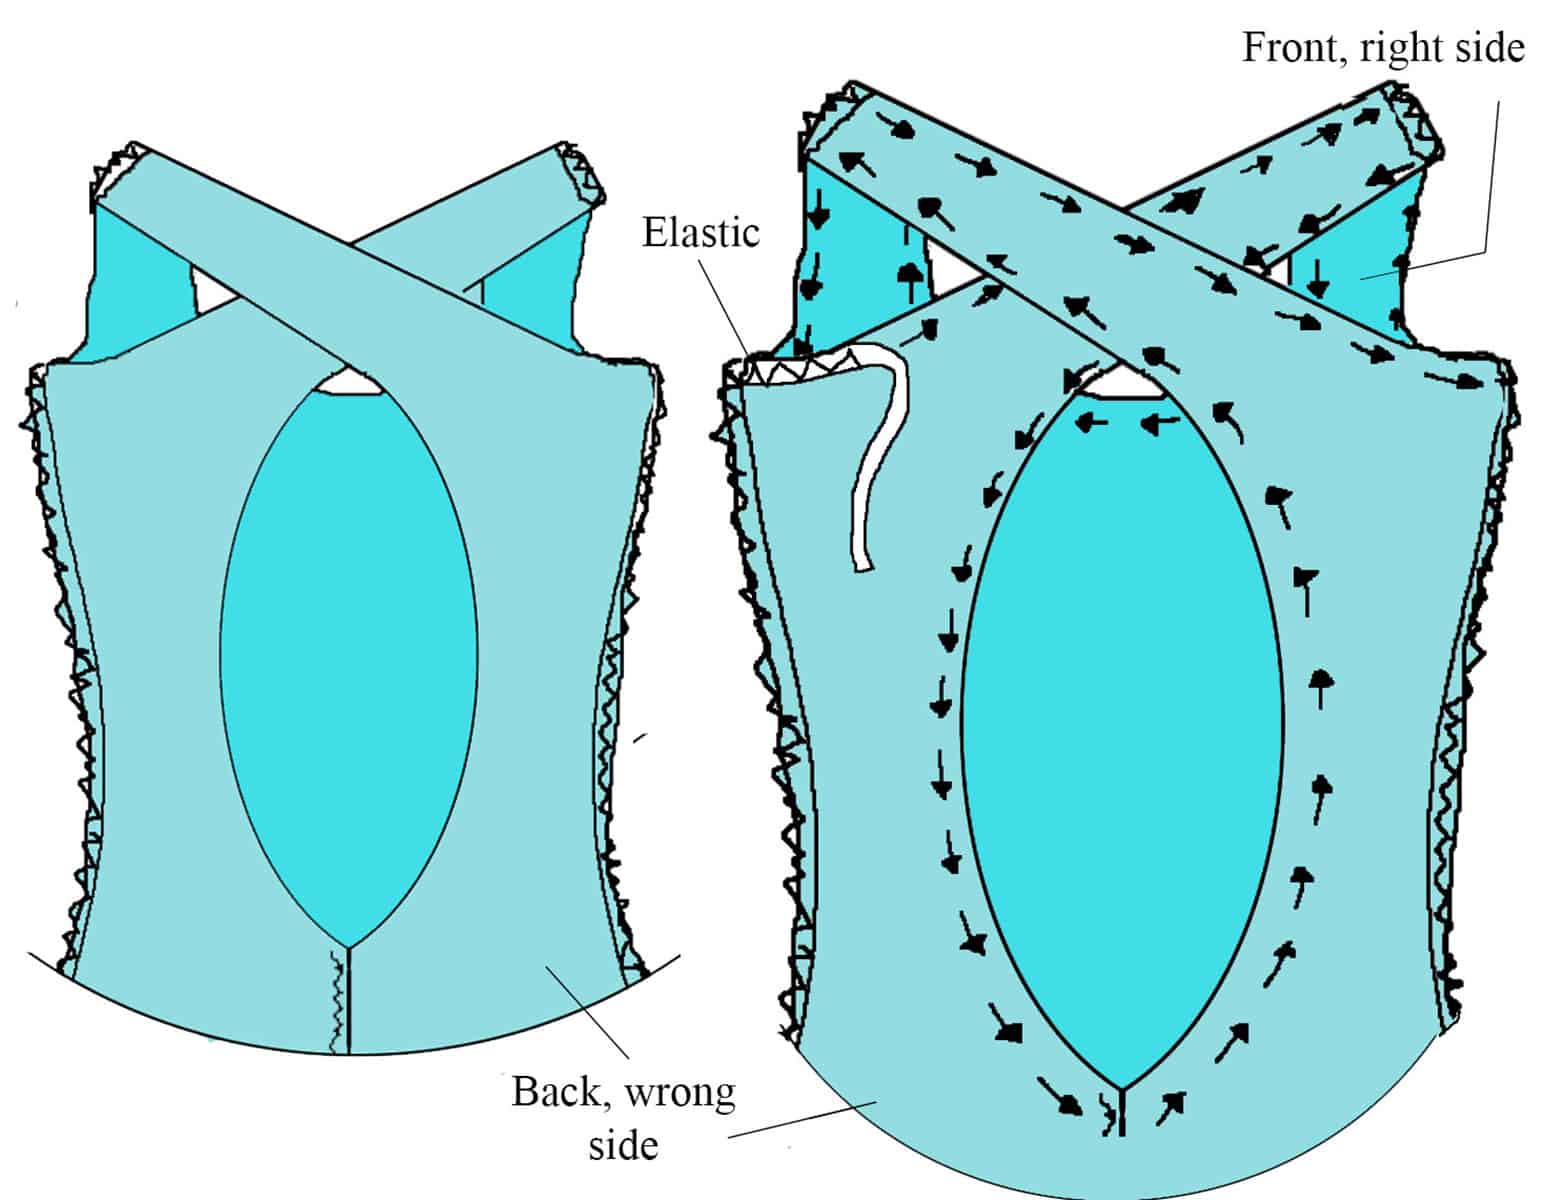
A fun thing about this style is that the elastic for the entire upper body - neck, back, and arms - is sewn in as one piece!
Stretch the elastic just slightly MORE than the fabric so that it gathers a little.
Flip the seam, finish it off with a zigzag, and there you go!
How to Make a Basic Halter

Basic Halter
On the front suit pattern piece, re-draw the neckline so that it curves/angles in more towards the neck, and extends beyond it by about 5".
Note: 5" is a good estimation for adult sized garments. Children’s will be a bit shorter. No matter which size you need, you can trim this back later, to fit!
At the end of the line you just drew, draw a short line that is perpendicular to it. It should be long enough to account for both the desired width of the finished halter strap, as well as 2x your elastic width.
Draw a line that curves up from the arm pit to meet up with the outer edge of the line you just drew (See sketch below)
On the back of the pattern, draw a line from the arm pit to the center back seam. This can be straight across or scooped downwards, depending on the style you would like to achieve. Play around with it.
If you’re scooping the back, you may end up needing to adjust the front pattern to match up. You want a smooth and even transition from the front to the back.
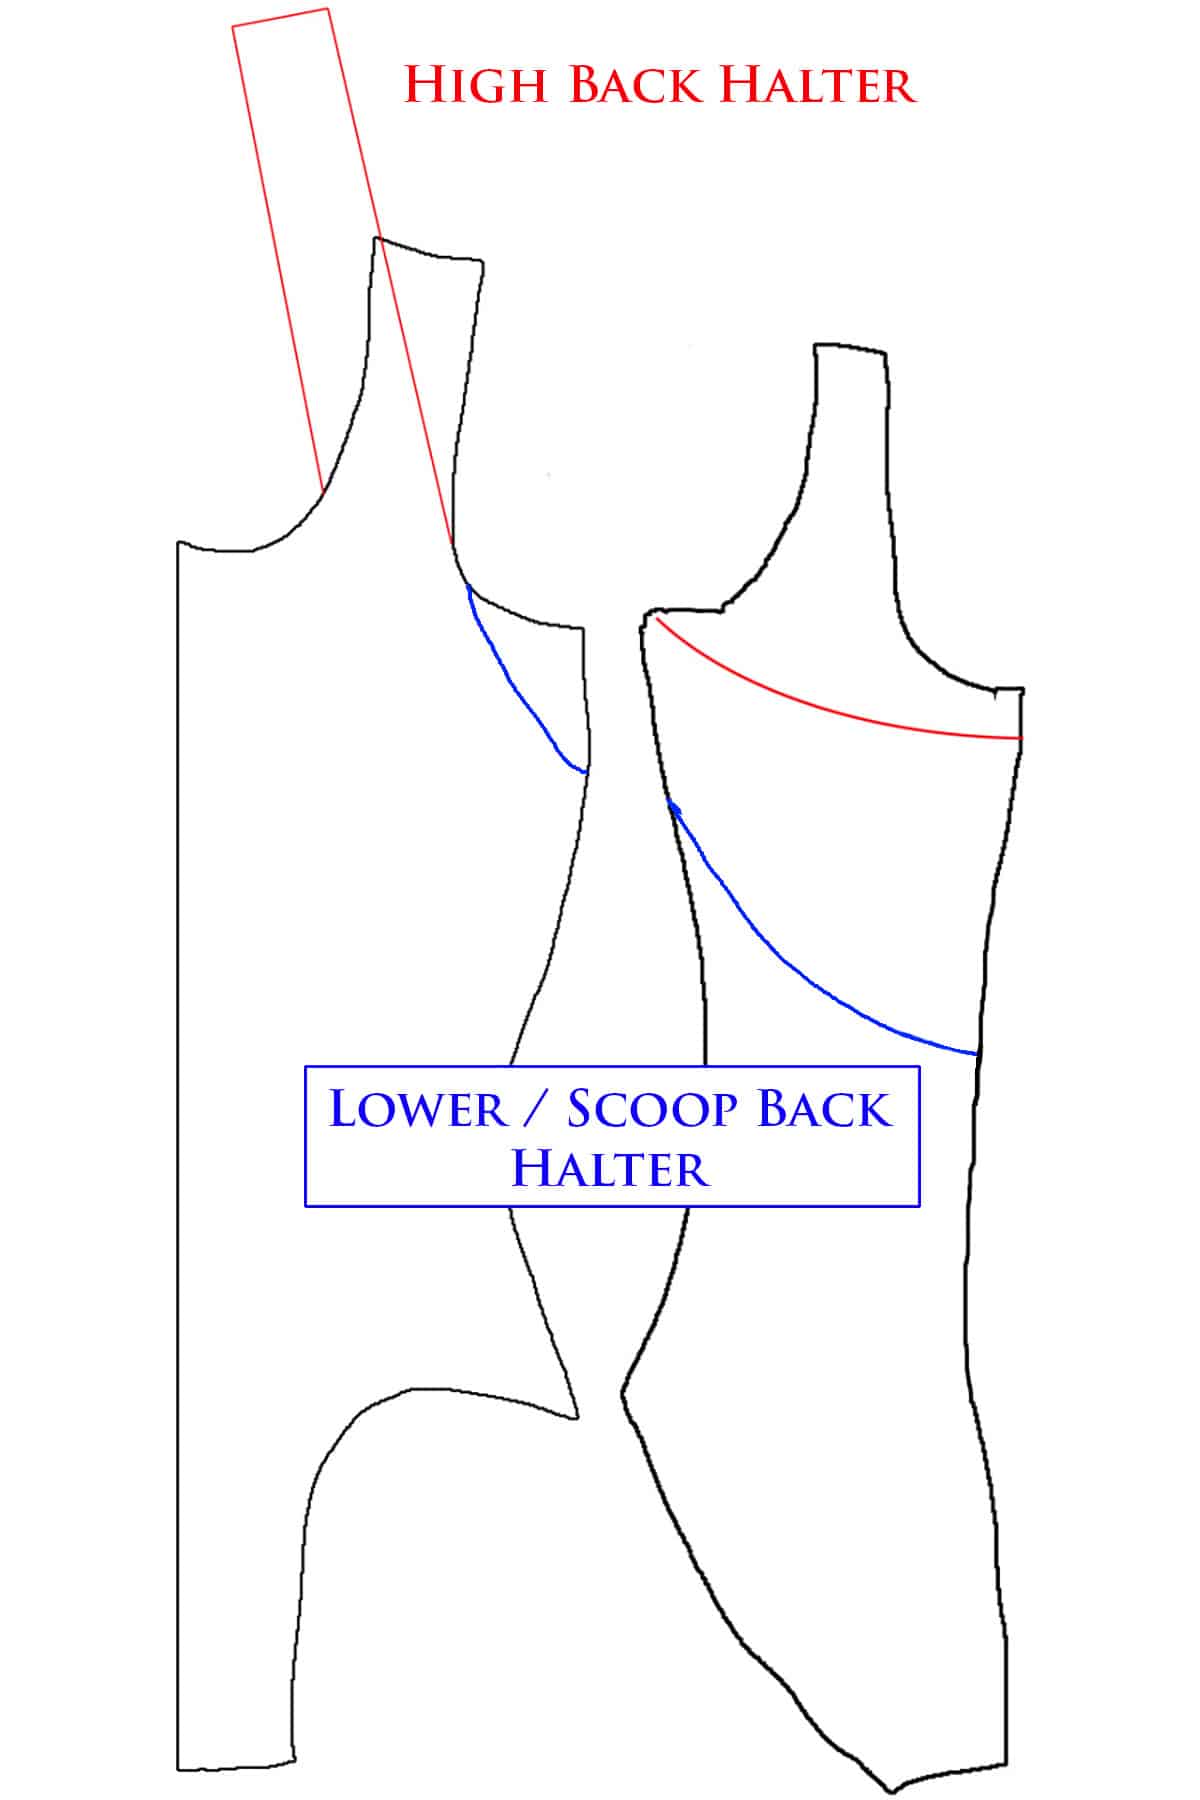
While you can use the base arm hole (front) for a high back halter (red), you'll want to redraw the lower arm hole if doing a deeper back.
Sewing A Halter Style
Sew the side seams of the garment, with the good sides of the front and back facing each other.

Apply elastic to both the front neckline and the back neckline, both starting from an end of the straps.
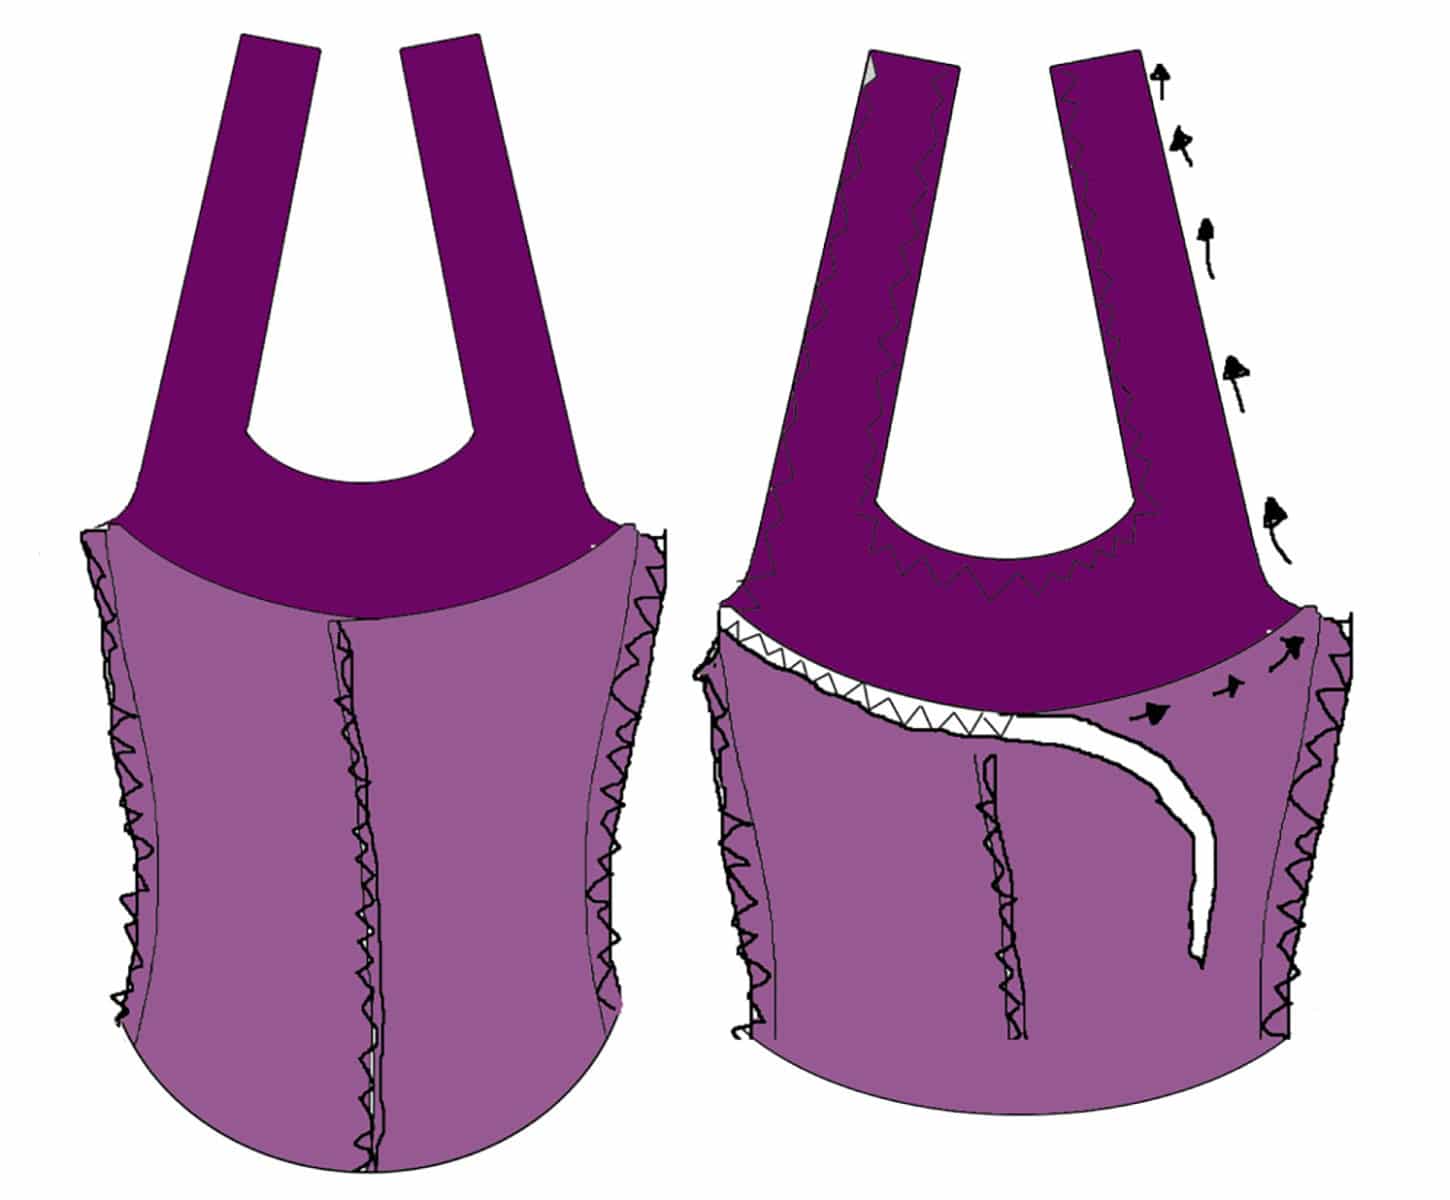
Flip the elastic, finish with zig zag.
Apply your desired form of closures to the back of the straps, trimming extra length from neck straps if necessary.
Note: Due to the importance of the closure *holding* with this style, I like to sew butterfly clasps in backwards.
This prevents it from cracking open over the wearer’s neck bone!
How to Make a “Choker” Halter
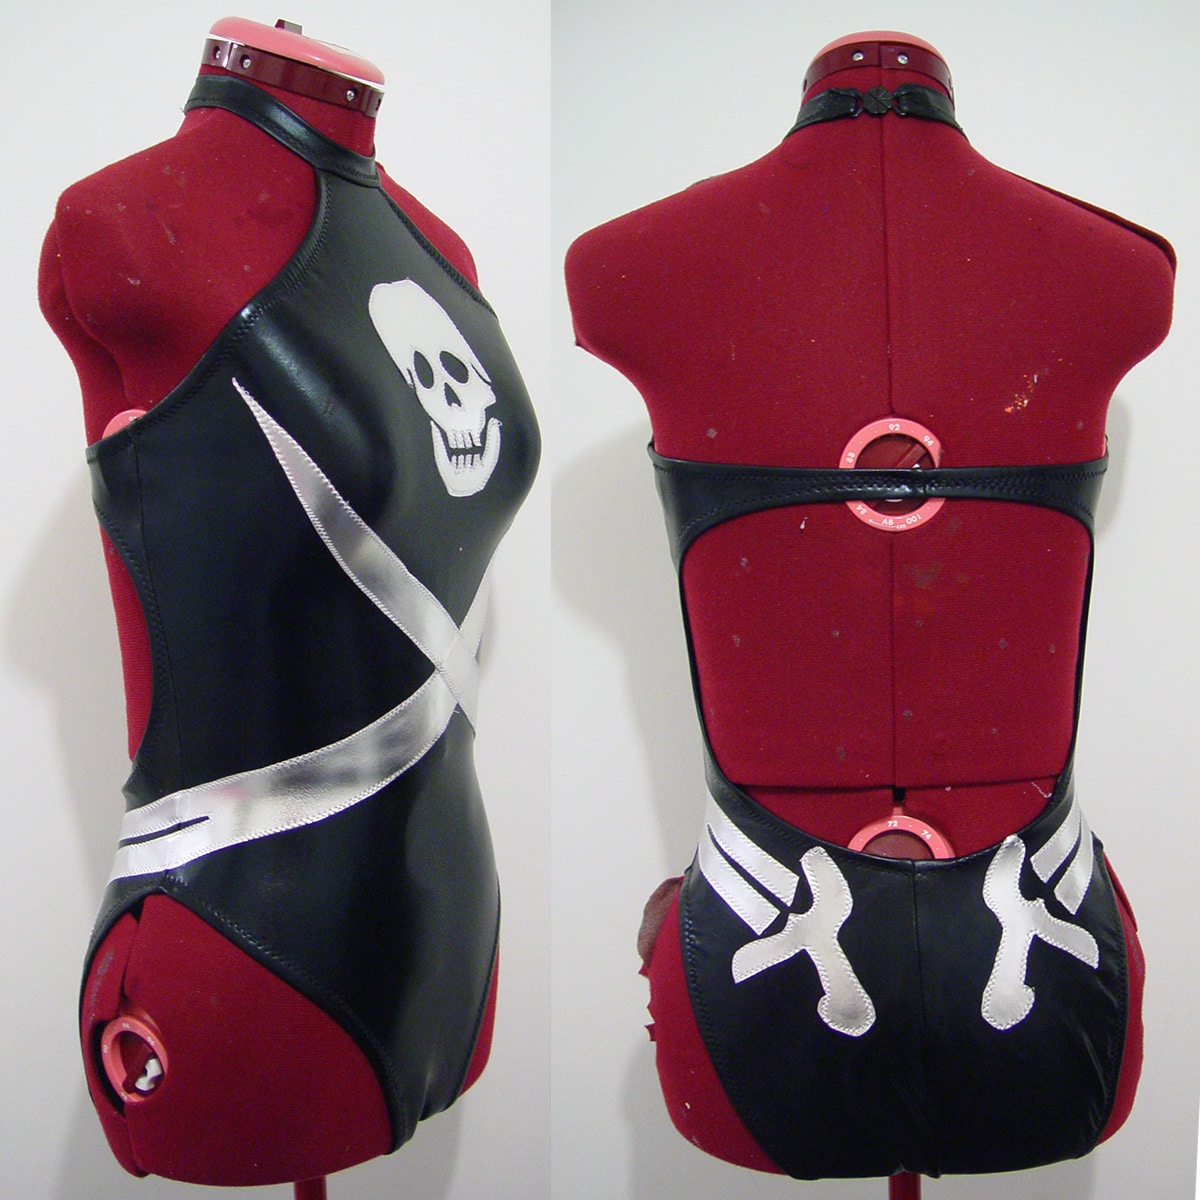
"Choker" Halter
For this style, be sure to use a pattern that has a high neckline - up to the collar bone - or alter your neckline accordingly.
Alter the front suit pattern piece to reflect your desired neckline.
Decide on the point that you would like the outer edge of the suit to end at the neckline, and draw a new arm hole. This should curve from the arm pit up to the desired point.
Re draw the back line, as per the basic halter top instructions, and assemble the garment.

Apply elastic all the way around the back, from one edge of the front neck hole to the other. Do not apply elastic to the top front neckline area (where it lays across the collar bone).
Finish off all elastic edges with a zig zag.
Cutting Your Collar
You’ll want to cut a piece of fabric that is:
- Long enough to go around the neck, plus 2". The greatest degree of stretch should go along this length.
- Width: [The desired height of the collar + ½"] x 2.
So if you’re looking to make a collar that’s 1.5" tall, you’d add the ½" (seam allowance) to that - so 2" - and then double that. In this case, your width would be 4".
Make sure when you cut this piece out, you’re doing it right on the grain, and keeping all the lines very straight. This will prevent weird curling later on!
Note: Before figuring your collar pattern out, know what size of clip you’ll be using, and plan accordingly!
Sewing the Collar
Fold the collar piece in half - wrong sides together, long end to long end.
Sew the 2 long raw edges together with a zig zag right on the edge.
Mark the center point of the sewn raw edge, pin it to the garment, matching the center point of the collar to the center point of the garment.
Your collar should be laying against the right side of the garment, with the folded edge of the collar facing down.
Sew the edge of the collar piece to the top edge of the suit, stretching the collar piece slightly more than the suit, and stretching both pieces together.
Apply elastic to the top edge of the collar piece, as shown below. On the section where the collar is attached to the suit, be sure to sew through the suit layers as well.
Flip and stitched down the elastic.
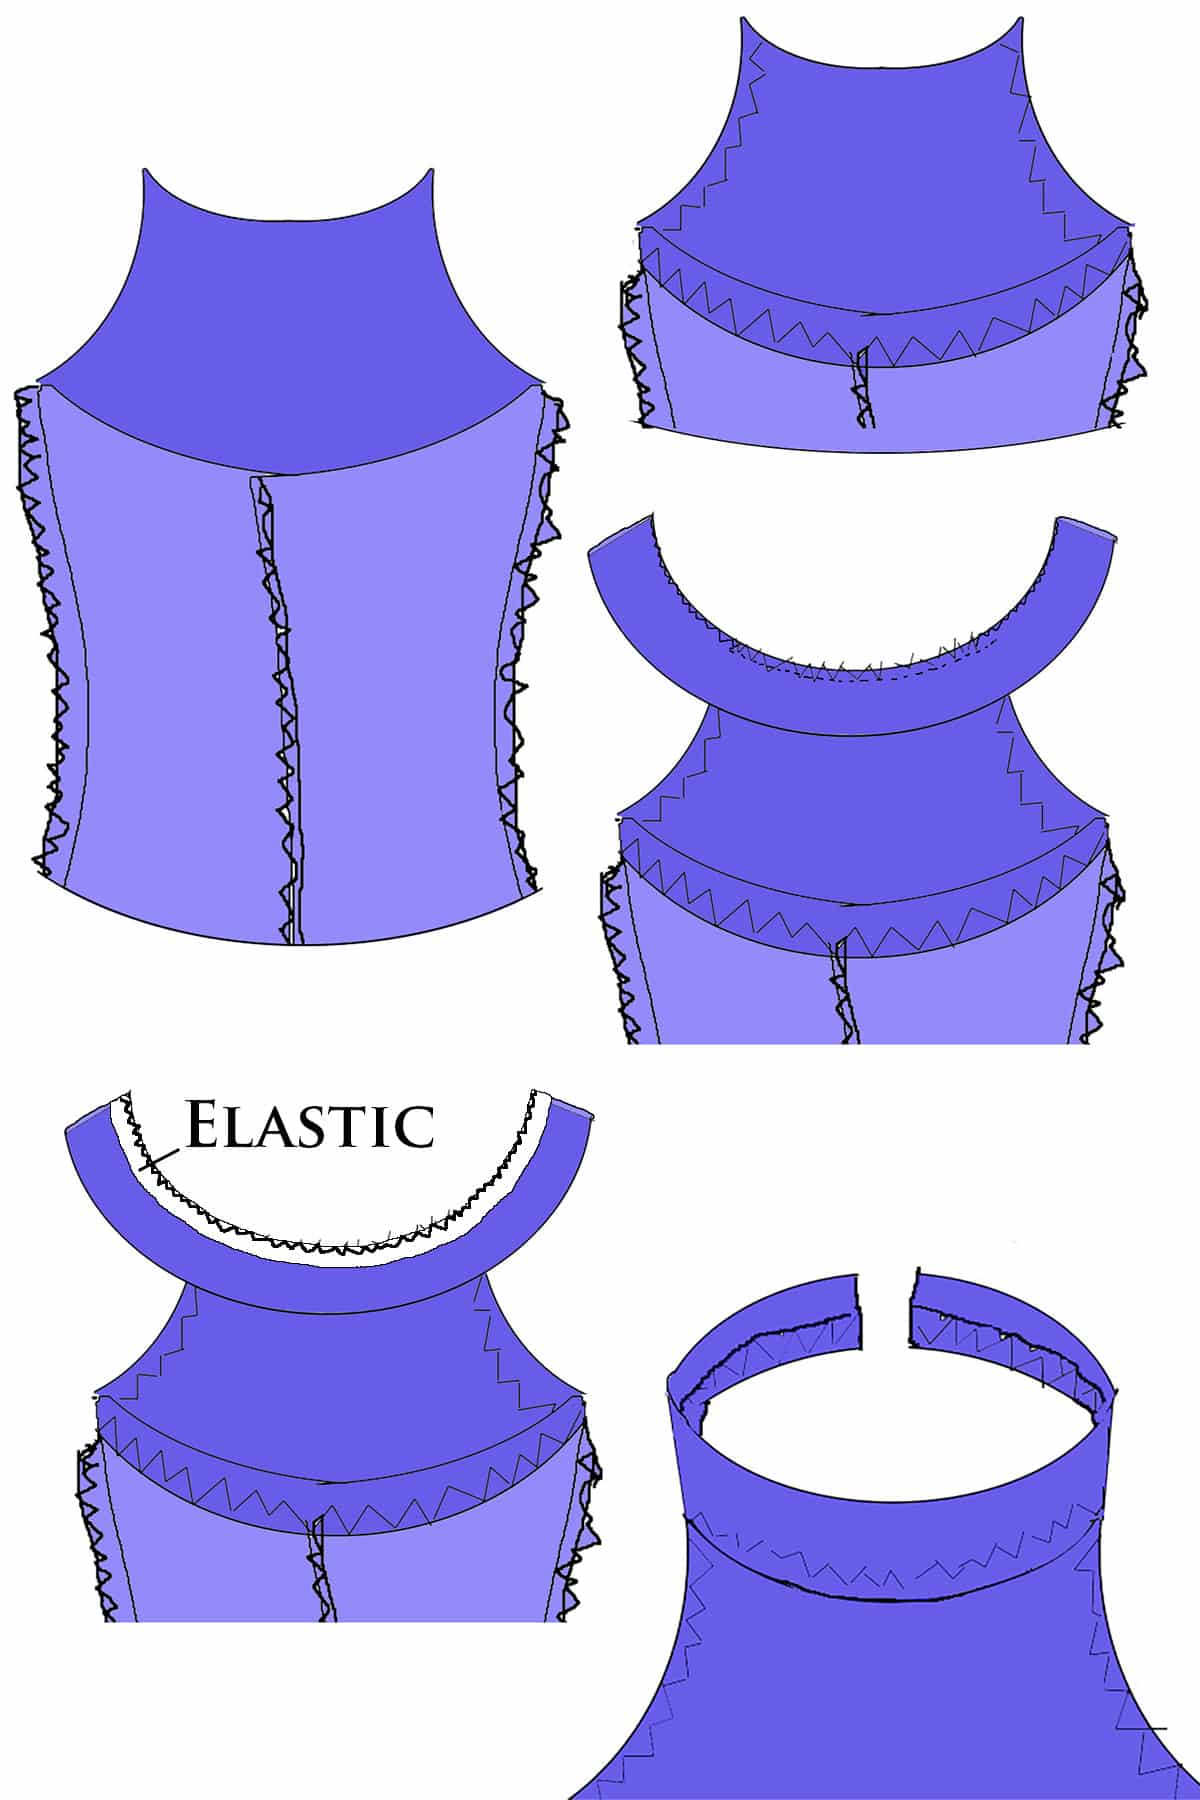
Apply your desired type of closure to the back edge. Fit suit on wearer, adjust length of collar if needed.
Note: You can combine a “choker” halter style, with straps - as shown below.
Just be sure to apply and finish elastic on the suit before applying the collar. Before applying the elastic to the collar, attach your straps where you’d like them to be on the collar, THEN sew the elastic on.
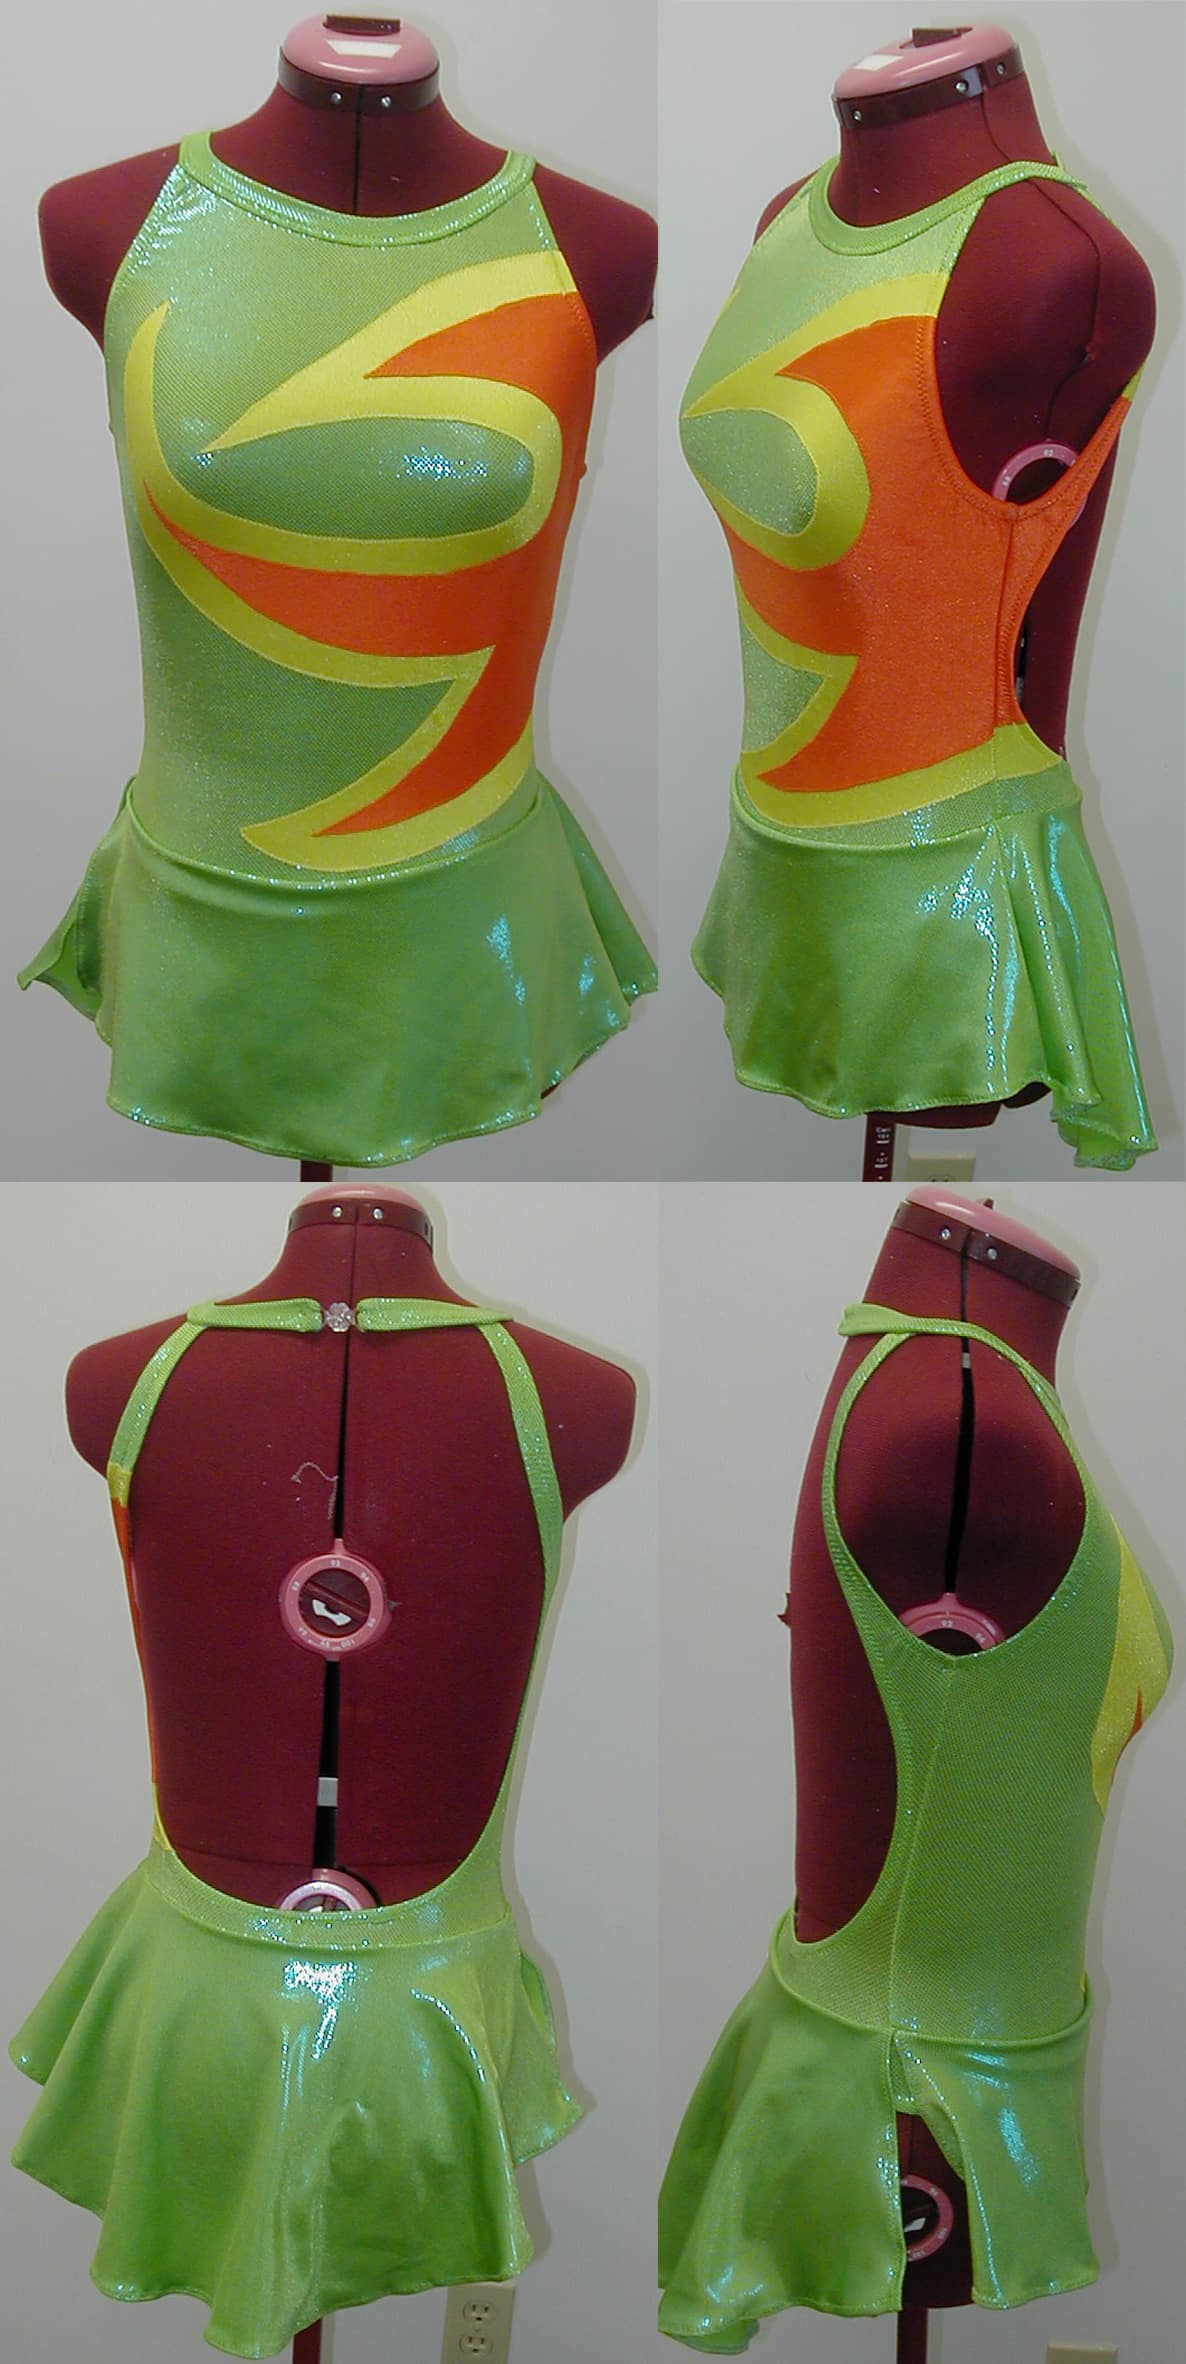
A variation of the choker collar
Basic Strappy Back
Elastic Straps are an easy way to achieve all kinds of different looks, with a little planning.
Before you get into the possibilities, let’s look at a very basic application.
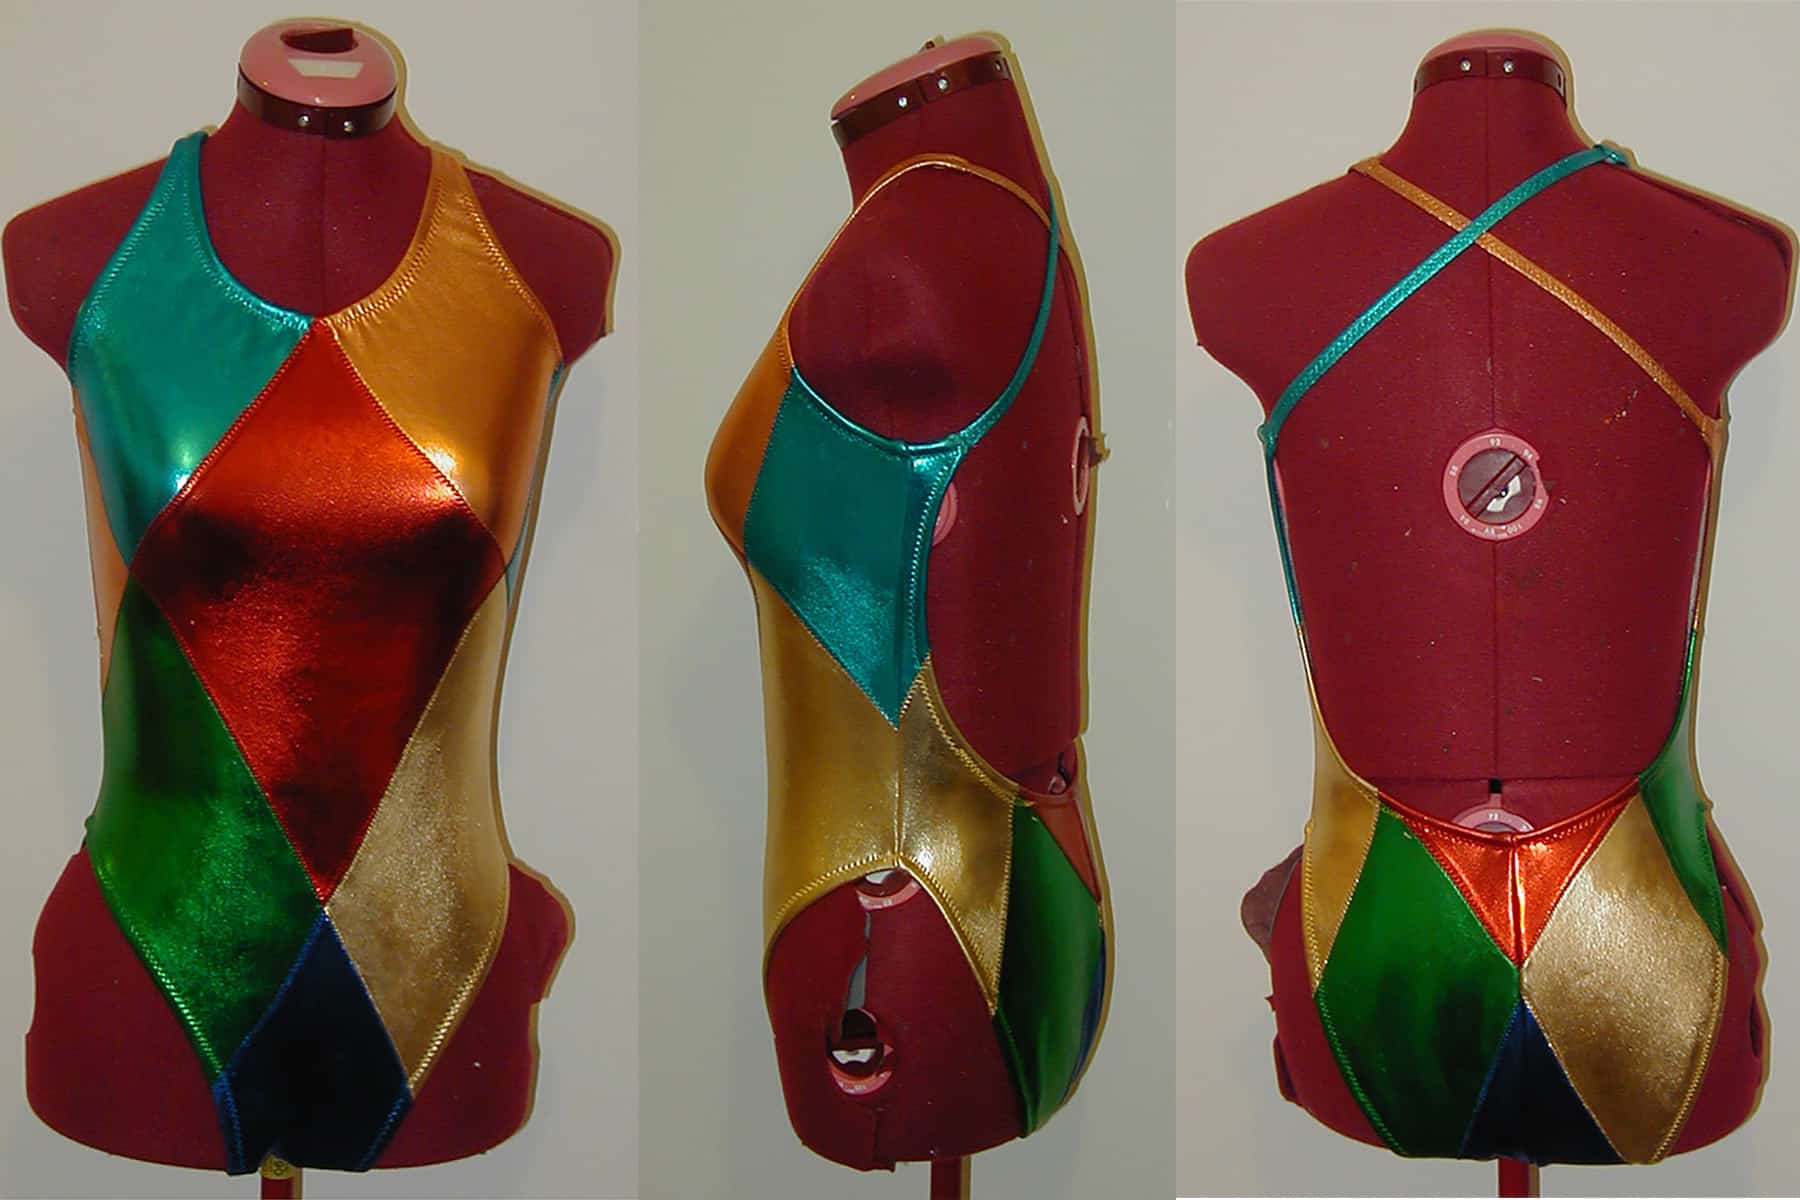
A basic strappy back.
Strappy Back Patterning
1. Alter the front of your garment pattern so that the shoulder tapers down to an appropriate width.
To determine the width, add the width of your strap to 2x your elastic width. (A lot of the time, this will just be 3x the width of the elastic being used)
2. Following the basic idea for the crossover back, alter the back pattern for your suit.
Instead of the teardrop extending all the way up to the other side, however, this will end a few inches from where it extends out of the armpit - see sketch below.
The line connecting the upper edge (extending from the armpit) and the “teardrop” line should measure the same as the measurement you came up with in step 1.
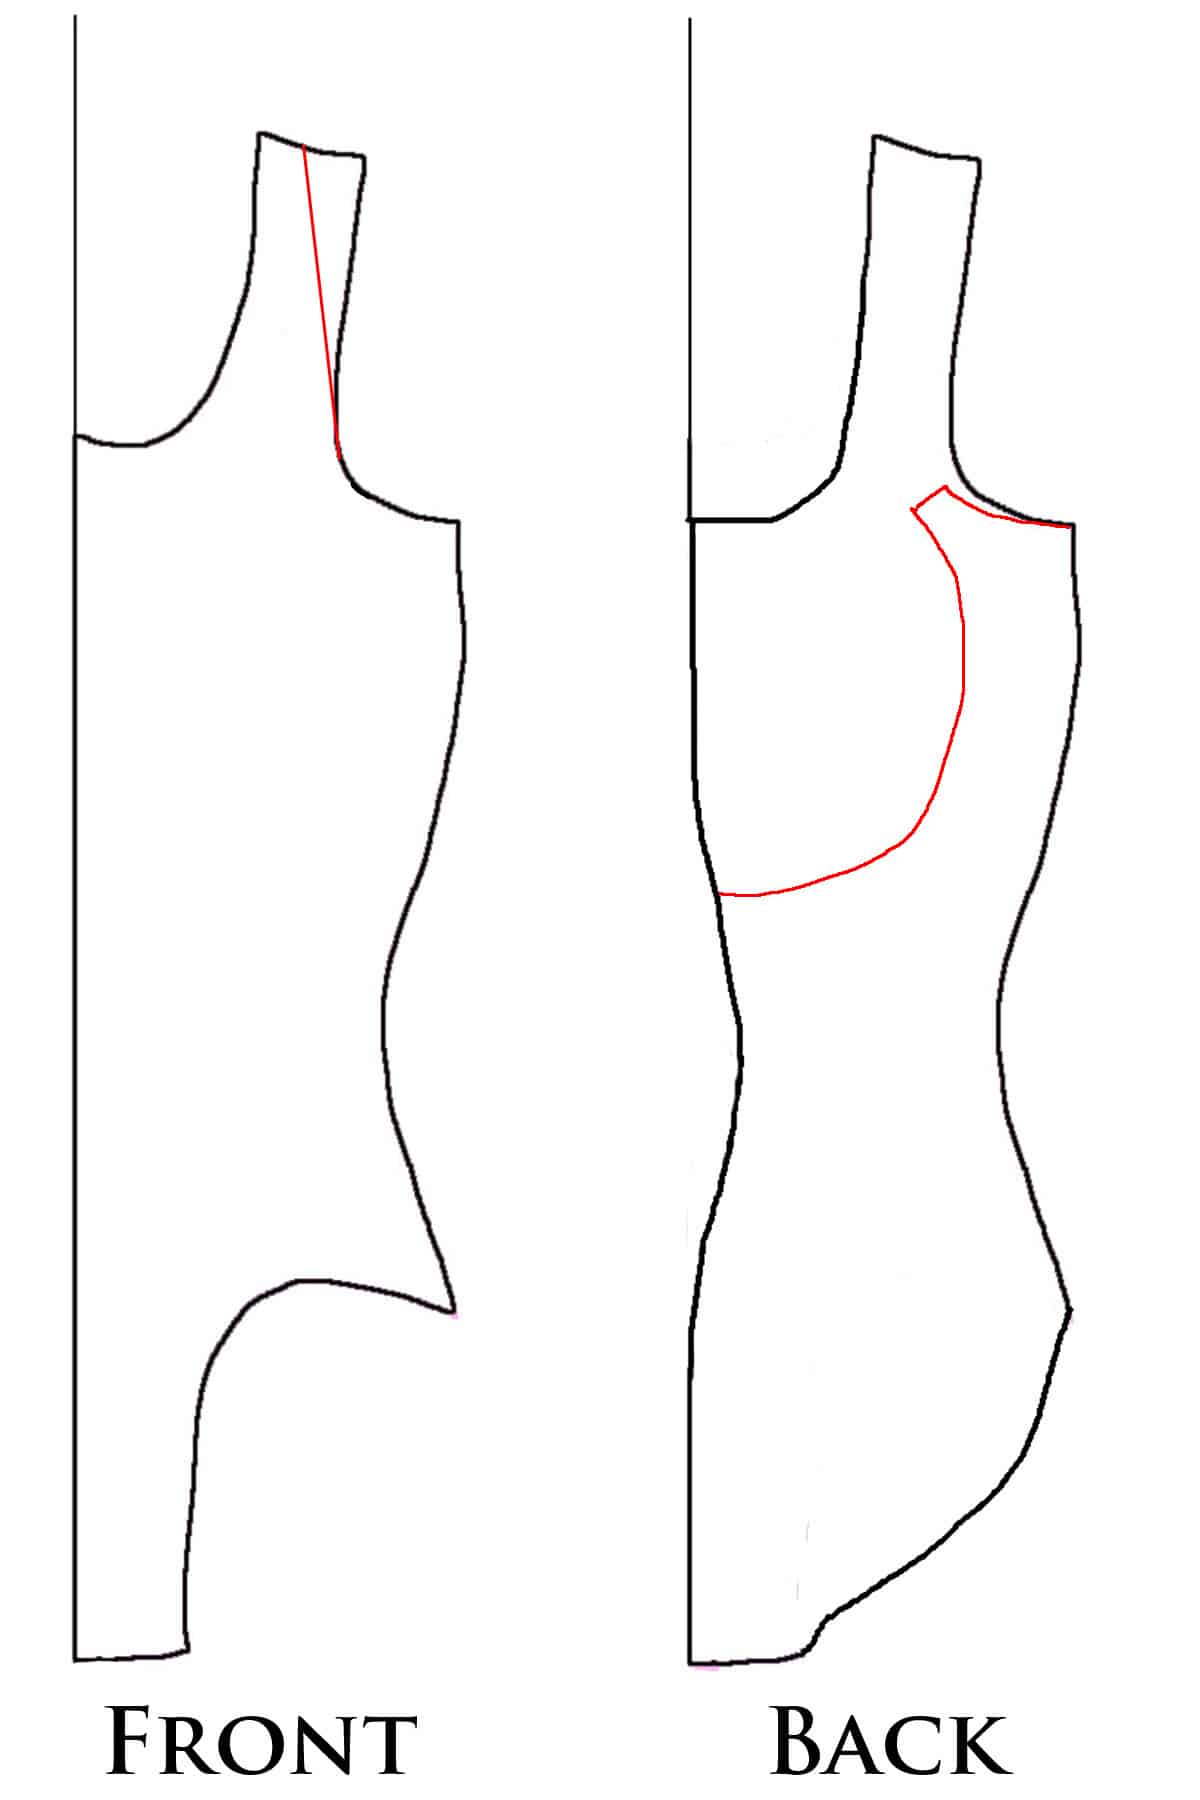
3. Cut front and back pattern pieces from both lining and outer fabric, sew center back, side, and crotch seams.
4. Cut two lengths of finished covered elastic / straps.
To measure for the length needed, lay the suit out flat, and measure from the top edge of one front shoulder, across to the top back edge of the opposite side.
Sewing a Strappy Back
5. Sew one end of one strap down to a top shoulder edge, right sides together and centered.
I like to use a straight stitch to get it in place, then finish the edge with a zig zag.
There should be enough room on either side of the strap for applying elastic later. Repeat with the other strap, on the other front shoulder.
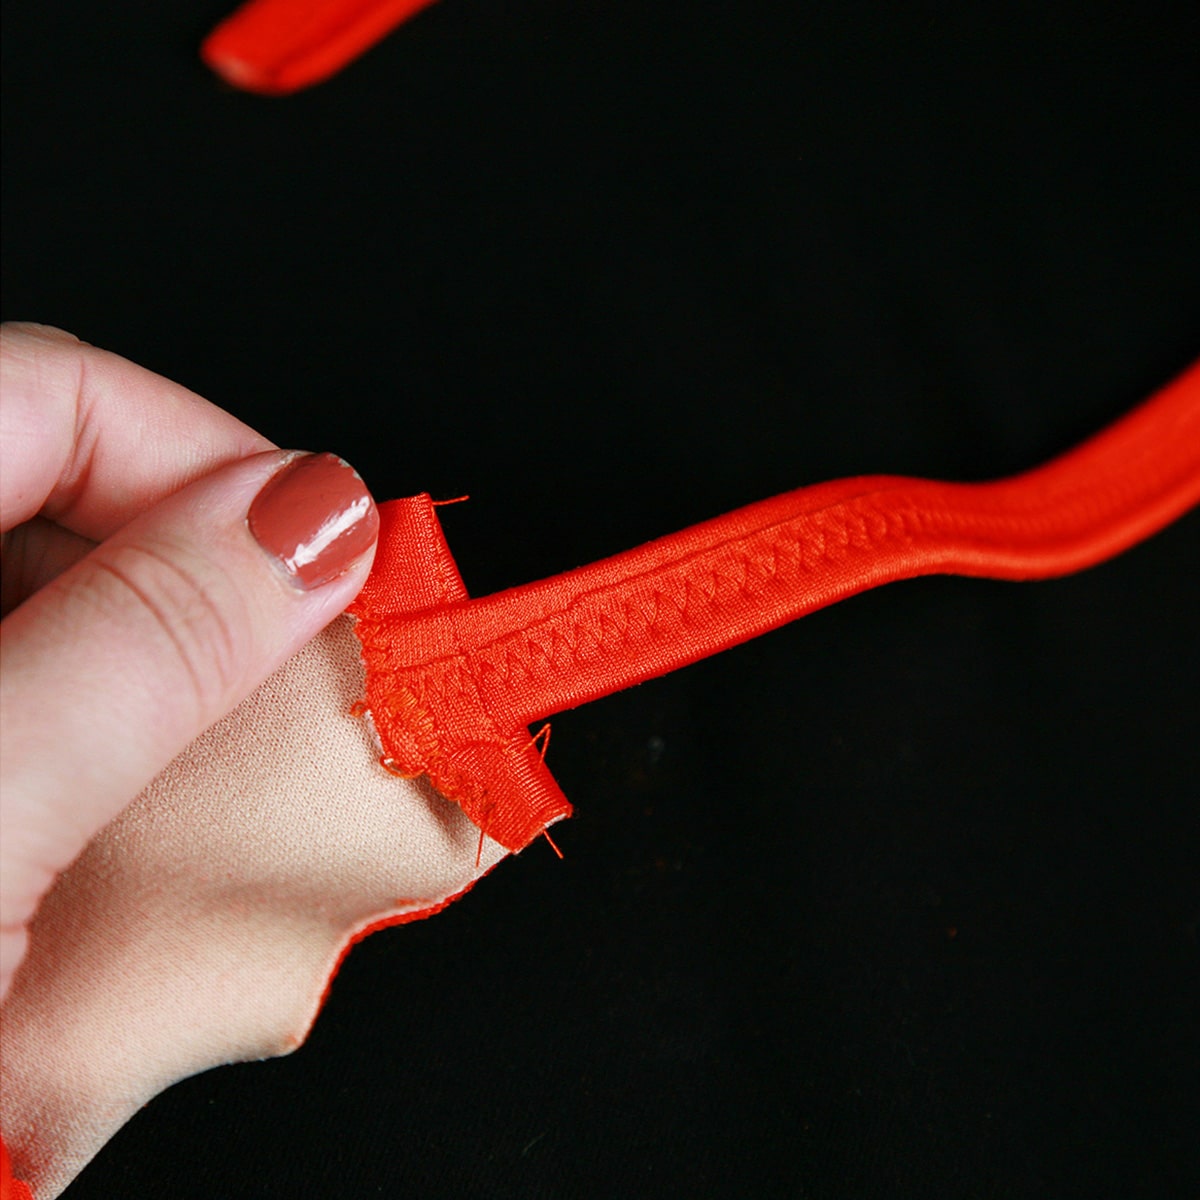
6. Sew the other end of one strap to the opposite side of the suit, attaching to the shot edge you created at the end of step 2.
Be sure to keep right sides together, and not have any twists in the strap. I find it easiest to have the suit inside out, and just flip back one side of the back, laying the strap in a straight line to it before attaching.
Repeat with the other side.
7. Apply elastic to the neck line, “teardrop”, and what remains of the arm hole.
You will start and end at a strap, each time. Fold the end of the shoulder / back piece under as you apply each piece - the seam you created to tack each piece in place should become the new edge.
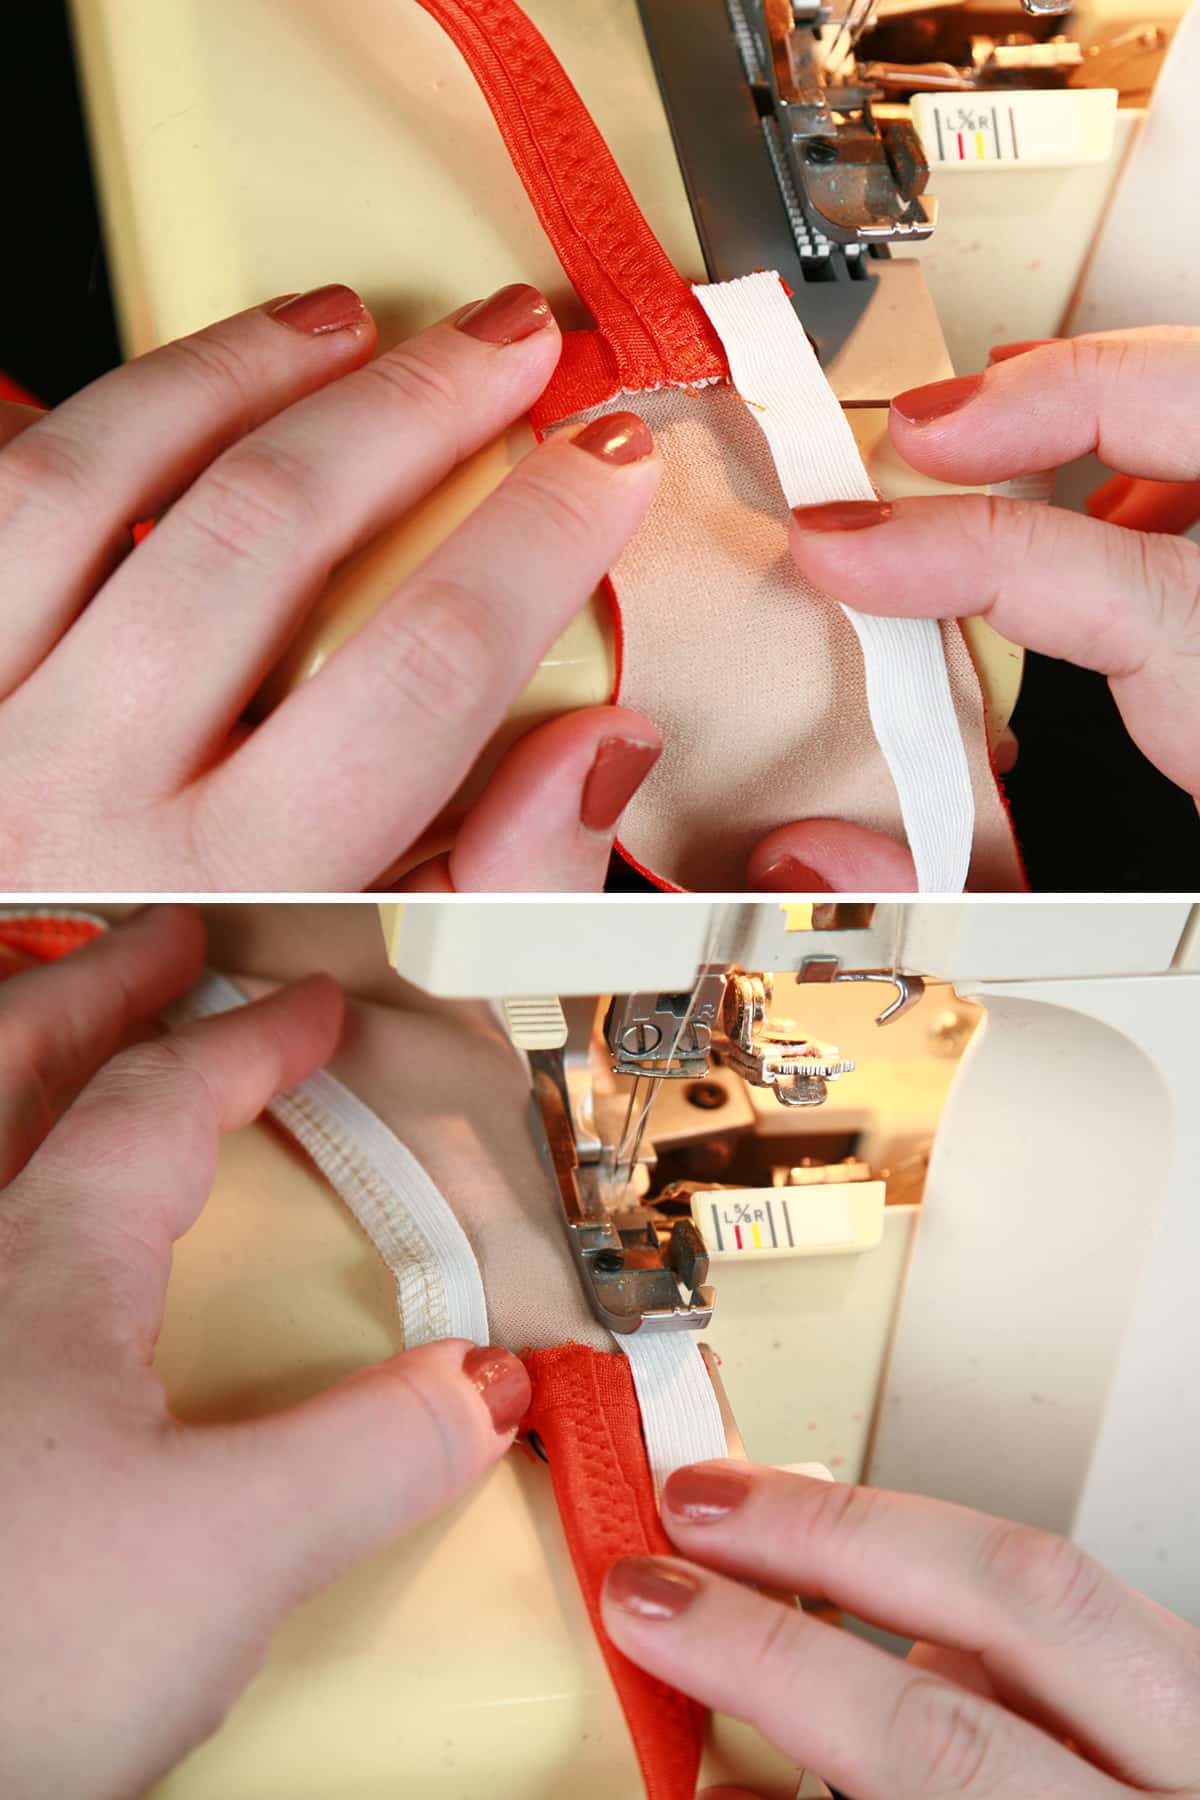
8. Finishing the elastic edge can be done as one big seam, stopping and turning at each strap end.
Starting at one strap end, fold one side of elastic over the very end of the strap, and the end of elastic on the other side over that.
Make sure that both sides of elastic are wrapped tightly up against the strap - this will give the cleanest appearance.
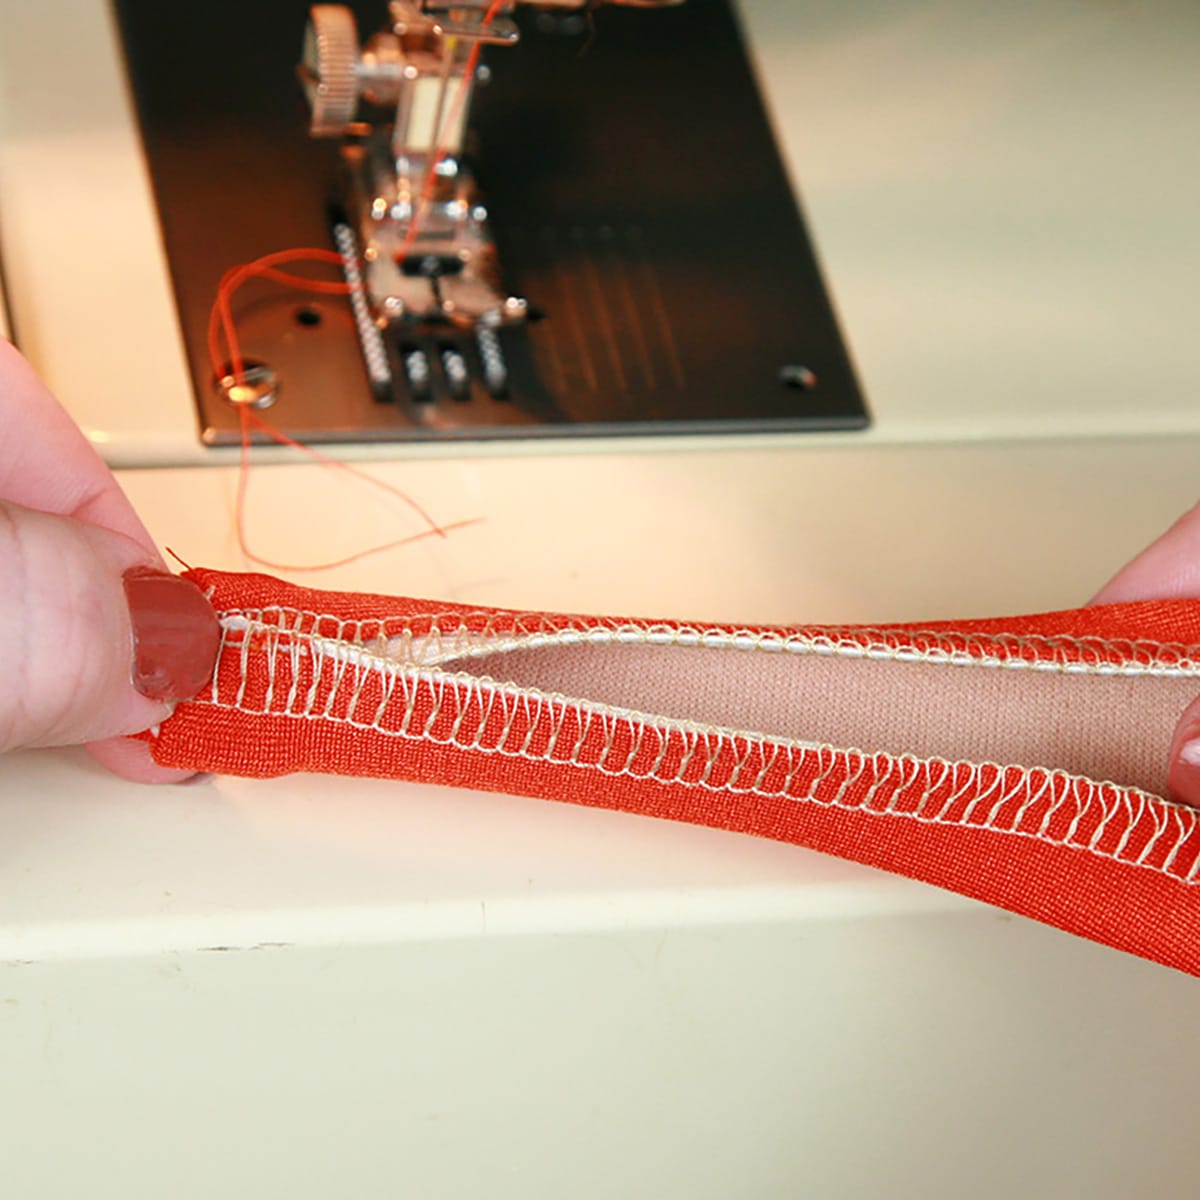
9. Start your zig zag stitch in the middle of one of these fold-overs, carefully sewing through all layers. Continue around your first stretch of elastic.
10. As you come up on another end of strap, stop sewing and fold everything over as in step 8.
Sew up to the strap, continuing along the piece of elastic you are currently stitching down.
When you get close to the strap, put your needle down, lift your presser foot, and turn the suit so that you’ll be aimed to work down the next piece of elastic.

Drop your presser foot, and continue along. Repeat until you come up to the strap you started on.
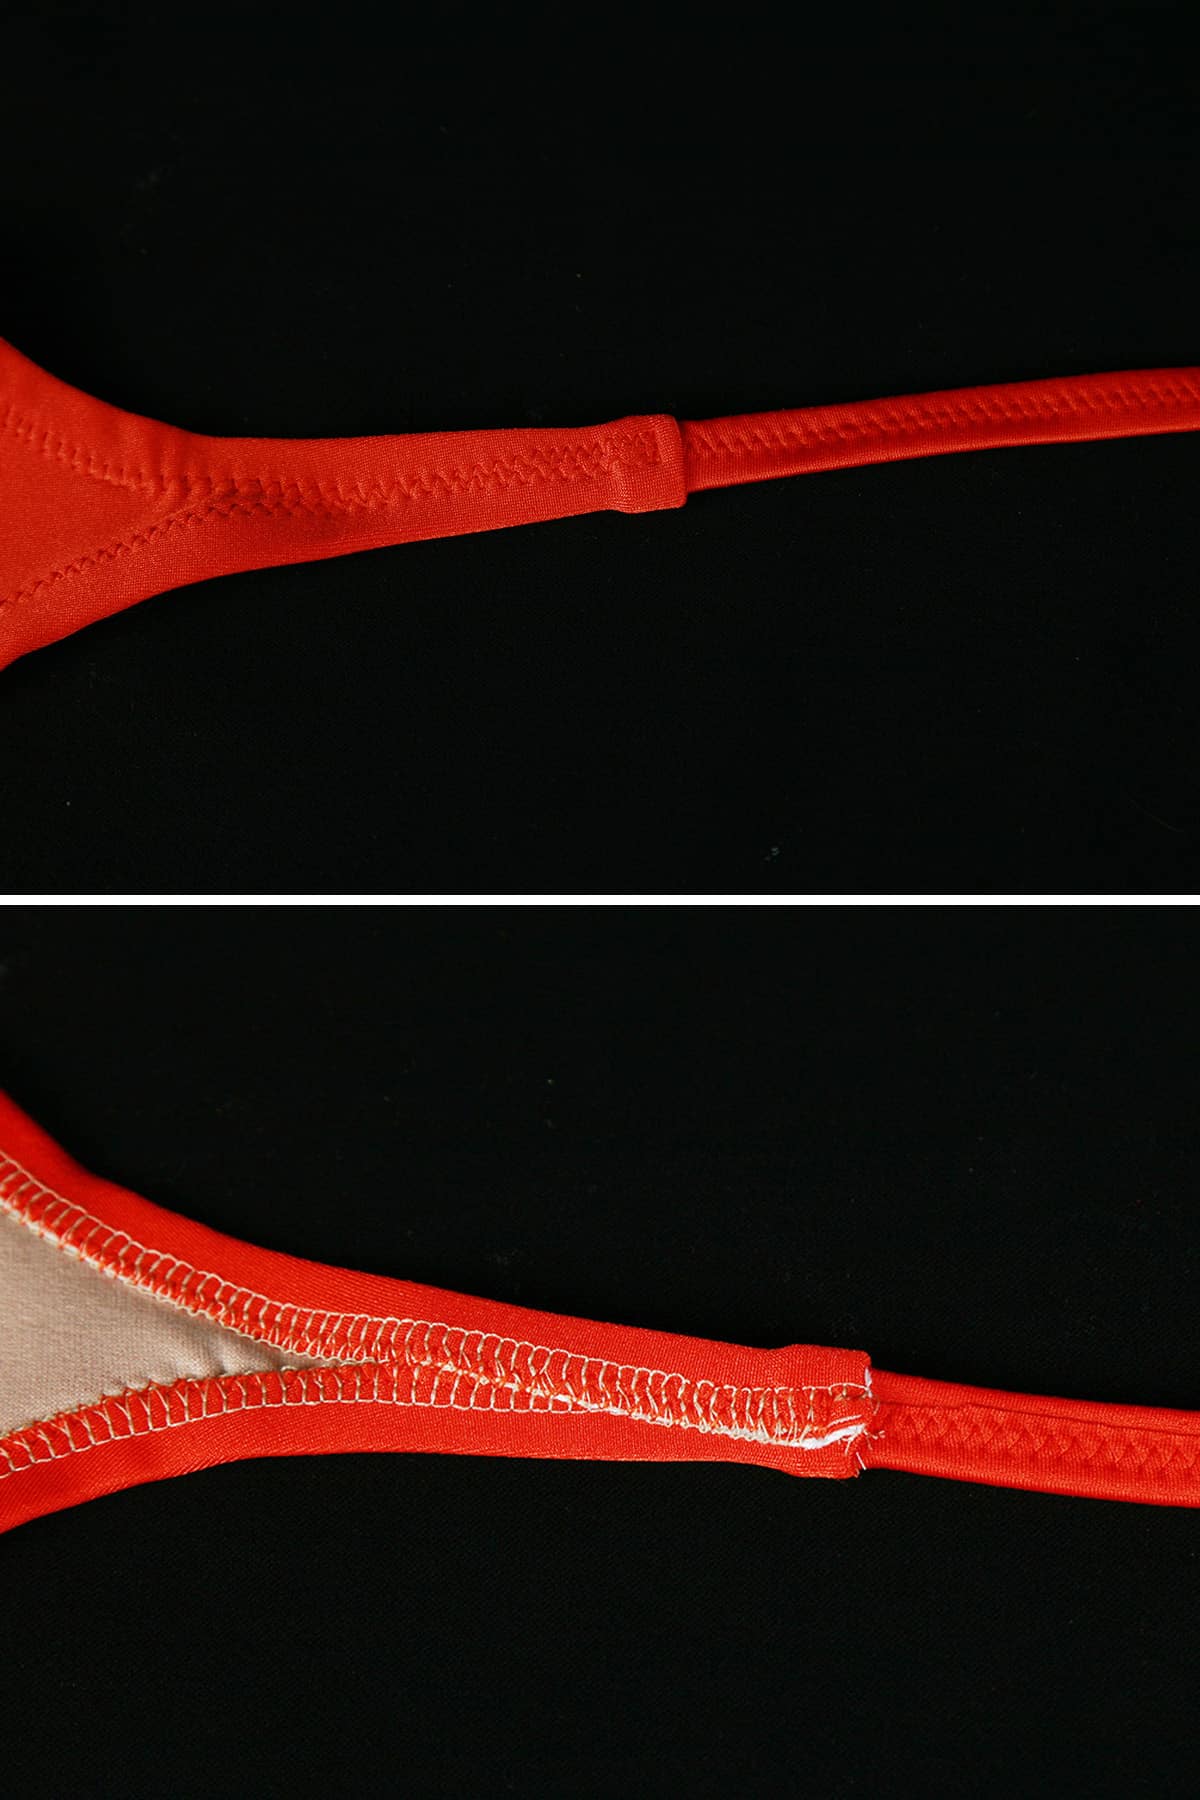
Sew up to the strap, finish off your seam.
Multiple Crossover Straps
There are many, many ways that you can do multiple strap backs. Here are some basic instructions- for a symmetrical design - to start with.
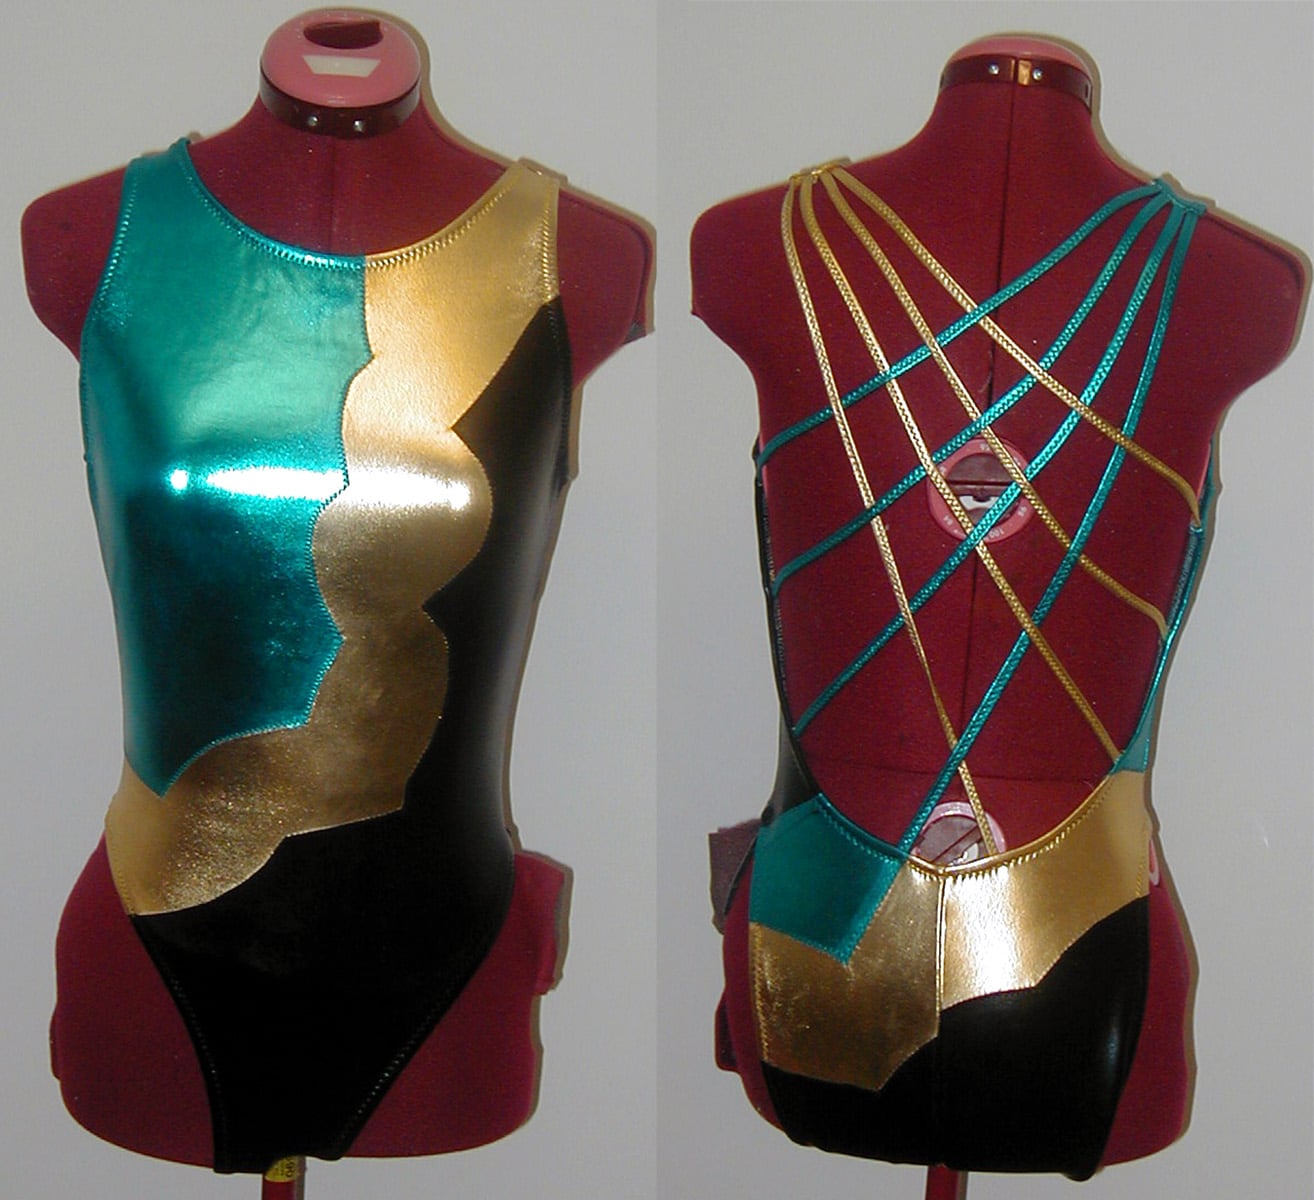
1. First, you will need to alter the suit pattern for style. Before doing this, make sure that and required alterations for size have been done.
The back portion of the suit will be treated either as a halter back (as I'll be demonstrating below) or the same as for the “Basic strappy” suit (as above - the blue/gold/black suit)... and may be scooped as deeply as you like.
As for the front suit, you may want to trim some of the shoulder seam away, usually from the outside of the shoulder - this will depend on the math below:
Multiple Crossover Strap Math
To figure out how wide you will want the new shoulder to be, you will need to know how many straps you will be using per shoulder, how wide they are, and how wide your elastic is.
Using:
E = Elastic width
X = Number of straps per shoulder
S = Strap Width,
.... your shoulder will be 2E + XS.
For example, if the elastic width is ⅜", and you will have 3 straps at ⅜" each, your formula will be :
2 times ⅜" + 3 times ⅜" , or 5 x ⅜" = 15/8, or 1 ⅞.
Which means your shoulder width should be just a hair under 2 inches wide.
For the sake of example, We will use these specifications to demonstrate.
2. Curve the outside edge of your new shoulder down towards the original arm pit, and adjust your neck line if you so desire.
Assemble the suit by sewing the side seams and centre back seam.
Placing The First Straps
3. On the right side of the fabric, attach 3 of your 6 (total) straps, to one shoulder, with their sides touching each other, and leaving an equal elastic allowance on either side of the group.
Straight stitch them on, and finish the edge with a zigzag. Repeat with the other shoulder and remaining straps
4. On one half of the back suit, mark off 3 evenly spaced locations for the straps to be attached to.
There should be at least 2 inches in between the side seam and the strap closest to it (if using the halter back style), and at least 1.5 inches between the center back seam and the strap closest to IT.
Transfer these markings to the other half of the back, matching up the locations.
5. Starting with the strap closest to the neckline on one side (we’ll call this shoulder #1), without twisting the strap, pin it to the marking closest to the SIDE SEAM of the opposite side of the back.
Make sure that all straps are pinned to the right side of the back suit as described under “basic strappy back”.
6. Repeat with the middle strap, pinning it to the middle spot marked on the opposite side of the back.
7. Then, repeat with the strap closest to the arm hole on the front, pinning it to the spot closest to the center back seam on the opposite side of the suit.

Weaving Straps
8. Repeat steps 5 - 7 on the other side. Rather than laying it straight across, though, you want to weave them through the straps you already have pinned down, alternating as you go.
If your first strap goes “over, under, over”, the middle strap should go “under, over, under”, and so on.
9. Once all straps are pinned into place on the back, sew them all down with a straight seam, very close to the edge (as in step 3)
Apply Elastic
10. Apply your elastic in 2 sections - one along the front neckline, and one long piece going from the outside of one of the front shoulders, all the way around the back, and ending at the straps on the other side of the front.
Stretch elastic slightly, and then stretch elastic and suit together as you sew it on.
Note: When applying elastic to the back, be sure to stitch through both the suit and the ends of the straps that are attached to it.
11. Flip all elastic lengths and finish off with a zigzag.
You will want to flip the shoulder seam allowances down so that they lay flat against the wrong side of the front suit, folding the elastic down on top of it before stitching, as you did for “Basic Strappy Back”.
Using these directions as a starting point, experiment!
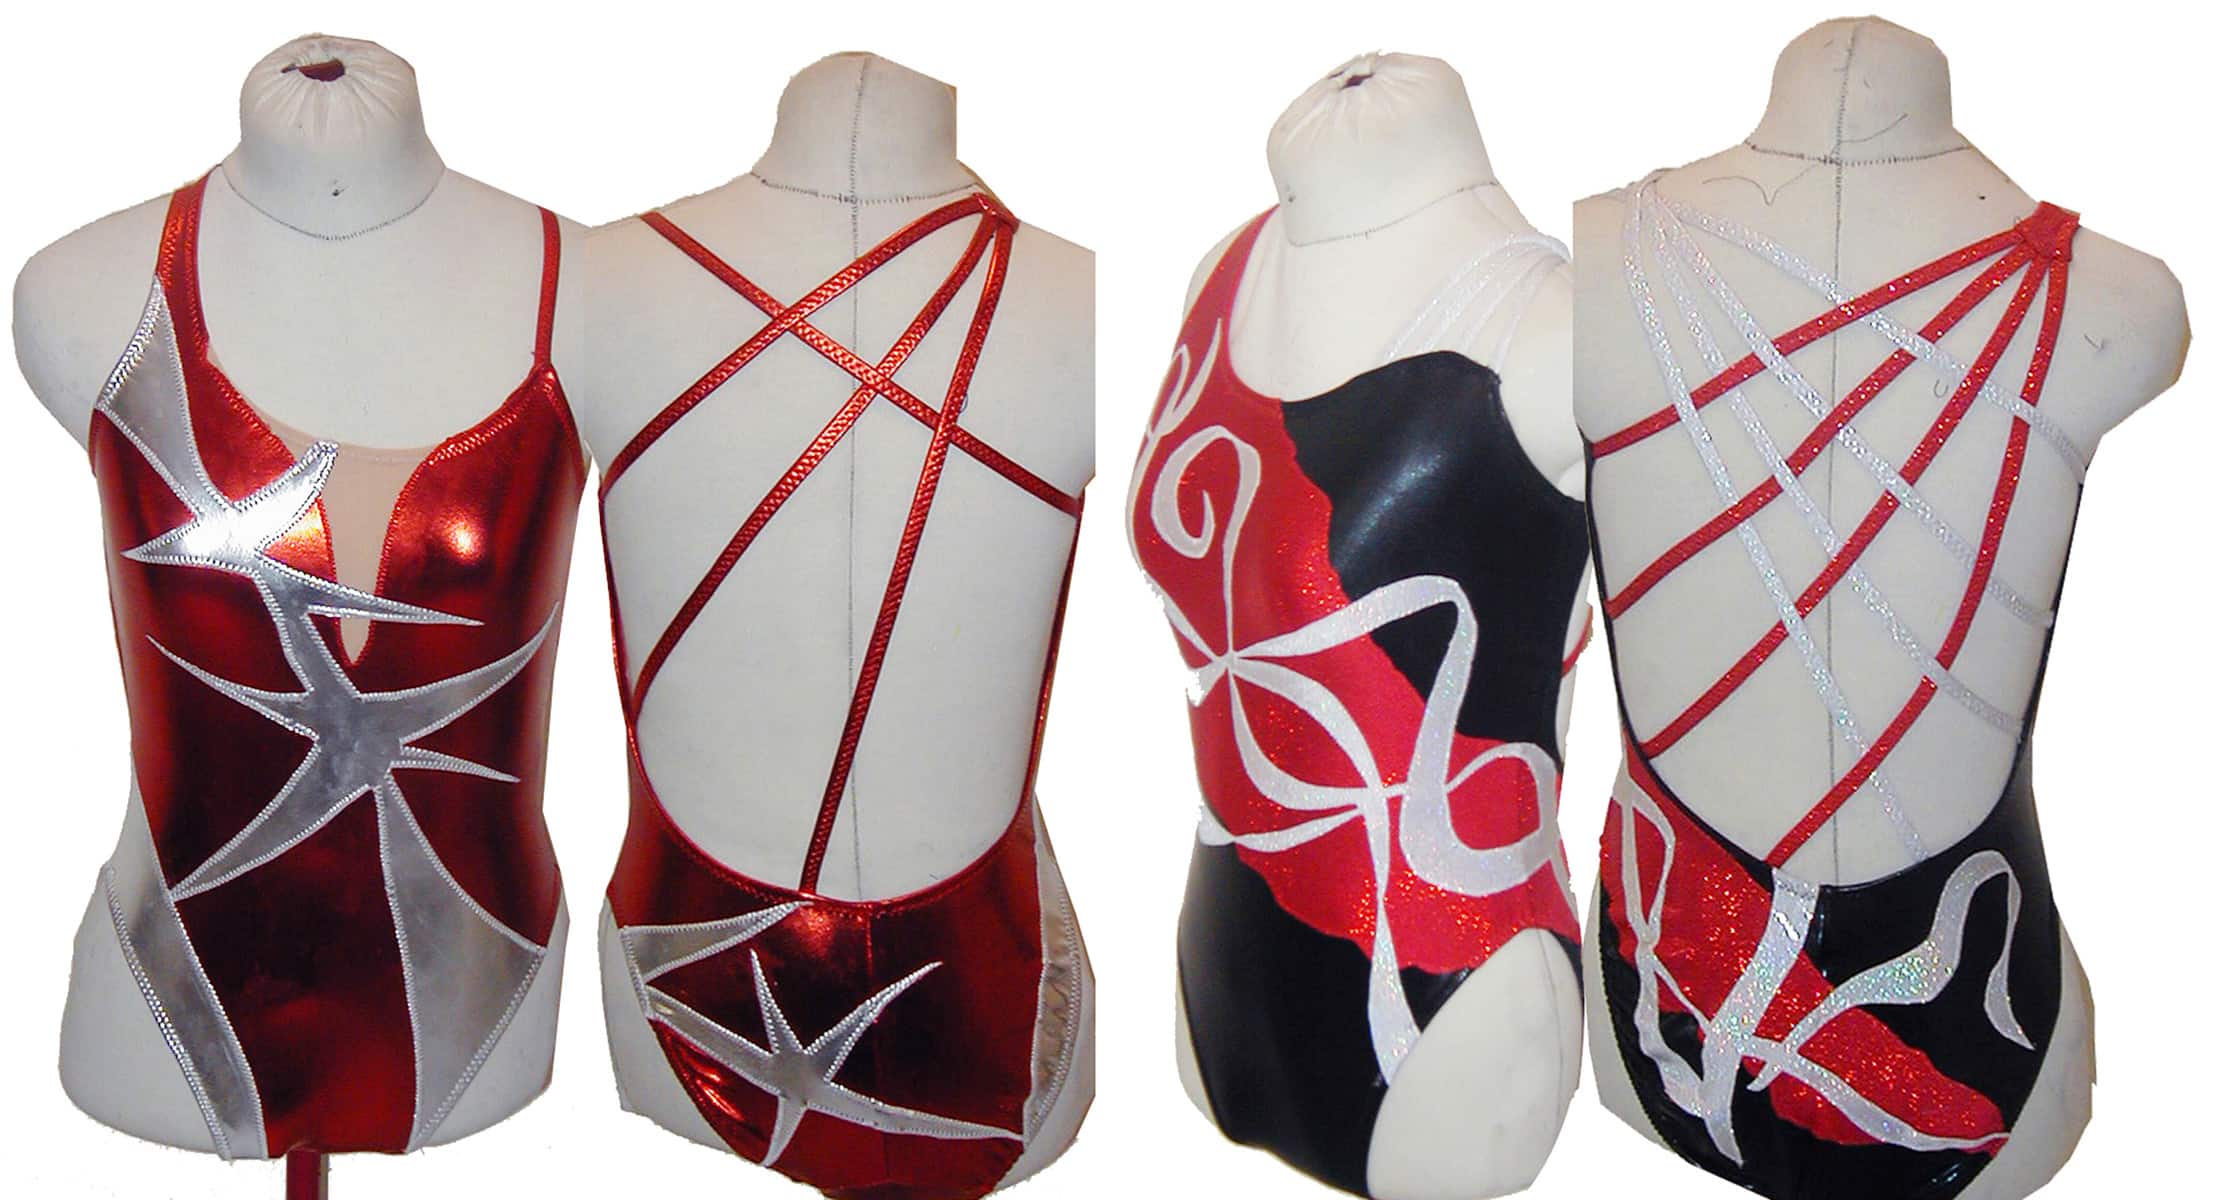
You can do asymmetrical designs with crossover straps - Just pay attention to what is going where!
Multiple Strap Variations
- Try one number of straps on one side (even just a single strap!), and another number of straps coming from the other side.
- Rather than starting out with a halter style back, you can start out with the same back as the basic strappy back.
- Try starting the straps lower on the front, rather than from the shoulder. Just be sure that you at the length you're losing from the base pattern (the length of the front shoulder that you're trimming off) to the length of the straps being used.
- Experiment with how much of the back is open. You can do a very shallow opening (the back of the suit cut straight across the shoulder blades), or very open (Back opening cut out almost to the side seams, and low on the back).
- Use different colours. You can have all the straps on one side as one colour, and all the straps on the other side as a different colour... or have multiple colours across each side.

If you cut semi-circles between each strap attachment - and apply elastic between each - You can design an effect like this.
Lace Up Back
I love this style - it’s pretty, fun, and not something you see often.
For this style, you’ll need 2 long strings (see “How to Make Bikini String”), plus a shorter length to cut up.
For the long strings, I generally do a full-width cut of the fabric - so usually 58" or so.
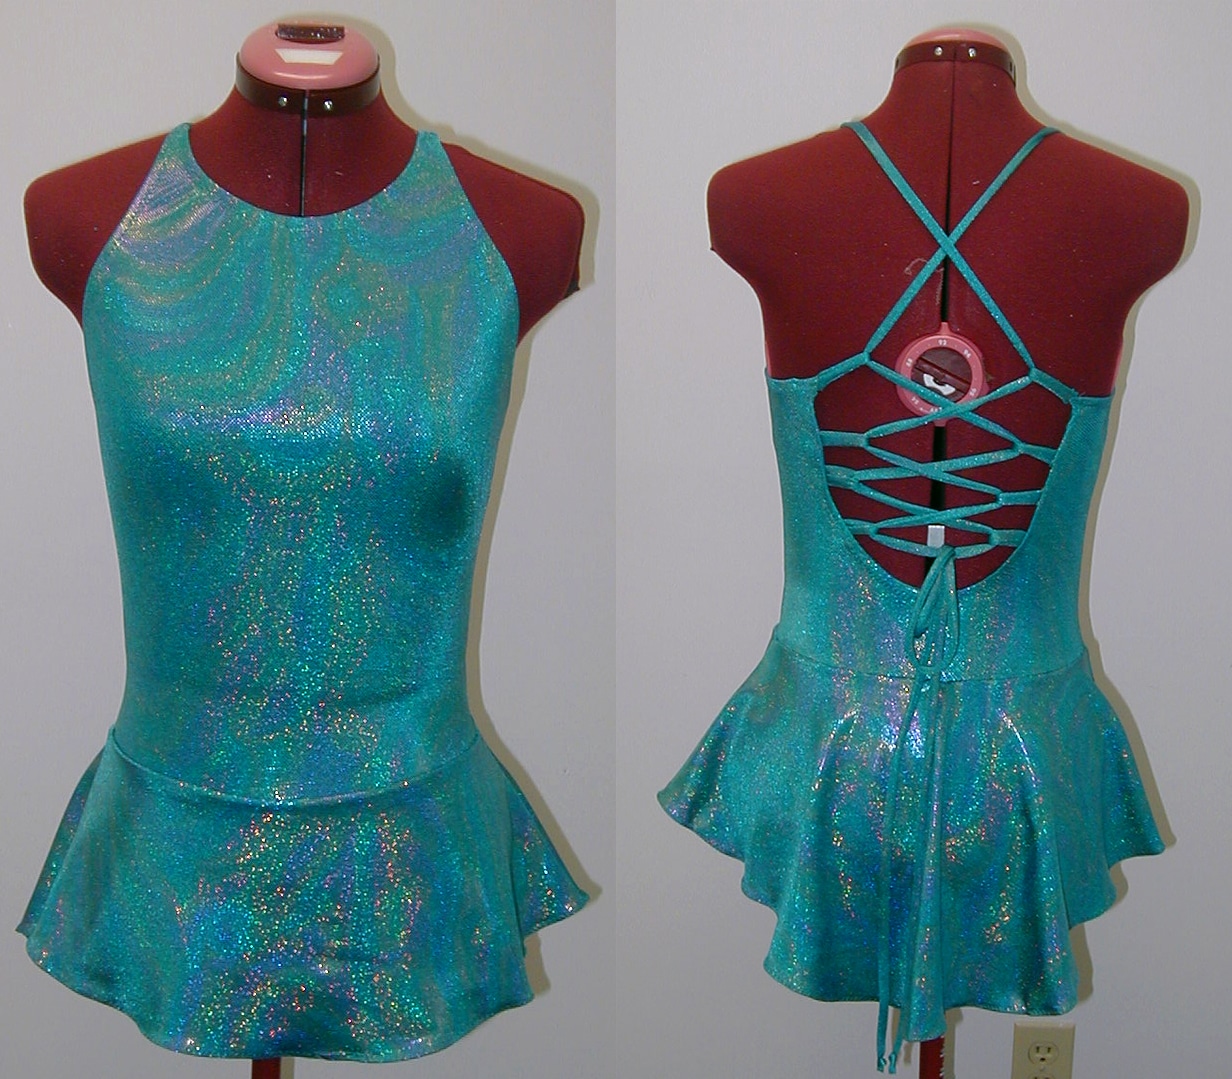
Patterning
1. Adjust your pattern in the same way you would for “basic strappy back”, above.
Instead of using an elastic width for measurement, you’ll need the width of your string, plus 1 elastic width on either side of it.
Cut fabric pieces out, sew your center back seam - if applicable.
2. Decide how many loops you’d like along the back of the dress.
Mark the placement of them onto the right side of the back of the bodice, using a pin in each spot.
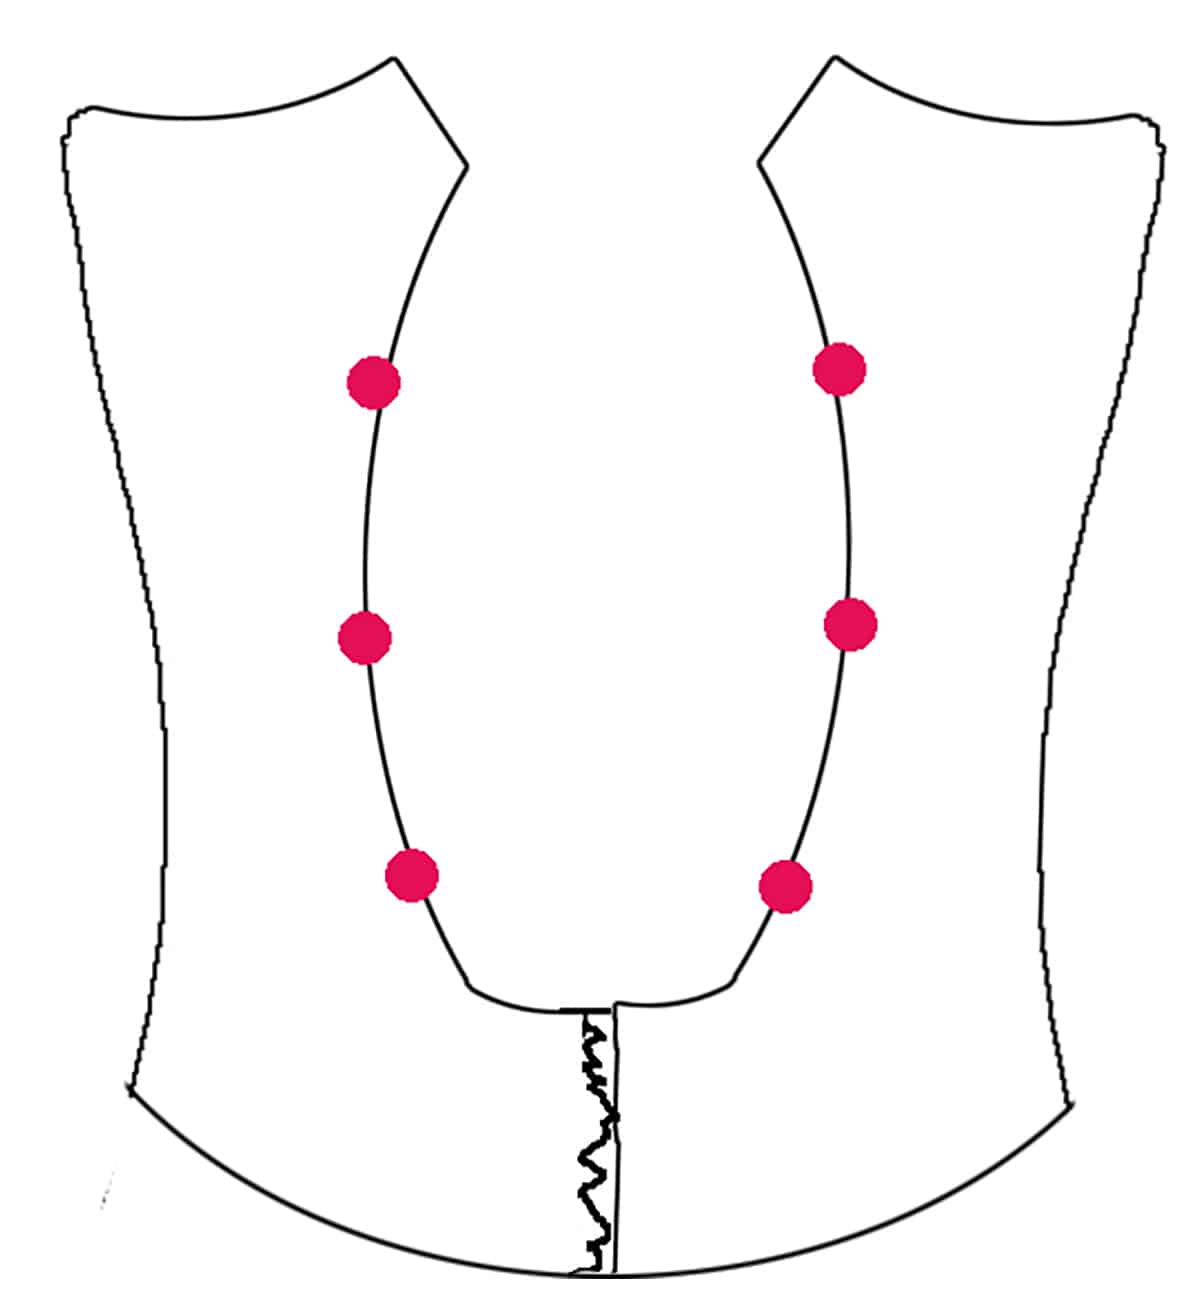
Make sure to space them evenly, and that the spots are marked at the same height on both sides of the back.
Make Your Loops
3. Decide how long you’ll want your string loops to be.
As a general rule, I like to cut them about 2" long. Cut as many as you need (8, as pictured) from your shorter length of string
4. One at a time, fold a piece of string loop in half and attach to a marked spot with a straight stitch.
Keep your stitches fairly close to the edge, while making sure to stitch through both layers of the string.
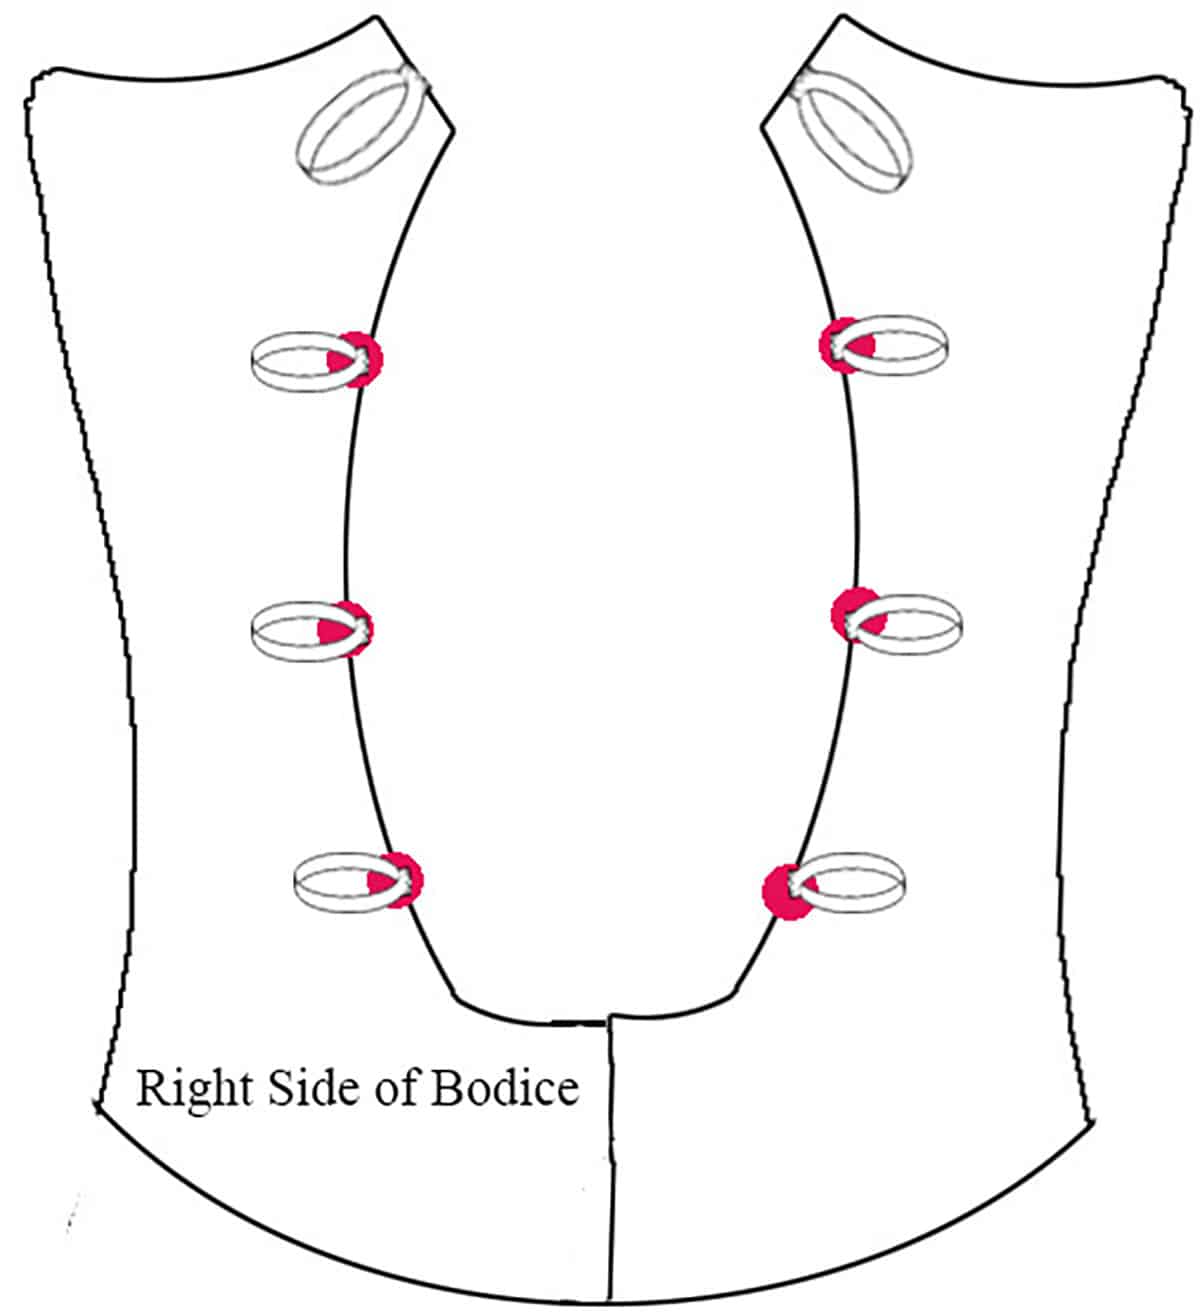
Sew Your Lace Up Back Garment
5. Sew the front bodice to the back bodice on the side seams only. If you have a back seam, sew that as well.
6. Attach one end of each of the long strings to the appropriate place on the front of the bodice, also using a straight stitch.
7. Keeping a close eye on where your loops are , apply elastic along the neckline, back, and under the arms, following the instructions for basic / multiple strappy backs.
8. Turn the bodice right side out.
Cross one string over to the upper loop on the opposite side of the back bodice, thread through the loop. Repeat with the other side, continue to lace down the back.
9. After fitting, trim the ends of the tie strings to desired length, tie a knot in the new ends to prevent ravelling/fraying.

T Shirt Collar
Depending on your desired look, a t shirt collar can be done to match, or contrast to, the rest of the bodice.
Note: As-is - to look like an actual tshirt - this works best for garments that are pulled over the head, rather than stepped into.
If you need to step into the neck of the garment, be sure that the neck opening is big enough to accommodate!
Design the Collar Pattern
1. Determine the desired finished height of the collar.
For this example, we’ll say 1.5 inches. Add a seam allowance to that measurement (Say ¼ inch), and double it. (1.75 inches x 2 = 3.5 inches.)
2. Determine the length of collar needed.
Measure the edge of the neckline - after sewing, and not taking the shoulder seam allowances into the measurement. , and subtract 1-2 inches. (1 for younger children, 2 for teens/adults). We will say that this measurement is 21 inches and for a child, so for example, the length needed is 20 inches.
3. Draw a rectangle that is - in this example - 20 inches by 3.5 inches.
Cut this out of the desired fabric. Make sure that the greatest degree of stretch goes along the length of it. It should be stretchier from short end to short end than it is from long end to long end.
Note: Do NOT stretch the cut piece! With such a narrow piece, this can cause curling and warping issues, when it comes to sewing!
Sew the Collar
4. Sew the two short ends together, with the good sides facing.
Fold this loop in half so that the two long edges are touching, with the good side facing out. Zig Zag along the long edges, securing them together.
Make sure to stretch as you go.
Mark Placement
5. Fold the collar in half, to create 4 equal sections - with the seam as one of the 4 folds. Mark the 3 other folds with a pin, or lightly with a pen.
6. Fold the garment neckline in half, with the center back seam as one of the two folds, and the center front as the other.
Mark the center front point with a pin. Unfold, then hold the center front to the center back to determine the halfway point between the front and back, along the sides.
These may or may not be on or near the shoulder seam, depending on how deep your front/back scoop necklines go.
Mark these two points with a pin, thereby dividing your neckline into 4 equal parts.
Sew Your Tshirt Collar On
7. Line the zig zagged edge up with the neckline of the bodice, folded edge pointing inward on the good side. Sew the edges together, stretching as you sew.
Finish the edge with a zig zag or a serger seam, and flip the cuff out.
8. Pin the collar to the sewn garment, lining up the collar seam with the center back bodice seam, and the other 3 collar pins/marks to the corresponding pins on the bodice.
9. Sew along the neckline, stretching both the collar and the bodice edge as you go. You’ll want to evenly stretch the collar slightly more than the bodice, to have the shorter collar ease to run evenly along the longer bodice edge.
10. Finish edge off with a zig zag or serger.

Note: While pictured with a fairly shallow neckline, this technique can be used on deeper scoops as well. If going for a deeper scoop, subtract an additional inch when it comes to the length of the collar piece.
Note 2. As pictured, this can also be used to finish off a sleeveless dress.
Follow the same instructions, but make the collar about 2" shorter than the measurement of the arm hole.
Play with it!
Cutaway / Mesh / Illusion Neckline
This is the method used to create sweetheart necklines, or accents with sheer mesh or Illusion.
The cutaway neckline is an example of applique. Maybe reverse applique, depending on how you look at it!
Either way, be sure to see my How to Applique Spandex post for all the details on sewing applique (and reverse applique!).
Note: This method can be combined with many of the above mentioned techniques. Just deal with the mesh/applique first, then finish the neckline as appropriate!
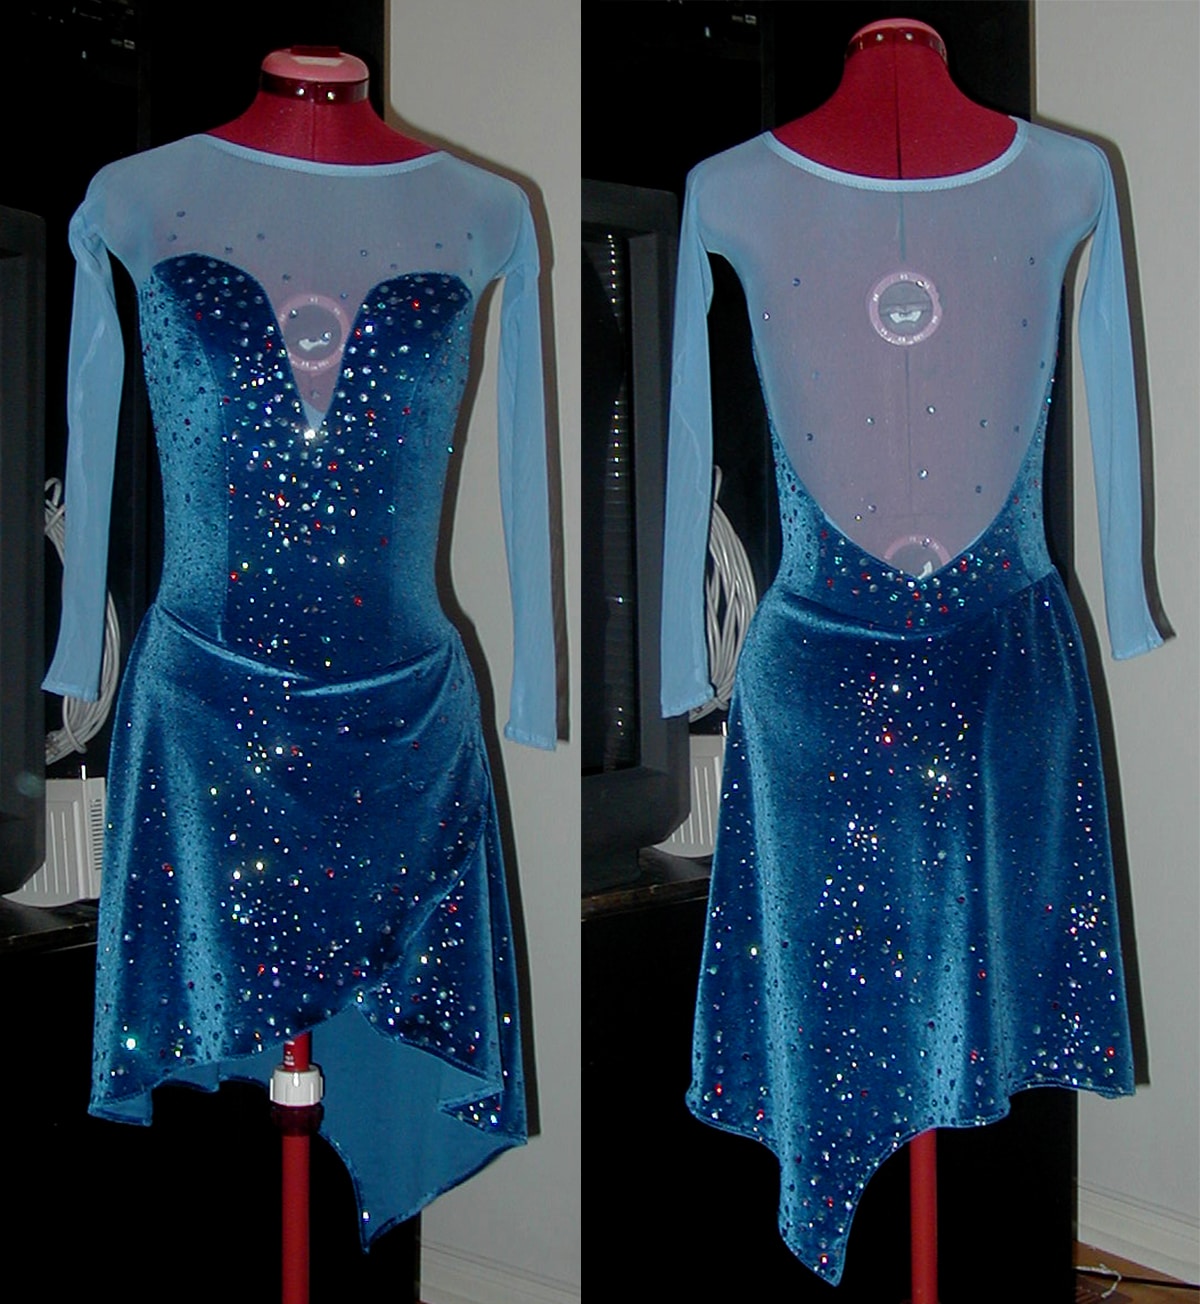
This photo is almost 20 years old!
Mesh Neckline Patterning
1. On the bodice pattern, draw your desired “fake” neckline.
We will use a dropped sweetheart neckline as an example. Cut along this line, and keep both pieces of the pattern.
2. Cut the bodice out of the desired main body fabric.
3. Lay the smaller piece of pattern onto a piece of paper, and along the edge that was touching the main pattern, add 1 inch.
Cut this out of sheer mesh or Illusion fabric. (Note: I freehanded, and wasn’t the most precise with this in the example!)
Note: If you look closely at the pink part of the bodice, you'll notice a notch where the applique meets up with the neckline. This is the width of the elastic, and ensures a smooth transition from the pink neckline in the mesh, and the actual edge of the pink upper neck/shoulder, where the applique ends
Setting the Applique
4. On the main part of the bodice, along the new “neckline”, gently dab a thin line of glue stick to the wrong side of the fabric.
Alternately, you can hit it with a bit of adhesive. (See the applique post mentioned above!).
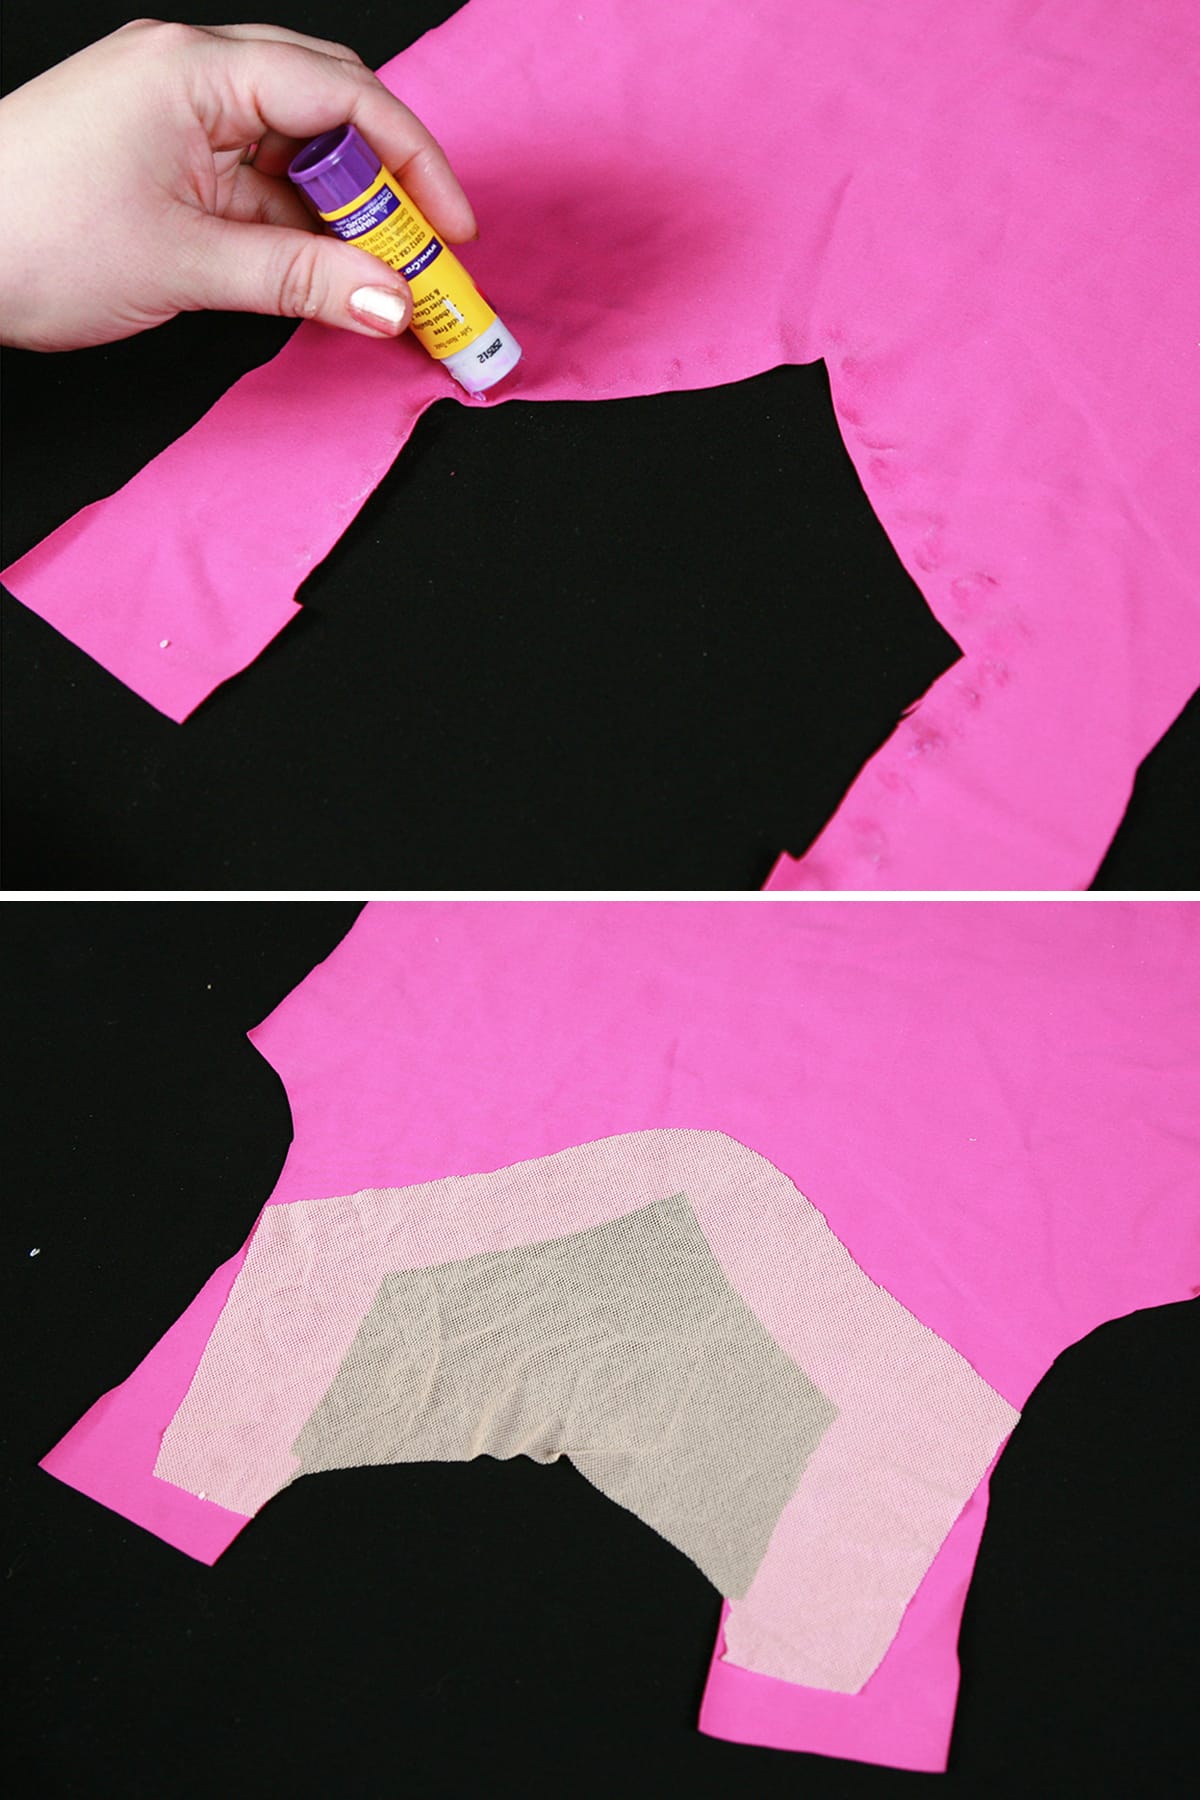
5. With the good side of the bodice facing down, and the glue facing up, lay the piece of sheer fabric, good side facing down, on top of the glue.
Make sure that there is 1 inch of sheer to the inside of the main bodice edge, the whole way around, and that the bodice is laying very flat, and is not distorted in shape.
Press down and allow to fully dry, or it will muck up your sewing machine.
Sewing the Applique
6. With the good side of the garment facing up, and using a thread that matches the bodice of the fabric, zig zag around the bodice edge using the applique stitching technique.
7. If using this method for a cutaway back, repeat these instructions for the back, then attach the front of the garment to the back of it.
8. Sew the shoulder seam. If your sheer fabric extends to the shoulder make sure you sew the bodice part in the thread that matches the body, and the illusion part of the shoulder seam in a thread to match the mesh, if the mesh does NOT match the main bodice.

Cutaway neckline on front and back bodice, along with matching sleeve - reverse applique
Share the Love!
Be sure to take some pics of your handiwork! If you post it to Bluesky, be sure to tag us - @SpandexSimplified.
Also, be sure to follow me on Pinterest, and subscribe to my Youtube Channel, so you never miss out on any of my nonsense.
Well, the published nonsense, anyway!




Thanks for such detailed information on the different neck/back alterations, I found it really useful.
This is amazing! Thank you! I have been making basic Leos and following several patterns, but itching to try some of my own ideas. This has given me the tools to start! Thank you.
I love love love this page! Thank you so much - this makes my life as a mum for 3 twirlers so much easier. So happy you shared this with the world 🫶🏻
Thank you so much!!! I'm glad to hear it's helping someone!