How to Draft Circle Skirt Patterns
How to Draft Circle Skirt Patterns for Skating, Dance, and Cosplay. Easy instructions - with tool recommendations - to learn this technique
Yield: 1 Pattern
Cost: $5
Equipment
- A Long Ruler
- A pen or marker
Materials
- Paper Craft or Rosin Paper
Instructions
Before You Get Started
- You will need to know:
- - The hip circumference (which will be the actual hip measurement of the human, not the pattern (Use hip rather than waist, to allow the wearer to pull it on over the hips)
- - How much gathering you want at the waist line of the skirt.
- - Desired length of skirt at sides, front, and back (from the waist seam, not the actual waist).
To Draft The Pattern
- Multiply the hip measurement by whatever factor you want for the gathering.
- For instance, if you want the gathering to be such that you have twice the fabric as the actual hip, multiply by 2. For 50% more fullness than if actual hip size, multiply by 1.5, etc etc.
- Then, take that number and divide that by 3.14 - that gives you your diameter. Divide by 2, there's your radius.
- As you're not likely to end up with a number that's nice to work with, feel free to round up to the nearest ¼". For the sake of example, let's say you end up with something that ends up becoming 5", after rounding.
- Then, take a large sheet of whatever paper you'll use to pattern - I tend to use really wide craft paper - and decide if you want to pattern with side seams (half circle) or not (full circle).
To Draft a Half Circle Pattern
- Fold the paper in half. The fold is your center line, either front or back - you'll do this one for each.
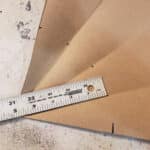
- You're likely going to need to square one edge, from that fold, to work on. To do so, draw a line that is 90 degrees from the fold, as pictured.
- Once you have the line drawn, cut through both layers of paper, trimming the raw edge off the end. This new raw edge will become your side seam:
- Measure out the radius measurement (5", in this example) from the point of the fold, to both the folded edge and the raw edge:
- You can measure out further points in between, as well - can temporarily fold the folded edge to meet the raw edge, unfold, and use that line as another guide to measure along.
- For the side with the two raw edges, I find it best to fold each layer in to the center, individually.
- Connect all the dots in a smooth curve, this is now your waist line.
- Then, starting at the curve you drew, measure out from that circle and mark the side seam length along the raw edge, and the center front or back measurement along the fold:
- If these are the same, you can do the same as you did for the waist line - fold it in half one or more times, use the lines as guide on where to measure - always out from the waist line, not the folded center point.
- If you're doing a longer center measurement, you can do all the folds, but there will be more math involved.
- For the fold that connected the center fold to the side seams - that is, the line halfway between the fold and the raw edges - mark a measurement that is halfway between the side and center measurements.
- So, if your side seam is 10 and your center is 15, this would be 12.5* Whatever number you come up with, mark that number next to the mark for the measurement, to keep track.
- Then, mark other halfway points the same way. The fold line halfway between that first halfway point and the raw side edge will be the difference between those numbers - so in this case, 11.25.
- The one between the drawn midpoint and the folded center would be 13.75 in this example, etc.
- When you've got that all sorted, connect the marks with a smooth curve:
- Carefully cut the pattern out - through both layers of paper - and that's a half circle pattern.
- Repeat the process for the other half circle pattern needed, if that center measurement is different.
To Draft a Full Circle Pattern:
- Two ways you can do it, and which you pick will depend on the width of the paper you’re working with, and the length of the skirt you’re drafting.
- Do the above directions, for both front and back. Mark “front” and “back”, tape them together.
- This works best if you’re going to be doing a dance length dress, or if your paper isn’t wide enough to accommodate whatever you are doing.
- Also, this is the easier option if you’re dealing with center front and center back that are different measurements, IMHO.
- If your paper is plenty wide to accommodate, you can do it all as one piece.
- Start by folding the paper in half, long edge to long edge. This will be your center line, front and back. You can mark it as such - to keep track - if you like.
- Then, fold the fold over itself, dividing the paper in half again. This will form your side lines. Again, feel free to mark them at this point.
- As pictured below, the edge closest to the bottom of the image is folded, and the fold extending up from it is the side line:
- At this point, feel free to make as many interim -m and equal - folds as you’d like. The longer the skirt seam, the more folds will be helpful (as the distance between marks gets further in between, the further out you go from the center point.)
- Whatever you're folding should be in half, and if there's anything corresponding to that area that hasn't been folded in half, it should be.
- The goal is to end up with equally spaced lines. If you appear to be missing any, make whatever fold needed to add it in.
- Once you’ve folded as many times as you’d like, unfold til you’re back to that very first fold. Have that center line fold laid out in front of you, across your work surface.
- Decide which side (out from the center point) will be the front of the skirt, and which will be the back - this is really only necessary if you have measurements that differ - and mark them as such.
- Start by marking your radius measurement out from that center point, along the fold lines.
- Connect them all with a smooth curved line. This is now your waistline:
- From there, measure your center front measurement out towards the front side of the paper, on that part of the drawn waist line. Measure the center front back out from what will be the center back waist.
- Then, measure the side measurement from the point of the waist line centered between the other two folds, out from there (ie: directly out in front of you.)
- Now, if this is an actual circle of a circle skirt - ie: side, center front, and center back measurements are all the same - you can go ahead and measure that distance out from the waist line, along all the folds. Connect all the marks with a nice smooth line.
- If your circle skirt has different measurements for side and center front / center back:
- For the fold line that is exactly halfway between the center fold and the side line, mark a measurement that is halfway between the side and center front measurements.
- So, if your side seam is 10" and your center front 15"*, this would be 12.5". Whatever number you come up with, mark that number next to the mark for the measurement, to keep track.
- Then, mark other halfway points on THAT part of the skirt (between side line and the same way. The fold line halfway between that first halfway point and the side line will be the difference between those numbers - so in this case, 11.25".
- The one between the drawn midpoint and the folded center would be 13.75" in this example, etc:
- Each time you are finding the halfway point between numbers, make sure you’re marking that distance on the fold line that is halfway between the two lines that provided the measurements you’re averaging from.
- Once you’re done filling in all the lines on the front quarter of the dress pattern (The front half of the pattern, as you see it), repeat for the back half.
- Connect all the points with a smooth, curved line, then carefully cut the pattern out, through both layers of paper.
Notes
* These measurements are random and - for most dresses - completely nonsensical. I just wanted to use nice, easy numbers to math with, it's early in the morning :)